3
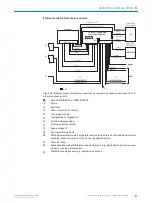
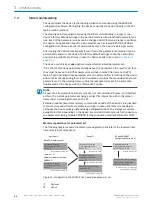
PC with SOPAS ET configuration software
4
MicroSD memory card
5
Permanently saved device parameter set
6
and/or
7
CMC600 parameter cloning module
8
Parameter set in the working memory of the device
9
Factory-set defaults for the device
ß
Opened project file with current device parameter set
à
Saved project file with archived device parameter set
á
Nonvolatile memory
â
Volatile memory
ã
Database on the hard drive, for example (nonvolatile memory)
Saving behavior:
The device is optionally equipped with a microSD memory card or connected to a CDB
or CDM connection module with an optional CMC600 parameter cloning module:
•
Each time the currently valid parameter set is saved in the device with the option
“Permanent”, the parameter set is also permanently saved externally on the mem‐
ory card or in the CMC600.
NOTE
To avoid compatibility problems, we recommend only using micro SD memory cards
approved by SICK. You can find these as accessories online at:
•
•
•
Supporting the exchange of a defective device without manually required reconfigura‐
tion
NOTE
Exchanging the device without losing the configuration data only makes sense if a
defective device is replaced with an exchange unit
of the same type
.
In order to quickly exchange a defective device with an exchange unit, an optional
CMC600 must be present beforehand in the connected connection module of the
defective device or a memory card must be present beforehand in the device. If a mem‐
ory card and a CMC600 are present, the exchange unit adopts the parameter set from
the CMC600.
Device with memory card
1
Remove the memory card from the defective device in a de-energized state.
2
Only use the memory card when the exchange unit’s power is off.
3
Switch on the supply voltage for the replacement unit.
The device starts and loads the parameter set from the memory card to its work‐
ing memory and permanent internal parameter memory.
7.4
Adjust the device
For complete adjustment of the device, the electrical installation must be complete and
the device must have been commissioned.
1.
Loosen the bracket screws so that the device can be aligned.
2.
Align the device so that the angle between the scanning line and the bar code
stripes is almost 90°.
COMMISSIONING
7
8019588/129Z/2019-02-07 | SICK
O P E R A T I N G I N S T R U C T I O N S | CLV63x, CLV64x, CLV65x
57
Subject to change without notice


