background image


136 

Chapter 8    DETAIL PERFORMANCE SETTINGS 


8.5    MAINTENANCE SETTING 


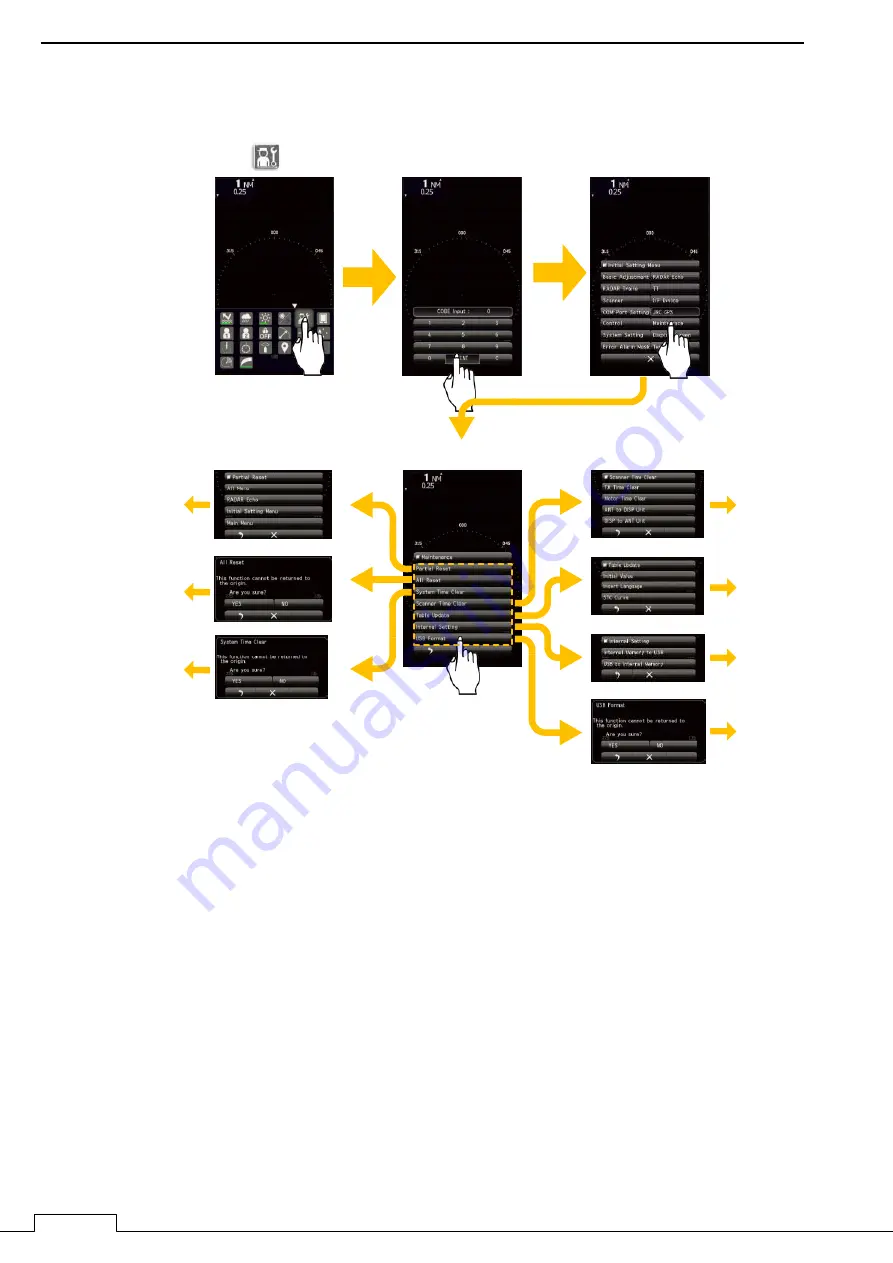
Tap   


  icon.

Input code 

0

 and tap ENT.

Tap 

Maintenance

.

Maintenance menus appear.

Next to section 8.5.1

Partial Reset

All Reset

System Time Clear

Scanner Time Clear

Table Update

Internal Setting

USB Format

Next to section 8.5.2

Next to section 8.5.3

Next to section 8.5.4

Next to section 8.5.5

Next to section 8.5.6

Next to section 8.5.7

Summary of Contents for T-760 Series

Page 1: ...MARINE RADAR EQUIPMENT INSTRUCTION MANUAL...

Page 2: ......

Page 3: ...the injured or ill person has an intraoral injury you are hesitant about giving mouth to mouth resuscitation or preparing the mouthpiece for rescue breathing takes too long omit rescue breathing and...

Page 4: ...nding a Ask for help loudly Ask somebody to make an emergency 119 call and bring an AED Somebody has collapsed Please help Please call an ambulance Call 911 119 112 999 etc by local number Please brin...

Page 5: ...n or getting and preparing the mouthpiece for rescue breathing takes too long omit rescue breathing and perform chest compressions c When performing rescue breathing it is recommended to use a mouthpi...

Page 6: ...hen the injured or ill person has been handed over to the emergency services b When the injured or ill person has started moaning or breathing normally lay him her on his her side in a recovery positi...

Page 7: ...to push a button to analyze the heart rhythm 13 Electric shock defibrillation a If the AED determines that electric shock is needed the voice prompt saying Shock is needed is issued and charging star...

Page 8: ...pads on a When the injured or ill person has been handed over to the emergency services b When the injured or ill person has started moaning or breathing normally lay him her on his her side in a rec...

Page 9: ...y for correct operation Maintain this instruction manual so that operators can refer to it at anytime Refer to this manual when any inconvenience or defect occurs In this equipment manual contains an...

Page 10: ...RE FUSE 58V 7 5A 2pices INSTRUCTION MANUAL 1Piece This book TEMPLATE SHEET FOR SCANNER MOUNTING SCREW HOLES 1Piece NOTE This radar display is possible to use AIS TT LL_ position Depth and N UP functio...

Page 11: ...this indication is neglected and these equipment are not operated correctly CAUTION This indication is shown where any person is supposed to be injured or any property damage is supposed to occur if t...

Page 12: ...PZ No184 FZ of Federal Law about Technical Regulation dated December 12 2002 and Resolution of the Russian Federation Goverment dated 19 11 03 No0696 navigation equipment has an appropriate marking T...

Page 13: ...LABEL MOUNTING POINT xi WARNING LABEL MOUNTING POINT Warning label is patched on the equipment visible surface Do not try to remove break or modify the label NKE 1066 NL SCANNER UNIT NKE 2044 NL SCANN...

Page 14: ...xii WARNING LABEL MOUNTING POINT NCD 2256 ST DISPLAY UNIT...

Page 15: ...lists of each unit are as follows NCD 2256 ST DISPLAY UNIT Parts Name Figure Qty Display Unit NCD 2256 ST 1 Sun Cover MTV305319 1 Power Cable CFQ 9900 1 Instruction Manual H 7ZPRD0909 1 Mounting Hardw...

Page 16: ...NG LIST Parts Name Figure Qty Attached parts MPXP35291 Name plate MPNN49122 1 Fuse H 7ZXRD0032 2 Read Me H 7ZPRD0910 1 Template MTZ304757 1 NMEA Cable Option H 7ZCRD1689 1 means revision such as A B a...

Page 17: ...igure Qty Scanner Unit NKE 2044 NL 1 Mounting Hardware MPXP35114 Bolt M8X30 SUS304 4 Spring Washer SW8 SUS 4 Washer W8 SUS 4 Instruction for Equipment MTZ304691 1 Template MTZ302447 1 Installation Cab...

Page 18: ...Figure Qty Scanner Unit NKE 1066 NL 1 Mounting Hardware MPXP35115 Bolt M8X30 SUS304 4 Spring Washer SW8 SUS 4 Washer W8 SUS 4 Instruction for Equipment MTZ304694 1 Template MTZ304696 1 Installation Ca...

Page 19: ...feet Scanner Unit NKE 1066 NL Radome diameter 450mm 2feet Scanner Unit NKE 2044 NL Radome diameter 620mm STANDARD LENGTH 10m OPTION LENGTH 5m 15m 20m 30m T 761 RADAR T 760 RADAR 7inch WIDE VGA COLOR L...

Page 20: ...EQUIPMENT APPEARANCE xviii NKE 1066 NL SCANNER UNIT NKE 2044 NL SCANNER UNIT...

Page 21: ...LR PUSH SWITCH ROTARY KNOB WITH PUSH SWITCH FRONT PANEL TOUCH PANEL REAR CASE MOUNTING BRACKET SUN COVER SPEAKER Thumb position Fingertip position Note When you remove the sun cover do the thumb posit...

Page 22: ......

Page 23: ...OF THE SCANNER UNIT 13 1 3 1 SELECTING THE INSTALLATION POSITION 13 1 3 2 LOWEST SCANNER INSTALLATION HEIGHT 14 1 3 3 MOUNTING RACK AND MAST FOR THE SCANNER 14 1 3 4 SCANNER AND THE SURROUNDING STRUC...

Page 24: ...RADAR TRAILS 68 5 5 1 SETUP THE TRAIL LENGTH 68 5 5 2 SETUP THE RADAR TRAILS REF LEVEL etc 69 5 6 AIS OPERATIONS 71 5 7 TT OPERATIONS 73 5 8 MODE FUNCTION 75 5 9 SWITCHING DAY NIGHT MODE 77 5 10 USER...

Page 25: ...UP 106 7 6 NOISE LEVEL 106 7 7 COMMUNICATION PORT SETUP 107 7 7 1 BAUD RATE 108 7 7 2 RX PORT 108 7 7 3 TX PORT 109 7 7 4 TX DATA FORMAT 110 7 7 5 TARGET INFORMATION TX 111 7 8 I F DEVICE 112 7 8 1 H...

Page 26: ...139 8 5 5 TABLE UPDATE 140 8 5 6 INTERNAL SETTING 141 8 5 7 USB FORMAT 143 8 6 SYSTEM SETTING 144 8 6 1 MASTER SLAVE DEMO 145 8 6 2 OWN SHIP OUTLINE 145 8 6 3 UNIT 146 8 6 4 MOVE OWN SHIP 147 8 6 5 US...

Page 27: ...SERVICE 171 10 1 KEEPING PERIOD OF MAINTENANCE PARTS 171 10 2 WHEN YOU REQUEST FOR REPAIR 171 10 3 RECOMMENDED MAINTENANCE 171 10 4 RADAR FAILURE CHECK LIST 172 Chapter 11 DISPOSAL 173 11 1 DISPOSAL...

Page 28: ...SIGNAL 188 12 7 3 STANDARD CONFIGURATION 188 12 7 4 OPTION CABLE 188 APPENDIX A 1 NKE 1066 NL 1 5FT SCANNER INTERCONNECTION DIAGRAM A 1 NKE 2044 NL 2FT SCANNER INTERCONNECTION DIAGRAM A 2 NCD 2256 ST...

Page 29: ...rossing Range and Bow Crossing Time C C up Course up Own ship s course is pointed to the top center of the radar display CCRP The Consistent Common Reference Point A location on own ship to which all...

Page 30: ...int to the bearing scale to indicate the heading of the ship H up Head up Own ship s heading line is always pointed to the top center of the radar display I IR Radar Interference Rejecter L Lost AIS t...

Page 31: ...ity incident on the target Range Rings A set of concentric circles labeled by distance from CCRP Reference target A symbol indicating that the associated tracked stationary target is used as a speed r...

Page 32: ...ip SP Short Pulse STAB Stabilization STW Speed Through Water The speed of the ship relative to the water surface T TCPA Time to Closest Point of Approach to own ship Test target Radar target of known...

Page 33: ...inated The international standard of time kept by atomic clocks around the world V VRM Variable Range Marker An adjustable range ring used to measure the distance to a target W Waypoint A geographical...

Page 34: ......

Page 35: ...ions Available cable lengths and types for installing the radar T 760 are as shown in the table below Request an appropriate cable from SI TEX beforehand A cable longer than the sufficient length may...

Page 36: ...ake precautions to prevent water from splashing through the window or door of the bridge onto the display unit Install the display unit by considering convenience of maintenance Install the display un...

Page 37: ...Chapter 1 INSTALLATION 3 1 2 3 DIMENSIONAL DRAWING OF DISPLAY MOUNTING...

Page 38: ...Chapter 1 INSTALLATION 4...

Page 39: ...Chapter 1 INSTALLATION 5 1 2 4 EXAMPLES OF DISPLAY MOUNTING DESK TOP INSTALLATION Mounting bracket...

Page 40: ...Chapter 1 INSTALLATION 6 DESKTOP MOUNTING TEMPLATE Please note the paper size 182 257...

Page 41: ...ter 1 INSTALLATION 7 FLUSH MOUNTING Front cap Flush mount Remove base and take out cover of front panel Fix with the front 4 corner screws to the wall Note Please slide out when removing of the front...

Page 42: ...Chapter 1 INSTALLATION 8 FLUSH MOUNTING TEMPLATE Please note the paper size 182 257...

Page 43: ...Chapter 1 INSTALLATION 9 CEILING INSTALLATION Option Overhead Mounted Kit Note Please slide out when removing of the front cap Front cap...

Page 44: ...please replace it with the spare parts Fuse 58V 7 5A When you connect with the ship power supply without using the optional rectifier you need measure the voltage between the ground and the positive...

Page 45: ...ng JRC GPS receiver please connect NMEA1 Using JRC NSK please connect NMEA3 AIS connects all NMEA port available Navigation system interfaces such as GPS Telecommunications standard NMEA0183 61162 to...

Page 46: ...GNSS fixdata xxMTW Water temperature xxMWD Wind direction and speed xxMWV Wind speed and angle xxRMA Recommended minimum specific LORAN C data xxRMB Recommended Minimum Navigation Information xxRMC R...

Page 47: ...er the better However if it is too high radio wave energy greatly attenuates above the scanner s vertical beam width the point 3 dB from the peak of the main lobe As a result it is difficult to detect...

Page 48: ...he wheelhouse provide a cylindrical radar mast to install the scanner Consider the convenience of the service staff who take care of installation maintenance adjustment and repair of the scanner by pr...

Page 49: ...interference with other equipment and to prevent radio noise from generating do not place the VHF antenna GPS antenna and INMARSAT s dome within the range of the vertical beam width Keep a record of...

Page 50: ...pwardly between the scanner and a structural object so that the radar s radio wave will not directly come in contact with the structural object Reference Because most radio wave absorbers have poor du...

Page 51: ...e as far as from the cables of other radio equipment in order to prevent other radio equipment from interfering with the radar operations Especially inter wiring cables between scanner unit and displa...

Page 52: ...ubber or resin between the mount base and the scanner chassis legs If rubber or resin is inserted the amplitude of vibration increases resulting in the possibility of damage to the scanner Furthermore...

Page 53: ...Chapter 1 INSTALLATION 19 1 3 6 CONFIRM MOUNTING BASE BEFORE INSTALL NKE 1066 NL 1 5FT SCANNER Fig 1 3 6 2 Fig 1 3 6 1 4 40 RUBBER PLATE...

Page 54: ...Chapter 1 INSTALLATION 20 NKE 2044 NL 2 FT SCANNER Fig 1 3 6 3 Fig 1 3 6 4...

Page 55: ...Base mm Bolt Torque N m 3 15 mm Recommend M8X30SUS attachment 20 N m Use of washer and corrosion resistant measures At the location where a bolt s head comes in contact with the scanner chassis legs a...

Page 56: ...on is not affected by wind The microwave radiator is also protected by the radome even in a poor weather conditions it can be rotated stably at all times Remove the radome then open the metal protecti...

Page 57: ...e any direction during the initial setting However it is strongly recommended that you install the scanner with the shortest cable length along the mast bow Ship heading Fig 1 4 1 1 Open radome Loosen...

Page 58: ...Chapter 1 INSTALLATION 24 Fig 1 4 1 3...

Page 59: ...Chapter 1 INSTALLATION 25...

Page 60: ...Chapter 1 INSTALLATION 26 Fig 1 4 1 4 coating clip Connect cable mesh wire as Ground Pull and fix the cable toward the outside with coating clip Avoid to touch the cable to electrical parts...

Page 61: ...nstall and possible to initial setup but it is better selection to select the cable length must be minimize along the mast Ship heading bow stern Fig 1 4 2 1 Open radome Loosen the screws by using box...

Page 62: ...Chapter 1 INSTALLATION 28 Fig 1 4 2 3...

Page 63: ...Chapter 1 INSTALLATION 29...

Page 64: ...Chapter 1 INSTALLATION 30 Fig 1 4 2 4 Clamp the cable Connect cable mesh wire as Ground...

Page 65: ...pe when you re using a touch screen take a look at this table The operation with touch panel TAP Push an item once Swipe Sliding the finger while it is touching the screen Flick Flick is just like a s...

Page 66: ...2 1 SCREEN DISPLAY Heading SPD base on ground 1 Numerical Information MOB Range Ring Heading Line Bearing Scale Bearing Mode Motion Mode Alarm Range Interval Range Scale 1 In case of only input of VH...

Page 67: ...he finger quickly Swipe Operation of sliding the finger on the screen 2 PWR CLR Push Switch Push Turns on the equipment when the power is turned off Clear function when the power is turned on Long Pus...

Page 68: ...the magnetron causes sparks resulting in its unstable oscillation Start transmission on a short pulse range and change the range to the longer pulse ranges in turn If the transmission is unstable in t...

Page 69: ...Chapter 2 START THE BASIC OPERATION 35 Starting transmission Touch Panel operation Turn the rotary knob Select and push rotary knob Flick up Tap Rotary Knob operation Transmitting display...

Page 70: ...Chapter 2 START THE BASIC OPERATION 36 Stopping transmission Touch Panel operation Turn the rotary konb Select and push the rotary knob Flick up Tap Rotary Knob operation Standby display...

Page 71: ...RATION 37 Power off 2 4 SCREEN LAYOUT 2 4 1 STANDBY SCREEN Startup screen Startup screen can be selected from three choices below Press the PWR CLR key 3 seconds or more Swipe Swipe Graphical screen N...

Page 72: ...Chapter 2 START THE BASIC OPERATION 38 Tap on the screen to select graphical display screen Temperature and Depth Wind speed and direction Vessel speed and Course...

Page 73: ...T THE BASIC OPERATION 39 Various STBY screens Normal screen Graphical screen Numerical screen Flick up Flick up Flick down Flick down Flick up Flick up Flick down Flick down Flick up Flick up Flick do...

Page 74: ...Chapter 2 START THE BASIC OPERATION 40 2 4 2 TRANSMISSION SCREEN Tap the TX STBY icon After a few seconds the icons fade out Flick up Flick down Transmitting...

Page 75: ...RT THE BASIC OPERATION 41 Push the rotary knob or flick the screen then the resident icons will be displayed Turn the rotary knob to select the TX icon Set focus on TX icon Push rotary knob Tap TX ico...

Page 76: ...knob to display the icons No operation about 10 seconds the icons fade out Turn the rotary knob to select a function icon Selected icon is focused Push the rotary knob to execute function Adjust the...

Page 77: ...Chapter 2 START THE BASIC OPERATION 43 Tap the TX STBY icon or push the rotary knob when the TX STBY icon is focused TX STBY Tap icon or push rotary knob Radar echo Tap icon or push rotary knob...

Page 78: ...ically Tap Auto of Gain setting mode Tap MANUAL of Gain setting mode Monitor the green bar while turning the rotary knob Flick the green bar Tap or The case of TX Adjustment Bar is shown You should be...

Page 79: ...n bar while turning the rotary knob Flick the green bar Tap or Adjustment Bar is shown You should be adjust the sea level while monitoring the radar echo in TX mode Tap return icon Push rotary knob Pu...

Page 80: ...turning the rotary knob Flick the green bar Tap or Adjustment Bar is shown You should be adjust the rain snow clutter suppression level while monitoring the radar echo in TX mode Tap return icon Push...

Page 81: ...d for separate the target and rain or snow as long as possible BRILL brightness adjustment Set up the brightness of a screen It sets up brightly daytime and sets up not dazzle at night MOB Man Over bo...

Page 82: ...is possible to move own position from fixed center of screen Tap the icon will shift the own position Shifting point are fixed 5 positions only TX transmission ST BY standby Whenever it carries out a...

Page 83: ...RT THE BASIC OPERATION 49 Various system setups Tap the setting icon the initial setting menu will be displayed Start the initial setting menu by entering the code 0 Choose a item and set up individua...

Page 84: ...AIS data display setting of guard zone etc MARK Use when plot a mark on the screen Moreover also when deleting an unnecessary mark it uses Mode OFF Mode function easily sets most appropriate settings...

Page 85: ...play color and brilliance according to the ambient lighting conditions are provided The display color setting is easily changed User Option icon Users can freely make setting with option keys and Assi...

Page 86: ...to the favorite icon area You can line up your favorite function icons in this area 4 or less Specified icons can be copied to the favorite icon area All of the icons are displayed Resident icons Fixe...

Page 87: ...ow to add another icon Resident icons Tap and hold the icon listed in the favorite icon area Tapped icon is removed from the favorite icon area Then the remaining icons are shifted to the left Tap and...

Page 88: ...1 CHANGE RANGE This picture is selected 1 5 nm range Outer dashed line shows the maximum observation range 1 5NM RANGE RANGE RING INTERVAL Increase Decrease Range is easily changed by tap increase dec...

Page 89: ...Chapter 3 ADJUST THE RADAR ECHO 55 Range scale list Range NM NKE 1066 NL T 760 NKE 2044 NL T 761 0 0625NM 0 125NM 0 25NM 0 5NM 0 75NM 1NM 1 5NM 2NM 3NM 4NM 6NM 8NM 12NM 16NM 24NM 32NM 48NM...

Page 90: ...an optimal level The gain level is displayed in the bottom portion of the icon It is possible to judge the gain level by the length of a green bar roughly How to change the Gain level Please refer to...

Page 91: ...ll become inhibited When using the sea clutter suppression function make sure to choose the most appropriate image noise suppression level The sea clutter suppression level is displayed in the bottom...

Page 92: ...etection of not only echoes from the rain or snow but also targets such as other ships or dangerous objects will become inhibited When using the rain snow clutter suppression function make sure to cho...

Page 93: ...ar appears through a double tap on the screen Adjustment of the screen brightness can be realized by a flick operation Double tap Brilliance Menu appears Push and turn rotary knob Screen brightness al...

Page 94: ...tter suppression function can suppress the near range clutter noise If the suitable adjustment is done you can observe a clear target from short range to long range When the automatic mode is selected...

Page 95: ...ed to the specified target Then distance to the target is displayed on the screen Of course the same operation can be realized by the rotary knob Erase VRM Double tap the VRM icon or double push the r...

Page 96: ...t 10 seconds Range from own ship to the target is displayed Target bearing is displayed Flick on the screen then the VRM ring will move along with the fingertrip Turn the rotary knob to control the mo...

Page 97: ...ction TT and display AIS symbol is necessary the GYRO or GPS compass signal When GYRO or GPS compass signal is received normally azimuth is measured from the north ABSOLUTE AZIMUTH This radar scanner...

Page 98: ...from boat The T 760 series radar provides a single press Man Overboard MOB operation Instantly a dedicated symbol arises on the screen including a range detailed info such as position bearing range an...

Page 99: ...OFF CENTER FUNCTION It is possible to shift the center of own ship in order to observe a particular target in a wider range Be to tap once on the icon center of own ship will be shifted as the followi...

Page 100: ...d bearing information at that point are displayed in the lower side of the screen If the GPS signal coming in the latitude and longitude information of that point are also can be displayed Tap anywher...

Page 101: ...nds Warning area Two automatic acquisition zones can be set in a sector These zones act as suppression zones avoiding unnecessary overloading to the processor and clutter by disabling automatic acquis...

Page 102: ...obstacle and how well you can keep the bearing that have set for your boat The echo trail is displayed on the radar display screen so you can easily assess visually what is going on 5 5 1 SETUP THE T...

Page 103: ...Chapter 5 VARIOUS FUNCTION ICONS 69 5 5 2 SETUP THE RADAR TRAILS REF LEVEL etc Tap Tap Radar trail Tap the desired menu Trails REF Level or Time All Combine Trails Mode Trails Interval...

Page 104: ...and and other fixed targets True bearing signal input and speed signal input are required to display radar trails in true trail mode Relative motion trails The system plots the trails of a target at a...

Page 105: ...he AIS symbol then the details are displayed on the screen Activated AIS target This symbol shows the position of an AIS target on the PPI Plan Position indicator The shape is an isosceles triangle an...

Page 106: ...Using a long tap operation to release the target detailed data The target data will remain on the radar display until the target is lost or until another target is designated The displayed AIS data c...

Page 107: ...umbered automatically When the number of targets tracked has reached to the maximum 10 targets any new target is not acquired Tracking target This symbol is displayed for the target which becomes the...

Page 108: ...ted target course Calculated from own ship course and target ship course SPD Calculated target speed Calculated from own ship speed and target ship speed The target data will remain on the radar displ...

Page 109: ...Flick on the touch panel Resident icons appear Flick on the touch panel again All icons appear Tap icon Mode Menus appear Tap Mode Setting Tap anything you desired Choose Standard in this example set...

Page 110: ...er The settings for each mode are following Mode Name Setting Contents OFF Standard Coast Float River IR Middle Middle Middle Middle Middle Process Off Off Off 5Scan COREL Off Target Enhance Level1 Le...

Page 111: ...or and brilliance according to the ambient lighting conditions is provided The display color setting can be changed easily Flick on the touch panel Resident icons appear Flick on the touch panel again...

Page 112: ...ng menu Flick on the touch panel Resident icons appear Flick on the touch panel again All icons appear Tap icon Set Tuning in this example setting Main menus appear Long Tap Tuning menu bar User Key m...

Page 113: ...e function to the option key By using the option key you can open the heavily used menu in one operation You can set a function listed in the bar menu to an option key as following However the functio...

Page 114: ...memos You can delete all the memos by tapping the clear bar You can select a marker to display by tapping the view menu bar Flick on the touch panel Resident icons appear Flick on the touch panel agai...

Page 115: ...ar Flick on the touch panel again All icons appear Tap icon Set Line in this example setting Mark menus appear Tap Setting bar Mark Setting menus appear Tap Mark1 bar Set Mark1 in this example setting...

Page 116: ...nction need not If no GPS signal is input you cannot select the Line function You can change the color and width of lines You can undo and redo the lines You can delete all the lines by tapping the cl...

Page 117: ...el Resident icons appear Flick on the touch panel again All icons appear Tap icon Select the symbol in this example setting Mark menus appear Tap Setting bar Mark Setting menus appear Tap Mark1 bar Se...

Page 118: ...s input you cannot select Symbol marker function You can select the following symbols Cross symbol1 Cross symbol2 Y symbol Sandglass symbol You can change the color and size of the markers You can und...

Page 119: ...NCTION ICONS 85 5 12 RADAR ECHO Tap Tap Radar Echo Radar Echo menus appear Tap each key to adjust the radar echo Pulse Length IR Interference Rejection Target Enhance Process Video Latitude Video Nois...

Page 120: ...ion pulse length becomes shorter and the range resolution improved The suppression of sea clutter return or rain snow clutter return is heightened Recommended conditions are following In bays harbors...

Page 121: ...at 2 steps for horizontal direction Level3 Select this mode to detect small targets such as buoys Expands the radar echo area at 2 steps for vertical direction and at 3 steps for horizontal direction...

Page 122: ...nals are to be shown on the radar display Narrow Narrows the dynamic range at short range Normal Standard setting The dynamic range varies depending on the actual range Wide1 Use this mode when rainy...

Page 123: ...the signals are displayed When detection of targets is definite the signals are displayed Level2 Rejects the signals of definitely unwanted waves noise and clutter When detection of targets or unwant...

Page 124: ...us appear Tap to select Auto or Manual The same operation can be realized by rotary knob Auto Selected Manual Selected Auto tuning is selected Tap Manual tuning is selected Tuning indicator to maximum...

Page 125: ...pment automatically adjust tuning Tuning is adjusted when the range is changed or pulse length is changed When MANUAL is selected adjust the video to be the largest by observing the tune indicator bar...

Page 126: ...d so that the ship s heading line points to the zenith of the PPI Since targets are displayed in their direction relative to the ship s heading line the operator can view the video in the same field o...

Page 127: ...ps around own ship can be accurately and easily monitored The relative vector does not represent the true motion of the target but its relative relation with own ship This means that a target with its...

Page 128: ...whether to display EBLs in true bearing mode or relative bearing mode Bearing signal input is required to display true mode VRM Unit sets unit of VRM range Range Rings RR displays or hides the range...

Page 129: ...UNCTION ICONS 95 5 17 TARGET Tap icon Tap Target bar Tap anything to adjust the target Function ON OFF CPA Limit TCPA Limit CPA Ring Display Target Number Display ALR Alarm From AIS AIS Display Target...

Page 130: ...is the own ship s position The CPA ring is not displayed when the true vector mode is selected 5 17 5 TARGET NUMBER DISPLAY A target ID number is a value displayed beside the target symbol or AIS sym...

Page 131: ...information also can be changed by tapping upper right are It is possible to display the 6 combinations as following 1SI TEX2 SI TEX MARU 3SI TEX4 DAIYONSI TEXMARU 5SI TEX6 SI TEX 7SI TEX8 SI TEXMARU...

Page 132: ...Chapter 5 VARIOUS FUNCTION ICONS 98 Depth and Latitude Longitude Depth and Wind True Depth and Wind Relative Temperature and Latitude Longitude Temperature and Wind True Temperature and Wind Relative...

Page 133: ...ideo signal to an external monitor Additional external port is using a D sub 15 pin connector External monitor s display pixels are 800x400 dots WVGA Any operation on the radar is impossible through t...

Page 134: ...munications standard NMEA0183 IEC61162 1 2 is not conformity at all Communications protocol 4800 bps start 1bit data 8bit stop 1bit With no parity Input sentence NMEA0183 V1 5 GGA GLL RMC V2 0 GGA G L...

Page 135: ...V DC12 24V 10 30 Power dissipation is about 50W If ship s DC battery power supply is not enough to the operation of this radar we strongly recommended that to you use this rectifier unit AC DC power c...

Page 136: ...ctory This product will be shipped in a usable state However in the case you want to configure it with your favorite please set it by referring to this chapter Tap Input code 0 and tap ENT Tap Basic A...

Page 137: ...set The tuning function control fine tunes the receiver circuits to match their maximum sensitivity to that transmitted signal Tuning adjustment is necessary for maintaining a high performance Choose...

Page 138: ...p at anchor a breakwater or a buoy relative to own ship s heading Procedure 1 Radar is set to TX mode 2 Adjust GAIN RAIN and SEA to find the known target on the screen 3 Adjust the bearing at the end...

Page 139: ...ner should be better Range unit is using the NM in marine radar usually 1NM 1852m Before adjustment Select a target which range is already known Procedure 1 Radar is set to TX mode 2 Adjust GAIN RAIN...

Page 140: ...sea clutter level is proportion to the height of the scanner So an optimum sea clutter rejection constant must be selected according with the height of antenna 7 6 NOISE LEVEL The noise level had bee...

Page 141: ...ation port to communicate external device Tap Input code 0 and tap ENT Tap COM Port Setting Baud Rate Tap the desired menu TX Port Target info TX RX Port TX Data Format Next to section 7 7 1 Next to s...

Page 142: ...Data speed setting of communication Auto Switching automatically between 4800bsp and 38400bps 7 7 2 RX PORT Choose the receive port of each signal Auto Switching automatically between 4800bsp and 384...

Page 143: ...Chapter 7 INITIAL SETTINGS 109 7 7 3 TX PORT Choose the transmit port of each signal AUTO Switching automatically between NMEA1 NMEA2 and NMEA3...

Page 144: ...Chapter 7 INITIAL SETTINGS 110 7 7 4 TX DATA FORMAT or...

Page 145: ...Chapter 7 INITIAL SETTINGS 111 7 7 5 TARGET INFORMATION TX or...

Page 146: ...quipment when inputting true bearing signals true bearing data and speed data Settings and parameters are different for each type of equipment Make settings for the type of equipment to be connected T...

Page 147: ...S compass or electronic compass GPS Input the course data of own ship from GPS receiver 7 8 2 MANUAL HEADING When 7 8 1 Heading equipment is selected manual please input bearing value 7 8 3 SPEED EQUI...

Page 148: ...Chapter 7 INITIAL SETTINGS 114 7 8 5 MAGNETIC COMPASS This item is set as to whether or not the heading bearing is to be corrected Switches between On and Off or...

Page 149: ...atus of the GPS receivers GPS DGPS and WAAS receivers currently connected This setting is available only for JRC GPS DGPS WAAS receiver directly connected to the connector for which GPS is engraved at...

Page 150: ...position only with single GPS Does not perform fixing with SBAS or beacon SBAS Fix a position with SBAS or single GPS Does not perform fixing with beacon Beacon Fix a position with beacon or single GP...

Page 151: ...low a great number of changes will occur but there will be little time lag As such it is important to choose the optimal value for your own usage situation 7 9 2 7 SMOOTHING SOG Smoothing can be appl...

Page 152: ...depending on the JRC GPS software version 0 to 99 sec R29 04 R33 99 1 to 99 sec R26 01 R29 03 Smoothing function can be applied to measured positions speeds and courses However if the set value of th...

Page 153: ...INITIAL SETTINGS 119 7 9 2 12 EXCLUSION SATELLITE Set a satellite disabled for use 7 9 2 13 GPS SETTING SEND DATA Send GPS setting Data to the GPS receiver or The satellite number can be set between...

Page 154: ...ADJUST Input the approximate latitude and longitude of the own ship to acquire initial Set the antenna height Enter the current time in UTC Enter the current date in UTC Initialize the GPS receiver S...

Page 155: ...ed to the connector for which GPS is engraved at the rear of the cabinet AUTO Select an optimum beacon station automatically Manual You need to set the beacon frequency and baud rate by yourself This...

Page 156: ...ally enter the SBAS satellite number This setting is enabled when Satellite Search is set to Manual Set the selection mode for satellite number to be used Set whether or not the SBAS satellite is to b...

Page 157: ...SETTINGS Chapter 8 DETAIL PERFORMANCE SETTINGS 8 1 SETS RADAR ECHO Tap the desired menu Next to section 8 1 1 Next to section 8 1 4 Next to section 8 1 5 or Next to section 8 1 6 Tap icon Input code...

Page 158: ...ay If the main bang is not so big use the default setting at factory Before adjustment Set the range to 0 125NM Set the radar video enhance function Set the radar video process function Turn the GAIN...

Page 159: ...igh the range resolution may be declined So it is necessary to set a value properly 8 1 3 GAIN PRESET Adjust the maximum sensitivity level of the GAIN control Do not change this adjusted level careles...

Page 160: ...126 Chapter 8 DETAIL PERFORMANCE SETTINGS 8 1 5 FTC Sets the FTC Curve or...

Page 161: ...tection the alarm operates for weaker targets When setting to higher level detection be careful because the alarm may not operate properly RADAR Alarm1 For guard zone1 RADAR Alarm2 For guard zone2 Thi...

Page 162: ...et but many clutters are include Sometime do miss tracking because of much noise When region is narrow possible to track stable but fast moving targets are tend to lost Because of fast target soon goe...

Page 163: ...129 Chapter 8 DETAIL PERFORMANCE SETTINGS 8 3 SCANNER FUNCTION Tap Input code 0 and tap ENT Tap Scanner Tap the desired menu or Next to section 8 3 3 Next to section 8 3 5...

Page 164: ...controlled by the transmission repetition frequency control of the transmitter This function is effective when radar interference does not go away This setting cannot be performed simultaneously with...

Page 165: ...y and magnetron life expectancy are considered Economy Sensitivity slightly lowers but the service life of magnetron is prolonged when short pulses are used High Power Sensitivity improves when long p...

Page 166: ...erly adjusting the tune peak adjustment value may result in improvement of the automatic tuning function It should be noted that an optimal adjustment value is required for proper operation of the aut...

Page 167: ...133 Chapter 8 DETAIL PERFORMANCE SETTINGS 8 4 CONTROL Tap Input code 0 and tap ENT Tap Control Tap the desired menu Next to section 8 4 1 Next to section 8 4 2...

Page 168: ...ORMANCE SETTINGS 8 4 1 TOUCH PANEL CALIBRATION Tap Touch Panel Calibration Long Tap cross mark Long Tap cross mark Long Tap cross mark Calibration complete message appears Press the CLR button to fini...

Page 169: ...135 Chapter 8 DETAIL PERFORMANCE SETTINGS 8 4 2 BUZZER or Tap Buzzer Tap the desired menu Operation Error CPA TCPA AZ Alarm Zone Target Lost System Alarm...

Page 170: ...T Tap Maintenance Maintenance menus appear Next to section 8 5 1 Partial Reset All Reset System Time Clear Scanner Time Clear Table Update Internal Setting USB Format Next to section 8 5 2 Next to sec...

Page 171: ...enu Initialize all settings except marks lines and own track data RADAR Echo Initialize the RADAR Echo settings in the Main Menu and the Adjust Menu Initial Setting Menu Initialize the Basic Adjustmen...

Page 172: ...arks lines If system operation is unstable it may be stabilized by initialized the memory area To initialize the memory area follow the procedure in above section The memory area is reset to the facto...

Page 173: ...internal control circuit perform the procedure below to inherit scanner time data 1 Save the scanner time data 2 Replace the scanner internal control circuit 3 Restore the scanner time data Restore t...

Page 174: ...140 Chapter 8 DETAIL PERFORMANCE SETTINGS 8 5 5 TABLE UPDATE The following data can be uploaded Initial Value STC Curve Insert Language...

Page 175: ...141 Chapter 8 DETAIL PERFORMANCE SETTINGS 8 5 6 INTERNAL SETTING...

Page 176: ...justment Outputs the Basic Adjustment settings in the Adjust Menu via USB Main Menu Outputs the settings of the Main Menu and radar screen via USB except RADAR Echo and Function Settings Adjust Menu O...

Page 177: ...143 Chapter 8 DETAIL PERFORMANCE SETTINGS 8 5 7 USB FORMAT Inset USB flash memory to USB port...

Page 178: ...er 8 DETAIL PERFORMANCE SETTINGS 8 6 SYSTEM SETTING Tap Input code 0 and tap ENT Tap System Setting Tap the desired menu Next to section 8 6 2 Next to section 8 6 4 Next to section 8 6 5 Next to secti...

Page 179: ...source to display echo without scanner Demo Set to this item when no video signal is input from external source and no scanner is connected Echo data on FROM is displayed This mode operates only with...

Page 180: ...146 Chapter 8 DETAIL PERFORMANCE SETTINGS 8 6 3 UNIT Set the unit that you have accustomed...

Page 181: ...147 Chapter 8 DETAIL PERFORMANCE SETTINGS 8 6 4 MOVE OWN SHIP Set the own ship s movement 8 6 5 USE RANGE SELECT Turn on off the range display 32NM 48NM 32sm and 48sm ranges cannot be used in T 760...

Page 182: ...NCE SETTINGS 8 7 DISPLAY SCREEN You can set your favorite screen pattern 8 7 1 OWN VECTOR DISPLAY Select the Own Vector display ON or OFF Tap Input code 0 and tap ENT Tap Display Screen Tap the desire...

Page 183: ...BY DISPLAY SELECT Switching the display screen in standby state 8 7 3 OPERATION NUMERICAL DISPLAY Turn on off numerical information upper right on the screen 8 7 4 DISPLAY COLOR Normal Graphical Numer...

Page 184: ...Once the AIS filter is set only the AIS targets that are inside the filter area are displayed setting can be made such that AIS targets outside the AIS filter will not be shown The filter is initially...

Page 185: ...151 Chapter 8 DETAIL PERFORMANCE SETTINGS 8 8 ERROR ALARM MASK Tap Input code 0 and tap ENT Tap Error Alarm Mask Tap the desired menu Next to section 8 8 1 Next to section 8 8 2 Next to section 8 8 3...

Page 186: ...or detection time is changed be careful because the alarm may not occur or may be delayed 8 8 2 DISPLAY UNIT Set the error alarm of display unit Do not change the set value carelessly If alarm detect...

Page 187: ...RMANCE SETTINGS 8 8 3 RX DATA Set the error alarm of RX data Do not change the set value carelessly If alarm detection is turned off or detection time is changed be careful because the alarm may not o...

Page 188: ...the maintenance work as described below If maintenance is made properly troubles will reduce It is recommended to make regular maintenance work Common points of maintenance for each unit are as follo...

Page 189: ...E AND CHECK 155 9 2 MAINTENANCE OF EACH UNIT 9 2 1 SCANNER NKE 1066 NL DANGER When conducting maintenance work on the antenna make sure to turn its main power off Failure to comply may result in elect...

Page 190: ...r 9 MAINTENANCE AND CHECK 156 9 2 2 SCANNER NKE 2044 NL DANGER When conducting maintenance work on the antenna make sure to turn its main power off Failure to comply may result in electrocution or inj...

Page 191: ...loth Also do not use gasoline or thinner to clean the screen Failure to comply will result in damage to the screen surface Dust accumulated on the screen will reduce clarity and darken the video For c...

Page 192: ...attention to the high voltage sections in checking and take full care that no trouble is caused by any error or carelessness in measurement Take note of the results of checking which can be used effe...

Page 193: ...Chapter 9 MAINTENANCE AND CHECK 159 9 3 1 TEST MENU The performance status of this radar equipment can be checked on the Test Menu Tap Input code 0 and tap ENT Tap Test Tap the desired menu...

Page 194: ...r Motor Time Scanner Running Time 9 3 4 SCANNER INFORMATION Displays the following scanner information Transmitted output power Motor Type Magnetron Current 9 3 5 HARDWARE INFORMATION Displays the fol...

Page 195: ...Chapter 9 MAINTENANCE AND CHECK 161 9 3 8 SELF TEST The following tests can be performed Key Test Buzzer Test Key Light Test Monitor Display Test Memory Test Line Test Sensor Test...

Page 196: ...Chapter 9 MAINTENANCE AND CHECK 162 9 4 REPLACEMENT OF MAJOR PARTS...

Page 197: ...periodic replacement works interval hours or more but if it is over the interval hours it is recommended to replace the early The occurrence of phenomenon when parts were consumed Magnetron The radar...

Page 198: ...a communication S006 Scanner Data Alarm Collision occurs when transmitting data to the scanner Checksum of the received data is different S007 Scanner EEPROM Alarm Stored value erroris returned from t...

Page 199: ...hecksum error which had been received properly D014 GPS Position Alarm Cannot receive valid position data which had been received properly D015 GPS Datum Alarm Cannot receive valid geodetic data which...

Page 200: ...IS receiver is received ALR D033 AIS Alarm003 Alarm For AIS function ON an error from the AIS receiver is received ALR D034 AIS Alarm004 Alarm For AIS function ON an error from the AIS receiver is rec...

Page 201: ...t of range Creation of area 1 is out of range Area2 Approach Alarm Echo in area2 Area2 Secession Alarm No echo in area2 Area2 Out of Range Alarm Rectangle area 2 is out of range Creation of area 2 is...

Page 202: ...rations for the position of latitude 80 degrees or more MOB input Event mark input Input moving marks Input moving inserting lines Floating position setting for EBL latitude longitude Floating positio...

Page 203: ...rk Poor Contact in Terminal Board of Inter Unit Cables Poor contact in terminal board The cable end is not fully connected that it contacted with earthed another terminal Disconnected cable wire Poor...

Page 204: ...wave unit NZT 1066 Include Magnetron and Chassis Display Unit LCD Panel unit NZP 2256 Include Process Circuit CDC 1433 T 761 Location Circuit Block Type Remarks Scanner Motor unit H7BDRD0052A Scanner...

Page 205: ...t any failure is caused due to misuse faulty operation negligence or force major such as natural disaster and fire the product will be repaired with charges Repair after the Warranty Period If any def...

Page 206: ...Chapter 10 AFTER SALE SERVICE 172 10 4 RADAR FAILURE CHECK LIST...

Page 207: ...173 Chapter 11 DISPOSAL Chapter 11 DISPOSAL 11 1 DISPOSAL OF THE UNIT When disposing of this unit be sure to follow the local laws and regulations for the place of disposal...

Page 208: ...N A magnetron is used for the scanner NKE 1066 NL and NKE 2044 NL When the magnetron is replaced with a new one return the used magnetron to our dealer or business office For detail consult with our d...

Page 209: ......

Page 210: ...Chapter 12 SPECIFICATIONS 176 Chapter 12 SPECIFICATIONS 12 1 SCANNER DIMENSION 12 1 1 NKE 1066 NL NKE 1066 1 5ft scanner 4kw radome 450mm 4 40 RUBBER PLATE...

Page 211: ...Chapter 12 SPECIFICATIONS 177 12 1 2 NKE 2044 NL...

Page 212: ...Chapter 12 SPECIFICATIONS 178 12 2 DISPLAY DIMENSION 12 2 1 NCD 2256 ST...

Page 213: ...Chapter 12 SPECIFICATIONS 179...

Page 214: ...nce film type The operation can be realized intuitive and simple 12 3 1 CONFIGULATION 1 Display unit NCD 2256 ST Integrated the 7 inch wide VGA color LCD Monitor unit Keyboard unit and Processing unit...

Page 215: ...uracy Less than 1 10 Bearing Indication RM Head up North up Course up TM North up Course up 11 Ambient Condition Standards IEC60945 Ed 4 0 Temperature Scanner Operation 25 to 55 C Storage 25 to 70 C O...

Page 216: ...Tube Magnetron M1624 9 Pulse width Repetition Frequency Bandwidth SP1 0 08 s 4000 Hz Wide 20MHz SP2 0 08 s 2250 Hz Wide 20MHz SP3 0 13 s 1700 Hz Wide 20MHz MP1 0 25 s 1700 Hz Middle 6MHz MP2 0 5 s 120...

Page 217: ...etron MSF1421B 9 Pulse width Repetition Frequency Bandwidth SP1 0 08 s 4000 Hz Wide 20MHz SP2 0 08 s 2250 Hz Wide 20MHz SP3 0 13 s 1700 Hz Wide 20MHz MP1 0 25 s 1700 Hz Middle 6MHz MP2 0 5 s 1200 Hz N...

Page 218: ...ates of 4 patterns 4 patterns are back side 64dots left side 92dots front side 92dots right side 92dots from the default center position Transition of the radar trails is possible during Off Center mo...

Page 219: ...colors Black Blue White Characters 7 colors White Cyan Green Black Red Gold Amber AIS TT 3 colors Cyan Green White EBL VRM 4 colors Cyan Black Magenta White Cursor 4 colors White Red Magenta Yellow Ow...

Page 220: ...N STANDARD BUILT IN 1 Display Number of targets Up to 50 targets stores up to 500 ship static data Target information Displays MMSI call sign ship name COG SOG CPA TCPA direction distance Filters Dist...

Page 221: ...HDM DEPTH DPT DBT WATER TEMP MTW ROT ROT Unsupported on display RUDDER RSA Unsupported on display AIS VDM VDO ALR WIND MWV VWT VWR WAYPOINT RMB BWC BWR 2 Bearing signal JRC NSK format JLR 10 20 30 by...

Page 222: ...optional kit NQA 2447 is necessary In this case waterproofing IPx5 of rear side of display unit is not guaranteed 4 Slave display output no function 5 LAN no function 12 7 3 STANDARD CONFIGURATION Sca...

Page 223: ...A 1 APPENDIX APPENDIX NKE 1066 NL 1 5FT SCANNER INTERCONNECTION DIAGRAM FIG A1...

Page 224: ...A 2 APPENDIX NKE 2044 NL 2FT SCANNER INTERCONNECTION DIAGRAM FIG A2...

Page 225: ...A 3 APPENDIX NCD 2256 ST DISPLAY UNIT INTER CONNECTION DIAGRAM FIG A3...

Page 226: ...A 4 APPENDIX T 760 PRIMARY POWER SUPPLY DIAGRAM FIG A4...

Page 227: ...A 5 APPENDIX T 760 INTERCONNECTION DIAGRAM FIG A5...

Page 228: ...A 6 APPENDIX MEMO...

Page 229: ...back of the sun cover Please cut along the dotted line and use the operation sheet FIG A6 GAIN VRM CURSOR RAIN GURDZONE SETTING BRILLIANCE AIS ACTIV USER1 RANGE MOB MODE STD EBL OFF CENTER MODE COAST...

Page 230: ...A 8 APPENDIX MEMO...

Page 231: ...REF Level Level1 Level2 Level3 Level4 2 Time All Combine OFF ON 3 Trails Mode True Relative 4 Trails Interval Short OFF 15sec 30sec 1min 2min 3min 4min 5min 6min 10min 15min CONT Middle OFF 30sec 1min...

Page 232: ...IX Item Setting Contents 1 99min 4 CPA Ring Display OFF ON 5 Target Number Display 1 TT OFF ON 2 AIS OFF ON 6 ALR Alarm From AIS OFF ON 7 AIS Display Targets 20 30 40 50 8 AIS List Display OFF ON 8 NM...

Page 233: ...evel1 Level2 Level3 Level4 2 RADAR Alarm2 Level Level1 Level2 Level3 Level4 3 RADAR Trails 1 MAX Interval Short Middle Long Super Long 2 Suppression Distance 0 1000 4 TT 1 Vector Constant 1 8 2 Gate D...

Page 234: ...MEA2 NMEA3 13 RSD OFF NMEA1 NMEA2 NMEA3 4 TX Data Format 1 TX Interval 1 9sec 2 NMEA Version V1 5 V2 0 V2 3 3 NMEA Talker Normal GP 5 Target Info TX 1 TX Target TT AIS TT AIS 2 TTM Range Accuracy 1 2...

Page 235: ...eset 1 All Menu 2 RADAR Echo 3 Initial Setting Menu 4 Main Menu 2 All Reset 3 System Time Clear 4 Scanner Time Clear 1 TX Time Clear 2 Motor Time Clear 3 ANT to DISP Unit 4 DISP to ANT Unit 5 Table Up...

Page 236: ...7 16km OFF ON 8 32km OFF ON 3 sm 1 0 0625sm OFF ON 2 0 125sm OFF ON 3 0 25sm OFF ON 4 1sm OFF ON 5 2sm OFF ON 6 4sm OFF ON 7 8sm OFF ON 8 16sm OFF ON 9 24sm OFF ON 10 32sm NKE 2044 NL only OFF ON 11...

Page 237: ...anner 1 Scanner Time Out 1 Alarm Sensitivity OFF ON 2 Sensitivity Time 0 999sec 2 Scanner Data 1 Alarm Sensitivity OFF ON 2 Sensitivity Time 0 999sec 3 Scanner Video 1 Alarm Sensitivity OFF ON 2 Sensi...

Page 238: ...ty Time 0 999sec 8 Wind 1 Alarm Sensitivity OFF ON 2 Sensitivity Time 0 999sec 9 Rate of Turn 1 Alarm Sensitivity OFF ON 2 Sensitivity Time 0 999sec 10 Rudder 1 Alarm Sensitivity OFF ON 2 Sensitivity...

Page 239: ...7 Self Test 1 Key Test 2 Touch Panel Test 3 Buzzer Test 4 Key Light Test 5 Monitor Display Test 1 Pattern1 2 Pattern2 3 Pattern3 4 Pattern4 5 Pattern5 6 Pattern6 7 Pattern7 8 RGB Setting 1 Red 2 Green...

Page 240: ...A 18 APPENDIX DECLARATION OF CONFORMITY...

Page 241: ...al parts are no longer charged Extra protection is ensured by wearing dry cotton gloves at this time Another important precaution to observe is to keep one hand in your pocket at a time instead of usi...

Page 242: ...ately or ask someone to call doctor 4 Lay the patient on the back loosening the necktie clothes belts and so on 5 a Feel the patient s pulse b Check the heartbeat by bringing your ear close to the pat...

Page 243: ...ntinue artificial respiration until natural respiration is restored 6 If the patient s mouth won t open easily insert a pipe such as one made of rubber or vinyl into either nostril Then take a deep br...

Page 244: ...ess the chest wall to a depth of approximately 4 to 5 cm Chest compressions of 30 at the rate of about 100 times per minute Cardiac massage 2 If only one first aider is available perform a cardiac mas...

Page 245: ...t When conducting maintenance make sure to turn the main power off Failure to comply may result in electrocution Turn off the main power before cleaning the equipment Especially when a rectifier is us...

Page 246: ...an human height Direct exposure to electromagnetic waves at close range will have adverse effects on the human body Direct exposure to electromagnetic waves at close range will have adverse effects on...

Page 247: ...echoes from waves but also targets such as other ships or dangerous objects will become inhibited When using the sea clutter suppression function make sure to choose the most appropriate image noise...

Page 248: ...ion officer himself should make the final decision for ship operations such as collision avoidance Making the final navigation decision based only on the alarm may cause accidents such as collisions W...

Page 249: ...our hand must get close to the magnetron Failure to comply may result in damage to the watch since the magnetron is a strong magnet When cleaning the display screen do not wipe it too strongly with a...

Page 250: ......

Page 251: ...blank...

Page 252: ...tomer Service are Sitex Main Office 1 631 996 2690 Sitex Fax 1 631 996 2693 Sitex Service E mail address service si tex com Sitex Customer Support E mail address customerservice si tex com Sitex Main...

Reviews: