- 11 -
Before removing/installing any of these devices: CPU, DIMMs, Add-On
Cards, and Cables, please unplug the onboard power connector.
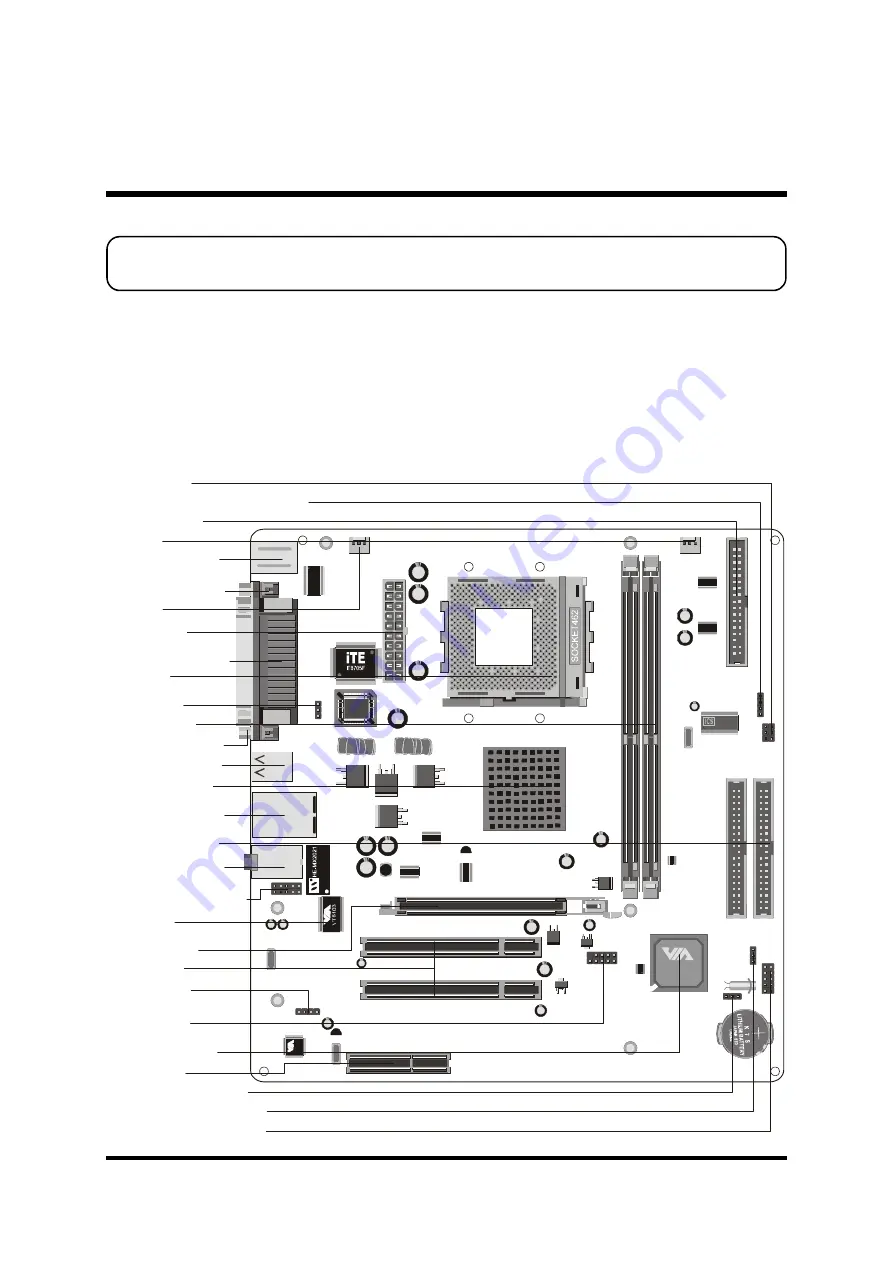
This section outlines how to install and configure your mainboard. Referring to the follow-
ing mainboard layout helps you identify various jumpers, connectors, slots, and ports.
Steps described herein will lead you to a quick and correct installation of your system.
3.1 Step-by-Step Installation
Accessories Of MK35V/MK35VN
3 HARDWARE INSTALLATION
VT8235
0305CD CHINA
UJ760371
0226
950902AF
V
T
1
6
1
2
A
PSKBM1
COM1
LPT1
VGA1
USBIEEE1
USBLAN1
JS1
CD1
1
CNR1
AGP1
PCI1
PCI2
USB3
1
JP1
1
JP5
1
PANEL1
1
BAT1
IDE2
IDE1
1
1
SPEAKER1
1
IR1
FDD1
CASFAN1
1
1
CPUFAN1
1
ATX1
1
1
JP3
DIM1
DIM2
1
AUDIO1
1
PhoenixBios
D686 BIOS
PS/2 Mouse & PS/2
Keyboard Port Connectors
COM1 Port Connector
Parallel Port Connector
VGA1 Port Connector
CPUFAN1
ATX Power
Connector - ATX1
Socket 462
Two DIMM Slots
USB Port Connectors
LAN(MK35VN Only) &
USB Port Connectors
VIA KM266 Chipset
Line-In & Line-Out &
Mic-In Port Connectors
Two IDE Connectors
Front Panel Microphone &
Line-Out Header - AUDIO1
One AGP4X Slot
Two PCI Slots
Audio CD_IN
Connector - CD1
Extended USB
Header - USB3
VIA VT8235 Chipset
One CNR Slot
Clear CMOS Jumper - JP1
CPU Frequency Jumper - JP5
Front Panel Header - PANEL1
CASFAN1
Floppy Connector
Internal Speaker Header - SPEAKER1
IR Header - IR1
BIOS Flash Protection
Jumper - JP3
VIA VT6103
(MK35VN Only)


