background image

7

SystemSetup

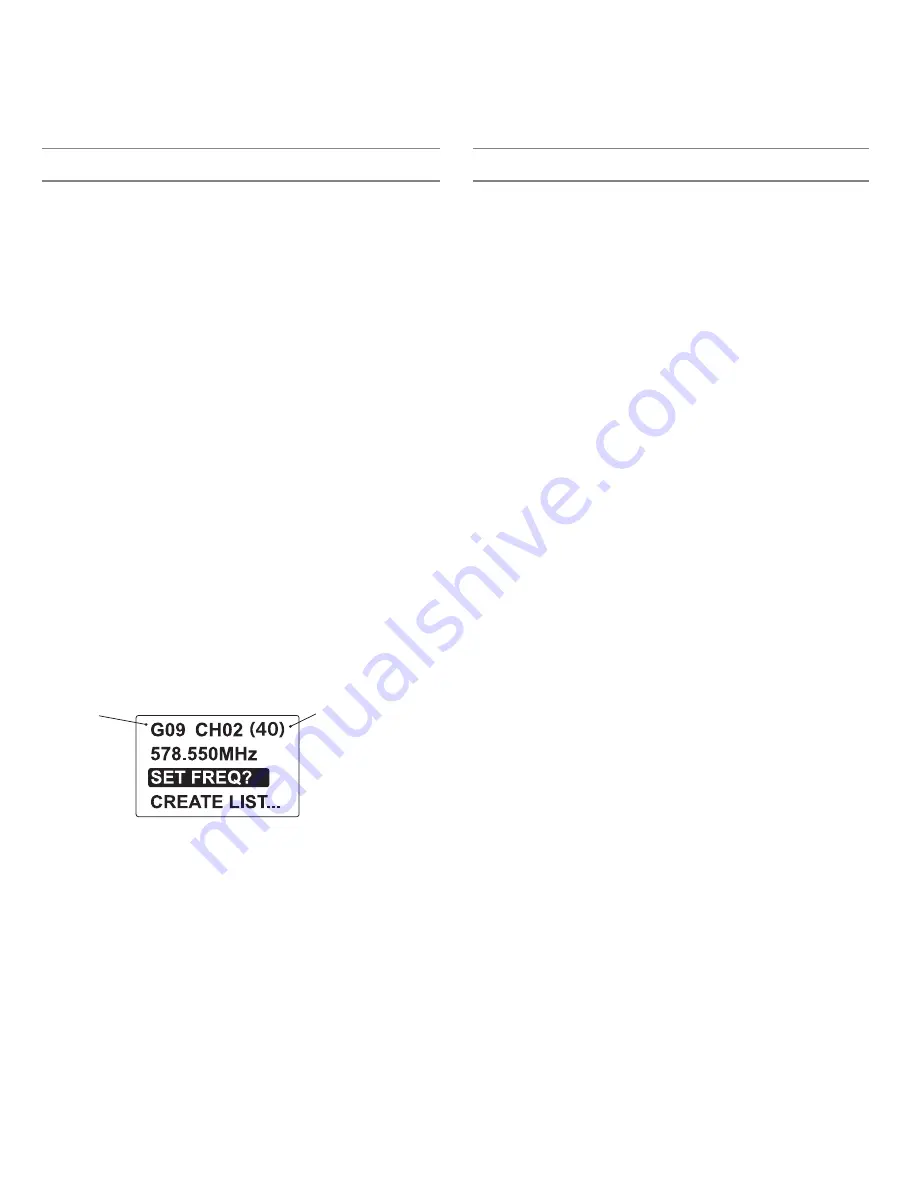
group

number of frequencies

Radio Frequency (RF) Settings

2.  Sync the receiver with the transmitter. Leave the transmitter on. 

Repeat the following steps for each additional system:  
1.  Manually set the receiver to the designated group. 
2.  Press 

scan

 once to find the next compatible frequency. 

3.  Sync with transmitter and leave transmitter on while setting up additional systems. 

Scan and Sync

Use this procedure to set a receiver and transmitter to the same open channel. 

Important! Before you begin: 

• 

Turn off the RF on the transmitters for the systems you are setting up. (This prevents 

them from interfering with the frequency scan.) 

• 

Turn on potential sources of interference such as other wireless systems or 

devices, computers, CD players, large LED panels, effects processors, and digital 

rack equipment so they are operating as they would be during the presentation or 

performance (so the scan will detect and avoid any interference they generate).

1.  Perform a group scan on the receiver by pressing and holding the 

scan

 button for 

two (2) seconds. 

GROUP SCAN

 appears while the receiver scans for the best group of 

frequencies in your RF environment.

2.  After the scan completes, the receiver displays the best available frequency and 

highlights the 

SET FREQ

 menu item. Press 

enter

 to accept the frequency and return 

to the home screen. 

3.  From the receiver home screen, press 

enter

 to go to the main menu and highlight 

SYNC

.

4.  Power on the selected UHF-R transmitter, align the IR windows, and press 

enter


on the receiver to begin the sync.

5. 

SYNCING…

 appears on the LCD. When complete, 

SUCCESS

 appears and the LEDs 

on the receiver flash. The transmitter and receiver are now tuned to the same 

frequency. 

Multiple System Setup

When setting up multiple systems, begin by setting up the first system as follows:        
1.  Conduct a group scan on the receiver by pressing and holding the 

scan

 button for 

two seconds. 

Note the group number and number of compatible frequencies. 

Press 

enter

 to accept the selected frequency. 

Transmitter Compatibility

The receiver is compatible with both UHF-R and Axient transmitters, but must be set to 

the correct system mode. Select the transmitter type from the system mode menu. This 

configures the receiver with a compatible tonekey, audio companding, and IR sync pro-

tocol. The MW5 does not have Axient ShowLink capabilities.

Note: Changing modes removes all entries in the MTx list. You will be prompted with the 

following warning: 

MTx MODE LIST WLL BE ERASED?

.

System Mode Menu

UTILITIES

 > 

MTx MODE

 > 

SYS SETUP

 > 

SYS MODE

UHF-R

Compatible with UHF-R transmitters.

Axient

Compatible with Axient transmitters.

RF Pad

Access the RF pad menu (

RADIO

 > 

RF PAD

) to attenuate antenna signal level in 1 dB 

increments. 

Scanning for an Open Channel

If you experience interference, use one of the following frequency scans to analyze the 

RF environment and identify an available frequency.

• 

Channel Scan: Press the scan button on the bodypack. Finds the first available 

channel.

• 

Group Scan: Press and hold the scan button for two seconds. Finds the group with 

the greatest number of available channels. (Each group contains a set of frequencies 

that are compatible when operating multiple systems in the same environment.)

• 

Full Scan: Scans the full RF band and allows you to view the results in a graphical 

display. 

Full Scan

This feature scans the RF band in 25 kHz increments for all available frequencies, 

first with antenna A, then with antenna B. You can then view a graphical display of the 

results. 
1.  Navigate to the full scan menu (

RADIO

 > 

FULL SCAN

)

2.  Select 

RUN SCAN

 and press 

enter

 to initiate the full scan.

3.  Once the scan is completed, select 

SPECTRUM

 from the full scan menu to view the 

results. 

Note: If the full scan is interrupted, no data is stored, and 

NO DATA

 displays on the 

screen.

Summary of Contents for MW5

Page 1: ...MW5 2012 Shure Incorporated Printed in China 27A16757 Rev 2 Portable Wireless Receiver...

Page 2: ...he damage WARNING Ignoring these warnings may cause severe injury or death as a result of incorrect operation CAUTION Ignoring these cautions may cause moderate injury or proper ty damage as a result...

Page 3: ...iversity Balanced Output Variety of mounting options Operates with standard AA batteries or Shure SB900 rechargeable battery The MW5 is a premium portable wireless microphone receiver component design...

Page 4: ...c exit enter sync scan exit enter sync scan scan exit enter sync scan exit enter sync exit enter sync scan exit enter sync scan scan exit enter sync exit enter sync scan scan exit enter sync scan exit...

Page 5: ...o scroll through menus change settings or select transmitters in MTx mode Can be assigned to control headphone or camera output volumes LCD Screen Displays current settings and menus Tri Color Battery...

Page 6: ...peak level 5th segment on the audio bar 2 Check the input setting on the device to which you are connecting the receiver Set the camera output volume on the receiver accordingly AUDIO CAMERA VOL Input...

Page 7: ...tem as follows 1 Conduct a group scan on the receiver by pressing and holding the scan button for two seconds Note the group number and number of compatible frequencies Press enter to accept the selec...

Page 8: ...when the transmitter tonekey RF sig nal becomes low or in the presence of high RF noise While squelch is activate the blue LED on the portable receiver turns off WARNING Adjusting the squelch can nega...

Page 9: ...ty 20 4 Use the buttons to choose the number of transmitters you want to add to the list 5 Press enter to create the list CREATING LIST displays while the list populates When complete it displays LIST...

Page 10: ...ponse 50 Hz to 16 kHz Ultimate Quieting 100 dBm A weighted Total Harmonic Distortion Ref 20 kHz deviation with 1 kHz tone 0 4 THD typical Signal To Noise Ratio A Weighted 90 dB typical Companding Pate...

Page 11: ...and RF power levels for wireless microphone products MW5 Frequency Band Name Range Freq Span MHz MABJ 779 810 31 X2 925 932 7 Accessories and Parts Dimensions 22 mm 65 mm 83 mm Furnished Accessories...

Page 12: ...se of supplied and recommended cable types The use of other cable types may degrade EMC performance Changes or modifications not expressly approved by the manufacturer could void the user s authority...

Page 13: ...13 MW5 1 4 2 TA3F XLR TA3F 3 5 mm 3 2 90 SMA 2 3 Shure SB900 MW5 Shure UHF R MW5...

Page 14: ...nc exit enter sync scan exit enter sync scan scan exit enter sync scan exit enter sync exit enter sync scan exit enter sync scan scan exit enter sync exit enter sync scan scan exit enter sync scan exi...

Page 15: ...15 MW5 TA3M 3 5 mm 2 IR RF MTx 3 2 Shure SB900 MTx LCD 3 LED RF LED 2 SMA 2 Shure AFP522DC 3 Shure SB900...

Page 16: ...ATTERY Hrs Min Left 15 Health Status mAh Temperature Cycle Count 3 LED 2 5 2 2 1 2 1 1 1 1 5 2 AUDIO CAMERA VOL MW5 10 dB MIC 5 dB 3 TA3F 4 5 6 AUDIO CAMERA VOL HP VOLUME HPO MODE AUDIO HPO MODE MTx U...

Page 17: ...R IR enter 5 SYNCING LCD SUCCESS LED 1 scan 2 enter UHF R Axient IR MW5 Axient ShowLink MTx MTx MODE LIST WLL BE ERASED UTILITIES MTx MODE SYS SETUP SYS MODE UHF R UHF R Axient Axient RF RF RADIO RF...

Page 18: ...SCAN SPECTRUM 2 3 enter 1 MHz 4 scan Enter to Set 5 enter RADIO SET FREQ RF RF LED RF HIGH NORMAL HIGH NORMAL MID SN LOW TONEKEY ONLY HIGH NO TK NO SQUELCH RF RF UTILITIES LABEL RX scan enter LCD LCD...

Page 19: ...r MTx MTx enter EXIT MTx MO MTx MTx MTx 20 RF 1 2 scan 2 CREATE LIST 3 MTx 1 MTx 20 4 5 enter CREATING LIST LIST DONE MTx MTx UTILITIES MTx MODE ADD CURRENT ADD CURRENT enter SUCCESS 20 LIST FULL MTx...

Page 20: ...YNC SUCCESS 6 50 Hz 16 kHz 100 dBm A THD Ref 20 kHz 1 kHz 0 4 THD S N A 90 dB 18 C 57 C 0 F 135 F Shure SB900 LR6 1 5 V 4 SB900 8 200 g 7 83 x 65 x 22 mm 3 3 x 2 6 x 0 9 RF 470 952 MHz FM 45 kHz 100 d...

Page 21: ...21 MW5 MHz RF MABJ 779 810 31 X2 925 932 7 22 mm 65 mm 83 mm TA3F XLRm WA451 TA3F 3 5mm WA461 AFP512 Shure SB900 Shure 8 SBC800 SBC210 SBC210 Anton Bauer AFP522 Anton Bauer DC AFP522DC RF...

Page 22: ...A Jakob Dieffenbacher Str 12 75031 Eppingen Germany Tel 49 7262 92 49 0 Fax 49 7262 92 49 11 4 E EMEAsupport shure de RSS 2 1 2 Le pr sent ap pareil est conforme aux CNR d Industrie Canada applicables...

Page 23: ...MODE ENTER MODE ADD CURRENT DELETE ALL COPY PASTE VOL ASSIGN TONE GEN RX NAME LOCK PANEL SYST CONF SYS MODE DISPLAY CONTRAST BATTERY RESTORE SET MODE UHFR AXT SET FREQ SQUELCH RF PAD RUN SCAN SPECTRU...

Page 24: ...ail info shure com hk United States Canada Latin America Caribbean Shure Incorporated 5800 West Touhy Avenue Niles IL 60714 4608 USA Phone 847 600 2000 Fax 847 600 1212 USA Fax 847 600 6446 Email info...

Reviews: