6
Ch a n g i n g Un i ts o f M easu r e
By pressing the UNIT button, the DRI will scroll between English, Metric, and Newton units; once the DRI is turned OFF the unit will
default to the factory setting. Instructions to change the default unit of measure setting are as follows:
1. Press the PEAK button while holding down the ON button; the small display will indicate “dSP”.
2. Press the PEAK button three times; the main display will indicate “init” and the small display will reflect the current default setting.
3. Each time the UNIT button is pressed, the small display will scroll between English, Metric, and Newton units.
4. Press the MEMO SET button to store the default unit setting and exit.
Se t t i n g H i g h a n d Lo w Li m i ts
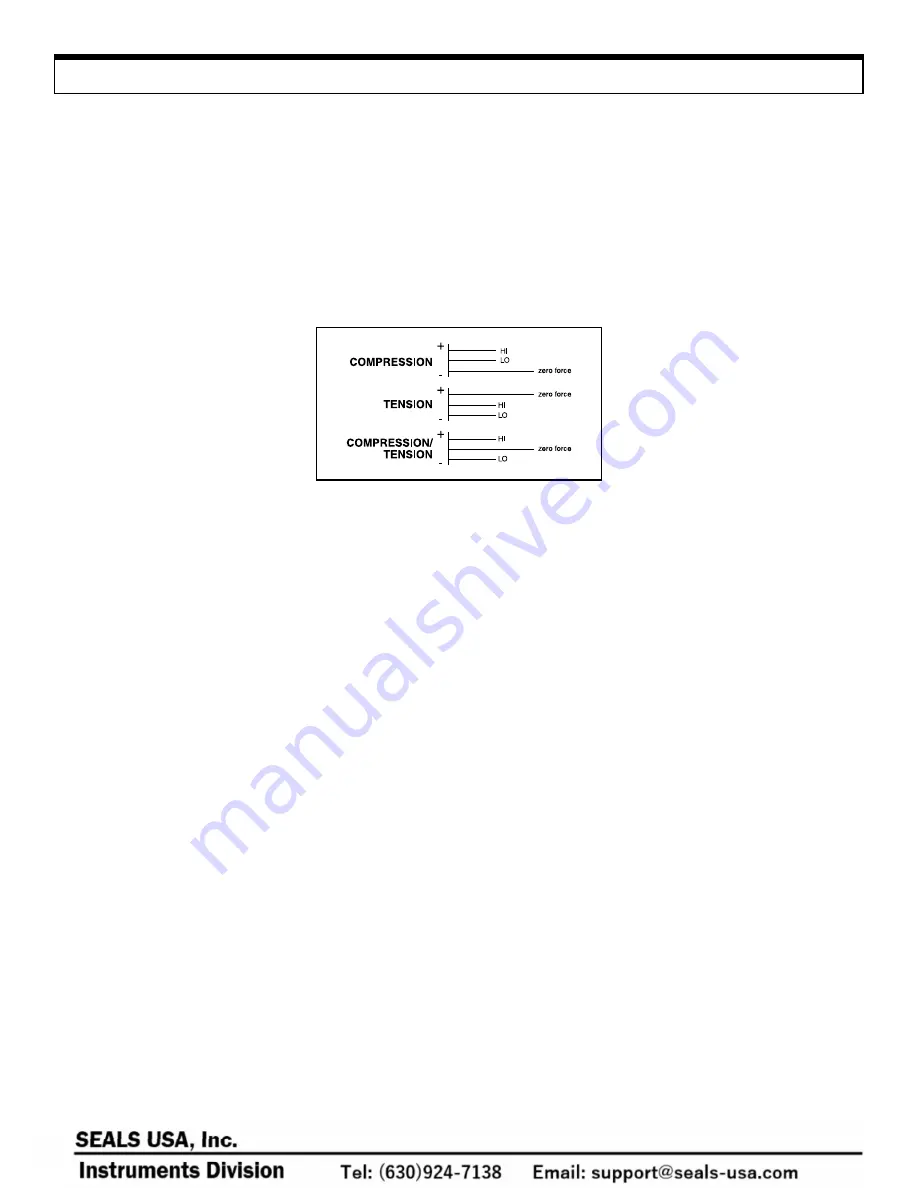
It is possible to program high and low limits for applications requiring tolerances. Use the diagram below as a guide for setting the limits.
Op e r a t i on (con t i n ue d)
Instructions to set the high and low limits are as follows:
1. Press the HI-LO button; “
∆
HI” will be flashing on the small display and whatever limit is already programmed will be displayed.
2. Press the > button; the entire display will be flashing.
3. Press the HI-LO button to toggle between “+” (compression or clockwise torque) and “-” (tension or counter-clockwise torque).
4. Press the > button to scroll across each digit position.
5. Press the HI-LO button to select the numerical value of each digit position.
6. Once the high limit has been programmed, press the MEMO SET button; “
∇
LO” will be flashing on the small display and whatever
limit is already programmed will appear on the main display.
7. To program the low limit, repeat steps 2-5.
8. Once the low limit has been programmed, press the MEMO SET button to store the set points and exit from this function.
The unit of measure will be displayed when the measurement is within the set points. Small “arrows” (
∆
or
∇
) will appear on the small
display when the measurement is above or below the set points.
The unit of measure will never be displayed if the low limit is set higher than the high limit. This is because it is impossible for the
measurement to fall between the setpoints.
Set points can be referenced by pressing the HI-LO button: the first time the button is pressed the display will show the high limit, the
second time will show the low limit, and the third time will exit.
To cancel the high and low limits, both settings must be set to zero.
NOTE
: A comparator output is available for “go – no go” testing (refer to “Comparator Output” section).
Ch a n g i n g Disp l a y Up d a t e Ti me
The display update time works with the sampling rate (1000 hz) to provide an average reading. All samples taken within the selected
update time are averaged (based on 1000 samples/sec) and displayed.
To change display update time:
1. Press the PEAK button while holding down the ON button. The small display will exhibit “dSP” and the main display will reflect
the current setting.
2. Each time the > button is pressed, the main display will scroll through “0.125”, “0.25”, “0.5”, “1.0” and “2.0” (these correspond
with the amount of time in seconds that the display will update).
3. Press the MEMO SET button to store the desired display update time and exit.


