Sherwin-Williams SUPERNOVA 820-002 Owner'S Manual Download Page 11

11

For interior corners, such as on a bookcase or inside a
cabinet, aim the gun toward the center of the corner to
spray. By dividing the spray pattern this way, the edges
on both sides are sprayed evenly.

If there is a wind, angle the spray pattern into the wind to
minimize drifting. Paint from the ground to the roof.

Shrubs. When next to the house, tie back shrubs from the
surface to be painted with rope and stakes. Then cover
them with a canvas dropcloth as the painter approaches
the area. Remove the canvas dropcloth as soon as the
area is painted, to prevent damage to the shrubs.

Concrete walks. If the walkways will be walked on, cover
them with a canvas dropcloth to avoid slipping. Other-
wise a plastic cloth is all that is needed.

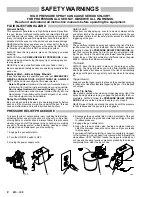
Electrical outlets and lamps. Protect electrical outlets
with masking tape. Cover lamps with plastic bags se-
cured with masking tape.

0673

Nearby objects. Move objects such as automobilies, pic-
nic tables, lawn furniture, etc. up–wind of the surface to
be sprayed. In the case of a nearby home, make a protec-
tive barrier by hanging plastic between two long poles.

SHUTDOWN AND CARE

Pressure Relief Procedure
To reduce the risk of serious bodily injury, including
fluid injection; splashing in the eyes or on the skin; in-
jury from moving parts or electric shock, always fol-
low this procedure whenever you shut off the sprayer,
when checking or servicing any part of the spray sys-
tem, when installing, cleaning or changing spray tips,
and whenever you stop spraying.

1.

Engage the gun safety latch.

2.

Turn the ON/OFF switch to OFF.

3.

Unplug the power supply cord.

4.

Disengage the gun safety latch. Hold a metal part
of the gun firmly to the side of a grounded metal
pail, and trigger the gun to relieve pressure.

5.

Engage the gun safety latch.

6.  Open the drain valve, having a container ready to

catch the drainage. Leave the drain valve open
until you are ready to spray again.

If you suspect that the spray tip or hose is com– plete-
ly clogged, or that pressure has not been fully re-
lieved after following the steps above, VERY SLOW-
LY loosen the tip guard retaining nut or hose end cou-
pling and relieve pressure gradually, then loosen
completely. Now clear the tip or hose.

WARNING

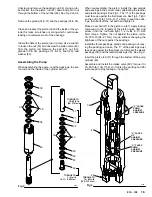
Check the packing nut/wet cup daily. First, follow the
Pressure Relief Procedure Warning, above. The pack-
ing nut should be tight enough to stop leakage – no tight-
er. Use a rod and a light hammer to adjust the nut. Don’t
overtighten! Overtightening may cause binding and ex-
cessive packing wear.

CAUTION

Do not nick the threads of the displacement pump,
which may extend above the bearing housing,
when adjusting the packing nut. A nick in the
threads can strip the threads in the bearing housing
when installing or removing the pump.

Flush the sprayer at the end of each work day and fill
it with mineral spirits to help prevent pump corrosion and
freezing. See FLUSHING GUIDELINES on page 9.

CAUTION

Never leave water or water–based paint in the
sprayer overnight to prevent pump corrosion and
freezing in the pressure control or pump, during
cold weather, which can damage the sprayer.

For very short shutoff periods, leave the suction tube
in the paint follow the Pressure Relief Procedure Warn-
ing
 to the left, and clean the spray tip.

Wrap the hose around the sprayer when storing it,
even if only overnight, to help protect the hose from dam-
age.

WARNING

Read HOSE SAFETY on page 3 for information on
the hazard of using damaged hoses.

USE A ROD AND A

LIGHT HAMMER

TO ADJUST THE

PACKING NUT

TIGHTEN

0741

Summary of Contents for SUPERNOVA 820-002

Page 1: ...r stop leaks with any part of the body Drain all pressure before removing parts Avoid accidental trig gering of gun by always setting safety latch when not spraying Never spray without a tip guard In...

Page 2: ...risk of fluid in jection when the tip is not installed Check diffuser operation regularly Follow the PRESSURE RELIEF PROCEDURE be low then remove the spray tip Aim the gun into a metal pail hold ing...

Page 3: ...Hose Grounding Continuity Proper hose grounding continuity is essential to maintaining a grounded spray system Check the electrical resistance of your fluid hoses at least once a week If your hose do...

Page 4: ...dentellement Diffuseur Le diffuseur du pistolet sert diviser le jet et r duire les risques d injection accidentelle quand l ajutage n est pas en place V ri fier le fonctionnement du diffuseur r guli r...

Page 5: ...le tuyau imm diatement Un tuyau sans mise la terre ou avec une mise la terre incorrecte peut entra ner des risques pour votre syst me Lisez aussi LES RISQUES D INCENDIE OU D EXPLOSION RISQUES D INCEND...

Page 6: ...ante El no hacerlo puede llevar al disparo imprevisto de la pistola Difusor El difusor de la pistola dispersa el chorro pulverizado y reduce el riesgo de inyecci n cuando no est instalada la boquilla...

Page 7: ...la ga ma apropiada para comprobar la resistencia si excede los lites recomendados reemplazarla de inmediato Es muy arriesgado tener una manguera sin puesta a tierra o con la puesta a tierra en malas...

Page 8: ...elp relieve sys tem pressure and to help prime the sprayer Do not attach a spray hose to the drain valve doing so could result in costly damage to the pressure control PRESSURE CONTROL KNOB 1 4 NPT M...

Page 9: ...tal pail Put the pump suction tube in the pail 3 Be sure the pressure control knob is set at minimum and the drain valve is closed 4 Remove the spray tip from the gun 5 Disengage the gun safety latch...

Page 10: ...Then use a solvent soaked brush to clean the spray tip and to keep build up from drying and clogging the spray tip APPLICATION METHODS Always hold the gun perpendicular to the surface and keep the gun...

Page 11: ...irmly to the side of a grounded metal pail and trigger the gun to relieve pressure 5 Engage the gun safety latch 6 Open the drain valve having a container ready to catch the drainage Leave the drain v...

Page 12: ...NING PROBLEM CAUSE SOLUTION Electric motor won t run Power or extension cord is unplugged or build ing circuit fuse is blown Overload switch1 has opened Pressure setting too low Pressure control froze...

Page 13: ...int too viscous Wrong type of hose Increase Clean Change spray tip Fill and reprime Thin Use minimum 50 ft 15 2 m static free nylon hose only wire braid hose is un acceptable Paint runs or sags Spray...

Page 14: ...ng 55 down over the pin Screw the pump cylinder completely into the drive as sembly you will feel some resistance from the packings Now turn the cylinder back until the outlet nipple 22 faces back Scr...

Page 15: ...t en the nut 33 to 10 5 in lb 1 2 N m to seat the pack ings then back off the nut and hand tighten it Place a new ball 27 in the piston rod 47 Apply locking compound to the threads of the piston valve...

Page 16: ...replace both of them When installing the rod and the bearing coat the sur faces with SAE 10 non detergent motor oil Clean and inspect the crankshaft J Wipe it clean with a rag do not use solvent If t...

Page 17: ...r includes a new resis tor already installed ELECTRIC MOTOR WARNING To reduce the risk of serious bodily injury including fluid injection splashing in the eyes or on the skin injury from moving parts...

Page 18: ...mounting screws 8 See Fig 9 5 Pull the pressure control 74 away from the conduit 76 and carefully guide the leads through the con nector 75 one at a time See Fig 10 6 Remove the mounting bracket 77 Re...

Page 19: ...um setting 5 Plug in and turn on the sprayer Increase the pres sure setting just enough to start the sprayer Prime the hose and purge all air from the system 6 Open the needle valve a little more enou...

Page 20: ...820 319 TAG Caution 1 73 820 006 LABEL identification 1 74 820 321 PRESSURE CONTROL ASSEMBLY See page 22 for parts 1 76 820 473 CONDUIT electrical 4 in 77 820 324 BRACKET mounting 1 78 820 560 SCREW 4...

Page 21: ...located under the cover 119 DANGER LABEL FRENCH DANGER LABEL ENGLISH Ref 77 8 9 18 8 22 20 26 50 52 54 88 90 87 103 55 55 56 57 63 64 9 61 65 25 24 58 59 99 3 100 94 71 22 Ref 20 121 19 Ref 90 78 79 7...

Page 22: ...527 BUSHING strain relief 1 107 820 448 LOCKWASHER int No 8 1 108 820 528 CORD SET 1 109 820 529 NUT hex No 6 32 2 110 820 530 LOCKWASHER No 6 2 111 820 531 SCREW mach flat hd No 6 32 x 5 8 2 113 820...

Page 23: ...an extra kit on hand to reduce down time 43 47 27 33 32 30 29 45 49 40 28 41 48 36 42 38 37 35 34 46 31 39 ACCESSORIES French 185 955 Spanish 185 962 German 186 042 Greek 186 046 Korean 186 050 Englis...

Page 24: ...on inadequate or improper maintenance negligence accident tampering or substitution of non original equipment manufacturer component parts Nor shall The Sherwin Williams Company be liable for malfunct...

Page 25: ...y Hose Requirements grounded 50 ft 15 m minimum non wire braid spring guards on both ends Pump Material zinc plated carbon steel polyurethane tungsten carbide Delrin Pump Packing Material UHMW polyeth...

Page 26: ...1 820 311 Bearing Assembly 2 820 312 Connecting Rod 3 820 313 Drive Housing 4 820 317 Pinion Gear 5 820 621 Motor 5a 820 339 Capacitor 5b 820 704 Motor Fan 6 185 952 Danger Label 7 820 533 Cart 8 820...

Reviews: