background image

Tape 

 Display

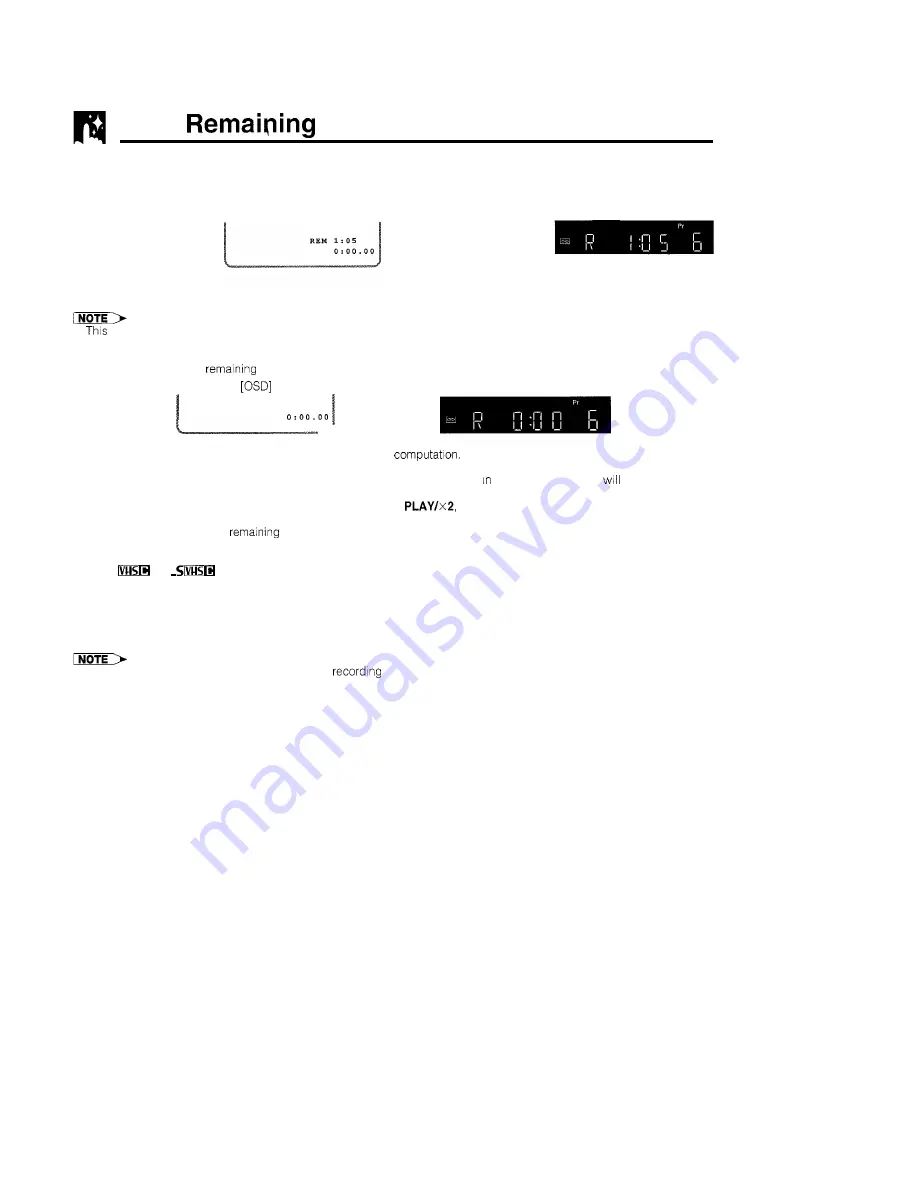
The tape remaining display only works with tapes recorded in PAL. It does not work with tapes recorded in

NTSC.

On Screen Display

VCR Display

* S e l e c t   F U L L   o r

C O U N T E R   d i s p l a y
m o d e   b y   p r e s s i n g
MODE OSD on the
remote control.

*Press DISPLAY on

the remote control.

 function accurately displays the tape remaining only for tapes recorded in PAL mode. (It does not accurately display

the tape remaining for tapes recorded in NTSC or MESECAM modes.)

When you insert the tape and the VCR is in the stop mode, the tape remaining cannot be computed. The following Indicator

is shown when the tape 

 has not yet been computed or cannot be computed.

REM

[VCR display]

When you start recording or playback, the VCR will begin the 

 However, this may take some time.

When computation is completed, tape remaining will be shown on the OSD and VCR display for 5 seconds.

If the “REM.” mode is selected with 

MODE OSD 

or 

DISPLAY 

and the VCR is   stop mode, the tape 

 automatically fast

forward or rewind for a few seconds and then the VCR will begin computing the amount of tape remaining.

During computation, 

REC 

will not function, and pressing 

STOP, 


or other buttons will interrupt the computation.

Setting the DPSS or ZERO-BACK function during computation may cancel it.

The indicated length of tape 

 is only an approximate guide.

This function may not properly work for video tapes other than E-60, E-90, E-180 and E-240.

The length of tape remaining during fast forward or rewind may be indicated as greater than it actually is

When 

 and 

 tapes are used with a cassette adapter, the indication may not be correct.

Warning for the length of tape remaining

When the tape reaches the point where only about five minutes of recording time is left, the remaining length of
tape will be automatically displayed, as a warning.

No warning, however, will be shown during timer 

 or Simple Recording Timer recording

3 8

Summary of Contents for VC-H670X

Page 1: ...SHARP VIDEO CASSETTE RECORDER OPERATION MANUAL Please read this operation manual carefully before using the VCR ...

Page 2: ...ape Play Back on PAL TV Auto Tracking Control System Auto Head Cleaning System l Quick Start with Full Loading Mechanism Auto Rental Mode l Blue Back l Full Auto Playback l Playback of HI Fi Recorded Tapes Audio Output Mode Adjusting Hi Fi Audio Tracking Recording a TV Programme 23 l Cassette Erase Protection l Recording a TV programme l TO Watch Another TV Programme While Recording Recording Hi F...

Page 3: ...s on the VCR In the event that liquid should enter the cabinet unplug the VCR immediately and contact the retailer or a service centre approved by Sharp immediately 6 Do not remove the VCR cabinet Touching parts inside the cabinet could result in electric shock and or damage to the VCR For service and adjustment inside the cabinet call a qualified dealer or service centre approved by Sharp 7 The u...

Page 4: ...ick Start with Full Loading Mechanism l 365 Day 8 Programme Timer Daily Weekly Programmable Auto Channel Tuning l 48Channel Preset PLL Frequency Synthesized Tuner l Built in Shuttle Control l LOW POWER feature l Built in Front AV Jacks l 60 minute Timer Memory Backup Timer settings etc remain in memory after power interruptions of up to 60 minutes l 345 times High Speed Rewinding Function Enhances...

Page 5: ... If this occurs switch to POWER STANDBY mode l This mode cannot be used when the programmable timer is set to TIMER ON 2 In POWER ON mode Each time STANDBY LOW POWER on the VCR or the remote control VCR STANDBY for VC H690X STANDBY for VC H670X is pressed the POWER MODE changes as shown below Current POWER ON mode pimE t POWER STANDBY mode t LOW POWER mode l LOW POWER mode cannot be used when the ...

Page 6: ... AV jack LINE IN 2 VIDEO AUDIO L R VCR Display explained throughout the operation instructions lpmTiF I I l When the VCR is in POWER ON mode this Indicator Where a channel posltion number is usually displayed will light up When the POWER STANDBY mode LOW POWER mode this part will not be lit The display changes each time DISPLAY on the remote control is pressed See page 37 Rear Connection terminals...

Page 7: ...on I A DUB button VGH670X Inserting the Batteries First install the batteries properly Fit two R6 UMISUM 3 AA 1 5 volt batteries included or equivalent If the remote control stops working insert new batteries Ensure the batteries are inserted correctly matching the polarities indicated in the remote control VC H69OX l Do not subject the remote control to shock water or excessive humidity l The rem...

Page 8: ...old for more than 1 second VCH670X TV Functions to be Controlled My for VC 67UX I Switch to n control moda L Press TV to select the TV control mode f 3 R I t o V C R cufltrol moda Pns ss VCR to eGt the VCR cantrui mode 1 _ N functbn control 0 Press TV to select the TV cantrat m e Use the fdlowing buttons on your remote control to INOTE l When you replace the batteries in the remote control if your...

Page 9: ... end into your TV s ANTENNA IN terminal ANTENNA IN TV back panel RF OUT Connecting to a Stereo TV l 7 To AUDIO IN R L To VIDEO IN A IN l Stereo sound output is only possible using the AUDIO OUT terminals Sound from the radio frequency converter RF OUT is mono only l The power cord should not be plugged into the power outlet until the above connectrons have been completed l If TV reception is weak ...

Page 10: ...VCR is used l If picture interference appears on the TV screen in step 0 above you can change the video channel RF output channel from the VCR with the following procedure If UHF channel 37 is an active broadcast channel in your area manually select a different channel UHF 28 to UHF 69 see below and then retune your TV as above A Press STANDBY LOW POWER on the VCR or VCR STANDBY for VCH690X or STA...

Page 11: ...te control operates the following functions same functions on the VCR A CHA Y YCH 4 f REW Shuttle Ring b 3 FF Shuttle Ring VC H690X Initial Setting of Language VC H670X Refer to page 12 to set the clock Changing Language l If the language has already been set previously and you want to change it follow the steps below 0 Press MENU SET Select item LANGUAGE with A v and press SET 0 SET 1 Select the ...

Page 12: ...owing procedure PREPARATION l Select the video channel on your TV And turn on the VCR See page 5 item 3 CChanging the Clock Setting Initial Setting of Clock First set the language refer to page 11 Then press SET l 12H 12 h l If 12H mode was selected then set the AM PM indicator control and then press First set the day digits and then the month If there is only one day or one month digit Follow ste...

Page 13: ...the picture is not clear if you want a different channel from the one preset or if you wish to reset a skipped 5 VHF 5A 29 46 Skipped channeis channel reset the channel as follows 6 VHF 6 7 VHF 7 47 AUTO TUNING PREPARATION l Select the video channel on your TV And turn on the VCR See page 5 item 3 SET Select item AUTO with A V and press SET A 0 NOTE l CHANNEL PRESET has been preset to MANUAL at th...

Page 14: ...uning Channel Position 3 to Broadcast TV Channel 7 Select item CHANNEL PRESET with and press EL PRESET has been preset to MANUAL at the desired broadcast channel on your TV and then press l Numeric buttons on the remote control can also be used to select channel numbers Press to switch between one and two digit numbers for step 0 14 ...

Page 15: ...hannel on your TV And turn on the VCR See page 5 item 3 Example Skip channel position 12 ress 4 or F to se ect Cancelling skip PREPARATION l Select the video channel on your TV And turn on the VCR See page 5 item 3 Example Reset channel position 12 l Follow the same procedures 0 in Channel skip and then the procedures 0 0 below Select SKIP setting mode by pressing A or V ...

Page 16: ...Screen Display The tape counter and VCR mode can be shown on the screen while you are playing back a tape or watching a broadcast on the video channel lJplay GAalllp S PICTURE New Sham Super Picture AUDIO DUB MIX indicator PLAY X2 VSF FF 4 VSR REW n STOP CASSETTE IN 11 F ADV II b slow 11 STILL l REC l II REC PAUSE Programme channel positlon Audio System STEREO I II Audio output indicator Auto Fieo...

Page 17: ...your TV and select the video channel And turn on the VCR See page 5 item 3 AUTO Usually select AUTO mode PAL Strict PAL colour mode ur VCR receives no TV signal or an due to weak TV signal reception or ils see Auto Repeat on page 35 REC on page 31 Select the AUDIO MIX mode by pressing For details see pages 31 and 32 and then ...

Page 18: ...OWER STANDBY mode Press PLAY X2 The auto tracking control system engages and F flashes on the TV screen for a few seconds Video Search Use the following procedure to quickly find the section you want while viewing the picture 0 During playback press FF for forward video search or REW for reverse search VSFNSR VSFNSR 3 I I SP LP x 7 x 3 There are 2 search speeds in each direction The VCR switches b...

Page 19: ...arch Forward or VSR Video Search Reverse mode Select from two speeds by turning the ring Release the ring the shuttle ring returns to centre to return to playback l During playback turning the ring all the way to the left or right locks the VCR in VSF Video Search Forward or VSR Video Search Reverse mode Press PLAY X2 to return to regular playback TAPE SPEED Slow Motion Playback with the Remote Co...

Page 20: ...our mode Normally the colour mode should be set to AUTO mode See Mode Selection on page 17 StrictPALdour made INoTE ma l When the colour mode is set to frxed co our mode while the VCR is playing back a black and white tape or is receiving a Change with 4 or F black and white broadcast the picture may be coloured In this t event set the COLOUR mode on the MODE selection screen to Then press SET AUT...

Page 21: ...back is engaged when in the standby mode Auto Rental Mode This function only works when AUTO RENTAL mode on the MODE selection screen is set to ON The convenient auto rental mode lets you enjoy playback with ease When you insert a cassette with the erasure protection tab removed rental videos etc your VCR automatically turns on the power winds the tape forward to find the recorded section and play...

Page 22: ... sound output is only possible using the AUDIO OUT terminals Sound from the radio frequency converter RF OUT is mono only A blue screen will appear if audio only Hi Fi tapes are played back Audio Output Mode The audio output mode is controlled by AUDIO OUT on the remote control The VCR is normally set to the Hi Fi mode with 0 and I3 displayed on the VCR display and normal stereo sound output Selec...

Page 23: ...will be ejected To pause during recording press PAUSE STILL F ADV To resume recording press PAUSE STILL F ADV again To stop recording press STOP l The pause mode disengages automatically after about 5 minutes and the VCR enters stop mode l To record audio and video from an external source through the AUDIO VIDEO terminal on the front or rear of the VCR press INPUT SELECT on the remote control or p...

Page 24: ...g Input Signals Various sources of video and audio signals can be recorded as shown in the following chart a Selecting a channel will record both video and audio from the VCR tuner b Selectrng an external source position to select an external source position press INPUT SELECT or select a channel situated between the last channel and the first channel with CHANNEL A V CH A V will record both video...

Page 25: ...increases the stop time by 10 minutes Press STANDBY to turn to the POWER STANDBY mode See page 5 item 2 Ex Present time 8 28 AM After the Simple Recording Timer is set the channel position cannot be changed To confirm the starting time and the ending time first turn on the power Then press DTIME to confirm the starting and ending time And turn to the POWER STANDBY mode l To clear the Simple Record...

Page 26: ...on each of the events can be set to be recorded on a daily or weekly basis up to the limit of the tape PREPARATION l Select the video channel on your TV Turn on the VCR See page 5 item 3 l Load ihe cassette ensuring the erasure protection hole is covered The VCR power will automatically turn on l Check that the clock is displaying the correct time CODE number refer to your newspaper or TV guide OD...

Page 27: ... recorded To cancel the programmed G CODE setting select the TIMER setting mode on the MENU screen Then select the programme number you wish to cancel with A Y and press CLEAR See Cancelling Timer Programmes on page 30 Setting the Programme Number In Step 5 When using G CODE for the first time the Programme number PR on the screen shows two dashes and is highlighted white Set it to be the same as ...

Page 28: ...with A v and press SET l If the timer positions 1 to 4 have already been set the screen changes 212 timer positions 5 to 8 Set the date for timer recording with the numeric buttons or A V on the remote control and then press b First set the day digits and then month If there is only one day or one month digit enter a 0 first 0 If you want to record only once press b and go to step 0 Otherwise sele...

Page 29: ...ssed when there is no cassette loaded 17 flashes for 5 seconds indicating that timer recording is not possible l If TIMER ON OFF is pressed while a cassette with an uncovered erasure protection hole is loaded B flashes and the cassette is ejected l When Yl is lit regular VCR operation clock setting and settrngicancellingiconfirming timer positions are not possible For reaular VCR ooeration clock s...

Page 30: ... checking or correcting the programme contents press TIMER ON OFF to enter the Timer Standby mode Cancelling Timer Programmes Perform the following procedure to cancel timer programmes that have already been set PREPARATION l Turn on your TV and VCR and select the video channel on the TV SET MENU 0 I 0 SET 0 0 _I_ I M6 Normal Screen 0 Press MENU If the 13 indicator on the VCR display is lit cancel...

Page 31: ...ded w Audio Dubbing This VCR allows you to add a narrative or background music to a pre recorded tape l The audio signal will be recorded on the mono linear track The Hi Fi tracks remain unchanged Connect the audio source to the AUDIO IN L R terminals or L termrnal only on the front of your VCR remember to select L2 If a microphone is to be used connect it to your audio equipment Audio source Conn...

Page 32: ...usly set the AUDIO MIX mode to ON see page 17 A U D I O M I X 1 AUDIOOUT M O D E 1 V C R D I S P L A Y 1 RESULT 0 la Original Hi Fi audio L R channels OFF Hi Fi audio 0 Original Hi Fi audio L channel Original Hi Fi audio R channel Mono audio Dubbed mono audio 0 El Original Hi Fi audio L R channels plus dubbed mono audio ON Hi Fi and Mono audio 0 Original Hi Fi audio L channel plus dubbed mono audi...

Page 33: ...m Virtual Dolby Surround SURROUND Function ...

Page 34: ...reaches the O OO OO position the tape automatically stops l The zero back function does not operate during recording The function works during the playback stop fast forward rewind and video search modes m DPSS Digital Programme Search System With this feature you can quickly locate a desired section of the tape The DPSS feature makes use of VISS index signals to search for a specified tape segmen...

Page 35: ...ard video search for a fixed interval of playback time before resuming playback Depending on how many times the button is pressed it is possible to set the forward video search time to approx 30 60 90 or 120 seconds of recorded material Number of Times Pressed Forward Video Search Time On the VCR display 1 time Approx 30 sec 1 i 5 I of playback time U J u I I 2 times Approx 60 sec 1 i7 h of playba...

Page 36: ...n the VCR display Press ti again J remains lit on the VCR display confirming that New Child Proof Lock has been activated Now regardless of what other operating buttons are touched the VCR will continue to operate in the present mode If New Child Proof Lock is activated during playback once the tape reaches its end the VCR automatically rewinds the tape ejects it and turns into POWER STANDBY mode ...

Page 37: ...he display shows the record finish time When DISPLAY is pressed the display changes in the following way If the m indicator on the VCR display is lit cancel the timer standby mode by pressing TIMER ON OFF and then turn on the power Fxamnle Example COUNTER REMAINING TIME Example PRESENT TIME Example RECORD FINISH TIME l During Simple Recording Timer recording 0 lights Counter Clear Make sure the co...

Page 38: ...play for 5 seconds l If the REM mode is selected with MODE OSD or DISPLAY and the VCR is In stop mode the tape WIII automatically fast forward or rewind for a few seconds and then the VCR will begin computing the amount of tape remaining l During computation REC will not function and pressing STOP PLAY x2 or other buttons will interrupt the computation l Setting the DPSS or ZERO BACK function duri...

Page 39: ...t SP 11 70 mm set LP Antenna 75 Ohm unbalanced Reception channels VHF channel 0 to 12 UHF channel 28 to 69 RF output signal UHF channel 28 to UHF channel 69 preset to UHF channel 37 Power requirement AC 240 V 50 Hz Power consumption VC H670X 16 W approx l O W Max at Low Power Mode VC H690X 17 W approx l O W Max at Low Power Mode Operating temperature 5 C to 40 C Storage temperature 20 C to 55 C Vi...

Page 40: ...ther cassette inside l Make sure the cassette is properly positioned and reinsert l Make sure the VCR is not In the timer setting or clock setting mode l Make sure the VCR is not in the channel setting mode l Desired channel positlon cannot be The channel has been set to be skipped Cancel Ihe skip mode for that selected channel NO COLOUR OR POOR PICTURE l No colour or poor TV picture on normal l M...

Page 41: ...SHARP CORPORATION OF AUSTRALIA PTY LIMITED A C N 003 039 405 1 Huntingwood Drive Huntingwood Blacktown N S W 2148 SHARP CORPORATION Osaka Japan c T Printed in Malaysia TINS 341 IAJZZ T1880 A ...

Reviews: