background image

49

SUPPLIES

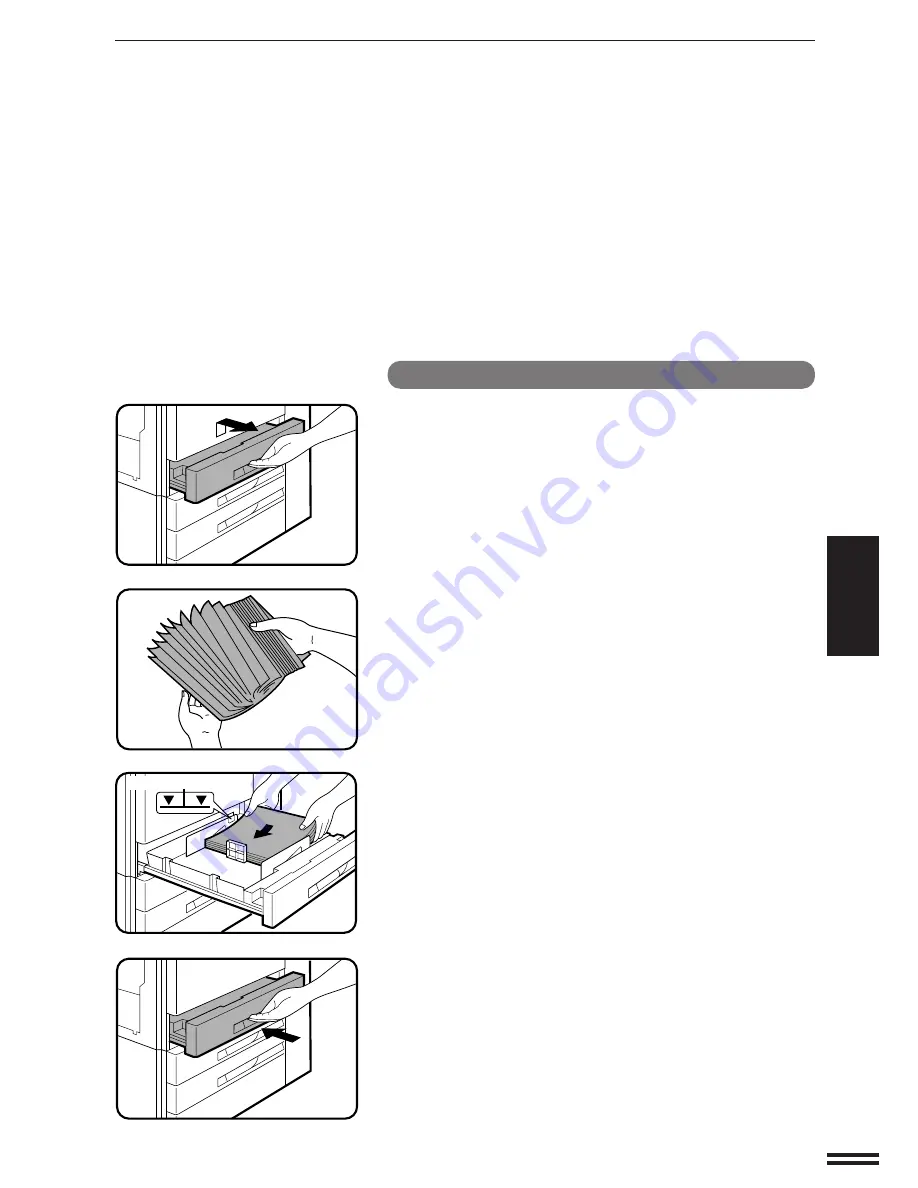
Loading paper in paper trays 1 to 3

1

Gently lift and pull out the paper tray.

2

Fan the copy paper and insert it into the tray.

Each tray holds 500 sheets of paper.
Do not load paper above the maximum height line.

3

Push the paper tray firmly back into the copier.

PAPER

Paper

Maximum height line

Summary of Contents for SF-2052

Page 1: ... GETTING STARTED MAKING COPIES SUPPLIES COPIER TROUBLE GENERAL INFORMATION OPTIONAL EQUIPMENT KEY OPERATOR S GUIDE 2 7 48 53 66 75 105 ELECTROSTATIC COPYING MACHINE OPERATION MANUAL MODEL SF 2052 Page ...

Page 2: ......

Page 3: ...E COPYING 18 ERASE 19 MARGIN SHIFT 21 COVERS 24 INSERTS 26 TRANSPARENCY FILM WITH INSERT SHEETS 43 JOB MEMORY 45 INTERRUPT 47 SUPPLIES PAPER 48 Types and sizes of copy paper 48 Loading copy paper 48 ADDING TONER 50 STORAGE OF SUPPLIES 52 COPIER TROUBLE MISFEED REMOVAL 53 TROUBLESHOOTING 64 GENERAL INFORMATION PART LOCATIONS AND FUNCTIONS 66 Exterior 66 Interior 67 Operation panel 68 USER MAINTENAN...

Page 4: ...and functions of the SF 2052 Then refer to the manual as needed to become thoroughly familiar with those features you will normally use For Key Operators Please read all sections thoroughly to become familiar with all features and functions of the SF 2052 Throughout the manual information which is relevant to key operator functions is noted by KEY OPERATOR Please pay close attention to these notes...

Page 5: ...de near the rear of the copier 3 Do not install the machine where it is damp or humid exposed to direct sunlight extremely dusty poorly ventilated subject to extreme temperature or humidity changes e g near an air conditioner or heater 4 Ensure that the area chosen for the machine location is level 5 Be sure to allow the required space around the machine for servicing and proper ventilation 60 cm ...

Page 6: ...inutes Once the copier is ready the message display will change to READY TO COPY and the START key indicator will light up indicating that copying is possible If the copier has been programmed in the auditing mode the message ENTER YOUR ACCOUNT NUMBER will appear after warming up Once a valid account number has been entered the message will change to READY TO COPY and the START key indicator will ...

Page 7: ...preheat mode is enabled the copier will enter the mode once the set time has elapsed without any copier operation after the last copy of a run is made or power is turned on When the copier enters the preheat mode the message PREHEAT MODE PLACE ORIGINALS IN THE DOCUMENT FEEDER TRAY OR PRESS ANY KEY ON THE OPERATION PANEL TO RESTORE THE COPIER TO READY TO COPY will appear In this condition the fuser...

Page 8: ...ress the SCROLL DISPLAY key The following message will appear SELECT FEATURE OF INTEREST 1 DUPLEX 2 DOCUMENT FEEDER 3 SORTER 4 OTHER FEATURES 3 Select the feature you would like to know about by pressing a number from 1 through 4 using the 10 key pad If selection 1 2 or 3 is made information about that feature will appear If selection 4 is made the first selection display for other features will a...

Page 9: ... number is entered ACCOUNT STATUS COPIES MADE 000 000 COPIES REMAINING 000 000 The message will be displayed for several seconds then change to the following message READY TO COPY WHEN COPYING IS FINISHED PRESS THE AUDIT CLEAR KEY In the interrupt copy mode see page 47 the following message will appear instead of the message above READY TO COPY WHEN COPYING IS FINISHED PRESS THE INTERRUPT KEY NOTE...

Page 10: ... be sensed to be A4R 8 1 2 x 11 R Image void can occur at the leading edge max 3 mm 1 8 andthetrailingedge max 4mm 5 32 of the copies 1 sided copies of 1 sided originals 1 Adjust the original guides to the size of the originals and set the originals face up in the document feeder tray The original size will be indicated in the message display and the paper tray with the corresponding paper size wi...

Page 11: ...cted 3 Use the 10 key pad to enter the desired number of copies The number will be shown in the copy quantity display Use the clear key to cancel an entry if a mistake has been made 4 Press the START key To cancel a copy run press the clear key Copying will stop and the RADF will output any originals which have been fed Also the number in the copy quantity display will be reset to 0 Using the RADF...

Page 12: ...ies is more than 50 the copy quantity display will display 50 after copying starts If an optional sorter is installed the display will change to 20 after copying starts in sort mode 4 Press the START key To cancel a copy run during duplex copying press the clear key Incomplete copies will be output from the duplex tray 2 sided copies from 2 sided originals 1 Adjust the original guides to the size ...

Page 13: ...m 2 sided originals 1 Adjust the original guides to the size of the originals and set the originals face up in the document feeder tray 2 Use the ORIGINAL TO COPY key to select 3 Enter the desired number of copies 4 Press the START key To cancel a copy run press the clear key Copying will stop and the RADF will output any originals which have been fed Also the number in the copy quantity display w...

Page 14: ...ocument feeder cover The original size will be detected and indicated in the message display 3 Ensure that 1 sided to 1 sided is selected on the ORIGINAL TO COPY section of the operation panel When no indicator in the ORIGINAL TO COPY section is lit the 1 sided to 1 sided copying mode is selected 4 Ensure that the desired paper tray is selected Paper matching the size of the original will be autom...

Page 15: ... the remainder of the originals in reverse order COPYING FROM THE DOCUMENT GLASS ORIGINAL TO COPY EVEN NUMBER ODD NUMBER 1 1 2 2 2 2 1 ORIGINALS 1 PRE COUNT ORIGINALS ODD NUMBER 2 2 2 1 1 Copying from the document glass ORIGINAL TO COPY EVEN NUMBER ODD NUMBER 1 1 2 2 2 2 1 ORIGINALS 1 PRE COUNT ORIGINALS ODD NUMBER 2 2 2 1 1 For an even number of originals 1 Use the ORIGINAL TO COPY key to select ...

Page 16: ...the paper tray with the desired paper size NOTE This feature will not work when original or copy paper is of non standard size 3 Press the AUTO IMAGE key The best reduction or enlargement ratio for the selected paper size will be automatically set If the size and orientation of the original do not correspond to standard reduction enlargement ratios for the selected paper tray then the following me...

Page 17: ...the key to increase the ratio To decrease or increase the zoom ratio rapidly press and hold the or key However the value will stop at the preset reduction or enlargement ratios To move beyond these ratios release the key and then press and hold it again D Same size reset Press the 100 key to reset the copy ratio to 100 3 Ensure that the desired tray is selected If the AUTO PAPER SELECT mode is on ...

Page 18: ... of the copy paper Be sure to extend the tray when feeding B4 or A3 8 1 2 x 14 or 11 x 17 sized paper 4 Insert the copy paper all the way into the manual feed tray Labels tracing paper and special purpose papers other than SHARP standard transparency film must be fed individually Up to 100 sheets of standard copy paper measuring from A5 to A3 5 1 2 x 8 1 2 to 11 x 17 can be loaded into the manual ...

Page 19: ... very low density areas of an original or in suppressing unusually high density background areas 1 Use the AUTO MANUAL PHOTO key to select MANUAL 2 Use the LIGHT and DARK keys to adjust the copy density as desired Photo This mode is useful for copying photographs 1 Use the AUTO MANUAL PHOTO key to select PHOTO 2 Use the LIGHT and DARK keys to adjust the copy density as desired Exposure adjustments...

Page 20: ... key The message DUAL PAGE COPY will be displayed A4 8 1 2 x 11 sized copy paper will be automatically selected If A4 8 1 2 x 11 copy paper is not loaded the following message will appear LOAD A4 PAPER To leave a binding margin on the copy press the MARGIN SHIFT key See page 21 The MARGIN SHIFT feature applies only to the left page on the document glass To erase shadows caused by document binding ...

Page 21: ...ginal face up in the document feeder tray or face down on the document glass NOTE When the document feeder is used the amount of edge erase and centre erase will vary with the copy ratio However when the document glass is used the amount will be constant 2 Press the ERASE key The following message will appear for several seconds EDGE ERASE CENTRE ERASE or both are highlighted depending on the sett...

Page 22: ...E using the 10 key pad 4 Select the desired erase mode using the 10 key pad The selected erase mode will return to the initial setting when the ERASE key is pressed again 5 Make all other desired copier selections and press the START key The ERASE feature will work only when standard size copy paper is used ERASE CENTRE ERASE EDGE ERASE USE 10 KEY PAD TO SELECT ERASE MODE EDGE CENTRE EDGE CENTRE E...

Page 23: ...the text or image to the right both on one sided copies and on the front side of two sided copies The text or image is shifted to the left on the reverse side of two sided copies Shift direction can be changed in the manner described below in steps 3 through 5 The standard shift setting is 9 mm 1 4 but can be changed to 0 mm 3 mm 6 mm 12 mm or 15 mm 0 1 8 3 8 1 2 or 5 8 as desired KEY OPERATOR The...

Page 24: ...ect the margin shift amount for the reverse side The selected shift amounts will be highlighted To correct an entry error press the SCROLL DISPLAY key The following message will appear after the selection of a margin shift amount if shift direction change has been enabled with key operator program P42 Margin shift MARGIN SHIFT MARGIN SHIFT RIGHT 9mm SIDE 2 LEFT 9mm SELECT SHIFT AMOUNT WITH 10 KEY ...

Page 25: ...ettings when the MARGIN SHIFT key is pressed again 6 Ensure that the desired paper tray is selected 7 Enter the desired number of copies 8 Press the START key MARGIN SHIFT Margin shift 3 6 9 C START 1 2 3 4 5 6 7 8 9 C 0 AUDIT CLEAR TRAY SELECT INFORMATION 3 A3 A4 A4R A4R AUTO PAPER SELECT ORIGINAL 2 1 A4 1 2 3 4 5 6 7 8 9 C 0 AUDIT CLEAR ...

Page 26: ...See page 8 for the stream feeding mode 1 Place the originals face up in the document feeder tray 2 Press the COVERS INSERTS key If the 1 sided to 1 sided mode was previously selected the following message will appear Otherwise the message in step 3 will appear USE 10 KEY PAD TO SELECT ORIGINAL TO COPY MODE IT IS NOT POSSIBLE TO CHANGE MODE AFTER THIS FUNCTION IS SET 1 1 1 1 2 EVEN NUMBER ORIGINALS...

Page 27: ...ected the first page of the document will be copied onto the front cover sheet In either case the following message will appear USE DOCUMENT FEEDER LOAD COVER STOCK INTO MANUAL FEED TRAY 7 Load the cover stock into the manual feed tray making sure that the cover stock is the same size as the copy paper The START key indicator will light up 8 Enter the desired number of copies and press the START k...

Page 28: ...ways be off See page 8 for the stream feeding mode Some examples of insert sheet placement When 1 sided copies are to be made Insert sheets can be placed with or without printing on them See page 27 for inserts with printing See page 30 for inserts without printing When 2 sided copies are to be made Copying onto insert sheets in this mode is possible only on the front side The chapters of the orig...

Page 29: ...NAL TO COPY key the message in step 4 will appear USE 10 KEY PAD TO SELECT ORIGINAL TO COPY MODE IT IS NOT POSSIBLE TO CHANGE MODE AFTER THIS FUNCTION IS SET 1 1 1 1 2 EVEN NUMBER ORIGINALS 2 ODD NUMBER ORIGINALS 3 2 2 4 2 1 5 4 Press key 1 or key 5 on the 10 key pad to select a 1 sided copy mode The selected item will be highlighted and then the following message will appear 1 2 3 4 5 6 1 2 3 4 5...

Page 30: ...he message PRINT ON THE CHAPTER PAGES USE 10 KEY PAD TO SELECT YES PRESS 1 NO PRESS 2 will appear 7 Press key 1 on the 10 key pad to select YES The following message will appear 8 Use the 10 key pad to designate the position of the first original to be copied onto an insert sheet and then press the PROGRAM key In this example press key 3 and then the PROGRAM key The entered number will be displaye...

Page 31: ...g message will appear 10 Use the 10 key pad to select a tray for insert sheets and load the insert stock into that tray The insert stock must be the same size as the copy paper 11 Make all other copier selections and press the START key INSERTS TO RETURN PRESS USE 10 KEY PAD TO INDICATE TRAY FOR INSERT PAPER 4 4 1 TRAY 1 2 TRAY 2 3 TRAY 3 0 MANUAL FEED TRAY 3 6 9 C START 1 2 3 4 5 6 7 8 9 C 0 AUDI...

Page 32: ...NAL TO COPY key the message in step 4 will appear USE 10 KEY PAD TO SELECT ORIGINAL TO COPY MODE IT IS NOT POSSIBLE TO CHANGE MODE AFTER THIS FUNCTION IS SET 1 1 1 1 2 EVEN NUMBER ORIGINALS 2 ODD NUMBER ORIGINALS 3 2 2 4 2 1 5 4 Press key 1 or key 5 on the 10 key pad to select a 1 sided copy mode The selected item will be highlighted and then the following message will appear 6 5 4 3 5 6 1 2 3 4 1...

Page 33: ... tray The message PRINT ON THE CHAPTER PAGES USE 10 KEY PAD TO SELECT YES PRESS 1 NO PRESS 2 will appear 7 Press key 2 on the 10 key pad to select NO The following message will appear 8 Use the 10 key pad to designate the first original position to be preceded by an insert sheet and then press the PROGRAM key In this example press key 3 and then the PROGRAM key The entered number will be displayed...

Page 34: ...g message will appear 10 Use the 10 key pad to select a tray for insert sheets and load the insert stock into that tray The insert stock must be the same size as the copy paper 11 Make all other copier selections and press the START key 3 6 9 C START INSERTS TO RETURN PRESS USE 10 KEY PAD TO INDICATE TRAY FOR INSERT PAPER 4 4 1 TRAY 1 2 TRAY 2 3 TRAY 3 0 MANUAL FEED TRAY 1 4 P CA PROGRAM CLEAR ALL...

Page 35: ...y 4 Press the COVERS INSERTS key If the 1 1 mode was previously selected the following message will appear If the 1 2 or 2 2 mode has been selected with the ORIGINAL TO COPY key the message in step 5 will appear USE 10 KEY PAD TO SELECT ORIGINAL TO COPY MODE IT IS NOT POSSIBLE TO CHANGE MODE AFTER THIS FUNCTION IS SET 1 1 1 1 2 EVEN NUMBER ORIGINALS 2 ODD NUMBER ORIGINALS 3 2 2 4 2 1 5 5 Press key...

Page 36: ...ocument feeder tray The message PRINT ON THE CHAPTER PAGES USE 10 KEY PAD TO SELECT YES PRESS 1 NO PRESS 2 will appear 8 Press key 1 on the 10 key pad to select YES The following message will appear The insert sheets can be copied on but only on the front sides The rear side of a 2 sided original designated as an insert will not be copied COVERS AND INSERTS USE 10 KEY PAD TO SELECT COVERS INSERTS ...

Page 37: ...er page numbers in ascending order To correct an entry error press the SCROLL DISPLAY key The following message will appear 11 Use the 10 key pad to select a tray for insert sheets and load the insert stock into that tray The insert stock must be the same size as the copy paper 12 Make all other copier selections and press the START key INSERTS TO RETURN PRESS USE 10 KEY PAD TO INDICATE TRAY FOR I...

Page 38: ...t feeder tray 4 Press the COVERS INSERTS key If the 1 1 mode was previously selected the following message will appear If the 1 2 or 2 2 mode has been selected with the ORIGINAL TO COPY key the message in step 5 will appear USE 10 KEY PAD TO SELECT ORIGINAL TO COPY MODE IT IS NOT POSSIBLE TO CHANGE MODE AFTER THIS FUNCTION IS SET 1 1 1 1 2 EVEN NUMBER ORIGINALS 2 ODD NUMBER ORIGINALS 3 2 2 4 2 1 5...

Page 39: ...message PRINT ON THE CHAPTER PAGES USE 10 KEY PAD TO SELECT YES PRESS 1 NO PRESS 2 will appear 8 Press key 2 on the 10 key pad to select NO The following message will appear 9 Use the 10 key pad to designate the first original position to be preceded by an insert sheet and then press the PROGRAM key In this example press key 5 and then the PROGRAM key The entered number will be displayed on the bo...

Page 40: ...ng message will appear 11 Use the 10 key pad to select a tray for insert sheets and load the insert stock into that tray The insert stock must be the same size as the copy paper 12 Make all other copier selections and press the START key INSERTS TO RETURN PRESS USE 10 KEY PAD TO INDICATE TRAY FOR INSERT PAPER 4 4 1 TRAY 1 2 TRAY 2 3 TRAY 3 0 MANUAL FEED TRAY 3 6 9 C START 1 4 P CA PROGRAM CLEAR AL...

Page 41: ...ge in step 4 will appear USE 10 KEY PAD TO SELECT ORIGINAL TO COPY MODE IT IS NOT POSSIBLE TO CHANGE MODE AFTER THIS FUNCTION IS SET 1 1 1 1 2 EVEN NUMBER ORIGINALS 2 ODD NUMBER ORIGINALS 3 2 2 4 2 1 5 4 Select the desired copy mode by pressing key 1 2 3 4 or 5 on the 10 key pad The selected item will be highlighted and then the following message will appear COVERS AND INSERTS USE 10 KEY PAD TO SE...

Page 42: ...l be counted When counting is completed replace the originals in the document feeder tray The following message will appear 7 Select cover placement by pressing key 1 2 or 3 on the 10 key pad If FRONT or FRONT BACK is selected the message PRINT ON FRONT COVER USE 10 KEY PAD TO SELECT YES PRESS 1 NO PRESS 2 will appear 8 Select YES or NO by pressing key 1 or 2 on the 10 key pad The message PRINT ON...

Page 43: ...tep 8 on page 34 To place insert sheets without printing in the 2 sided copy mode go to step 8 on page 37 When different types of paper are to be used for cover stock and insert sheets load insert sheets into any tray other than the manual feed tray and cover stock into the manual feed tray If the same paper stock is to be used for cover stock and insert sheets load the stock into the manual feed ...

Page 44: ...ing Front cover without printing Insert sheets without printing 2 sided to 2 sided copy mode Front cover with printing Insert sheets with printing Front cover without printing Insert sheets with printing Front cover with printing Insert sheets without printing Front cover without printing Insert sheets without printing 3 6 3 6 3 5 3 5 4 9 5 10 4 8 5 9 5 11 5 11 5 9 5 9 Examples of positions to be ...

Page 45: ...ided modes A multiple number of copies cannot be selected in this mode Transparency film must be fed from the manual feed tray Insert sheets must be the same size as the transparency film 1 Place the originals face up in the document feeder tray or face down on the document glass 2 Press the TRANSPARENCY INSERTS key The following message will appear Transparency film with insert sheets 2 3 4 4 3 2...

Page 46: ... as the transparency film 6 Make all other selections and press the START key When copying is completed remove remaining transparency film TRANSPARENCY FILM WITH INSERT SHEETS Transparency film with insert sheets 1 2 3 4 5 6 7 8 9 C 0 AUDIT CLEAR 3 6 9 C START TRANSPARENCY INSERTS PRINT ON THE INSERT SHEETS USE 10 KEY PAD TO SELECT 1 1 2 2 1 2 YES PRESS 1 NO PRESS 2 TRAY SELECT INFORMATION 3 AUTO ...

Page 47: ...GRAM NUMBER 1 2 3 4 5 6 TO STORE OR DELETE PROGRAMS PRESS 0 The numbers which appear in the display are program numbers which have been used The dashes in the display show unused program numbers 2 Press the 0 key The following message will appear USE 10 KEY PAD TO SELECT MODE 1 STORE 2 DELETE To cancel the job memory mode press the CLEAR ALL key 3 Press key 1 on the 10 key pad The following messag...

Page 48: ...ory Recalling a job program 1 Press the PROGRAM key The following message will appear TO RECALL A PROGRAM PRESS PROGRAM NUMBER 1 2 3 4 5 6 7 8 9 TO STORE OR DELETE PROGRAMS PRESS 0 The numbers which appear in the display are program numbers which have been used 2 Use the 10 key pad to select a stored program from 1 to 9 All selections stored in the program will be reflected on the operation panel ...

Page 49: ... which have been fed into the document feeder The copier will return to the initial settings If this copier has been programmed in the auditing mode the account number entry message will appear Enter your account number using the 10 key pad The number of copies of the interrupt copying will be accumulated against this account number 2 When the copier stops remove the original s and set the origina...

Page 50: ...n regions 8 1 2 x 11 is indicated as 216 mm x 279 mm and or 216 mm x 330 mm 8 1 2 x 13 size paper can be used additionally in paper trays 1 to 3 A4 8 1 2 x 11 is the maximum size that can be manually fed for paper weighing from 104 to 128 g m2 28 to 34 lbs Loading copy paper OPEN TRAY AND ADD PAPER will be displayed when there is no copy paper in a selected paper feed station When a selected paper...

Page 51: ...ently lift and pull out the paper tray 2 Fan the copy paper and insert it into the tray Each tray holds 500 sheets of paper Do not load paper above the maximum height line 3 Push the paper tray firmly back into the copier PAPER Paper Maximum height line ...

Page 52: ... INSTRUCTIONS ON HOW TO ADD TONER indicating that the toner supply is empty Toner can be added any time after the message TONER SUPPLY IS LOW PRESS THE KEY FOR INSTRUCTIONS appears To add toner proceed as below When either of these messages appears you can use the INFORMATION and SCROLL DISPLAY keys for detailed information as necessary During long copy runs of multiple originals containing many i...

Page 53: ...elease all toner into the toner hopper It will take about 30 seconds for the toner to flow into the toner hopper Do not remove the toner cartridge until it becomes empty 7 Slide the empty toner cartridge back along the guides and remove it The cartridge opening will be closed as it is moved back along the guides 8 Close the toner hopper cover NOTE Add only one cartridge of toner ADDING TONER Addin...

Page 54: ...use patterns and environmental conditions The automatic adjustments are made in response to a sensor that detects the reflectance characteristics of a special area of the drum WARNING This feature requires drums containing the special reflectance area recommended genuine SHARP photoconductive drum If you use other drums the process control system cannot run properly To prevent improper control and...

Page 55: ...TED AREA PRESS THE KEY FOR RECOVERY INSTRUCTIONS will appear with a display of paper misfeed locations Press the INFORMATION and SCROLL DISPLAY keys for more detailed information as necessary If paper becomes accidentally torn during removal be sure to remove all pieces Be careful not to damage the photoconductive drum or the corona wires Misfeed in the RADF When the RADF misfeeds an original shee...

Page 56: ...e original out Be sure to open and close the document feeder cover to cancel the misfeed display C Open the feeding roller cover and the document feeder cover and remove the original NOTE After misfed originals are removed from locations A B and or C a message will appear indicating the number of originals which must be returned to the document feeder tray Return the originals and press the START ...

Page 57: ...rays 1 to 3 1 Open the right front door 2 Open the paper guide at the right side of paper trays 1 to 3 and remove any misfed paper Be careful not to tear the misfed paper during removal Be sure to perform this step before pulling out a paper tray If this step is not performed first misfed paper may be torn A MISFEED HAS OCCURRED CLEAR INDICATED AREA PRESS THE KEY FOR RECOVERY INSTRUCTIONS Paper gu...

Page 58: ...lose the right front door Confirm that the misfeed display is cleared Misfeed in the manual feed tray 1 Pull out the misfed paper 2 Open the right front door of the copier and then close it to cancel the misfeed display A MISFEED HAS OCCURRED CLEAR INDICATED AREA PRESS THE KEY FOR RECOVERY INSTRUCTIONS Paper guide ...

Page 59: ... Push the paper guide release button to open the paper guide 4 Turn the roller rotating knob in the direction of the arrow and remove the misfed paper Be careful not to tear the misfed paper during removal Roller rotating knob Duplex section Paper guide A MISFEED HAS OCCURRED CLEAR INDICATED AREA PRESS THE KEY FOR RECOVERY INSTRUCTIONS ...

Page 60: ...guide and gently push back the duplex section 6 Close the front doors Confirm that the misfeed display is cleared Misfeed in the paper transport area 1 Open the front doors of the copier A MISFEED HAS OCCURRED CLEAR INDICATED AREA PRESS THE KEY FOR RECOVERY INSTRUCTIONS ...

Page 61: ... in the direction of the arrow to remove the misfed paper CAUTION Be careful not to damage the photoconductive drum or the corona wires 4 Turn the transport lever back in the direction of the arrow 5 Close the front doors Confirm that the misfeed display is cleared Photoconductive drum Roller rotating knob Transport lever ...

Page 62: ...paper 3 If the misfed paper is in the exit area open the exit area cover carefully Open the cover while pulling the lever up and supporting it until fully open If an optional sorter is installed slide it away from the copier and then open the cover 4 Turn the roller rotating knob in the direction of the arrow and remove the paper A MISFEED HAS OCCURRED CLEAR INDICATED AREA PRESS THE KEY FOR RECOVE...

Page 63: ...reen roller rotating knob 5 Close the exit area cover 6 Close the front doors Confirm that the misfeed display is cleared Misfeed in the duplex section NOTE If any other misfeed locations are indicated be sure to remove any misfed paper from these locations and then perform the procedure described below 1 Open the front doors A MISFEED HAS OCCURRED CLEAR INDICATED AREA PRESS THE KEY FOR RECOVERY I...

Page 64: ...ED REMOVAL COPIER TROUBLE Misfeed removal 2 Pull out the duplex section 3 Remove the paper on the duplex tray 4 Open the paper guide under the duplex tray and remove the misfed paper Paper guide Duplex section ...

Page 65: ...Misfeed removal 5 Close the paper guide and push back the duplex section Close the paper guide securely Push back the duplex section securely into its original position 6 Close the front doors Confirm that the misfeed display is cleared ...

Page 66: ... on Turn the power switch on Is the message REPLACE USED TONER CONTAINER displayed Toner collecting container is full Contact your Sharp Service Centre Is steadily lit in the copy quantity display Copies are too dark or too light Copy density properly adjusted See page 17 Blank copies Is the original placed face up in the document feeder tray or face down on the document glass Place the original f...

Page 67: ...e 68 Use standard paper If using special papers feed the paper through the manual feed tray Non standard paper used If a problem persists after checking the above please consult your key operator prior to contacting your authorised Sharp Service Centre Self diagnostic function An automatic self diagnostic function is built into this copier Should the copier malfunction the self diagnostic function...

Page 68: ... 50 originals i Document feeder cover Open to make copies from the document glass o Document glass All originals which cannot be copied from the RADF must be copied here 0 RADF exit area Finished originals are output from here 1 RADF exit roller cover Open to remove misfed originals 2 Toner hopper cover Lift to add toner when a message appears in the display indicating the need to do so 3 Power sw...

Page 69: ...t section 2 Photoconductive drum Copy images are formed on the drum 3 Roller rotating knobs Turn as indicated to remove misfed paper 4 Duplex section Duplex copies are inverted here 5 Toner collecting container Used toner is collected here Replacement of toner collecting container should only be done by an authorised Sharp service technician Accessories Operation manual 1 Corona cleaner 1 PART LOC...

Page 70: ... for more information when the symbol appears at the end of a message Displays the total number of copies made to date if pressed during standby Press to change the parameters for the MARGIN SHIFT ERASE and STAPLE SORT features 2 INFORMATION key and indicator p 6 Press for operation guidance on use of various features of this copier Press for guidance when a misfeed occurs or when adding toner 3 P...

Page 71: ...l settings can be programmed as desired The auto clear time can also be changed See pages 119 and 117 PART LOCATIONS AND FUNCTIONS Two sided copies from two sided originals One sided copies from two sided originals Indicates that the number of originals will be counted 8 EXPOSURE keys p 17 LIGHT key Used to adjust the exposure level in the MANUAL or PHOTO mode to give lighter copies AUTO MANUAL PH...

Page 72: ...kept clean to avoid dirty areas from being copied onto the copies Document glass and RADF transport belt Wipe the document glass and transport belt with a soft clean cloth If necessary dampen the cloth with water Do not use thinner benzene or similar volatile cleaning agents User maintenance ...

Page 73: ...N MAINTENANCE REQUIRED When the message READY TO COPY MAINTENANCE REQUIRED appears service by an authorised Sharp Service Technician will be required soon Contact your Service Centre as soon as possible Maintenance required ...

Page 74: ...y ratio Variable 50 to 200 in 1 increments total 151 steps Fixed presets 50 70 81 86 100 115 122 141 200 50 64 77 95 100 121 129 141 200 Exposure system Moving optical source slit exposure stationary platen with automatic exposure function Copy paper feed Three paper trays with automatic feed 500 sheets each and one manual feed tray with 100 sheet automatic feed capability Fusing system Heat rolle...

Page 75: ...4 and A3 8 1 2 x 14 and 11 x 17 originals Size A5 to A3 5 1 2 x 8 1 2 to 11 x 17 Capacity Up to 50 sheets for A5 A4 and B4 5 1 2 x 8 1 2 8 1 2 x 11 and 8 1 2 x 14 originals provided the total aggregate thickness does not exceed 6 5 mm or 1 4 50 to 80 g m2 or 14 to 21 lbs or 5 mm or 3 16 80 to 128 g m2 or 21 to 34 lbs Up to 30 sheets for A3 11 x 17 originals In some regions the reversing automatic ...

Page 76: ...74 GENERAL INFORMATION MEMO ...

Page 77: ...BIN STAPLE SORTER SF S53N 20 BIN STAPLE SORTER SF S55N 82 Part names 82 Using a staple sorter 83 Sorter capacities 84 Staple sort 85 Manual stapling 88 Staple cartridge replacement 90 Staple jam removal 93 Misfeed removal 97 Specifications 100 LARGE CAPACITY TRAY SF C52 SF C52N 101 Part names 101 Specifications 101 Loading copy paper 102 Misfeed removal 103 OPTIONAL EQUIPMENT ...

Page 78: ...3N and SF S55N and Large Capacity Tray SF C52 SF C52N For the Card Counter SF EA11 Auditor SF EA12 and Counter Commander SF EA13 see their manual 20 bin sorter SF S16 20 bin staple sorter SF S53N 20 bin staple sorter SF S55N Exit tray Sold separately in some regions Large capacity tray SF C52 SF C52N Card counter SF EA11 Auditor SF EA12 Counter commander SF EA13 Personal counter SF 71A 71B ...

Page 79: ...ups copies from different originals into separate sort bins The maximum allowable number of copies varies with the selected mode The number of copies will be automatically reset to the maximum number allowable for the selected mode when copying begins if this maximum is exceeded PART NAMES CAUTION Do not put pressure on the sorter or subject it to undue force Top cover Sort bins 20 bin sorter SF S...

Page 80: ...to special papers such as transparency film or label stock SORT Press the SORTER key to select the SORT mode SORT is used for automatic copy collating Copies of each original will be sequentially deposited in the sort bins GROUP Press the SORTER key to select the GROUP mode In the GROUP mode all copies of the same original will be deposited in the same bin Using the sorter GROUP SORT SORT STAPLE S...

Page 81: ...de after copying starts When making one sided copies from two sided originals the maximum number of originals that can be copied is half the number shown in the above table Do not use special paper in the SORTor GROUP mode Max No Max No Mode Paper size of of copies originals to be set Min A6 NON 5 1 2 x 8 1 2 100 SORT Max A3 11 x 17 A4 A4R B4 A3 SORT 8 1 2 x 11 50 20 8 1 2 x 11 8 1 2 x 11 R 8 1 2 ...

Page 82: ...orter back against the copier Confirm that the misfeed display is cleared If the message indicating a misfeed is still displayed check the inside of the copier and remove any remaining misfed paper Misfeed removal The copier will stop when a misfeed occurs The message A MISFEED HAS OCCURRED CLEAR INDICATED AREA PRESS THE KEY FOR RECOVERY INSTRUCTIONS will appear with a display of paper misfeed loc...

Page 83: ... sheets Paper size Top bin Max A3 11 x 17 Min A6 5 1 2 x 8 1 2 Sort bins Max A3 11 x 17 Min A4 8 1 2 x 11 Power supply Drawn from the copier Weight Approx 31 kg 68 4 lbs Dimensions 500 mm W x 520 mm D x 883 mm H 19 11 16 W x 20 31 64 D x 34 49 64 H Specifications are subject to change for improvement without notice 20 bin sorter SF S16 ...

Page 84: ...matically move toward the front side of the staple sorter after copying is completed so that copies can be easily taken out After the copies move the next copy run can be started without taking out the copies if the copy paper size for the next copy run is A5 A4 or 8 1 2 x 11 5 1 2 x 8 1 2 8 1 2 x 11 or A4 Even if the automatic front access function has been disabled the copies can be moved toward...

Page 85: ...f each original will be sequentially deposited in the sort bins STAPLE SORT Press the SORTER key to select the STAPLE SORT mode In this mode copies will be automatically sorted and finished sets of copies will be automatically stapled when used in conjunction with the RADF GROUP Press the SORTER key to select the GROUP mode In the GROUP mode all copies of the same original will be deposited in the...

Page 86: ... 50 11 8 1 2 x 11 R A4 B4 A3 25 8 1 2 x 14 11 x 17 Staple Sort Mode Paper size Bin capacity max A4 A4R 8 1 2 x 11 8 1 2 x 11 50 8 1 2 x 11 R A4 B4 A3 25 8 1 2 x 14 11 x 17 Group Mode Paper size Bin capacity max A5 A4 8 1 2 x 11 5 1 2 x 8 1 2 8 1 2 x 30 11 A4 A4R B4 A3 8 1 2 x 25 11 R 8 1 2 x14 11 x17 The limits for the number of originals which can be used and the number of copies that can be set ...

Page 87: ...fault position for the SF S55N 2 Press the SORTER key to select the STAPLE SORT mode Make sure that there is no paper in any sort bin before selecting the STAPLE SORT mode If the auto paper select mode has been enabled the paper tray with the corresponding paper size will be automatically selected If the 20 bin staple sorter SF S55N is installed copy paper sizes which can be used depend on the sta...

Page 88: ... SORT mode If the auto paper select mode has been enabled the paper tray with the corresponding paper size will be automatically selected If the 20 bin staple sorter SF S55N is installed copy paper sizes which can be used depend on the stapling position If a copy paper size which cannot be used for the initial stapling position setting is selected the START key indicator will go out Select another...

Page 89: ... SELECT PRESS 1 PRESS 2 PRESS 3 A4R A4R A3 B4 A3 B4 A4 A4 CORNER TWO STAPLE ONE STAPLE If a MARGIN SHIFT mode or an ERASE mode has been selected a selection display for MARGIN SHIFT ERASE and STAPLE POSITION will appear Select STAPLE POSITION using the 10 key pad 3 Select the desired stapling position s using the 10 key pad Check the copy paper size to be used when performing this selection The po...

Page 90: ...re Make sure that there is no paper in the other sort bins If there is the manual staple key will not light up Up to 50 sheets of paper can be stapled together Exceeding this maximum may result in damage to the stapler 3 Press the manual staple key on the staple sorter when it lights up The set of copies will be stapled The manual stapling function can also be used after copying in the SORT mode i...

Page 91: ...of the staple sorter CORNER can be selected for all sizes However TWO STAPLE can be selected only for A4 B4 A3 and 8 1 2 x 11 8 1 2 x 11 11 x 17 and A4 sizes 4 Press the STAPLING START STOP key on the staple sorter when it lights up The set of copies will be stapled The manual stapling function can also be used after copying in the SORT mode is completed if the number of copies does not exceed the...

Page 92: ...rtridge and check to ensure that the staples are all stacked within the cartridge No staples should be protruding into the staple guide If any are protruding push them back into the staple cartridge The cartridge holds 5 000 staples 4 Insert the new staple cartridge into the stapler until it clicks into place 5 Close the stapler cover 6 Place a sheet of paper into the bin below the non sort bin Pr...

Page 93: ...is displayed Doing so will cause the stapler to jam 4 Push the green button and remove the thick paper from inside the staple box 5 Insert the new staple cartridge into the box until it clicks in place Insert the new cartridge by aligning the arrows on the cartridge with those on the box Check that the cartridge locks in place by pulling it slightly The cartridge holds 5 000 staples NOTE Be sure n...

Page 94: ...f the staple sorter 10Place a sheet of paper into the bin below the non sort bin Press the STAPLING START STOP key on the staple sorter when it lights up Check to see whether the sheet is stapled If it is not stapled press the STAPLING START STOP key again If the stapler does not operate properly even after replacement a staple may be jammed in it See page 95 Staples for the staple sorter are avai...

Page 95: ...Use caution in handling the stapler unit so that the cable does not become damaged 4 Press down and hold the green release lever on top of the stapler unit and slide the green lever on the face of the stapler up to expose the jammed staple Staple jam removal If staples become jammed in the stapler REMOVE THE STAPLER AND CHECK IT will be displayed Remove the jammed staples in the manner described b...

Page 96: ... their original positions before the stapler unit is reinstalled the stapler will jam again and may be damaged 7 Place the stapler unit back into position Tighten the stapler unit securing screw 8 Close the stapler cover and turn on the copier 9 Following the stapling procedure on page 88 staple a copy to check that the stapler works properly If it does not repeat this procedure until the stapler ...

Page 97: ...s the green button to unlock the stapler 4 Unlock the stopper to open the staple cover Use one finger to unlock the stopper and at the same time gently push up the metal tab with another finger 5 Use the tool attached to the inside of the front cover of the staple sorter to remove jammed staples 20 BIN STAPLE SORTER SF S55N Green lever Staple cover Stopper 20 bin staple sorter SF S55N ...

Page 98: ... the stopper 7 Gently push back the staple unit until it clicks 8 Close the front cover of the staple sorter 9 Following the stapling procedure on page 89 staple a copy to check that the stapler works properly If it does not repeat this procedure until it does 20 BIN STAPLE SORTER SF S55N 20 bin staple sorter SF S55N ...

Page 99: ...ease lever carefully pull the staple sorter away from the copier 2 Open the paper guide 3 Remove the misfed paper and return the paper guide to its original position 4 While holding the sorter release lever push the staple sorter toward the copier and latch it into place Confirm that the misfeed display is cleared If the message indicating a misfeed is still displayed check the inside of the copie...

Page 100: ...ve the misfed paper If the misfed paper is not visible or is difficult to remove rotate the green knob as shown to remove the misfed paper NOTE It may not be possible to open the paper guides shown in the figures if paper misfeed occurs when the stapling portion has moved If so remove the paper via the bins in accordance with steps 5 and 6 on the next page Paper guide Paper guide Paper guide Green...

Page 101: ...d location and press the bin up key or the bin down key on the staple sorter depending on the misfeed location If the paper is misfed above the wide interval bin press the bin down key If the paper is misfed below the wide interval bin press the bin up key 6 Remove the misfed paper to the left Confirm that the misfeed display is cleared If the message indicating a misfeed is still displayed check ...

Page 102: ...D x 37 13 32 H SF S55N No of bins 21 Non sort bin 20 sort bins Bin capacity NON SORT 250 sheets for non sort bin SORT 50 sheets A5 A4 A4R and 8 1 2 x 11 5 1 2 x 8 1 2 8 1 2 x 11 8 1 2 x 11 R and A4 25 sheets B4 and A3 8 1 2 x 14 and 11 x 17 STAPLE 50 sheets A4 A4R and 8 1 2 x 11 SORT 8 1 2 x 11 8 1 2 x 11 R and A4 25 sheets B4 and A3 8 1 2 x 14 and 11 x 17 GROUP 30 sheets A5 A4 and 8 1 2 x 11 5 1 ...

Page 103: ...23 mm H 11 37 64 W x 21 7 64 D x 20 19 32 H Specifications are subject to change for improvement without notice Paper tray release button Paper tray release button lamp LARGE CAPACITY TRAY SF C52 SF C52N The large capacity tray provides the convenience of increased paper capacity for this copier This tray holds 3 000 sheets of A4 8 1 2 x 11 sized paper PART NAMES Large capacity tray SF C52 SF C52N...

Page 104: ... the release button lamp goes out 3 Fan the copy paper 4 Load it onto the feed table Be sure to load paper appropriate for the large capacity tray See page 101 Do not exceed the maximum height line 5 Gently push back the large capacity tray The release button lamp will blink as the feed table returns to the feed position and will light up steadily when it is in position to feed Loading copy paper ...

Page 105: ...de at the area where paper is fed from the large capacity tray and remove any misfed paper Be careful not to tear the misfed paper during removal Be sure to perform this step before pulling out the large capacity tray If this step is not performed properly misfed paper may be torn If you let go of the paper guide it will automatically return to its original position 3 Close the right front door so...

Page 106: ...ing out the large capacity tray be sure to pull it out after the release button lamp goes out 5 Gently push back the large capacity tray 6 Open the right front door of the copier and then close it to cancel the misfeed display LARGE CAPACITY TRAY SF C52 SF C52N Large capacity tray SF C52 SF C52N ...

Page 107: ...e programs can only be accessed after a key operator code number has been entered Please familiarise yourself with this section and refer to it for the information you need to keep the SF 2052 operating smoothly CONTENTS Page KEY OPERATOR CODE NUMBER P19 106 Registering the key operator code number 106 KEY OPERATOR PROGRAMS 107 Using the key operator programs 110 KEY OPERATOR ASSISTANCE CALL 128 K...

Page 108: ... in the message will change to asterisks When the entry is complete a P will appear in the copy quantity display and the following message will appear INPUT A PROGRAM NUMBER AND PRESS THE START KEY 3 Enter the number 19 using the 10 key pad and press the START key The following message will appear P19 KEY OPERATOR CODE NUMBER CHANGE INPUT A NEW CODE AND PRESS THE START KEY 4 Choose a new 5 digit c...

Page 109: ... selectively resets 111 individual accounts P14 Account Number Registers accounts deletes accounts changes 112 Control an account number or displays all registered account numbers P16 Account Limit Sets the maximum number of copies which can be 114 Setting made against a registered account number P18 Account Number Guards against trial and error entering of audit 115 Security account numbers P19 K...

Page 110: ...red in job 121 of Inserts in Job memory Program Memory P45 Message Time Sets the length of time that messages are displayed 121 Setting P46 Require Key Prevents the copier from being started by people 121 Operator Code other than key operator P47 Stream Feeding Enables the stream feeding mode for copying 122 Mode from the document feeder P50 Staple Position Sets the initial stapling position setti...

Page 111: ...tions P75 Disabling of Duplex Temporarily prevents the duplex system from ope 125 Copying rating when it malfunctions Allows the use of the copier but not the duplex system P76 Disabling of Prevents damage to the stapler while awaiting 126 Stapler repair service Staple sorters are optional P77 Disabling of Covers Prevents the selection of COVERS INSERTS 126 and Inserts Mode mode P83 Enabling of Pr...

Page 112: ...e START key If a mistake is made during entry press the clear key to clear the entry The message display will show the number and name of the program In some programs the current setting will be displayed or highlighted in the message display 4 Follow instructions for the program When all steps for the program have been completed or when the PROGRAM key is pressed to exit the program a P will appe...

Page 113: ...sable the auditing mode press key 2 P11 Number of Copies per Account Program P11 is used to display the total number of copies made against each account number An A3 11 x 17 copy is counted as two copies When P11 is entered the following message will appear P11 NUMBER OF COPIES PER ACCOUNT INPUT ACCOUNT NUMBER TO BE DISPLAYED AND PRESS THE START KEY ACCOUNT NUMBER NUMBER OF COPIES MADE 1 Input the...

Page 114: ...n account number or display all account numbers When P14 is entered the following message will appear P14 ACCOUNT NUMBER CONTROL 1 ENTER 2 DELETE 3 CHANGE 4 DISPLAY To register accounts 1 Press key 1 The following message will appear P14 ACCOUNT NUMBER CONTROL INPUT ACCOUNT NUMBER TO BE REGISTERED AND PRESS THE START KEY 2 Enter a 5 digit account number 00001 to 99999 Select a number different fro...

Page 115: ...nter the account number to be deleted 4 Press the START key 5 Continue with steps 3 and 4 for other account num bers Press the PROGRAM key to exit the program To change an account number 1 Press key 3 The following message will appear P14 ACCOUNT NUMBER CONTROL INPUT ACCOUNT NUMBER TO BE CHANGED AND PRESS THE START KEY 2 Enter the account number to be changed 3 Press the START key The following me...

Page 116: ...ng message will appear P16 ACCOUNT LIMIT SETTING 1 SET LIMIT 2 CANCEL LIMIT To set a limit 1 Press key 1 The following message will appear P16 ACCOUNT LIMIT SETTING INPUT ACCOUNT NUMBER TO BE LIMITED AND PRESS THE START KEY 2 Enter the account number to be limited To set a limit for all accounts skip the account number entry and proceed to the next step 3 Press the START key The following message ...

Page 117: ...ll appear P16 ACCOUNT LIMIT SETTING CANCEL ALL ACCOUNTS 1 YES 2 NO 3 Press key 1 P18 Account Number Security Program P18 is used to make it difficult for users to gain access to accounts by entering code numbers through trial and error If P18 is selected and an operator enters three successive invalid account numbers the copier will not accept another number for one minute and the message PLEASE S...

Page 118: ...erval can be set for up to 24 hours in 10 minute increments When P21 is entered the following message will appear P21 POWER OFF TIMER SET THE TIME INTERVAL FOR POWER OFF 0 00 10 24 00 AND PRESS THE START KEY TO CANCEL PRESS THE C KEY AND THEN THE START KEY 1 Enter the time interval using the 10 key pad To disable the power off timer press the clear key 2 Press the START key P22 Toner Save Mode The...

Page 119: ...0 to 99 or the enlargement range 101 to 200 Only the added preset copy ratio can be changed The standard preset copy ratios are fixed in memory and cannot be changed When P24 is entered the following message will appear P24 ADD OR CHANGE EXTRA PRESET RATIO USE ZOOM KEYS TO SELECT NEW PRESET RATIO AND PRESS THE START KEY PRESENT NEW 1 Enter the desired copy ratio using the ZOOM keys To cancel the e...

Page 120: ...justment Set the amount of the erase area with this program When P27 is entered the following message will appear P27 ERASE WIDTH ADJUSTMENT FOR EDGE ERASE MODE 1 0 6mm 2 6 12mm 3 12 18mm 1 Make the selection for edge erase using the 10 key pad The following message will appear P27 ERASE WIDTH ADJUSTMENT FOR CENTRE ERASE MODE 1 10mm 2 15mm 3 20mm 2 Make the selection for centre erase using the 10 ...

Page 121: ...nt Program P29 is used to display the total counts of the copier document feeder duplex section and stapler An A3 11 x 17 copy is counted as two copies When P29 is entered the following message will appear P29 TOTAL COPY COUNT COPIES DOCUMENT FEEDER DUPLEX STAPLER The total counts for all units in use will be displayed Press the PROGRAM key to exit the program 1 2 3 4 5 6 7 8 9 C P CA 0 START PROG...

Page 122: ... completed The interval can be set between 1 and 120 minutes in 1 minute increments If 0 is set the preheat mode is disabled When P31 is entered the following message will appear P31 PREHEAT MODE SETTING SET THE TIME FOR PREHEAT MODE PRESS THE START KEY AFTER ENTRY 1 TO 120 MIN 1 MIN INCREMENTS 0 DISABLES PREHEAT MODE 1 Set the desired time interval using the 10 key pad 2 Press the START key P42 R...

Page 123: ... second increments When P45 is entered the following message will appear P45 MESSAGE TIME SETTING SET THE TIME FOR MESSAGES 1 TO 12 SECONDS PRESS THE START KEY AFTER ENTRY Set the time using the 10 key pad and press the START key P46 Require Key Operator Code Program P46 is used to prevent the copier from being used by people other than the key operator If this program is set the message ENTER KEY...

Page 124: ...following message will appear P47 STREAM FEEDING MODE DOCUMENT FEEDER 1 YES 2 NO To enable the stream feeding mode press key 1 To disable the stream feeding mode press key 2 P50 Staple Position Setting Program P50 is used to select the initial stapling position for an optional 20 bin staple sorter SF S55N When P50 is entered the following message will appear P50 STAPLE POSITION SETTING USE 10 KEY ...

Page 125: ...DE SETTING STAPLE SORTER SORT 1 YES 2 NO GROUP 1 YES 2 NO STAPLE SORT 1 YES 2 NO Enable or disable the automatic front access mode for the SORT GROUP and STAPLE SORT modes using the 10 key pad P52 Override Sorter Bin Capacity Limit Program P52 is used to control operation in case of bin capacity overflow of an optional staple sorter SF S53N or SF S55N If the control is cancelled copying in the STA...

Page 126: ...ion press key 2 P71 Disabling of Auto Tray Switching Program P71 prevents automatic switching between the paper trays When P71 is entered the following message will appear P71 DISABLING OF AUTO TRAY SWITCHING 1 YES 2 NO To disable auto tray switching press key 1 To restore auto tray switching press key 2 P72 Prohibiting of Manual Feed Tray in Duplex Copy Program P72 is used to disable the use of t...

Page 127: ... document feeder when it malfunctions When P74 is entered the following message will appear P74 DISABLING OF DOCUMENT FEEDER 1 YES 2 NO To prohibit use of the document feeder press key 1 To enable use of the document feeder press key 2 P75 Disabling of Duplex Copying Program P75 is used to enable or disable the duplex system If a malfunction occurs within the duplex system of the copier the system...

Page 128: ...To restore use of the modes press key 2 P83 Enabling of PC Modem Access Program P83 is used to determine whether persons other than persons who know the key operator code number will be permitted access via a computer or other equipment either directly or through a telephone line to the copier s key operator programs When P83 is entered the following message will appear P83 ENABLING OF PC MODEM AC...

Page 129: ... ALL P CODES TO SCROLL DISPLAY PRESS KEY TO RUN AN INDICATED PROGRAM PRESS START P10 AUDITING MODE P11 NUMBER OF COPIES PER ACCOUNT P13 RESETTING ACCOUNT P14 ACCOUNT NUMBER CONTROL P16 ACCOUNT LIMIT SETTING 1 Press the SCROLL DISPLAY key to advance through the list of programs Each additional press of the SCROLL DISPLAY key will advance the message display through the list of programs starting wit...

Page 130: ...am P74 to prevent the use of the PRESS THE CA KEY TO CANCEL JOB document feeder Contact your authorised Sharp Service Centre for service THE SORTER IS OUT OF SERVICE Contact your authorised Sharp Service Centre for service PRESS THE CA KEY TO CANCEL JOB This message will appear when an optional sorter or an optional staple sorter malfunctions PLEASE SELECT ANOTHER PAPER TRAY Contact your authorise...

Page 131: ...entered when accessing the Key Operator Program for the first time See page 106 NOTE The Key Operator Code Number is an important security number allowing the Key Operator to configure the copier s functions and auditor s settings You should register your own code number different from the factory setting above immediately after your copier is installed KEY OPERATOR Detach this page and store it i...

Page 132: ...MEMO ...

Page 133: ...MEMO ...

Page 134: ...PRINTED IN JAPAN 97J KS TINSE1595FCZZ SF 2052 SHARP CORPORATION ...

Reviews: