background image

7

E

MOUNTING PRECAUTIONS

•  This product is for use indoors.
•  A mounting bracket compliant with VESA specifications is 

required. 

•  Since the monitor is heavy, consult your dealer before 

installing, removing or moving the monitor.

•  Mounting the monitor on the wall requires special expertise 

and the work must be performed by an authorized SHARP 
dealer. You should never attempt to perform any of this 
work yourself. Our company will bear no responsibility 
for accidents or injuries caused by improper mounting or 

mishandling.

•  Use the monitor with the surface perpendicular to a level 

surface. If necessary, the monitor may be tilted up to 20 
degrees upward. 

•  When moving the monitor, be sure to hold it with the 

handles and the unit bottom. Do not grasp the screen, 

tray, speaker, or speaker cover. This may cause product 
damage, failure, or injury.

•  This monitor should be used at an ambient temperature 

between 41°F (5°C) and 95°F (35°C).

•  Be careful of high temperatures in the surrounding area.


When installing the monitor inside a housing, or if the 

ambient temperature may be outside of the range of 41°F 
(5°C) to 95°F (35°C), install a fan or take other measures to 
keep the ambient temperature within the required range.

•  Temperature condition may change when using the monitor 

together with the optional equipments recommended by 
SHARP. In such cases, please check the temperature 
condition specified by the optional equipments.

•  Do not block any ventilation openings. If the temperature 

inside the monitor rises, this could lead to a malfunction.

•  Do not place the monitor on a device which generates heat.

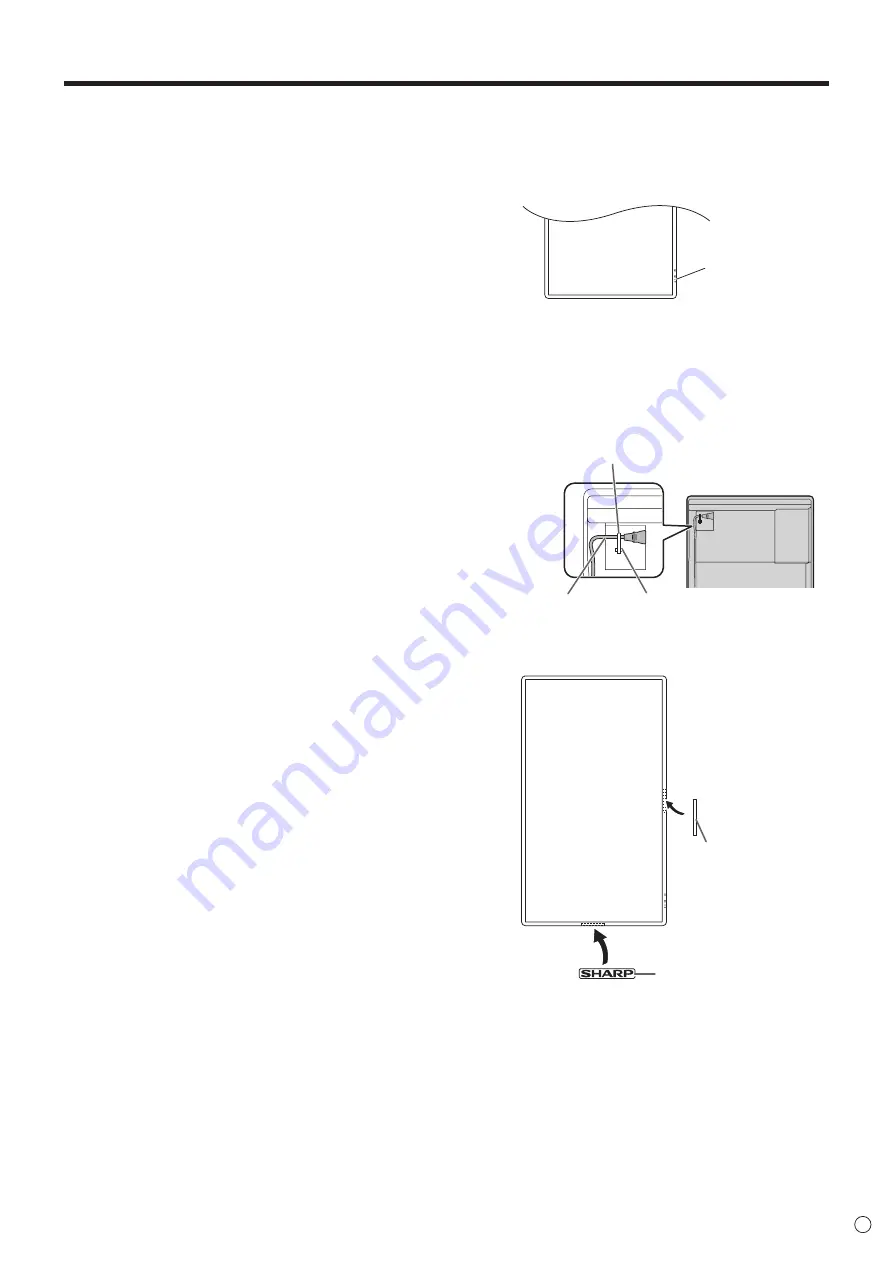
•  Adhere to the following when installing the monitor in its 

portrait orientation. Failing to adhere to the following may 

cause malfunctions. 

-  Install the monitor such that the power LED is located on 

the bottom side.

Power LED

- Set the MONITOR on the MONITOR menu to PORTRAIT.

(See page 33.)

-  Be sure to clamp the power cord (supplied) onto the cable 

clamp attachment using the supplied cable clamp. When 

clamping the power cord, take care not to stress the 
terminal of the power cord. Do not bend the power cord 
excessively.

Cable clamp 

attachment

Cable clamp

Power cord (Supplied)

•  Use the supplied vertical sticker when you install the 

monitor in portrait orientation.

Cover SHARP logo

Logo

Summary of Contents for PN-L803CA

Page 1: ...PN L803CA LCD MONITOR OPERATION MANUAL ...

Page 2: ...ORTANT To aid reporting in case of loss or theft please record the product s model and serial numbers in the space provided The numbers are located in the rear of the product Model No Serial No U S A ONLY ...

Page 3: ...tions to this equipment not expressly approved by the manufacturer could void the user s authority to operate this equipment NOTE This equipment has been tested and found to comply with the limits for Class A digital device pursuant to Part 15 of the FCC Rules These limits are designed to provide reasonable protection against harmful interference when the equipment is operated in a commercial envi...

Page 4: ...t people from stepping on them or objects from resting on them 10 The screen used in this product is made of glass Therefore it can break when the product is dropped or applied with impact Be careful not to be injured by broken glass pieces in case the screen breaks 11 Overloading Do not overload power outlets or extension cords Overloading can cause fire or electric shock 12 Entering of objects a...

Page 5: ...the user may be required to take adequate measures An apparatus with CLASS I construction shall be connected to a MAIN socket outlet with a protective earthing connection To maintain compliance with EMC regulations use shielded cables to connect to the following terminals HDMI input terminal D SUB input terminal DisplayPort input output terminals and RS 232C input terminal If a monitor is not posi...

Page 6: ...SHARP servicing dealer or service center Do not touch the screen when the monitor power is turned on it will lead to a malfunction When this occurs turn the monitor power off and then on Do not operate the screen with a hard or pointed object such as a fingernail or pencil Depending on the application used the touch pen may not function If another USB device is connected to the computer to which t...

Page 7: ... ambient temperature may be outside of the range of 41 F 5 C to 95 F 35 C install a fan or take other measures to keep the ambient temperature within the required range Temperature condition may change when using the monitor together with the optional equipments recommended by SHARP In such cases please check the temperature condition specified by the optional equipments Do not block any ventilati...

Page 8: ...necting the touch pen adapter 19 Touch Pen Preparations 19 Computer preparations 19 Touch pen actions 20 Adding touch pens pairing 20 Touch action 21 Touch action 21 Other functions 23 Cautionary points 23 Eraser 23 Basic Operation 24 Using the touch menu 24 Using the remote control unit 25 Menu Items 27 Displaying the menu screen 27 Menu item details 28 Adjustments for PC screen display 38 Initia...

Page 9: ...1 7 GHz or faster recommended Memory At least 2 GB Free space on hard drive At least 5 GB free space separately required for data storage To use the touch panel the touch panel and computer must be connected and Touch pen Management Tool and Pen Software must be installed on the computer from the supplied CD ROM When the Information Display Downloader is installed you can check and download the mo...

Page 10: ...n expansion Offering of this terminal is not a guarantee that future expanded functionality will be provided 20 D sub 1 input terminal See page 12 21 DisplayPort input terminal See page 12 22 HDMI 1 input terminal See page 12 23 Audio 1 input terminal See page 13 24 RS 232C input terminal See page 13 25 Terminal for firmware updating Normally not used 26 USB 2 port for touch panel See page 13 27 D...

Page 11: ... page 17 3 MUTE button See page 25 4 VOL buttons See page 25 BRIGHT buttons See page 25 Cursor control buttons 5 DISPLAY button See page 25 6 MODE button See page 25 7 INPUT button See page 25 8 MENU button See page 25 9 ENTER button See page 25 10 RETURN button See page 25 11 SIZE button See page 25 ...

Page 12: ... are factory set as follows Input mode Audio input terminal Factory setting D SUB1 Audio 1 input terminal D SUB2 Audio 2 input terminal DisplayPort DisplayPort input terminal HDMI1 HDMI 1 input terminal HDMI2 HDMI 2 input terminal HDMI3 HDMI 3 input terminal It is convenient to use the terminals for separate purposes For example using the terminal on the bottom of the monitor to connect a fixed co...

Page 13: ...put terminal 13 USB 2 port for touch panel To use the touch panel with a computer connected to the terminal below connect the touch panel to the computer with a USB cable Factory setting Can be changed in TOUCH INPUT SELECT on the SETUP menu D sub 2 input terminal HDMI 2 input terminal HDMI 3 input terminal 14 RS 232C input terminal The monitor can be connected to a computer using the RS 232C conv...

Page 14: ...d supplied into the power outlet Binding Cables Main power switch 1 AC input terminal 2 Power cord Supplied For power outlet 3 Cable Cable clamp insertion type 1 2 Cable clamp Cable Cable clamp attachment Cable clamp attachment 1 1 1 1 1 1 1 1 1 1 2 2 2 1 1 The cables connected to the terminals on the rear of the monitor and the USB cable on the back of the tray can be fastened with the cable clam...

Page 15: ...x 16 4 feet 5 m at an angle of approx 10 from the center to the top bottom right left of the remote control sensor Remote control sensor 10 10 10 10 16 4 feet 5 m TIPS Do not expose the remote control unit to shock by dropping or stepping on it This could lead to a malfunction Do not expose the remote control unit to liquids and do not place it in an area with high humidity The remote control unit...

Page 16: ...rews which were removed from this monitor Be sure the handles are attached securely 2 1 It is possible to mount a commercially available web camera in the following positions 1 Attach the supplied camera mount with the supplied camera mount screws x2 2 Attach the web camera to the camera mount with the supplied camera screw inch thread x1 The camera mount cannot be attached when the tray is attach...

Page 17: ...nal waiting mode TIPS You can fix the input mode that appears after startup Set START INPUT MODE on the SETUP menu Turning Power On Off Turning power off Turning power off with monitor buttons POWER button 1 Touch the POWER button The recognition screen appears 2 Touch OK The power is turned off Standby mode TIPS If about 15 seconds elapses while the recognition screen appears the power will autom...

Page 18: ...be set using DATE TIME SETTING from the SETUP menu when the date time setting screen disappears TIPS Set the date in Month Day Year order Set the time on a 12 hour basis The clock is maintained by the internal battery If you already set the time but the date time setting screen appears when the power is turned on the internal battery may be exhausted Please contact your local SHARP servicing deale...

Page 19: ... pen Check the plus and minus markings on the inside of the touch pen and insert the battery in the correct orientation Battery cap 2 1 3 Replace the cover and battery cap TIPS The supplied battery LR 03 AAA size may be exhausted in a short time depending on how it was stored If the touch pen will not be used for an extended time remove the battery from the touch pen For the battery use an alkalin...

Page 20: ...es damaged and the touch panel does not respond replace the pen tip When inserting the touch pen tip insert firmly all the way in The pen tip is made soft to protect the screen and improve writability For this reason the pen tip may become deformed however this is not a failure The touch pens cannot be used as touch pens and digitizer pens at the same time When the setting is changed in the Touch ...

Page 21: ... touch in Control Panel select the checkbox For the procedures for using the touch pen in the Pen Software see the Pen Software Operation Manual nCommon finger and touch pen actions Single tap Same action as left clicking a mouse Touch with your finger touch pen Double tap Same action as double clicking a mouse Quickly touch twice with your finger touch pen When double tapping with your finger be ...

Page 22: ...r finger touch pen and then lift your finger touch pen from the screen Slide to pan With your finger touch pen touching the screen move it up and down to scroll the screen nFinger actions Zoom Use in a screen that is capable of enlargement reduction Touch the screen with two fingers and move your fingers closer together to reduce the view or apart to enlarge the view Reduction Enlargement Press an...

Page 23: ... the pen tip This may not operate correctly if there is an inverter fluorescent light nearby Do not store with the pen tip of the touch pen or function button pressed The battery will be exhausted If there is dirt or foreign matter on the tip of the touch pen remove it Foreign matter may damage the screen The touch pen position may occasionally deviate in the login screen In this case use the keyb...

Page 24: ...page 31 4 Select the terminal to be used in D SUB1 of INPUT SELECT See page 31 5 Select the terminal for AUDIO SELECT which is used for audio input See page 31 2 Volume adjustment Changes the volume 15 Mutes the sound Touch again to return the sound to the original volume Increases the volume Decreases the volume 3 Touch action setting Touch to disable touch action Touch again to enable touch acti...

Page 25: ... any buttons for about 4 seconds the BRIGHT menu automatically disappears 6 ENTER Confirms the setting 7 RETURN Returns to the previous screen 8 SIZE Screen size selection The menu is displayed Press or to select the screen size See page 26 9 DISPLAY Displays monitor information The display changes from INFORMATION1 INFORMATION2 clear display and so on every time you press this button The display ...

Page 26: ...switching or dual screen display functions to compress or expand the screen for commercial or public viewing in establishments like cafes or hotels may infringe on the rights of the creators as protected by Copyright Law so please be careful When dual screen display is selected the screen size cannot be changed The appearance of the original video may change if you select a screen size with a diff...

Page 27: ...x 1 0 8 0 V 60 Hz H 67 5 kHz D SUB1 RGB 4 Press or to adjust the setting BRIGHT CONTRAST BLACK LEVEL TINT COLORS SHARPNESS COLOR ADJUSTMENT ADVANCED RESET 31 40 30 30 30 12 SCREEN PICTURE AUDIO SETUP MONITOR PIP PbyP OTHERS PICTURE BACK RETURN MOVE OSD DISPLAY 1 9 2 0 x 1 0 8 0 V 60 Hz H 67 5 kHz D SUB1 RGB For items that have press ENTER make settings and then press RETURN 5 Press MENU to close t...

Page 28: ... D SUB1 RGB D SUB2 Adjusts sampling clock phase for applicable video Useful when small characters appear with low contrast and or there are flickers at corners When using the adjustment pattern see page 38 make adjustments so that no horizontal stripe noise appears in it H POS Adjust the horizontal position of the image V POS Adjust the vertical position of the image H SIZE Adjust the horizontal s...

Page 29: ...n the WHITE BALANCE is set to PRESET The setting values are shown for reference The color temperature of the screen varies over time This function is not intended to keep the color temperature constant USER Adjusts each item when the WHITE BALANCE is set to USER R CONTRAST Adjusts bright toned red component G CONTRAST Adjusts bright toned green component B CONTRAST Adjusts bright toned blue compon...

Page 30: ...e RGB input signal range is detected automatically Use AUTO normally If the RGB input signal range cannot be set appropriately even when using AUTO set according to the image When the setting is different images will be displayed with washed out blacks and compressed gradients ACTIVE CONTRAST AV input Automatically adjusts the contrast according to the image In PIP mode the main side setting is re...

Page 31: ... Select the input mode to be used in D Sub1 input terminal Select SET after selecting the input mode and then press ENTER HDMI AUTO VIEW When ON is selected the screen size is adjusted automatically according to the screen size control signal included in the video signal input from the AV HDMI input terminal HOT PLUG CONTROL Sets whether to use hot plug control for the HDMI1 HDMI2 and HDMI3 input ...

Page 32: ...al into which the video signal of the computer connected to the USB 2 port will be input When SIDE INPUT TERM is selected and the input mode is HDMI2 HDMI3 or D SUB2 the touch panel can be used with the computer connected to the USB 2 port In the portrait orientation select the terminal into which the video signal of the computer connected to the USB 1 port will be input When SIDE INPUT TERM is se...

Page 33: ...he power LED flashes at approx 0 5 second interval in green SELF ADJUST On a D SUB1 RGB D SUB2 screen specify whether to perform screen adjustment automatically or not When ON is selected the screen is automatically adjusted when its resolution is 800 x 600 or higher and the timing of input signals changes ADJUSTING appears on the screen during the adjustment If SELF ADJUST is set to ON set the ti...

Page 34: ... menu item to display the sub screen transparently PIP SOURCE Selects the input signal of the sub screen in PIP PbyP or PbyP2 mode SOUND CHANGE Sets the sound which is output in PIP PbyP or PbyP2 mode If the main screen is displayed as a full screen by the AUTO OFF function the sound for the main screen is output even when the sound for the sub screen is specified MAIN POS Sets the position of the...

Page 35: ...e the monitor automatically changes the selected mode to another mode where a video signal is present When there are video signals in multiple input modes switching takes place according to the order of priority set in AUTO INPUT SELECT PRIORITY AUTO INPUT SELECT PRIORITY Sets the order of input terminal priority for NO SIGNAL AUTO INPUT SEL Input does not change automatically for terminals withou...

Page 36: ... except when it is set as the PIP main screen When dual screen display is selected the SCREEN MOTION function is disabled When dual screen display is selected the CONNECT AUTO INPUT SELECT function and NO SIGNAL AUTO INPUT SEL function are disabled When dual screen display is selected the INPUT SELECT options cannot be set When dual screen display is selected the AUDIO menu cannot be set When an i...

Page 37: ...ay regardless of the day of the week 4 TIME Specifies the time to execute the SCHEDULE Set the time on a 12 hour basis Factory default Can be entered as 24 hour time using the TIME setting in DATE TIME FORMAT 5 INPUT Specifies the input mode at power on If not specified the START INPUT MODE setting will apply By factory default the input that was active when the power was last turned off will appe...

Page 38: ... adjustment Before making adjustments in the SCREEN menu or PICTURE menu display an image to brighten the entire screen If you are using a Windows PC use the adjustment pattern on the supplied CD ROM Opening the adjustment pattern The following example is performed in Windows 7 1 Load the supplied CD ROM into the computer s CD ROM drive 2 Open CD Drive in Computer 3 Double click Adj_uty exe in the...

Page 39: ...s 40 and 51 Initialization Reset Functional Restriction Setting FUNCTION OSD DISPLAY Shows hides the menu modes and messages The FUNCTION screen cannot be hidden ON 1 Shows all menus modes and messages ON 2 Hides messages automatically displayed by the display Shows messages during operation OFF Hides all menus modes and messages LED Specifies whether to light the power LED TEMPERATURE ALERT Selec...

Page 40: ...ty bit None Set to the same baud rate as the BAUD RATE setting of SETUP menu Initial setting 38400 bps Communication procedure nCommand format When a command is sent from the PC to the monitor the monitor operates according to the received command and sends a response message to the PC C1 C2 C3 C4 P1 P2 P3 P4 Return code Command field 4 prescribed alphanumerical characters Parameter field 4 charac...

Page 41: ... W T A Return code 0DH 0AH When the following commands are used WAIT is returned In this case a value will be returned if you wait a while Do not send any command during this period Commands which return WAIT RSET INPS ASNC WIDE PXSL POWR AGIN MWIN MWIP MWPP When control via RS 232C is locked see page 39 E C D K O L Return code 0DH 0AH When RS 232C LAN SELECT is set to LAN U N S E L E C T E D Retu...

Page 42: ...r data Use the user data save command UGSV to save the transferred user data in the monitor If the data is not saved it will be cleared when The main power switch is off STANDBY MODE is LOW POWER and the monitor enters standby mode nActivating the GAMMA user data To activate the transferred user data select USER for GAMMA of the PICTURE menu or send the corresponding RS 232C command nChecking the ...

Page 43: ...Control Response contents POWER CONTROL POWR W 0 Switches to standby mode 1 Enters the power ON state R 0 Standby mode 1 Normal mode 2 Input signal waiting mode INPUT MODE SELECTION INPS W 0 Toggle change for input mode Terminals not selected in INPUT SELECT cannot be selected 2 D SUB1 RGB ERR when other than RGB is selected for D SUB1 of INPUT SELECT 3 D SUB1 COMPONENT ERR when other than COMPONE...

Page 44: ...RAST CRTG WR 0 256 0 256 B CONTRAST CRTB WR 0 256 0 256 R OFFSET OFSR WR 127 127 127 127 G OFFSET OFSG WR 127 127 127 127 B OFFSET OFSB WR 127 127 127 127 COPY TO USER CPTU W 0 Copies a preset value to the user setting GAMMA GAMM WR 0 2 0 2 0 1 8 1 2 2 2 2 4 during PC input 0 LIGHT 2 2 DARK during AV input 4 6 4 6 4 USER 5 2 0 6 STD during PC input 4 USER 5 LIGHT 1 6 STD during AV input FLESH TONE...

Page 45: ... AH3R WR 0 2 0 2 0 AUTO 1 FULL 2 LIMITED RGB INPUT RANGE HDMI3 PC PH3R WR 0 2 0 2 0 AUTO 1 FULL 2 LIMITED RGB INPUT RANGE D SUB1 RGB PDSR WR 1 2 1 2 1 FULL 2 LIMITED RGB INPUT RANGE D SUB2 PD2R WR 1 2 1 2 1 FULL 2 LIMITED RGB INPUT RANGE DisplayPort PDPR WR 0 2 0 2 0 AUTO 1 FULL 2 LIMITED ACTIVE CONTRAST AV input ACNT WR 0 1 0 1 0 OFF 1 ON DISPLAY COLOR PATTERN PTDF WR 0 0 No pattern display 1 1 W...

Page 46: ... MODE NAME DisplayPort INDP WR 0 30 0 30 0 NO SETTING 1 PC1 2 PC2 3 PC3 4 TV 5 VIDEO 6 DVD 7 HDD 8 DVR 9 BD 10 CAMERA 11 DOCUMENT CAMERA 12 VIDEO CAMERA 13 VIDEO CONFERENCE 14 WIRELESS 15 STB 16 CONTROLLER 17 COMPOSITE 18 COMPONENT 19 RGB 20 INPUT1 21 INPUT2 22 INPUT3 23 INPUT4 24 INPUT5 25 INPUT6 26 SATELLITE 27 CABLE 28 CAMCORDER 29 TABLET 30 SURVEILLANCE CAM HDMI1 INH1 HDMI2 INH2 HDMI3 INH3 D S...

Page 47: ...N MODE TOMD WR 0 2 0 2 0 AUTO 1 MULTI TOUCH MODE 2 MOUSE MODE ERR when the touch panel is not connected TOUCH PANEL MODE GMDP WR 0 1 0 1 0 OFF 1 ON When the input mode is PC PIP PbyP menu Function Command Direction Parameter Reply Control Response contents PIP MODES MWIN WR 0 3 0 3 0 OFF 1 PIP 2 PbyP 3 PbyP2 PIP SIZE MPSZ WR 1 64 1 64 PIP POS The longest direction MHPS WR 0 100 0 100 The shortest ...

Page 48: ...n 1 6 Priority setting ERR when OFF is selected for NO SIGNAL AUTO INPUT SEL All input terminals cannot be set to 0 simultaneously HDMI1 APH1 HDMI2 APH2 HDMI3 APH3 D SUB1 APD1 D SUB2 APD2 LOGO SCREEN BTSC WR 0 1 0 1 0 OFF 1 ON INPUT RESOLUTION PC RESOLUTION CHECK PXCK R Returns current resolution in the form of hhh vvv PIXEL SETTING D SUB1 RGB D SUB2 PXSL WR 1 1 768 1360 x 768 2 2 768 1280 x 768 3...

Page 49: ... SCREEN SIZE AV WIDE WR 0 5 0 5 0 Toggle to change size 1 WIDE 2 ZOOM1 3 ZOOM2 4 NORMAL 5 Dot by Dot VOLUME VOLM WR 0 31 0 31 MUTE MUTE WR 0 1 0 1 0 OFF 1 ON INFORMATION MODEL INF1 R Value SERIAL NO SRNO R Value TEMPERATURE SENSOR DSTA R 0 Internal temperature normal 1 Internal temperature abnormal has occurred and the monitor is in standby mode 2 Internal temperature abnormal occurred To delete t...

Page 50: ...0 FF aa Block number xxxx 32 pieces of user data cc Checksum ASCII data of the block number and user data GREEN GAMMA DATA TRANSFER UGGW W BLUE GAMMA DATA TRANSFER UGBW W RED GAMMA DATA READ UGRR W 1 16 xxxx xxxx xxxx 32 pieces xxxx 0000 1023 xxxx User data of 32 pieces GREEN GAMMA DATA READ UGGR W 1 16 BLUE GAMMA DATA READ UGBR W 1 16 USER DATA INITIALIZE UGRS W 0 Initialize the user data USER DA...

Page 51: ...will not initialize e mail addresses and other settings Controlling the Monitor with a PC LAN Settings to connect to a LAN Set the monitor s IP address and subnet mask to match the settings of your LAN These settings can be made on either the monitor or a PC connected to the monitor The settings depend on the configuration of your LAN Ask your LAN administrator for details To set on the monitor Se...

Page 52: ...IPv4 and then Properties 6 Make a note of the current IP address subnet mask and default gateway settings Make sure you write this information now as you will be changing the IP address subnet mask and default gateway settings back to these settings afterwards 7 Temporarily change the IP address and subnet mask To access the monitor as it is shipped from the factory set as follows IP Address 192 1...

Page 53: ... USER NAME and PASSWORD See page 55 Basic operation You use Internet Explorer on a PC on the LAN to control the monitor 1 Launch Internet Explorer on the PC 2 In the Address box type http followed by your monitor s IP address followed by then press the Enter key You can confirm the IP address with the DISPLAY function When prompted to enter a USER NAME and PASSWORD type the user name and password ...

Page 54: ...JUSTMENT You can adjust these settings which are also available on the monitor s menu SCREEN See page 28 PICTURE See pages 29 to 30 AUDIO See page 31 SETUP See pages 31 to 32 MONITOR See page 33 SCHEDULE See page 37 PIP PbyP See page 34 OTHERS See page 35 FUNCTION See page 39 TIPS After changing DISPLAY COLOR PATTERN to OFF in PICTURE menu click Refresh to correctly retrieve the status of the moni...

Page 55: ...using a DNS server specify 0 0 0 0 RESET Clicking Execute returns all of the LAN SETUP settings to the factory preset values except for the DNS SERVER ADDRESS AUTO ACQUISITION and DNS SERVER settings NETWORK SECURITY This screen allows you to specify the security related settings USER NAME PASSWORD Sets up a user name and password to restrict access to this monitor After entering a user name and p...

Page 56: ...s screen allows you to configure the e mail sent periodically or when the monitor has an error The settings depend on the configuration of your LAN Ask your LAN administrator for details SMTP SERVER Specify the SMTP server address for sending e mail When using a domain name make sure to specify the DNS server as well See page 55 SMTP PORT If the AUTHENTICATION is SMTP AUTH specify the port number ...

Page 57: ...l be displayed The error report will be displayed when an e mail transmission error occurs Also the e mail transmission errors will be cleared when ALL RESET1 is executed See page 39 TIPS The RECIPIENT E MAIL ADDRESSES can be up to 64 alphanumeric characters or symbols Controlling the Monitor with a PC LAN MAIL PERIODICAL When PERIODICAL for CONDITION of MAIL RECIPIENT is checked set the date and ...

Page 58: ...turn it on again with the main power switch When the monitor restarts wait about 30 seconds and then start the next operation If the IP address is changed while the SNMP function is operational turn off the monitor and then turn it on again with the main power switch TIPS Depending on the SNMP settings a short delay may occur before the SNMP is usable About 5 minutes Up to 16 alphanumeric letters ...

Page 59: ...s not set send When the transmission is successful Password is returned as response 3 Send the password set in the SECURITY settings see page 55 Send password If the password is not set send When the transmission is successful OK is returned as response 2 Send commands to control the monitor The commands used are the same as those for RS 232C Refer to the communication procedure see page 40 for op...

Page 60: ...ECT on the SETUP menu correct See page 31 Is the input signal compatible with this monitor See page 64 The video from D sub2 input terminal does not appear correctly Is the input signal compatible with this monitor See page 64 The video from DisplayPort input terminal does not appear correctly Is the input signal compatible with this monitor See page 64 Is the DisplayPort cable DisplayPort standar...

Page 61: ...e screen When the internal temperature of the monitor rises excessively the brightness of the backlight decreases automatically in order to prevent high temperature related problems When this occurs TEMPERATURE is displayed on the screen and the Power LED flashes red and green alternately When TEMPERATURE ALERT is set to OSD LED This varies depending on the setting If the internal temperature rise...

Page 62: ...z Bluetooth Low Energy FHSS method Touch pen adapter port USB 2 0 compliant Type A Power requirement AC 100 V 240 V 3 2 A 50 60 Hz Operating temperature 2 3 41 F to 95 F 5 C to 35 C Operating humidity 3 20 to 80 no condensation Power consumption Maximum input signal waiting mode 4 standby mode 5 280 W 6 0 W 3 5 W Dimensions excluding protrusions inch mm Approx 72 13 16 W x 3 3 4 D x 42 3 16 H 1850...

Page 63: ...nting the monitor be sure to use a wall mount bracket that complies with the VESA compatible mounting method SHARP recommends using M6 screws and tighten the screws Note that screw hole depth of the monitor is 3 8 inch 10 mm Loose mounting may cause the product to fall resulting in serious personal injuries as well as damage to the product The screw and hole should come together with over 5 16 inc...

Page 64: ...Hz 35 1kHz 37 9kHz 48 1kHz 46 9kHz 31 0kHz 48 4kHz 56 5kHz 60 0kHz 67 5kHz 47 8kHz 60 3kHz 49 7kHz 60 0kHz 64 0kHz 80 0kHz 47 7kHz 65 3kHz 55 9kHz 75 0kHz 65 3kHz 74 0kHz 44 7kHz 67 5kHz 31 5kHz 48 3kHz 53 6kHz 56 6kHz 61 8kHz 71 8kHz 71 7kHz 81 1kHz 68 6kHz 60Hz 72Hz 75Hz 56Hz 60Hz 72Hz 75Hz 60Hz 60Hz 70Hz 75Hz 75Hz 60Hz 75Hz 60Hz 60Hz 60Hz 75Hz 60Hz 60Hz 60Hz 60Hz 60Hz 60Hz 60Hz 60Hz 70Hz 60Hz 6...

Page 65: ...59 94Hz Yes Yes 60Hz Yes Yes 1920 1080i 50Hz Yes Yes 59 94Hz Yes Yes 60Hz Yes Yes 1280 720p 50Hz Yes Yes 59 94Hz Yes Yes 60Hz Yes Yes 720 576p 50Hz Yes Yes 720 480p 59 94Hz Yes Yes 60Hz Yes Yes 640 480p VGA 59 94Hz Yes 60Hz Yes 720 1440 576i 50Hz Yes Yes 720 1440 480i 59 94Hz Yes Yes 60Hz Yes Yes Specifications ...

Page 66: ...data 1 shield 15 SCL 6 TMDS data 1 16 SDA 7 TMDS data 0 17 DDC CEC GND 8 TMDS data 0 shield 18 5V 9 TMDS data 0 19 Hot plug detection 10 TMDS clock nDisplayPort input terminal pins DisplayPort 20 pin No Function No Function 1 MainLane 3 11 Gnd 2 Gnd 12 MainLane 0 3 MainLane 3 13 Gnd 4 MainLane 2 14 Gnd 5 Gnd 15 Aux 6 MainLane 2 16 Gnd 7 MainLane 1 17 Aux 8 Gnd 18 Hot plug detection 9 MainLane 1 19...

Page 67: ...m Do not use an impact driver After mounting please carefully ensure the monitor is secure and not able to come loose from the wall or mount Do not use any screw holes other than VESA holes for installation When moving the monitor be sure to hold it with the handles and the unit bottom Do not grasp the screen tray speaker or speaker cover This may cause product damage failure or injury If you need...

Page 68: ...nt screws M3 If you will use the monitor in a portrait orientation the speaker cover is not used nRemoving the tray mount fitting If you will use the monitor in a portrait orientation or will otherwise not use the tray remove the tray mount fitting nRemoving the Tray Pinch the locking tabs 4 places Back of the tray 1 2 ...

Page 69: ...PN L803CA M EN17H 1 ...

Reviews: