background image

3-5

3

Optional Batteries

To power your computer for extended periods of time, there are two available
optional batteries, the high capacity battery pack (CE-BL10) or the sheet battery (CE-
BP02).


Use only the appropriate optional battery (CE-BL10 or CE-BP02),
and attach it correctly.


You cannot use the high capacity battery pack (CE-BL10) and the
sheet battery (CE-BP02) at the same time. Only one optional battery
may be connected at any given time.

Connecting High Capacity Battery Pack (CE-BL10)

1.


Turn off the computer and the peripheral devices.

2.


Remove the AC adapter and peripheral devices.

3.


Place the computer upside down.

4.


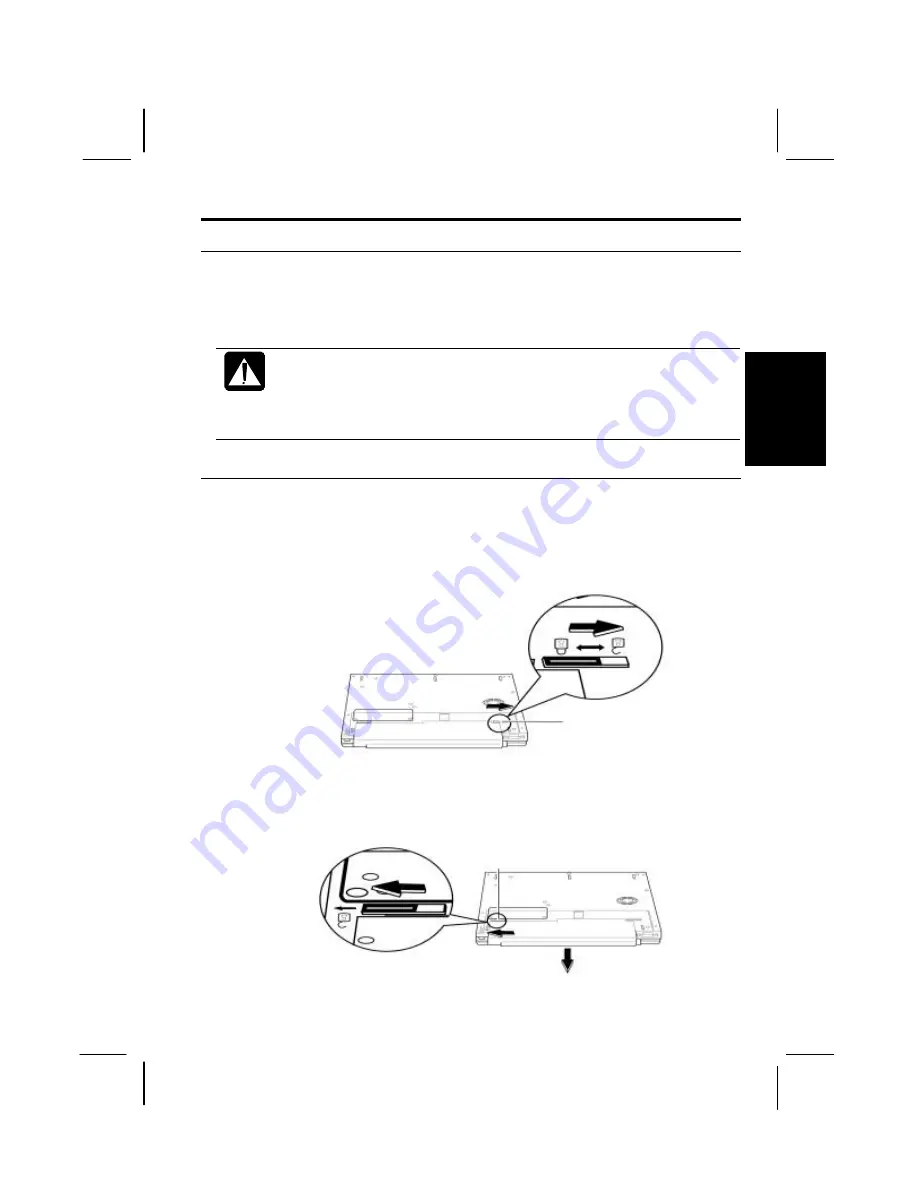
Slide the battery stopper outward to the “unlock” position.

5.


Slide the battery release lever outward to the “unlock” position and keep
pressing it.  Then remove the standard battery off the computer.

Battery Release

Battery Stopper

Summary of Contents for PC-AX Series

Page 1: ...ick Setup Turning Power On 1 1 Setting up Windows 98 1 4 Shutting Down the System 1 5 Basic Operations Choosing Power Source 2 1 Resetting the System 2 3 Using The Glide Pad 2 4 Using The Keyboard 2 6 Using External Floppy Disk Drive Unit 2 8 Using CD 2 11 Battery and Power Management Standard Battery Pack 3 1 Optional Batteries 3 5 Power Management 3 11 Peripherals Using Peripherals 4 1 Keyboard ...

Page 2: ... 6 3 Security Features Passwords 7 1 Preventing Infection of Computer Viruses 7 3 Security Slot 7 3 Setup Utility Running the Setup Utility 8 1 Main menu 8 3 Advanced menu 8 4 Security menu 8 5 Power menu 8 6 Exit menu 8 7 Appendixes Maintenance and Care A 1 Specifications A 3 Troubleshooting Troubleshooting T 1 Index Index Index 1 ...

Page 3: ... appearance of your computer may be slightly different depending on the model Front LCD Screen Quick Start Buttons Power Switch Glide Pad Audio Output Jack Microphone Jack Microphone Keyboard Speaker Volume Control Indicator Indicator ...

Page 4: ...ght Left Ventilation Openings IR Port USB Port AC Adapter Jack Power Switch CD ROM Drive Unit Port USB Port PC Card Slot Mini USB Port LAN Jack Modem Jack may not be available in some countries Mini USB Port ...

Page 5: ...xv Rear Bottom External Monitor Port Security Slot Sheet Battery Connector Reset Switch Ventilation Openings RAM Board Slot Battery Pack ...

Page 6: ...tails can be found on the warranty card inserted with the documentation Copyright Copyright may exist in material you wish to record Copying or broadcasting such material without permission of the relevant licensees or owners of the copyright is prohibited by law SHARP is not in a position to authorise the copying or broadcasting of copyright materials and nothing in this OPERATION MANUAL should b...

Page 7: ...this mains lead are coloured in accordance with the following code BLUE Neutral BROWN Live As the colours of the wires in the mains lead of this apparatus may not correspond with the coloured markings identifying the terminals in your plug proceed as follows The wire which is coloured BLUE must be connected to the terminal which is marked with the letter N or coloured black The wire which is colou...

Page 8: ...g you may experience communication errors The equipment has been approved in accordance with Council Decision 98 482 EC CTR21 for pan European single terminal connection to the public switched telephone network PSTN However due to differences between the individual PSTN s provided in different countries the approval does not of itself give an unconditional assurance of successful operation on ever...

Page 9: ... e 89 336 EEC 73 23 EEC come emendata dalla direttiva 93 68 EEC Η εγκατασταση αυτη ανταποκρινεται στιζ απαιτησειζ των οδηγιων τηζ Ευρωπαïκηζ Ενωσηζ 98 13 EC κατ 89 336 EOK 73 23 EOK óπωζ οι κανονισµοι αυτοι συµπληρωθηκαν απó την οδηγια 93 68 EOK Este equipamento obedece às exigências das directivas 98 13 EC e 89 336 CEE 73 23 CEE na sua versão corrigida pela directiva 93 68 CEE Este aparato satisf...

Page 10: ...he computer from an extremely cold place to an extremely warm place A temperature difference of more than 10 C 18 F will cause condensation inside the unit which may cause damage Do not block or cover slots or openings on the cabinet These protect the computer from overheating Care should be exercised when using on heat sensitive surfaces or your lap as the base of this computer will get hot Do no...

Page 11: ...al objects such as jewelry to short across the battery terminals as it could heat up and explode Do not allow liquids to come in contact with the battery pack Avoid dropping the pack or other violent shock Do not solder anything to the battery terminals Charging Charge the battery pack only with the AC adapter included with your computer or an optional one Discharging Do not use the battery pack f...

Page 12: ... terminals unless the telephone line has been disconnected at the network interface Use caution when installing or modifying telephone lines Avoid using the telephone during a lightning storm There may be a remote risk of electric shock from lightning Do not use the telephone to report a gas leak while in the vicinity of the leak Always use the modem cable included with the computer Using other ca...

Page 13: ...battery life has expired or any other causes SHARP assumes no responsibility directly or indirectly for financial losses or claims from third persons resulting from the use of this product and any of its functions such as stolen credit card numbers the loss of or alteration of stored data etc Edition 1st Edition April 2000 Copyright 2000 SHARP Corporation This document contains or refers to propri...

Page 14: ...e reference please record the following information in the spaces provided below Model Number Serial Number Date of purchase Dealer s Name Place of purchase Password The serial number is printed on a sticker located on the bottom of the computer ...

Page 15: ...more than one key are pressed simultaneously the key labels are separated by a plus sign Restart your computer by pressing Ctrl Alt Delete When necessary important key combinations are shown in graphics Sample Entries are shown in upper cases of different typeface In the following case press the Enter key after you type the command C DIR A Enter Words Texts on Screen such as window titles or possi...

Page 16: ...apter first Turning Power On Your computer is powered with either the rechargeable battery or AC power See the next chapter for more information on power sources Before using the computer for the first time 1 Place the computer upside down 2 Install the standard battery into the computer by matching the notched parts of the battery to the projected parts on the computer Notched Part Projected Part...

Page 17: ... one may not be available in some countries Using other AC adapters may damage the computer Always hold the AC power cord by its plug when removing it from the wall outlet Never pull on the cord When using the computer for the first time be sure to connect it to AC power If using the battery instead you may not be able to complete the Windows 98 setup if the battery does not have enough power 6 Pl...

Page 18: ...wer switch located on the right side of the computer When you turn on the computer the power indicator turns green the computer goes through a self test to detect any problems and Windows 98 starts When using the computer for the first time a dialog box called the Windows 98 Setup Wizard appears to guide you through the Windows 98 setup See the next page ...

Page 19: ...l completing Windows 98 setup If you turn off you cannot set up Windows 98 later Properties Dialog Box in Windows In the instructions in this manual you will often see the expression XXX Properties dialog box A dialog box is a window containing text boxes check boxes buttons etc with which you can send commands to Windows 98 or other application programs To open the properties dialog boxes click t...

Page 20: ...nced tab 4 Select Shutdown in When I press the power button on my computer 5 Click OK If you have not saved a file a dialog box will appear asking whether you want to save it Do not turn off or reset the computer while the hard disk indicator or the indicator on the external floppy disk drive unit or optional external CD ROM drive are lit Doing so may damage or even wipe out the data To protect th...

Page 21: ...echargeable battery Your computer is equipped with a standard battery You can also use optional batteries See Chapter 3 for battery information About the Power Indicators The following indicators show the power status of your computer Indicator Light Meaning Power On green Operating Blinking green Standby Off Powered off or Hibernation Battery Charge Blinking red Almost completely discharged The w...

Page 22: ... the battery The AC input voltage can range from 100 to 240 volts so that you can use the computer with the appropriate plug adapter The AC power cord included with the computer is appropriate for the voltage used in the area in which you purchased your computer If you attempt to connect the computer to a wall outlet other than in this area check the voltage of the outlet and use an AC power cord ...

Page 23: ...ress the Ctrl Alt Del keys again to restart the computer Resetting may cause data loss Use the software reset only if the normal Windows 98 Shut Down does not work because of software malfunction Although resetting will not damage the system you may lose the data you are processing Power Switch You can turn off the computer with the power switch if you encounter hardware or software problems which...

Page 24: ...incorrectly Using the Glide Pad Take a moment to become familiar with how the glide pad works Place Your Fingertip Place your left or right hand next to the glide pad resting your wrist naturally in a relaxed manner Place your thumb or finger on the glide pad Move Your Fingertip The rectangular pad of the glide pad acts like a miniature duplicate of the display As you slide your fingertip across t...

Page 25: ...r The object moves together with the pointer 4 Release the button when the object reaches its destination Scroll You can scroll through information in a list or in a document by using the glide pad To view information vertically place your finger on the most right part of the glide pad and slide your finger up and down To view horizontally place your finger on the bottom part of the glide pad and ...

Page 26: ...t clicking System Function Keys When pressed together with the Fn key function keys set specific system parameters This combination is sometimes referred to as hot keys Rotates display mode in LCD only CRT only and simultaneously display See the Display section in Chapter 4 for details Decreases the LCD screen brightness Increases the LCD screen brightness Turns on and off the screen backlighting ...

Page 27: ...and run the applications by simply pressing the buttons From the Start menu select Program Quick Start Button Configuration to show Quick Start Button Utility dialog box You can drag and drop the application icons to the buttons in the dialogue box or right click the button to change the settings See online help for more details Quick Start Buttons ...

Page 28: ... drive unit It may damage the drive or cause malfunction Do not place the AC adapter on the floppy disk drive unit It may cause the drive to malfunction Do not connect disconnect the floppy disk drive in MS DOS mode 1 Connect the floppy disk drive unit cable into the unit 2 Connect the core side connector of the floppy disk drive unit cable to any one of the mini USB ports on the left side of the ...

Page 29: ... objects on a disk Do not spill liquid onto a disk Inserting and Removing a Floppy Disk Inserting Hold the floppy disk with the arrow facing up and towards the drive Slide the disk into the drive until it locks into place Always insert a floppy disk straight into the floppy disk drive When inserting the disk make sure it is not upside down Do not use excessive force when inserting the floppy disk ...

Page 30: ... insert it into the floppy disk drive 2 Double click My Computer on the desktop 3 Click 3 Floppy A From the File menu select Format 4 From the capacity drop down list select 1 44MB or 720KB 5 Click Start to start formatting When you format a floppy disk all data previously stored on the disk is lost Backing Up Data We recommend that you regularly backup the data on your hard disk drive Windows 98 ...

Page 31: ...n the hard disk may be lost Connecting Optional External CD ROM Drive CE CD03 Do not place the CD ROM drive unit on its side or upside down Do not press on the CD ROM drive unit It may damage the drive or cause malfunction Do not place the AC adapter on the CD ROM drive unit It may cause the drive to malfunction 1 Turn off the computer 2 Connect the CD ROM disk drive unit to the CD ROM drive unit ...

Page 32: ...s away from direct sunlight heat and excessive moisture Always hold the CDs by the edges Fingerprints dirt or water on the CDs can cause noise or mistracking If a CD is dirty or does not play properly clean it with a soft dry cloth wiping straight out from the center along the radius Inserting a CD You can operate the CD ROM drive only when the computer is on 1 Make sure the CD ROM drive indicator...

Page 33: ... output and wavelength of the laser 3 6mW 795nm CLASS1LASER PRODUCT LASER KLASSE1 FDA regulations require the following statement for all laser based devices Caution Use of controls or adjustments or performance of procedures other than those specified herein may result in hazardous radiation exposure Removing a CD 1 Make sure the CD ROM drive indicator does not light on 2 Press the eject button t...

Page 34: ...ry life long Initialize the battery pack if the actual remaining power in your battery is less than what the battery indicator lights suggest as per the procedure on page 3 4 Turn off your computer when you are not using it The duration a battery charge will last will depend on the computer usage Applications which heavily use the peripherals will experience shorter power duration When the battery...

Page 35: ... Refer to the table below This battery indicator turns on automatically while the battery is being charged when connected to AC power When the battery is fully charged the battery indicator turns off The battery power remaining is an approximate figure The remaining operating time expected may be different from the actual remaining time depending on the use of the computer If the actual remaining ...

Page 36: ...warning beep sounds Save your data and turn off the computer or connect the computer to AC power immediately Otherwise the computer will be shut down and the data may be lost If you set the battery alarm in Windows 98 the computer will be turned off or enter System standby in case of significantly low battery power See Power Management section of this chapter The remaining operating time depends o...

Page 37: ...s fully charged The battery charge indicator turns green and the battery indicator turns off It will take about 2 5 hours if the battery was previously completed discharged 2 Turn on the computer 3 When the message Press F2 to enter System Configuration Utility appears press F2 to open the Setup Utility 4 Disconnect the AC adapter and leave the computer on until the battery is completely discharge...

Page 38: ... CE BL10 and the sheet battery CE BP02 at the same time Only one optional battery may be connected at any given time Connecting High Capacity Battery Pack CE BL10 1 Turn off the computer and the peripheral devices 2 Remove the AC adapter and peripheral devices 3 Place the computer upside down 4 Slide the battery stopper outward to the unlock position 5 Slide the battery release lever outward to th...

Page 39: ...he notched parts on both sides of the high capacity battery pack to the projected parts on the computer If you hear a clicking sound the high capacity battery pack should be correctly connected 7 Slide the battery stopper inward to the lock position to prevent the battery from falling off Battery Stopper Projected Part Notched Part ...

Page 40: ...unlock position and keep pressing it Then remove the battery off the computer Checking the Battery Level You can check the battery level of the high capacity battery pack in the same way as the standard battery pack with the battery indicator Press the button on the right of the indicator The status of the indicator is the same as that of the standard battery See page 3 2 Or you can check the powe...

Page 41: ...ipheral devices 2 Remove the AC adapter and peripheral devices 3 Place the computer upside down and open the cover of the sheet battery port 4 Hold the computer above the sheet battery as shown below Make sure the sheet battery connector is directed to the sheet battery port the projections beside the connector are directed to the corresponding holes on the bottom of the computer and the front cor...

Page 42: ...ng the Battery Level Or you can check the power remaining with AC plug icon on the task bar The status of the indicator is the same as that of the standard battery Sheet Battery Connector Projections Protection Shield Press the button to show the battery power remaining Indicator ...

Page 43: ...ge them and about 2 7 hours to discharge in the initializing process Removing Sheet Battery 1 Turn off the computer and the peripheral devices 2 Remove the AC adapter and peripheral devices 3 Loosen the screws counterclockwise 4 Take the sheet battery off the computer and close the cover of the sheet battery port Check the power remaining of the standard battery or connect AC adapter to the comput...

Page 44: ...Hard Disk 1 In the Power Management Properties dialog box select Power Schemes tab 2 Set Turn off hard disks to an appropriate value and click OK Stopping Power Supply to the Display This procedure is also effective for an attached external monitor complying with power management 1 In the Power Management Properties dialog box select Power Schemes tab 2 Set Turn off monitor to an appropriate value...

Page 45: ...ode below Selecting System Standby Mode If your battery becomes completely discharged during Standby you will lose unsaved data and will need to reboot your computer Therefore if you are planning to leave your computer powered by battery for long periods of time we recommend Hibernation 1 From the Start menu select Settings Control Panel 2 Double click Power Management icon 3 In the Power Manageme...

Page 46: ...ox select Advanced tab 2 Select Hibernate or Standby in When I close the lid of my portable computer 3 Click Apply 4 Click OK You slide the power switch The above functions if you perform the followings 1 In the Power Management Properties dialog box select Advanced tab 2 Select Hibernate or Standby in When I press the power button on my computer 3 Click Apply 4 Click OK You press Fn F12 The above...

Page 47: ...ot remain your computer will not resume from Hibernation To resume it connect the computer to AC power When the system resumes from Hibernation you may see some flicker on the display This is not a malfunction Your computer resumes from Hibernation if you slide the power switch or press Quick Start Button Disabling Power Management 1 In the Power Management Properties dialog box select Power Schem...

Page 48: ...an alarm or displaying a message and let your computer go on System standby or be shut down automatically 1 From the Start menu select Settings Control Panel 2 Double click Power Management icon 3 Select Alarms tab 4 Set the battery level at which the alarms are activated and the Alarm Action desired 5 Click OK twice ...

Page 49: ... page For the details refer to the section explaining each device and contact your dealer Be sure to turn off the computer and the peripheral device before connecting them except when connecting USB devices Some devices have to be turned on after the computer is turned on Some devices require that you install drivers before use Connecting Peripheral Device 1 Turn off the computer and the periphera...

Page 50: ...4 2 4 Peripheral Connection Overview Floppy Disk Drive Unit Floppy Disk Drive Unit CRT Monitor USB Device USB Device CD ROM Microphone Audio Equipment ...

Page 51: ...ck My Computer Control Panel Display Displaying the Screen on an External Monitor You can display the screen on an external monitor 1 In the Display Properties dialog box select Settings then Advanced 2 Select Monitor tab and click Change 3 Click Next 4 Select Display a list of all the drivers in a specific location so you can select the driver you want then click Next 5 Select Show all hardware 6...

Page 52: ...ect Settings 2 Select the number of the colors in the Colors and select the resolution in Screen area Refer to the table below 3 Click OK twice Resolutions and Colors you can choose Resolution Number of Colors 640 x 480 256 64K 16M 800 x 600 256 64K 16M 1024 x 768 256 64K 16M The number of colors in this mode is made using a Dithering algorithm on the internal LCD only You cannot switch to a displ...

Page 53: ...ndows 98 by clicking the speaker icon in the taskbar or with the volume control dial on the front side of your computer Connecting Microphone You can input sound using an external microphone connected to the microphone jack When using an external microphone you cannot use the built in microphone Connecting Digital Audio Equipment The audio output jack of the computer is compliant to S PDIF Sony Ph...

Page 54: ...tion programs Disable Windows power management Do not enter System Standby Do not operate the computer Use the digital audio equipment compliant to sampling rate of 48kHz Sound may not be recorded correctly if you use the synchronized recording system of the digital audio equipment USB Device Your computer has an interface called Universal Serial Bus USB With a USB connection you can connect disco...

Page 55: ...ganizers computers or printers To establish infrared communication follow the instructions below See the manual or online help of each application for details Positioning and Preparing the Computer and the Target Device 1 Put your computer on a flat surface 2 Place the target device so that its IR port is in line with that of your computer 3 Adjust the distance between the IR ports to be less than...

Page 56: ...light Disable the screen saver IR Mode Your computer supports two available IR modes IrDA Infrared Data Association and ASK Amplitude Shift Keying Each application automatically selects the appropriate IR mode Logical Port For some software you may have to change the assignment of the logical port 1 In the SHARP IR dialog box select Ports 2 Change the settings and click OK 3 When the message You h...

Page 57: ...ent The file you send will be saved in My Received Files in C drive of the target personal computer If you cannot send the file confirm your computer and the target computer are located correctly Double click My computer Infrared Recipient and check whether the name of the target computer appears in Available infrared devices within range If not relocate your computer and the target computer ...

Page 58: ...BX consult the PBX maintenance staff or its service company If the electric characteristics of your PBX are different from those of a regular analog line the modem will not function properly If you connect the modem to a digital PBX both the modem and the PBX may be damaged Connecting the Modem to a Telephone Line 1 Turn off your computer 2 Remove the cover of the modem jack on the left side of yo...

Page 59: ...ng set the COM port of the built in modem to COM3 2 Set parameters such as modem speed baud rate and line type pulse dialing or tone dialing See also the manual or online help of the software you are using Do not enter System standby while using communication software The communication speed may vary depending on the traffic local telecommunications infrastructure and ISP Internet Service Provider...

Page 60: ...the LAN cable into the network hub 4 Turn on the computer 5 From the Start menu select Settings Control Panel 6 Double click System icon 7 Click Device Manager tab 8 Double click Network adapters 9 Double click Realtek RTL8139xxxx 10 Click General tab and uncheck Disable in this hardware profile 11 Click OK then Close 12 In the Network dialog box set fields according to your network status Refer t...

Page 61: ... Panel 2 Double click the Network icon 3 In the Network dialog box select Configuration tab 4 Click Realtek RTL8139xxxx then Properties 5 Click Advanced tab and select Link Speed Duplex Mode in Property and enter an appropriate value in Value 6 Click OK twice and restart your computer ...

Page 62: ...omputer PC Card Your computer is equipped with a PC card PCMCIA slot which can accommodate one Type II card Before inserting a PC card into your computer refer to its manual Inserting PC Card 1 Push the PC card eject button twice The protection card pops out 2 Remove the protection card from the PC card slot ...

Page 63: ...he PC card driver by following the instructions on the screen Ejecting PC Card Some PC cards may become hot after long use Be sure to use the procedure below when ejecting a PC card Otherwise the system may not work properly 1 In the PC Card Properties dialog box click on the icon of the PC card you want to eject 2 Click Stop 3 When the message prompts you to eject the card click OK 4 Gently push ...

Page 64: ...the carpet Before installing the memory module carefully discharge static electricity from your body by touching an unpainted metal area Avoid touching the integrated circuits on a memory module Handle all components by the edges Keep the memory module in the anti static wrapping until you are ready to install it 1 Turn off the computer and disconnect the AC adapter and peripheral devices 2 Close ...

Page 65: ...RAM board slot cover 5 Align the memory module as shown below matching the notched part of the memory module with the projected part of the memory socket on the computer Notched Projected Part Projected Part Notched RAM Board Slot ...

Page 66: ...g sound 8 Replace the RAM board slot cover and tighten two screws 9 Turn on the computer and check the memory size with the following procedure From the Start menu select Settings Control Panel and double click the System icon Select the General tab to check the memory size of your computer 20 RAM Board RAM Board Slot Screws RAM Board Slot Cover ...

Page 67: ...a Memory Module 1 Follow steps 1 4 of Installing a Memory Module 2 Slightly bend the two latches outward until the memory module is released 3 Remove the memory module and follow from step 8 of Installing a Memory Module ...

Page 68: ...stem will require a password when the computer is turned on or resumes from Hibernation If you lose your password you will be unable to access the computer or change the configuration Make sure you select a password you will never forget and write it down and save it in a secure place Otherwise you will have to contact your dealer for assistance If you enter a wrong password three times the comput...

Page 69: ...stem Password and press Enter 2 Type your current password and press Enter 3 Type your new password and press Enter 4 Type your new password again and press Enter 5 Confirm Enable Password is checked and press Enter 6 Click Exit and select Save Changes and Exit 7 Press Enter twice The system restarts Deleting the Password 1 In the Security menu of the Setup Utility select System Password and press...

Page 70: ... some viruses by limiting writing to the hard disk To limit writing to the hard disk enable the item BootSector Protect in the Security menu of the Setup Utility You cannot prevent infection of all types of viruses with the above operation Even if a warning message appears the system may not be infected in some cases Security Slot You can prevent theft by using a security cable and the security sl...

Page 71: ...ts or passwords The information you have specified is saved in a special area called CMOS RAM which the system reads every time you turn on the computer Contents of the Setup Utility The Setup Utility consists of five menu pages as follows Main Basic system configuration Advanced Device interface configuration I O ports etc Security Password settings Power Power management battery saving settings ...

Page 72: ...off the computer when the Setup Utility is open slide the power switch Using the Setup Utility To navigate through the different menus you can use the following keys Moves the cursor from one menu to another Moves the cursor from one item to another in a menu Space bar Increases the numeric value or enable disable the item in the sub menu Decreases the numeric value or changes an item to the previ...

Page 73: ...ngs defines IDE adapter among the following items Standard Fast PIO Multiword DMA and Ultra DMA 33 Leave this at the default value during normal use Fast Boot eliminates memory test and delay on power up Boot Sequence specifies where the boot program looks for operating system files Display Mode defines the video display output among the following items Auto LCD Only and Simultaneously Select Auto...

Page 74: ...partition in the hard disk Keyboard Numlock defines whether the numlock keys of the built in keyboard is always disabled or not Pointing Device enables or disables the glide pad Hot Key Beep turns on off the sound when you press a hot key Cache Systems defines internal and external cache settings Resolution Expansion defines whether the screen is expanded when the resolution is 640x480 or 800x600 ...

Page 75: ... or change the configuration Make sure to select a password you will never forget or write it down and protect it in a secure place Otherwise you will have to contact your dealer for assistance Virus Alert enables virus warning by monitoring the boot sector BootSector Protect defines whether the boot sector of the hard disk is write protected When formatting the hard disk or when reinstalling soft...

Page 76: ...ce sets the battery consumption to the highest values Balanced Power Saving sets the battery consumption to the medium values Max Power Saving sets the battery consumption to the lowest values Customize enables the user to change the power saving settings enabling disabling Hard Disk Power Down After Standby After Suspend After Battery Low Warning Beep VGA Activity Resume On Time and Resume On Mod...

Page 77: ...hanges and Exit exits the Setup Utility without saving the settings you have changed Get Default Values returns the values of all items to the default To exit select one of the above items Load Previous Values returns the values of all items to the values you last saved To exit select one of the above two items ...

Page 78: ... not use alcohol benzene thinner or other strong chemical agents that may damage the cabinet Never clean the computer while it is powered on Screen The surface of the screen may become smeared and accumulate dust during use Avoid touching the screen with your fingers when using the system Gently wipe the surface of the screen with a soft cloth that has been dipped in a mild detergent solution and ...

Page 79: ...es Before traveling back up your data on floppy disks or other external media Bring an extra copy of your backup data Do not travel with an external floppy disk drive unit or optional CD ROM drive connected Do not travel with the computer powered on This may result in loss of data and or damage to the hard disk drive Disconnect the AC adapter from the computer Fully charge the standard battery pac...

Page 80: ...ome countries Data 56Kbps receive 33 6Kbps send Fax 14 4Kbps LAN 100Mbps operation Power AC adapter 100 240V 50 60 Hz Battery Rechargeable lithium ion battery Battery life Approximately 1 3 hours standard battery only Approximately 2 7 hours with sheet battery CE BP02 connected Approximately4 0 hours high capacitybatterypack CE BL10 only battery life varies depending on usage Standard battery Turn...

Page 81: ...A 4 Options may not be available in some countries High Capacity Battery Pack CE BL10 Sheet Battery CE BP02 External CD ROM Drive CE CD03 ...

Page 82: ...s are capable of generating errors and error messages If you encounter a software error try to determine if the error message is from your operating system or from an application program and refer to the appropriate manual for possible remedies You can also refer to the Windows 98 manual or Windows Help program to solve the problem To access the Help program select Help from the Start menu It also...

Page 83: ...to the first in Boot Sequence in the Main menu of the Setup Utility Question Why do I get a non system disk or disk error message You may have inserted a non bootable disk in the external floppy disk drive unit either a defective disk or one without an installed operating system Remove the disk If this message is issued when you attempt to boot from your hard disk drive insert a bootable disk into...

Page 84: ... the above slide the power switch for more than four seconds to turn off the system Five seconds later turn the computer on If you cannot power off the system with above procedure press the reset switch on the bottom of your computer and turn off the system refer to page 2 3 Wait five seconds and turn the computer back on Question Why does the external monitor display nothing Confirm the monitor i...

Page 85: ...nfirm the external floppy disk drive unit is correctly connected Confirm the floppy disk is inserted correctly The floppy disk may not be formatted or could be corrupted If you cannot write to a floppy disk the disk may be write protected Eject the disk and ensure that the write protect tab covers the detection hole If you cannot write to a floppy disk the disk may be full Use another disk Trouble...

Page 86: ...our seconds to turn off the system Five seconds later turn the computer on If you still cannot turn off the system with the power switch press the reset switch on the bottom of your computer to turn off the system refer to page 2 3 Five seconds later turn on the computer by pressing the power switch Question Why doesn t the glide pad function correctly Confirm the surface of the glide pad is compl...

Page 87: ...that IR communication is not turned off in the Sharp IR dialog box Confirm the item Ir Mode is set to the right mode in the Advanced menu of the Setup Utility Turn off power management in the Windows Do not use the IR port under intense fluorescent light or near cellular phones Question Why can t I communicate through the built in modem The built in modem may not be available in some countries Con...

Page 88: ...te Time icon in the Windows Control Panel or the Main menu of the Setup Utility Question Why can t I produce sound Check the volume control on the front side of your computer Click the speaker symbol on the taskbar and check the Windows volume control Question Why can t I use a hardware device Make sure the hardware device is not crossed out with an X mark using the following procedure 1 In the Sy...

Page 89: ...f colors 4 4 switching 4 3 E external floppy disk drive unit connecting 2 8 external CD ROM drive connecting 2 11 removing 2 12 F floppy disk formatting 2 10 handling 2 9 inserting 2 9 removing 2 10 G glide pad changing the configuration 2 5 using 2 4 H hibernation resuming from 3 14 high capaciaty battery pack connecting 3 5 initializing 3 8 removing 3 7 I indicator battery charge 2 1 power 2 1 i...

Page 90: ...g box 1 4 Q Quick start button 2 7 R reset switch 2 3 resetting 2 3 S security slot 7 3 setting up Windows 98 1 4 Setup Utility Advanced menu 8 4 entering and exiting 8 2 Exit menu 8 7 Main menu 8 3 Power menu 8 6 running 8 1 Security menu 8 5 using 8 2 sheet battery connecting 3 8 initializing 3 10 removing 3 10 shutting down the system 1 5 standard battery pack initializing 3 4 charging 3 4 stan...

Reviews: