background image

30

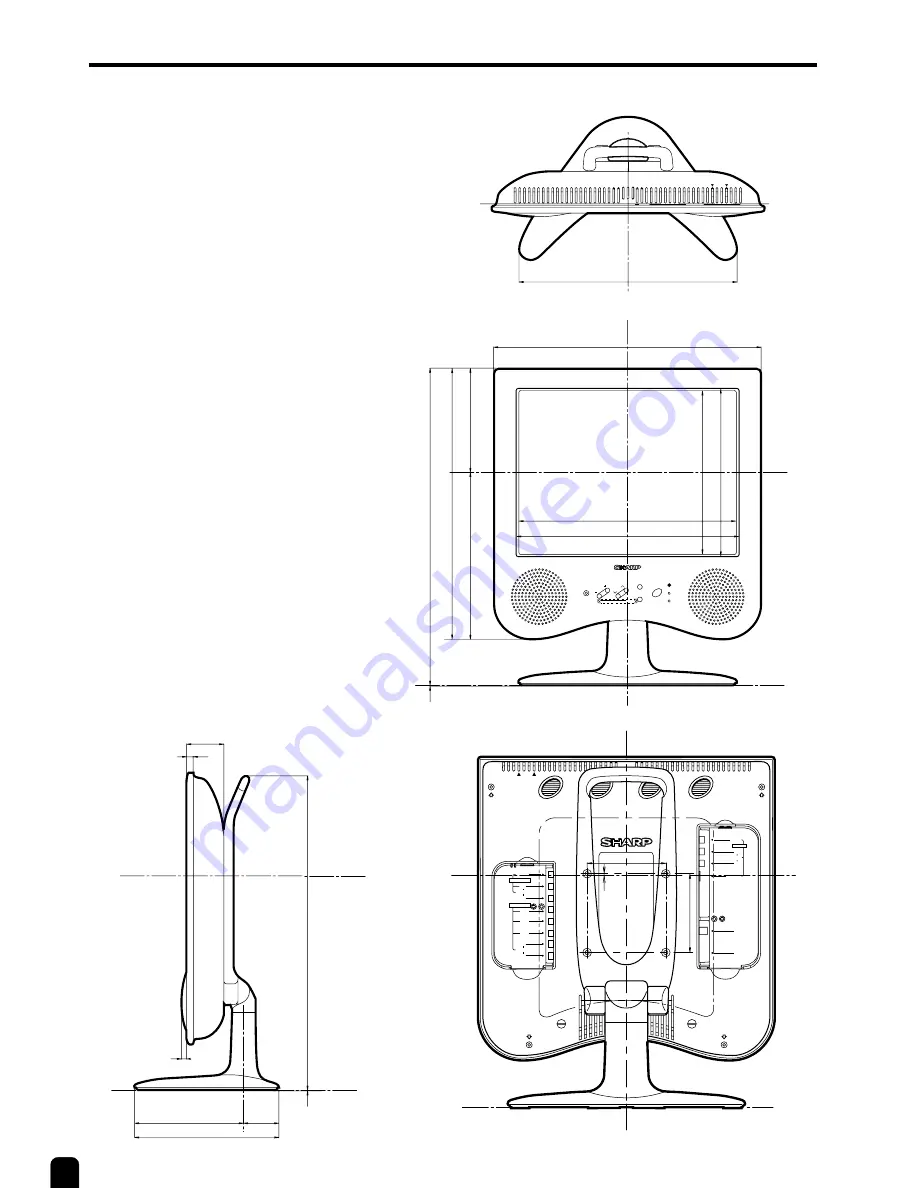
DIMENSIONAL DRAWINGS

LC-15C2HA

Unit: mm

301.6

377

445

150.5

385.5

1

235

307

229

231

305.2

HEADPHONE

VOL

CH

TV/VIDEO

MENU

MAINPOWER

POWER

SLEEP

PRESET

1

2

431.6

57.5

10

5

198

149.5

48.5

1

100

100

L

R

Y

POWER

INPUT

DC12V

AV-IN 2/OUT

AUDIO

VIDEO

COMPONENT

P

B

P

R

L

R

AV-IN 1

AUDIO

VIDEO

S-VIDEO

ANT.

L

R

AUDIO

2

Summary of Contents for LC-15C2HA

Page 1: ...ENGLISH LC 15C2HA LC 20C2HA LCD COLOUR TELEVISION OPERATION MANUAL LC 15C2HA LC 20C2HA ...

Page 2: ...und Volume 11 ON OFF Standby 11 Changing the Channels 12 SELECTING THE MENU ITEMS 13 Selecting a Menu Item 13 Page PRESET 14 15 16 On Screen Display Language Selection 14 Presetting the Channels AUTO 14 Presetting the Channels MANUAL 15 Channel Setting 16 ADJUSTMENT 17 18 19 20 21 Adjusting the SLEEP TIMER Setting 17 Adjusting the PICTURE Settings 18 19 Adjusting the FEATURE Settings 20 21 NICAM B...

Page 3: ...s stable voltage with minimum fluctuations Unstable power supply can cause problems in the product Overloading Do not overload AC outlets or extension cords Overloading can cause fire or electric shock Entering of objects and liquids Never insert an object into the product through vents or openings High voltage flows in the product and inserting an object can cause electric shock and or short inte...

Page 4: ...her openings in the cabinet are designed for ventilation Do not cover or block these vents and openings since insufficient ventilation can cause overheating and or shorten the life of the product Do not place the product on a bed sofa rug or other similar surface since they can block ventilation openings This product is not designed for built in installation do not place the product in an enclosed...

Page 5: ... provided with the product SUPPLIED ACCESSORIES Operation Manual 1 Wireless Remote Control 1 AAA size UM SUM 4 dry battery 2 AC Cord Cable clamp 2 AC Adapter 1 Antenna Cable 1 ENGLISH LCD COLOUR TELEVISION OPERATION MANUAL LC 15C2HA LC 20C2HA ...

Page 6: ...emove batteries as soon as they are non operable Chemicals that leak from batteries can cause a rash If chemical leakage is found wipe with a cloth The batteries supplied with the product may have a shorter life expectancy due to storage conditions If the remote control is not used for an extended period of time remove batteries from the remote control Preparing and Using the Remote Control Use th...

Page 7: ...NENT PB PR L R AUDIO Using the supplied antenna cable connect the room antenna terminal to the antenna input terminal on the TV set Refer to the figure below To antenna input terminal Room antenna terminal 75 ohm type Antenna cable supplied POWER INPUT DC12V L R AV IN 1 AUDIO VIDEO S VIDEO ANT L R Y AV IN 2 OUT AUDIO VIDEO COMPONENT PB PR L R AUDIO Plug into AC outlet AC cord AC adapter Household ...

Page 8: ...icator lights up red when the SLEEP TIMER is set to on To change the vertical angle of the LCD TV set tilt the screen up to 5 degrees forward or 10 degrees backward The TV set can also be rotated 50 degrees horizontally Please adjust the angle so that the TV set can be watched most comfortably Control panel PRESET 1 Press MENU on the front of the LCD TV set for more than two seconds to enter the P...

Page 9: ... DC12V L R AV IN 1 AUDIO VIDEO S VIDEO ANT L R Y AV IN 2 OUT AUDIO VIDEO COMPONENT PB PR L R AUDIO POWER INPUT DC12V L R AV IN 1 AUDIO VIDEO S VIDEO ANT Antenna POWER INPUT DC12V LC 15C2HA DC13V LC 20C2HA VIDEO AUDIO L AUDIO R S VIDEO AV IN 1 AUDIO L AUDIO R Y PB PR AUDIO L AUDIO R AV IN 2 OUT COMPONENT VIDEO Carrying handle ...

Page 10: ...elects next lower channel FLASHBACK Returns to previous channel DISPLAY Press Displays receiving channel for 10 seconds Channel indication reduces in size after about 10 seconds Press again Removes display MUTE Press Stops sound Press again Returns sound to previous level MPX Switching Audio mode BRIGHT The brightness can be switched between 3 levels LOCATION OF USERS CONTROL Continued Remote cont...

Page 11: ...h time TV VIDEO is pressed Note AV input mode indication remains for five seconds AV1 Video equipment connected to the AV1 input terminals An S video input terminal is additionally provided for the AV1 input If both S video terminal and normal video terminals are connected with cables the S video input terminal is selected as the high priority AV2 AV2 mode is used to adjust the preset settings and...

Page 12: ...TE mark 2 Press MUTE or VOL to turn the sound back to the previous level MUTE is automatically cleared when the following buttons are pressed POWER VOL MUTE To turn off the LCD TV Press POWER on the remote control The Power Standby indicator will turn red Standby position To turn the LCD TV back on Press POWER again The Power Standby indicator will turn green CH VOL TV VIDEO DISPLAY BRIGHT SLEEP M...

Page 13: ...annels 0 to 99 One digit and two digit methods of selection can be used Follow the procedure shown below to select channels 1 Press the button to set the 2 digit select mode 2 Press the button 3 Press the button Note Complete this procedure within 4 seconds otherwise the selection will not be made To select a two digit channel e g Channel 15 Changing channels with CH on the remote control Press CH...

Page 14: ... items differ depending on the setting conditions The selected item changes to yellow Items in purple cannot be selected AV mode Page 18 Selecting a Menu Item The screen indications shown above are larger than actual for easy reading TV VIDEO DISPLAY BRIGHT SLEEP MENU POWER MPX MENU CH VOL SLEEP TIMER RETURN SLEEP TIMER REMAIN MENU SELECT ADJUST EXIT PICTURE TV RETURN CONTRAST 30 COLOUR 0 BLACK LE...

Page 15: ...ds you can display the LANGUAGE select mode by selecting FEATURE LANGUAGE on the Menu screen 3 Press CH to select the language you wish to display 4 Press MENU to return to the normal screen TV VIDEO DISPLAY BRIGHT SLEEP MENU POWER MPX MENU CH VOL 1 2 MENU CH VOL TV VIDEO 1 2 PRESET 1 Press MENU PRESET 1 on the front of LCD TV set for more than two seconds The AUTO mode screen appears 2 Press VOL ...

Page 16: ...ET 1 front of the LCD TV set for more than two seconds The AUTO mode screen appears 2 Press MENU PRESET 1 to display the MANUAL mode screen 3 While the MANUAL mode screen is displayed press MENU for more than 2 seconds The channel position number remains in green Note While the MANUAL mode screen is displayed press MENU The LANGUAGE mode screen will appear 4 Adjust for good reception using VOL 5 A...

Page 17: ...details In AV mode items in purple cannot be selected I D K M B G MENU screen CH SETTING screen AUTO N358 N443 PAL SECAM PAL N PAL M POSITION The channel position changes to the upper or lower number COLOUR SYSTEM The mode changes in the following order SOUND SYSTEM The mode changes in the following order SKIP The mode changes in the following order ON OFF Channel numbers with a RED mark on the le...

Page 18: ...en 2 Press to move the cursor to SLEEP TIMER 3 Press to display SLEEP TIMER screen 4 Press to set the sleep timer in minutes The setting can be set in increment of 30 minutes and in the range between 30 and 120 minutes The setting is turned off when is displayed 5 Press MENU to return to the main screen TV VIDEO DISPLAY BRIGHT SLEEP MENU POWER MPX CH VOL MENU SLEEP 60 REMAIN MENU MENU SLEEP TIMER ...

Page 19: ...ment To adjust another item move the cursor by pressing while the MENU screen is displayed 7 Press MENU to return to the main screen CH VOL TV VIDEO DISPLAY BRIGHT SLEEP MENU POWER MPX MENU MENU MENU SLEEP TIMER PICTURE FEATURE CH SETTING SELECT ENTER EXIT MENU MENU SLEEP TIMER PICTURE FEATURE CH SETTING SELECT ENTER EXIT PICTURE TV RETURN CONTRAST 30 COLOUR 0 BLACK LEVEL 0 SHARPNESS 0 RED BLUE 0 ...

Page 20: ... Press to select COLOUR SYSTEM AV1 AV2 AUTO PAL SECAM N358 N443 PAL M PAL N PAL60 COMPONENT AUTO PAL NTSC Note TINT is displayed only when N358 or N443 is selected COLOUR SYSTEM is displayed only in the AV mode Switching the COLOUR SYSTEM Set the system to AUTO for normal reception The AUTO mode automatically detects the receiving signal system and changes the reception system of the set When the ...

Page 21: ...ess to move the cursor to FEATURE 3 Press to display FEATURE screen 4 Check the factory setting of each item on the FEATURE screen The user can change the settings by using and 5 Press MENU to return to the main screen TV VIDEO DISPLAY BRIGHT SLEEP MENU POWER MPX BRIGHT CH VOL MENU MENU MENU SLEEP TIMER PICTURE FEATURE CH SETTING SELECT ENTER EXIT MENU MENU SLEEP TIMER PICTURE FEATURE CH SETTING S...

Page 22: ...zontal image orientation IN ON The screen is turned blue when there is no signal Setting change NORMAL Brightness 60 Suitable for viewing in well lit areas Saves energy DARK Brightness 20 Sufficiently bright when viewing in dim areas ON The power of the LCD TV set is turned off when there is no signal for 5 minutes DOWN Inverted image To display images upside down for special uses MIRROR Mirror im...

Page 23: ...ICAM MONO and MONO Note otes If approximately 3 seconds pass without a button being pressed the mode setting is automatically terminated and the TV set returns to normal mode The setting can be selected individually for each channel position If the sound quality is poor due to a weak signal or other problems during NICAM broadcast reception set the OFF position of the NICAM to change the TV sound ...

Page 24: ...uality is poor due to a weak signal or other problems during IGR broadcast reception set the OFF position of the IGR to change the TV sound to monaural 1 Press MENU to display the MENU screen 2 Press to select CH SETTING 3 Press to display the CH SETTING menu 4 Press to select IGR 5 Press to select OFF When the IGR sound is set to the OFF position the TV sound is output in monaural Note When the I...

Page 25: ...ignals may result in malfunction The VIDEO input terminal and the S VIDEO input terminal on the AV IN 1 side are shared connections with priority given to the S Video terminal When making connections to both terminals the screen when selecting AV IN 1 will be that from the S Video input terminal When viewing video from the video input terminal do not make any connection to the S Video input termin...

Page 26: ... COMPONENT input terminal To component output terminal To AV IN 2 OUT terminal To video audio output terminal Video audio cord Audio L Audio R Video Audio R Audio L Note Notes If your VCR or other external devices has an S Video terminal S VIDEO connection is recommended Use an S video cord When you connect external devices to both S VIDEO and VIDEO terminals and if you select AV IN 1 you can only...

Page 27: ... You can output video and audio data from the TV set through the AV output terminals AV OUT Note AV2 has 2 OUT modes see page 21 When using the S VIDEO input for AV IN 1 no video output will be made to the AV output terminal but audio output will be made for connection to external audio systems POWER INPUT DC12V L R AV IN 1 AUDIO VIDEO S VIDEO ANT L R Y AV IN 2 OUT AUDIO VIDEO COMP ONENT PB PR L R...

Page 28: ...terminal is free of connections There is no sound Make sure the volume is not set to minimum Make sure the sound is not set to mute There is no picture or sound just noise Make sure the antenna cable is properly connected Bad reception can be considered Picture is not clear Make sure the antenna cable is properly connected Bad reception can be considered Picture is light or improperly tinted Check...

Page 29: ...g them further apart There are stripes on the screen or colours fade Is the unit receiving interference from other devices Transmission antennas of radio broadcasting stations or amateur radios and cellular phones may also cause interference Use the unit as far apart as possible from devices that may cause possible interference Use in hot and cold rooms locations When the unit is used in rooms loc...

Page 30: ... values of production units There may be some deviations from these values in individual units LCD panel Number of dots Video colour systems TV Standard TV Turning System TV STEREO BILINGUAL FUNCTION Universal R C for TV only AUTO PRESET CATV 4 LINE DIGITAL COMB FILTER Brightness Lamp life Viewing angles Audio output Speakers Terminals AV1 AV2 IN OUT Component Headphone Jack OSD LANGUAGE Power req...

Page 31: ...45 150 5 385 5 1 235 307 229 231 305 2 HEADPHONE VOL CH TV VIDEO MENU MAINPOWER POWER SLEEP PRESET 1 2 431 6 57 5 10 5 198 149 5 48 5 1 100 100 L R Y POWER INPUT DC12V AV IN 2 OUT AUDIO VIDEO COMPONENT PB PR L R AV IN 1 AUDIO VIDEO S VIDEO ANT L R AUDIO 2 ...

Page 32: ...194 374 1 298 403 3 298 8 300 8 401 3 TV VIDEO MAIN POWER POWER SLEEP MENU PRESET 1 2 265 228 5 0 5 295 8 67 6 10 6 5 247 6 182 1 18 5 12 5 65 5 100 51 5 100 L R Y POWER INPUT DC13V AV IN 2 OUT AUDIO VIDEO COMPONENT PB PR L R AV IN 1 AUDIO VIDEO S VIDEO ANT L R AUDIO ...

Page 33: ......

Reviews: