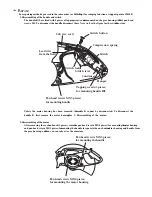
4
Replace the imaging film, making sure that the flange goes into
the rear slot on the left side of the printing compartment. Also,
make sure that the right, rear gear engages with the gear below it.
5
Wind the film slightly (rotate the gear on the right side of the
empty spool) so that there is no slack in the film. Make sure that
both edges of the film wind onto the spool evenly.
6
Close the print compartment cover, making sure it clicks into
place.
REDIAL
HOLD/
SEARCH
SPEAKER
1
2
3
4
5
6
7
8
9
0
GHI
JKL
MNO
TUV
WXYZ
PQRS
SPEED
DIAL
ABC
DEF
Space
Press this key twice
to enter a space.
Letters and numbers
To enter a letter or number, press the appropriate
key repeatedly until the desired number/letter
appears in the display (the number appears first,
then the letters in the order marked above the key).
Delete
Press this key to delete the letter
highlighted by the cursor (if the
cursor is to the right of the last
letter entered, it will backspace
and delete the last letter).
Shift
Press this key once to change
case (press it again to change
back).
Cursor left
Press this key to move the cursor
to the left.
Cursor right
Press this key to move the cursor
to the right.
Symbols
Press either key repeatedly until the
desired symbol appears (see the
symbol list on the following page).
[5] Quick reference guide
FUNCTION key menu
The following chart shows the layout of the functions and settings accessed by pressing the FUNCTION key. First press the FUNCTION key, the
appropriate numeric key as shown, and then "#" or "
" until the desired item appears.
Instructions for making each setting appear in the display. If you have any difficulty, refer to the detailed instructions on the page shown below the
setting.
Cover Sheet
Cover Sheet
Header
Timer Mode
Send Mode
Poll Mode
Listing Mode
Activity Report
Timer List
Telephone Number
List
Passcode List
Option Setting List
Anti Junk Fax
Number List
Program and Group
List
Caller ID List
Print Setup List
Entry Mode
Fax/Tel Numbers
for Auto Dialing
Own Number and
Name Set
Polling Security
Select
Passcode Numbers
for Polling
Date and Time Set
Daylight Saving
Store Junk Number
Priority Call Number
Optional Settings
Fine Resolution
Priority
Number of Rings in
Auto Mode
Recall Wait Interval
Recall Times
Tel/Fax Remoter
Number
Remote Reception
Select
Transaction Report
Print Select
Dial Mode
TAD Connected
Print Set-up
Initialize Film
Reception Ratio
2 in 1 Print
Paper Type Set
Paper Size Set
Copy Cut-off
Program/Group
Program Entry
Mode
Group Entry
Mode
Quiet Detect Time
Fax Reception
When TAD Fails
Distinctive Ringing
Fax Signal Receive
Junk Number Check
Polling
Caller ID
Auto Cover Sheet
Activity Report
Auto Print
ECM
FUNCTION
1
2
3
4
5
6
7
UX-510U/UX-510C/UX-500U
UX-500C/FO-1460U
1 – 8
Summary of Contents for FO-1460
Page 69: ...Control PWB parts layout Top side 6 7 UX 510U UX 510C UX 500U UX 500C FO 1460U ...
Page 70: ...Control PWB parts layout Bottom side 6 8 UX 510U UX 510C UX 500U UX 500C FO 1460U ...
Page 72: ...TEL LIU PWB parts layout 6 10 UX 510U UX 510C UX 500U UX 500C FO 1460U ...
Page 74: ...6 12 Power supply PWB parts layout UX 510U UX 510C UX 500U UX 500C FO 1460U ...
Page 77: ...Operation panel PWB parts layout 6 15 UX 510U UX 510C UX 500U UX 500C FO 1460U ...


