background image

1

R-90GC(S) O/M

This Sharp product is warranted against faults in materials and manufacture for a period of twelve (12) months
from the date of original purchase.

If service is required during the warranty period, please contact your nearest Sharp Approved Service Cen-
tre. These repairs would be carried out at no charge to the owner, subject to the conditions specified herein.

The owner is responsible for any transportation and insurance costs if the product has to be returned for
repair.

This warranty does not extend to accessories or defects or injuries caused by or resulting from causes not
attributable to faulty parts or the manufacture of the product, including but not limited to, defect or injury
caused by or resulting from misuse, abuse, neglect, accidental damage, improper voltage, liquid spillage,
vermin infestation, software, or any alterations made to the product which are not authorised by Sharp.

Please retain your sales documentation, as this should be produced to validate a warranty claim.

This warranty is in addition to and in no way limits, varies or excludes any express and implied rights and
remedies under any relevant legislation in the country of sale.

IMPORTANT

 DO NOT RETURN THIS PAGE TO SHARP

For your reference, please enter the particulars of your purchase below and retain, with your purchase
documentation.
Model No.
Serial No.
Date of Purchase
Retailer

WARRANTY

Consumer Electronic Products

Congratulations on Your Purchase!

FOR PRODUCTS PURCHASED IN

NEW ZEALAND

CONTACT YOUR SELLING DEALER/RETAILER

OR CALL

SHARP CUSTOMER SERVICES

telephone: 

09 573 0111

FACSIMILE: 09 573 0113

or contact our web site

www.sharpnz.co.nz

SHARP CORPORATION OF NEW ZEALAND LIMITED

59 Hugo Johnson Drive

Penrose, Auckland

IMPORTANT NOTICE: This warranty applies only to products sold in Australia & New Zealand.

FOR LOCATION ENQUIRIES WITHIN

AUSTRALIA

REGARDING YOUR

LOCAL

SHARP APPROVED SERVICE CENTRE

CALL THE

SHARP SERVICE REFERRAL CENTRE

TOLL FREE 

1 300 135 022

DURING NORMAL BUSINESS HOURS

(Eastern Standard Time)

or contact our web site

www.sharp.net.au

SHARP CORPORATION OF AUSTRALIA PTY. LIMITED

ABN 40 003 039 405

1 Huntingwood Drive Blacktown NSW 2148

R-90GC( S) O/M,Warranty

03.7.24, 5:36 PM

1

Summary of Contents for Carousel R-90GCS

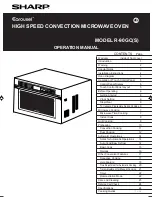
Page 1: ...6 Stop Clear 6 To Cancel a Programme During Cooking 6 Microwave Cooking 7 Microwave Time Cooking 7 Instant Cook 8 Grill Cooking 9 Preheating 10 Convection Cooking 11 Dual Cooking 12 Automatic Operations 14 Notes for Automatic Operations 14 Auto Cook Easy Defrost 14 Basic Cook 15 Recipes 16 Other Convenient Features 17 Sequence Cooking 17 Help Feature 18 Time Adjustment for Automatic Cooking 20 Tim...

Page 2: ...e a warranty claim This warranty is in addition to and in no way limits varies or excludes any express and implied rights and remedies under any relevant legislation in the country of sale IMPORTANT DO NOT RETURN THIS PAGE TO SHARP For your reference please enter the particulars of your purchase below and retain with your purchase documentation Model No Serial No Date of Purchase Retailer WARRANTY...

Page 3: ...results when the step by step instructions are followed When selecting another home appliance please again consider our full range of Sharp products INFO DISPLAY COOKING SYSTEM Thank you for buying a Sharp Microwave Oven Your new oven has an Information Display System which offers you step by step instructions to easily guide you through each feature Your oven also has a HELP key for instructions ...

Page 4: ...r operation Especially those which involve the removal of a cover which gives protection against exposure to microwave energy are very hazardous Donotoperatetheovenifitisnotworkingcorrectlyordamageduntilithasbeenrepairedbyaqualifiedservice technician trained by SHARP It is particularly important that the oven door closes properly and that there is no damage to 1 Door warped 2 Hinges and Latches br...

Page 5: ...and whites and oysters before cooking to prevent explosion Pierce skins of potatoes apples squash hot dogs sausages and oysters so that steam escapes Use specially bagged popcorn for the microwave oven Listen while popping corn for the popping to slow to 1 2 seconds Transfer baby food to small dish and heat carefully stirring often Check for suitable temperature to prevent burns Remove the screw c...

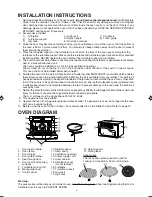
Page 6: ...microwave oven to be integrated within a kitchen the kit is available from your retailer This built in kit has been tested according to Australian Standards Sharp does not recommend the use of any other built in kit If the oven is to be positioned near a conventional oven ensure that adequate space is allowed and a suitable heat shield is incorporated between the two to prevent damage to the oven ...

Page 7: ...ess to defrost meat by entering weight 5 BASIC COOK KEY Press to select BASIC COOK mode 6 RECIPES KEY Press to select RECIPES mode 7 MENU KEYS Press to select BASIC COOK and RECIPES menu 8 TIME KEYS Press to enter cooking time and clock time 9 CLOCK KEY Press to set clock time 0 STOP CLEAR KEY Press to clear during programming Press once to stop operation of oven during cooking press twice to canc...

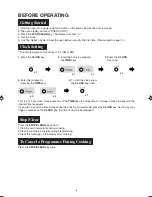
Page 8: ...splay after cooking Press the STOP CLEAR key twice Stop Clear To Cancel a Programme During Cooking To enter the present time of day 11 34 AM or PM Clock Setting This is a 12 hour clock If you press any of the TIME keys too many times continue to press the key until the desired time reappears If you wish to know the time of day during the cooking or timer mode press the CLOCK key As long as your fi...

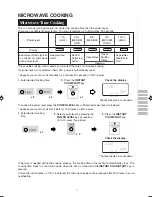
Page 9: ...te of microwave cooking If a power level is not selected then 100 power is automatically used Suppose you want to cook manually for 2 minutes 30 seconds on 100 power 30 MEDIUM LOW 50 MEDIUM 70 MEDIUM HIGH 100 HIGH 10 LOW Defrost Softening butter Vegetables Rice Pasta Fruit Casseroles Examples of foods typical ly cooked on microwave oven power level Display Microwave Time Cooking MICROWAVE COOKING ...

Page 10: ...inute on 100 microwave power Press the INSTANT COOK START key Within 3 minutes of closing the door The timer begins to count down Press theINSTANT COOK START key until desired time is displayed Each time the key is pressed the cooking time is increased by 1 minute Check the display MICRO COOK ...

Page 11: ...e recommended grill cooking times and procedures in the cookbook Warning Accessible parts e g oven door oven cavity dishes and accessories will become hot when in use To prevent burns always use thick oven gloves GRILL COOKING The GRILL is a pre programmed setting that cooks at high speed using a high temperature and maximum speed hot air circulation It is assisted by the turntable which rotates t...

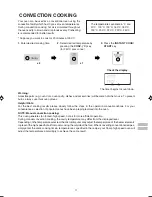
Page 12: ...e Preheating mode The preheated temperature will be maintained for approximately 30 minutes After this time preheat will be cancelled You may detect smoke or a burning smell when using convection for the first time This is normal and is not a sign that the oven is out of order Please see Refresh Cycle on page 19 If you are in the process of preheating and wish to check the actual oven temperature ...

Page 13: ...vity dishes and accessories will become hot when in use To prevent burns always use thick oven gloves Helpful Hints For the best cooking results please closely follow the steps in the operation manual cookbook For your convenience a selection of popular menus have been preprogrammed into the oven NOTE Manual convection cooking This oven generates fan forced high speed hot air for more efficient op...

Page 14: ...key until the desired temperature appears on the display The oven temperature can be changed from 40 C to 250 C in ten levels Preheat is recommended for both dual cooking modes To set preheat press the CONV C key prior to step 1 in Example 1 and Example 2 until the desired temperature appears on the display For DUAL 1 always preheat the oven to 250 C Remove the turntable and accessories before pre...

Page 15: ... display 5 Press the INSTANT COOK START key NOTES You may detect smoke or a burning smell when using convection for the first time This is normal and is not a sign that the oven is out of order Please see Refresh Cycle on page 19 After cooking is complete the cooling fan will continue working for a short time to lower the temperature of the electrical and mechanical parts The display may show NOW ...

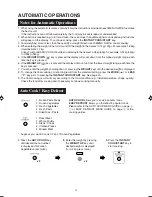
Page 16: ...ght by holding down or pressing the WEIGHT keys until the desired weight is displayed 8 To change the final cooking or defrosting result from the standard setting press the MORE or LESS key prior to pressing the INSTANT COOK START key See page 20 9 The final cooking result will vary according to the food condition e g initial temperature shape quality Check the food after cooking and if necessary ...

Page 17: ... key once 3 Enter the weight by pressing the WEIGHT DOWN key 7 times 4 Press the INSTANT COOK START key to start cooking NOTES Press the HELP key for guidance in operating your oven see page 19 After cooking it is recommended to wait for 2 minutes before cooking again to allow the oven to cool down HINTS 1 Prepare the food in advance so it is ready to put into the oven as soon as preheat is over 2...

Page 18: ...ts 2 Select the menu by pressing the MENU FORWARD key 3 times NOTES Press HELP key for guidance in operating your oven see page 19 After cooking it is recommended to wait for 2 minutes before cooking again to allow the oven to cool down HINTS 1 Prepare the food in advance so it is ready to put into the oven as soon as preheat is over 2 When action is required e g to stir food do not leave the door...

Page 19: ...r the cooking time by pressing the 1 MIN key 5 times 2 Input the power level by pressing the POWER LEVEL key twice STAGE 2 3 Enter the cooking time by pressing the 1 MIN key 6 times 4 Select the cooking mode by pressing the GRILL key once STAGE 3 5 Enter the cooking time by pressing the 1 MIN key 3 times 6 Select the cooking mode by pressing the DUAL 2 key then change the convection temperature by...

Page 20: ...ntally started with no food or liquid in the cavity the life of the oven can be reduced To prevent accidents like this your oven has a Child Lock feature that you can set when the oven is not in use To set the Child Lock 1 Press the HELP key twice 2 Press the INSTANT COOK START key The control panel is now locked each time a key is pressed the display will show CHILD LOCK ON To unlock the control ...

Page 21: ...imum condition Assist with cleaning the oven Leave the oven to cool for approx 10 minutes before cleaning see CARE AND CLEANING on page 23 NOTES 1 Remove the turntable from the oven before the Refresh Cycle No food should be in the oven 2 The Refresh Cycle takes 30 minutes 3 During the Refresh Cycle some smoke and odour may occur 1 Press the HELP key 4 times x 4 CONV COOK 2 Press the INSTANT COOK ...

Page 22: ...re time than the standard setting 1 Select the AUTO COOK menu for Frozen Vegetables by pressing the AUTO COOK key twice 2 Enter the weight by pressing the WEIGHT UP key twice 3 Choose the desired result well cooked by pressing the MORE key once 4 Press the INSTANT COOK START key to begin cooking NOTES To cancel LESS or MORE press the same key again To change MORE to LESS simply press the LESS key ...

Page 23: ...rly b Extending time at the end of cooking Cooking time can be extended at the end of cooking When theMORE indicator is flashing after cooking press the MORE key to extend the cooking time in multiples of 1 minute then press the INSTANT COOK START key A maximum of 10 minutes can be entered Check the cooking progress regularly Suppose you want to increase cooking time by 2 minutes during 5 minutes ...

Page 24: ...hen the timer reaches zero the oven will beep The time of day will appear in the display Demonstration Mode This feature is mainly for use by retail outlets and also allows you to practice the key operation Press the STOP CLEAR key and hold for 4 seconds When the oven beeps press the STOP CLEAR key 4 times within 2 seconds MICROWAVE OVEN WITH HIGH SPEED CONVECTION PRESS ANY KEY FOR DEMO MODE will ...

Page 25: ... stubborn stains inside the oven cavity ONLY Do not apply to the inside of the door Wipe clean ensuring all cleaner is removed After use wipe the waveguide cover in the oven with a soft damp cloth to remove any food splashes Built up splashes may overheat and begin to smoke or catch fire Do not remove the waveguide cover DO NOT USE CAUSTIC CLEANERS ABRASIVE OR HARSH CLEANSERS OR SCOURING PADS ON Y...

Page 26: ...d the fuse in your meter box If both the wall socket and the fuse are functioning properly CONTACT YOUR NEAREST SERVICE CENTRE APPROVED BY SHARP NOTE 1 If the time in the display is counting down rapidly check Demonstration Mode Please see page 22 for detail 2 If you cook for an extended amount of time on the same cooking mode the oven will lower the power automatically to avoid overheating Check ...

Page 27: ...LPFUL HINTS COOKWARE AND UTENSIL GUIDE 4 6 EASY DEFROST MENU GUIDE 7 RECIPES MENU GUIDE 9 AUTO COOK MENU GUIDE 3 BASIC COOK MENU GUIDE SHARP CORPORATION OSAKA JAPAN TINSEB011 WRRZ J31 PRINTED IN THAILAND 5 R 90GC S C B COVER 03 7 14 11 50 AM 1 ...

Page 28: ...us foods like minced beef or mashed potatoes microwave faster than dense ones like steak or whole potatoes 10 FAT AND BONE Marbling within meat or a thin even layer of fat on a roast speeds cooking Large fatty areas or excess drippings in dish attract energy away from meat and slows cooking Centre bones do not affect cooking but bone on the side of meat conducts heat to the areas next to it 11 STA...

Page 29: ...OOKING 1 Use thick oven gloves when removing food or the turntable from the oven to PREVENT BURNS Because accessible parts e g oven door oven cavity dishes and accessories will become hot when in use 2 Foods may be cooked either directly on the turntable or using the high low racks and splash guard HIGH RACK LOW RACK DUAL COOKING 1 There are two automatic preprogrammed dual settings 2 Use thick ov...

Page 30: ... using metal utensil place a heat resistant dish between the metal utensil and the rack refer to page 2 2 For cooking food with high fat contents do not bring the wrap in contact with the food as it may melt 3 Some microwave safe plastic cookware are not suitable for cooking foods with high fat and sugar content YES YES YES YES NO YES NO NO NO NO NO NO NO NO NO NO YES Not necessary YES NO YES For ...

Page 31: ...serves Place only one meal in oven at a time 1 serve 300 499 g 2 serves 500 749 g 3 serves 750 999 g 2 includes Frozen Vegetables Carrots Beans Brussels Sprouts Broccoli Cauliflower Corn Green Peas Mixed Vegetables hard vegetables medium vegetables soft vegetables 0 1 0 8 kg 18 C Frozen Before cooking separate vegetables eg broccoli as much as possible Arrange the vegetables in a shallow dish in t...

Page 32: ...ter cooking stand and stir NOTE For Tagliatelle use LESS key 2 5 Weight Hot tap water 1 cup 250ml 200g 300g 400g 500g 4 cups 4 cups 6 cups 6 cups Dried Rice Pasta 0 1 0 3 kg approx 60 C hot tap water or soup stock Wash rice thoroughly until water runs clear Place into a Pyrex bowl and cover with hot soup stock for rice or with hot tap water for rice or pasta Cook uncovered When oven stops and STIR...

Page 33: ...o separate as soon as possible When the oven has stopped remove defrosted pieces turn over and shield the warm portions of remaining pieces After defrost time stand covered with aluminium foil See NOTE below Shield the exposed bone with foil Place chicken pieces on a defrost rack When the oven has stopped remove any defrosted pieces turn over and shield the warm portions of remaining pieces After ...

Page 34: ...essories before preheating When preheat is over the audible signal will sound Foods marked with do not need preheat Chilled Salmon Fillets Steaks 0 2 0 8 kg C Low Flan dish 1 2 3 4 5 Chilled Fish Fillets Hoki Perch Barramundi Flake 0 2 0 6 kg C Low Flan dish F Low Flan dish Frozen Salmon Fillets 0 3 0 6 kg F Low Flan dish Frozen Fish Fillets Hoki Perch Barramundi Flake 0 2 0 6 kg F Low Flan dish F...

Page 35: ...ons Turntable 1 2 3 4 5 Rack Container Int Temp Weight Range Menu No C F Rack Chilled Savoury Pie 0 2 1 0 kg Low Turntable Chilled Quiche Flan 0 2 0 9 kg C Turntable Chilled Sweet Pie 0 2 0 8 kg C Frozen Savoury Pie 0 2 1 0 kg F Low Rack Frozen Quiche Flan 0 2 0 9 kg Low Rack Pie Quiche COOKING PROCEDURE Ensure all packaging is removed before cooking Only pre cooked ready made pies quiches are rec...

Page 36: ... Low Low 1 Margherita Pizza 2 Meat Feast Pizza Ham Pineapple Pizza Pesto Pizza Hawaiian Barbecue Pizza 3 4 5 Pizza No Menu Rack Container Cook book page Baking trays Flan dish Turntable Turntable Turntable 29 25 28 25 28 Low 1 Cheesy Jackets 2 Spicy Potatoes Spanish Omelette 3 4 5 Parmesan Potatoes High Low Roasted Vegetables Crispy Potatoes No Menu Rack Container Cook book page Turntable Turntabl...

Reviews: