background image

16 - 

TV Menu

Picture

Press 

MENU

.

Press     to select Picture, and press 

OK

.


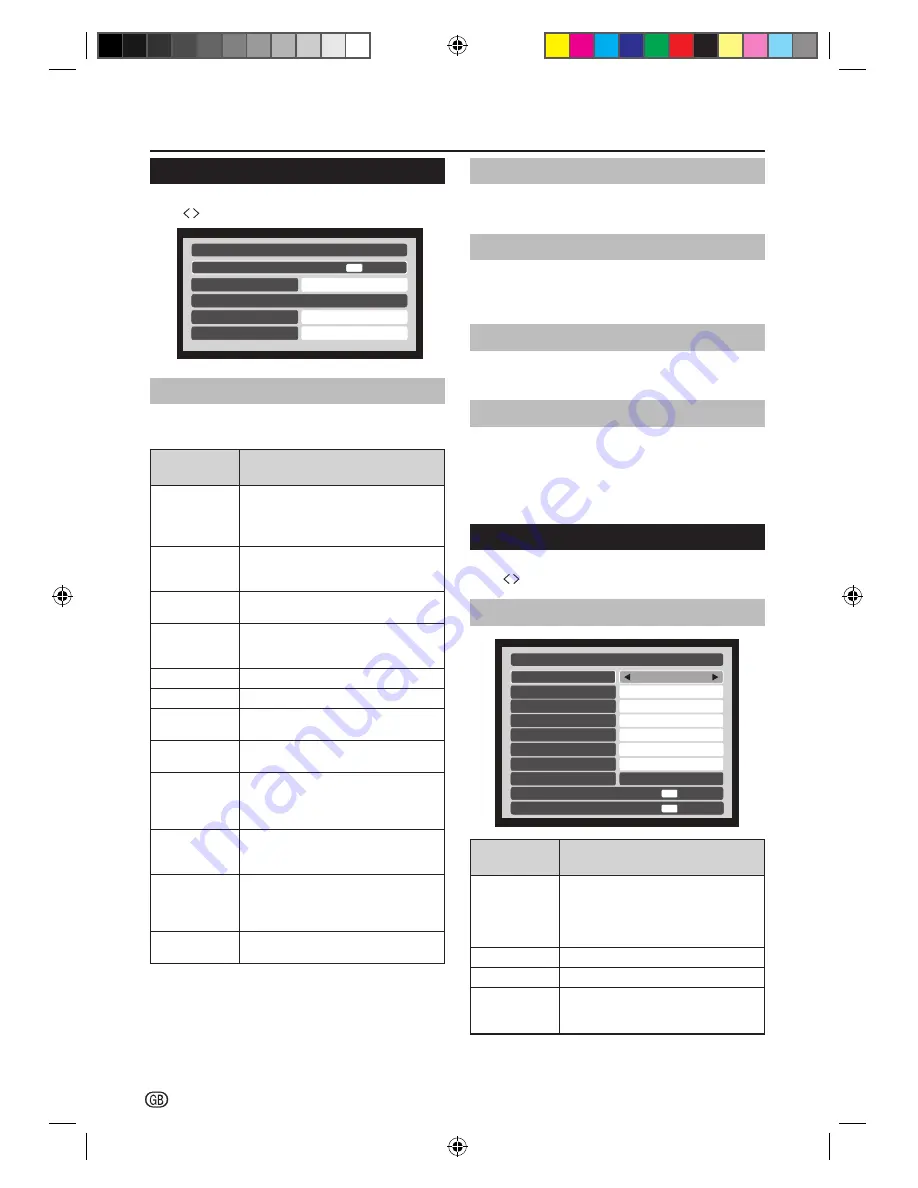
Picture

Picture Settings

C.M.S. Adjustment

OK

C.M.S. Control

DNR

MPEG NR

Off

Low

Low

Picture Settings

You can customise current picture mode settings while 
selecting “User” in the Picture Settings menu.

Selected 
item

Description

Smart Picture

Smart picture to set your TV to a 
predefined picture setting.
(Dynamic/ Standard/ Soft/ Movie/ 
User)

Active 
Contrast

Automatically adjust the contrast of an 
image according to the scene.
(Off/Low/High)

Back Light 

Adjust the background brighter or 
darker.

Contrast

Change the level of bright parts in 
the picture keeping the dark parts 
unchanged.

Brightness

Change the level of light in the picture.

Colour

Change the level of saturation.

Tint

Change the colours to reddish or 
bluish.

Sharpness

Change the level of sharpness of fine 
details.

Film Mode

Automatically detects a film-based 
source, analyses it and then recreates 
each still film frame for high-definition 
picture quality. (On, Off)

Colour 
Temperature

Set the colour temperature to Cool 
(bluer), Medium (balanced), Warm 
(redder).

Gamma 
Adjustment

Selects the tone difference of the 
brightness and darkness of the image  
according to the type of programme 
watched.

Reset

Reset all adjustment item to factory 
preset values.

C.M.S. Control

Select On to set the C.M.S. Adjustment to be more 
natural.

C.M.S. Adjustment

Adjust the brightness of a selected colour using a six-
colour adjustment system (only if the C.M.S. Control 
is On).

DNR

Filter and reduce the noise in the picture. (Off/Low/
Middle/High)

MPEG NR

When watching a DVD, the compression may cause 
some words or picture elements to become distorted 
or pixelated. Using the MPEG NR feature reduces this 
effect by smoothing out the edges. (Off/Low/Middle/
High) 

Sound

Press 

MENU

.

Press     to select Sound, and press 

OK

.

Adjust sound setting

Sound

Dual

Treble

Dual 1

Bass

Balance
Bass Enchancer

0

0

0

Surround Sound

Off

Off

AVL

Off

Dynamic Range Control

On

Digital Audio Output
Audio Description

OK

OK

Selected 
item

Description

Dual

If a programme or film is being 
broadcast with a soundtrack in more 
than one language, the DUAL feature 
allows selection between Dual1 or 
Dual2.

Bass

Adjust the Bass sound.

Treble

Adjust the Treble sound.

Balance

Set the balance of the left and right 
speakers to best fit your listening 
position.

SHARP_LE144E_1_GB_English.indd   16

SHARP_LE144E_1_GB_English.indd   16

5/31/2012   2:55:53 PM

5/31/2012   2:55:53 PM

Summary of Contents for Aquos LC-32LE144E

Page 1: ...CTRONICS Europe GmbH Sonninstraße 3 D 20097 Hamburg Deutschland SHARP CORPORATION http www sharp eu com Printed in Poland TINS F527WJZZ LC 32LE144E LC 32LE244E TINS F527WJZZ LE144E_244E_Cover_EN indd 1 LE144E_244E_Cover_EN indd 1 5 31 2012 10 57 08 AM 5 31 2012 10 57 08 AM ...

Page 2: ...wn Live As the colours of the wires in the mains lead of this product may not correspond with the coloured markings identifying the terminals in your plug proceed as follows The wire which is coloured blue must be connected to the plug terminal which is marked N or coloured black The wire which is coloured brown must be connected to the plug terminal which is marked L or coloured red Ensure that n...

Page 3: ...Favorite Control 15 Favorite Program 15 Favorite Network 15 Channel Grouping 15 Common Interface 15 TV Menu 16 Picture 16 Picture Settings 16 C M S Control 16 C M S Adjustment 16 DNR 16 MPEG NR 16 Sound 16 Adjust sound setting 16 Digital Audio Output 17 Audio Description 17 Setup 17 Language 17 Country 17 Tuner Mode 17 Auto Tuning 17 ATV Manual Tuning 17 DTV Manual Tuning 17 DTV Settings 17 Connec...

Page 4: ...the product in an enclosed place such as a bookcase or rack unless proper ventilation is provided or the manufacturer s instructions are followed The LCD panel used in this product is made of glass Therefore it can break when the product is dropped or impact applied If the LCD panel is broken be careful not to be injured by broken glass Heat sources Keep the product away from heat sources such as ...

Page 5: ...t m TELETEXT Press to activate Teletext Press again to activate Teletext with TV Press again to turn off Teletext AD Audio Description Press to switch the Audio Description On or Off SUBTITLE For DTV press to toggle off between available subtitle languages For ATV press to toggle off between available subtitle pages in Teletext v Top Bottom Full Press to change the font size Full screen Top half a...

Page 6: ...2 OUTPUT A A B AUDIO L R CAUTION Use a Product with the following thickness for optimal connection to HDMI cable USB device HDMI A 12mm USB A 10mm B 7mm EXT 3 COMPONENT AV INPUT EXT 2 HDMI 1 DIGITAL AUDIO OUTPUT EXT 1 SCART ANT PC L AUDIO R PB CB Y PR CR P MENU Common Interface slot COMPONENT CVBS and L R AUDIO INPUT Headphone Output USB Tuner Input SCART CVBS Tuner out PC IN VGA HDMI 1 HDMI 2 Pro...

Page 7: ...etach the TV stand do these steps in reverse order Mounting the TV on a wall This TV should be mounted on a wall only with a SHARP wall mount bracket The use of other wall mount brackets may result in an unstable installation and may cause serious injuries Mounting the LCD colour TV requires special skills and should only be performed by qualified service personnel Customers should not attempt to ...

Page 8: ... supplied with this product may have a shorter life expectancy due to storage conditions Note on disposing batteries The batteries provided contain no harmful materials such as cadmium lead or mercury Regulations concerning used batteries stipulate that batteries may no longer be thrown out with the household rubbish Deposit any used batteries free of charge into the designated collection containe...

Page 9: ... MENU Run the initial auto installation Auto Installation Language Country Digital Subtitle Language Digital Subtitle Language 2nd Audio Language Audio Language 2nd English Germany English English English English Back RETURN Select Tuner Mode OK 1 Language setting 2 Country setting 3 Digital Subtitle Language 4 Digital Subtitle Language 2nd 5 Audio Language 6 Audio Language 2nd Press to select the...

Page 10: ... Start Scan and press OK Auto Tuning ATV DTV Stop EXIT Progress 1 0 Channel C3 Station Found 0 0 NOTE You may be prompted to select your local cable operator before running the cable scan mode Watch TV 3 Congratulations Now you can watch TV If necessary adjust the antenna to attain maximum signal reception SHARP_LE144E_1_GB_English indd 8 SHARP_LE144E_1_GB_English indd 8 5 31 2012 2 55 42 PM 5 31 ...

Page 11: ...g to use this TV for a long period of time be sure to remove the AC cord from the power outlet A small amount of electric power is still consumed even when the power is turned off Changing channels Change channels by pressing P button Channel List Channel List allows you to quickly find the channel Press OK to bring up the Channel List If the Favorite Control in the DTV Settings is set to On chann...

Page 12: ...ss to select desired channel and press 3 Press to select programme and press OK Programme Guid 4 e Rossia K í í í í í í í í í Deejay Chiama Italia Deejay Hits The Club Deejay Tg Deejay News Beat Deejay News Beat UL Xg 4 4 6 9 Rossia K Radio Rossia NTV Rossia 75 DQDO LELJRQ SeUvice QIoUmatioQ SeUvice QIoUmatioQ SIT Back RETURN Save OK Edit Programme Timers 4 Rossia K Deejay Chiama Italia í XJ ONCE ...

Page 13: ...r teletext operations Buttons Description P Increase or decrease the page number Colour R G Y B Select a group or block of pages displayed in the coloured brackets at the bottom of the screen by pressing the corresponding Colour R G Y B on the remote control unit 0 9 Directly select any page from 100 to 899 by using 0 9 v Top Buttom Full Switch the Teletext image to Top Bottom or Full l INDEX Pres...

Page 14: ...he TV automatically detects and stores all available services in your area This function also allows you to perform the channel setting for digital and analogue individually and reconfigure the settings after the initial auto installation has been completed Press MENU Press to select Setup and press OK Press to select Auto Tuning and press OK E Tuner Mode Antenna 1 Press to select ATV and DTV DTV ...

Page 15: ...rn off to execute manual fine tune function I Station Station identification Use the buttons to enter up to seven characters 3 Press OK to save DTV Manual Tuning Press MENU Press to select Setup and press OK Press to select DTV Manual Tuning and press OK E DTV mode Antenna 1 Press to select RF Channel and press to select or use the digit buttons on the remote to enter a channel DTV Manual Tuning O...

Page 16: ... New Password Confirm Password Enter your password by using the digit buttons on the remote control NOTE If you forget your password enter 1276 to override any existing passwords DTV Settings DTV Settings Press MENU Press to select Setup and press OK Press to select DTV Settings and press OK Channels Channels TV Back RETURN 5HíQXPEHU Skip 3RViWiRQ 803 804 805 806 807 805 1aPH Rossia 1 Rossia 24 NT...

Page 17: ... scan Channel Grouping The channel group setting is to group the service type Video or Audio services while changing channel by P P buttons It is required for Riks TV certification for Norway When Channel Grouping is set to On the P P will change the services in a group for example we have the services in channel list like below 1 V1 video service 2 V2 3 V3 4 V4 5 V5 6 A1 audio service 7 A2 8 A3 I...

Page 18: ...e difference of the brightness and darkness of the image according to the type of programme watched Reset Reset all adjustment item to factory preset values C M S Control Select On to set the C M S Adjustment to be more natural C M S Adjustment Adjust the brightness of a selected colour using a six colour adjustment system only if the C M S Control is On DNR Filter and reduce the noise in the pict...

Page 19: ...impaired audio Setup Press MENU Press to select Setup and press OK Language Select the menu display language Country Select the country where you are located The TV installs and arranges channels according to your country Tuner Mode Select the tuner mode Antenna Cable Auto Tuning See page Channel Setting ATV Manual Tuning See page Channel Setting DTV Manual Tuning See page Channel Setting DTV Sett...

Page 20: ...n set to 4h 6h 8h the TV will automatically enter standby mode if no operations are performed in 4 6 8 hours Location Select the location Home Store Software Upgrade E Auto Upgrade The TV automatically determines whether a new software Searching for updates version is available when the TV is in standby mode NOTE All countries except UK Sweden and Italy are set to Off for this function E Auto Inst...

Page 21: ... when the TV receives Teletext signal broadcast by a TV network Auto LIST See page Teletext Button Control Lock Locks the buttons on the TV except the power switch Off Auto Wide When this television receives a true Wide screen picture and Auto format is On it will automatically be displayed in Wide screen format irrespective of the television s previous setting On Off 4 3 Mode Select aspect ratio ...

Page 22: ...me programmes Subtitle When subtitle are included on a letterbox format broadcast this setting will raise the picture to ensure that all the text is displayed 14 9 For 14 9 letterbox pictures A thin side bar appears on each side and you may also see bars on the top and bottom with some programmes Normal When using a PC connected via HDMI this setting will show the picture without over scan i e WYS...

Page 23: ... HDM I 2 USB C I OUTP UT AUDIO L R A B A USB A 10 mm B 7 mm HDMI A 12 mm CAU TION Use a Product with the following thickness for optimal connecti on to HDMI cable USB device P MENU NOTE Depending on the USB device the TV may not be able to recognise the contained data Use only alphanumeric characters for naming files File names over 80 characters may vary depending on character set may not be disp...

Page 24: ...ot be played properly Operation using USB hubs is not guaranteed Cables used to extend the USB device must be certified as USB 2 0 Video playback via a USB device may not be possible or the playback quality affected if the device data transfer speed rating is too low No quickly operation between play pause fast forward rewind The video might get judder or unsmooth when USB read write speed is unde...

Page 25: ...l the repeat Show playlists Select a file from the playlists to start playback The information will be removed by time out about 15 sec or press OK to exit Slow forward Each time you press slow forward the speed will change Single frame forward Each time you press OK the picture will change to the next still picture Aspect Ratio Smart Picture Rotate clockwise 90º Rotate counterclockwise 90º Select ...

Page 26: ... cable USB device HDMI A 12mm USB A 10mm B 7mm P MENU HDMI DVI HDMI 2 HDMI cable DVI HDMI cable HDMI device HDMI 1 or HDMI 2 DVI HDMI conversion Using a DVI HDMI adapter cable the digital video signals of a DVD can also be played via the compatible HDMI connection Both HDMI and DVI use the same HDCP copy protection method Supported video signal 576p 480p 1080i 720p 1080p See page 26 for PC signal ...

Page 27: ...e CI Common Interface slot of the TV The CA module and the Smartcard are not supplied accessories They are usually available from your dealer Inserting the Smartcard into the CA module 1 Carefully insert the CA module into the CI slot with the contact side forward 2 The logo on the CA module must be facing outward from the rear of the TV EXT 3 COM PON ENT Y L AU DIO R HDMI 1 PC AV INPU T EXT 2 PB ...

Page 28: ...C L AUDIO R PB CB Y PR CR C I USB HDMI 2 OUTPUT A A B AUDIO L R CAUTION Use a Product with the following thickness for optimal connection to HDMI cable USB device HDMI A 12mm USB A 10mm B 7mm P MENU DVI I VGA PC HDMI PC RGB cable DVI I RGB conversion cable Supported display resolutions Computer formats PC Resolution Refresh rate 640 x 480 60Hz 800 x 600 56Hz 800 x 600 60Hz 1024 x 768 60Hz 1280 x 7...

Page 29: ...e use the Channel Scan function to increase the number of channels not included in memory No colour Please adjust the colour setup Blinking picture accompanied by ghost image 1 Check the connection of antenna signal cable 2 Check if channel is in play mode 3 Press signal source and change input mode Broken lines or segments Adjust antenna Keep the TV away from noise sources such as automobiles neo...

Page 30: ...dia play DC5V 500 mA HDMI 2 Digital video and audio input HEADPHONE Ø 3 5mm jack Audio output OSD Language English German French Italian Dutch Spanish Greek Portuguese Swedish Finnish Russian Polish Turkish Hungarian Czech Slovak Danish Norwegian Estonian Latvian Lithuanian Slovenian Bulgarian Croatian Romanian Serbian Ukrainian Belarussian Power Requirement AC 220 240 V 50 Hz Power Consumption 58...

Page 31: ... hot or cold location Also do not leave the unit in a location exposed to direct sunlight or near a heater as this may cause the cabinet to deform and the LCD panel to malfunction Storage temperature 20 C to 60 C Devices connected to the protective earthing of the building installation through the MAINS connection or through other devices with a connection to protective earthing and to a televisio...

Page 32: ...ademarks of Rovi Corporation or its subsidiaries and are used under license ABOUT DIVX VIDEO DivX is a digital video format created by DivX LLC a subsidiary of Rovi Corporation This is an official DivX Certified device that plays DivX video Visit divx com for more information and software tools to convert your files into DivX videos ABOUT DIVX VIDEO ON DEMAND This DivX Certified device must be reg...

Page 33: ...duct please contact your local authorities and ask for the correct method of disposal For Switzerland Used electrical or electronic equipment can be returned free of charge to the dealer even if you don t purchase a new product Further collection facilities are listed on the homepage of www swico ch or www sens ch B Information on Disposal for Business Users 1 In the European Union If the product ...

Reviews: