5
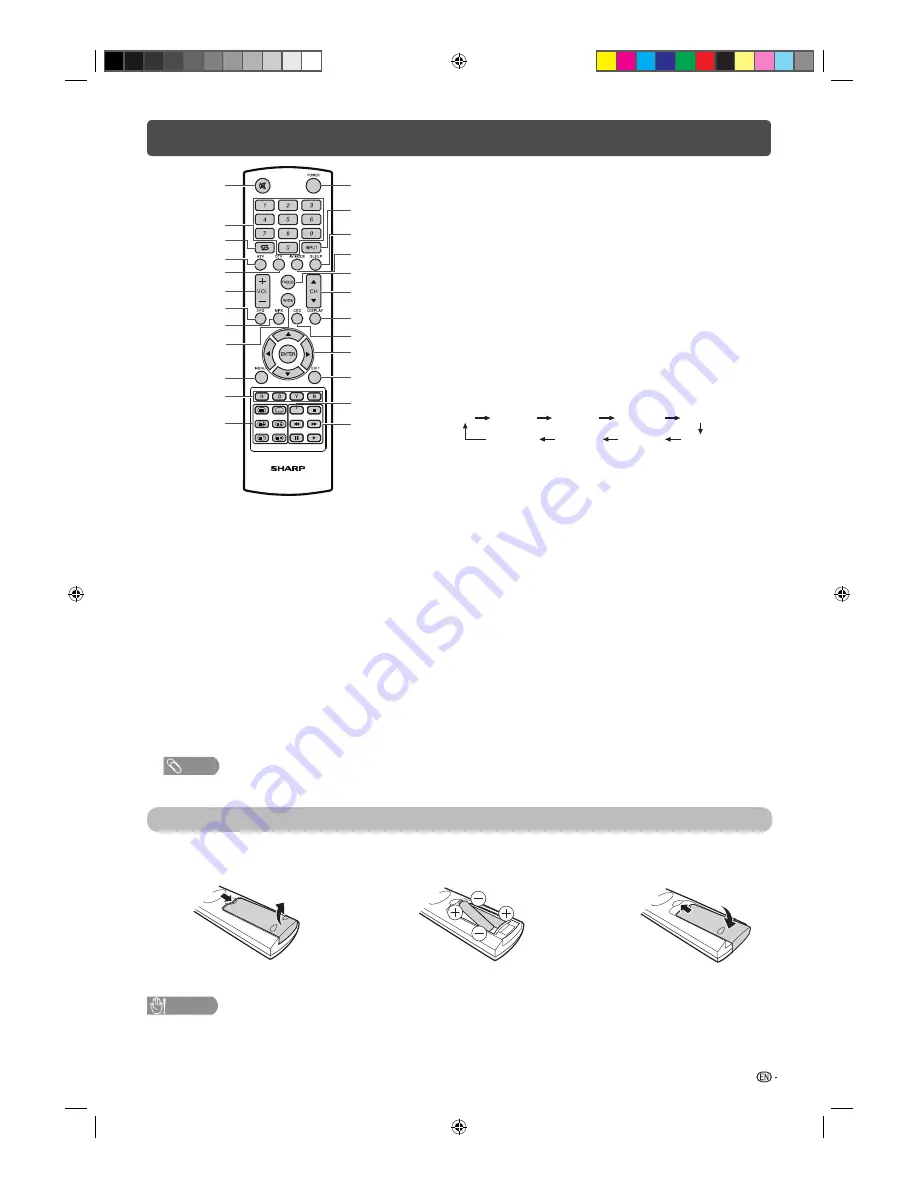
Remote control unit
1
10
3
6
8
9
4
7
15
14
13
19
18
17
16
5
2
11
12
21
20
22
23
*
8 MPX
Select the sound multiplex mode.
9 WIDE
Change the screen mode. (See page 10.)
10 MENU
Display the menu screen.
11 Colour (Red/Green/Yellow/Blue)
TELETEXT mode: Select a page. (See page 15.)
12
m
(TELETEXT),
k
(Reveal hidden for TELETEXT),
[
(SUBTITLE for TELETEXT),
3
(Hold),
1
(Subpage),
v
(Top/Bottom/Full)
Use for TELETEXT mode. (See page 15.)
13 POWER (On/Off)
To switch the power on and off. (See page 6.)
14 INPUT (INPUT SOURCE)
Select an input source.
15 SLEEP
Set the Sleep Timer.
Off
10 Minutes
20 Minutes
30 Minutes
60 Minutes
90 Minutes
40 Minutes
50 Minutes
120 Minutes
16 AV MODE
Select an audio and video setting. (See page 7.)
17 FREEZE
Freeze a motion picture on the screen.
•
FREEZE does function for TV channel only.
18 CH
a
/CH
b
TV input mode: Select the channel.
(
CH
a
) Increase the channel number.
(
CH
b
) Decrease the channel number.
TELETEXT mode: Select the page. (See page 15.)
19 DISPLAY
Display the channel or input information.
20 CEC
By connecting HDMI CEC compatible devices such as DVD
player with HDMI-certifi ed cables to the TV, you can control
a device using the TV’s remote control. (See page 18.)
21
a
/
b
/
c
/
d
(Cursor)
Select a desired item on the setting screen.
ENTER
Execute a command.
22 EXIT
Return to the default screen or the previous menu screen.
23
d
/
H
/
F
/
S
/
V
Used for the HDMI external equipment with CEC control function
and USB Media Player.
1
e
(Mute)
Press
e
s
Mutes sound.
Press
e
again
s
Restores sound.
2 0 – 9
Set the channel.
TELETEXT mode: Set the page. (See page 15.)
3
A
(Flashback)
Press
A
to return to the previous selected channel or
external input mode.
4 ATV
Press to access ATV mode. (See page 13.)
5 DTV
Press to access DTV mode. (See page 13.)
6 VOL
k
/VOL
l
Set the volume.
(
VOL
k
) Increase the volume.
(
VOL
l
) Decrease the volume.
7 EPG
DTV mode: To display EPG (Electronic Programme
Guide) screen. (See pages 14.)
NOTE
*
This button does not work in this model.
Inserting the batteries
Before using the TV for the fi rst time, insert two “AAA” size batteries (supplied). When the batteries become
depleted and the remote control fails to operate, replace the batteries with new “AAA” size batteries.
1
Open the battery cover.
2
Insert the two supplied “AAA” size batteries.
3
Close the battery cover.
• Place batteries with their terminals corresponding to the
(
e
) and (
f
) indications in the battery compartment.
CAUTION
• Batteries (battery pack or batteries installed) shall not be exposed to excessive heat such as sunshine, fi re or the like.
• If the remote control will not be used for a long time, remove the batteries.
• Do not subject the remote control unit to shock. In addition, do not soak the remote control unit with liquids or place it
in an area with high humidity.
• Do not install or place the remote control unit under direct sunlight. The heat may cause deformation of the unit.
LC24LE430X_EN.indb 5
LC24LE430X_EN.indb 5
7/19/2011 9:38:11 AM
7/19/2011 9:38:11 AM
Summary of Contents for Aquos LC-24LE430X
Page 2: ...LC24LE430X_EN indb 2 LC24LE430X_EN indb 2 7 19 2011 9 38 04 AM 7 19 2011 9 38 04 AM ...
Page 24: ...Memo LC24LE430X_EN indb 22 LC24LE430X_EN indb 22 7 19 2011 9 38 17 AM 7 19 2011 9 38 17 AM ...
Page 25: ...Memo LC24LE430X_EN indb 23 LC24LE430X_EN indb 23 7 19 2011 9 38 17 AM 7 19 2011 9 38 17 AM ...
Page 26: ...Memo LC24LE430X_EN indb 24 LC24LE430X_EN indb 24 7 19 2011 9 38 17 AM 7 19 2011 9 38 17 AM ...
Page 27: ...LC24LE430X_EN indb 25 LC24LE430X_EN indb 25 7 19 2011 9 38 17 AM 7 19 2011 9 38 17 AM ...


