background image

7

Rigging process using yhe SGM Omega brackets

Start the standard rigging process by blocking the lower working area, and make sure the work is 

performed from a stable platform.

1. 

Check that the clamp/bracket is undamaged and can bear at least 10 times the weight of 

the fixture. Check that the structure can bear at least 10 times the weight of all installed 

fixtures, lamps, cables etc.

2. 

Bolt the clamp/bracket securely to the omega bracket with a M12/ ½ bolt (min. grade 8.8 

C5M) and a lock nut.

3. 

Align the omega bracket with the i-5 Series base. For standard Omega Bracket,           in

-

sert the fasteners into the i-5 Series base bracket, and turn both levers a full 1/4 turn      

clockwise to lock. When using the POI Omega Bracket, insert the included M-10 screws through the bracket holes and 

tighten them with a M-10 key until they are fully attached to the base.

4. 

Working from a stable platform, hang the fixture on a truss or other structure. Tighten the clamp/bracket.

5. 

Install a safety wire that can bear at least 10 times the weight of the fixture. The safety wire attachment point is designed to 

fit a carabiner AISI316 grade.

6.  Verify that there are no combustible materials, cables, or surfaces to be illuminated within 0.3 m (12 in.) of the fixture.

7. 

Check that there is no risk of the head/yoke colliding with other fixtures or structures.

i-5 Mounting bracket 

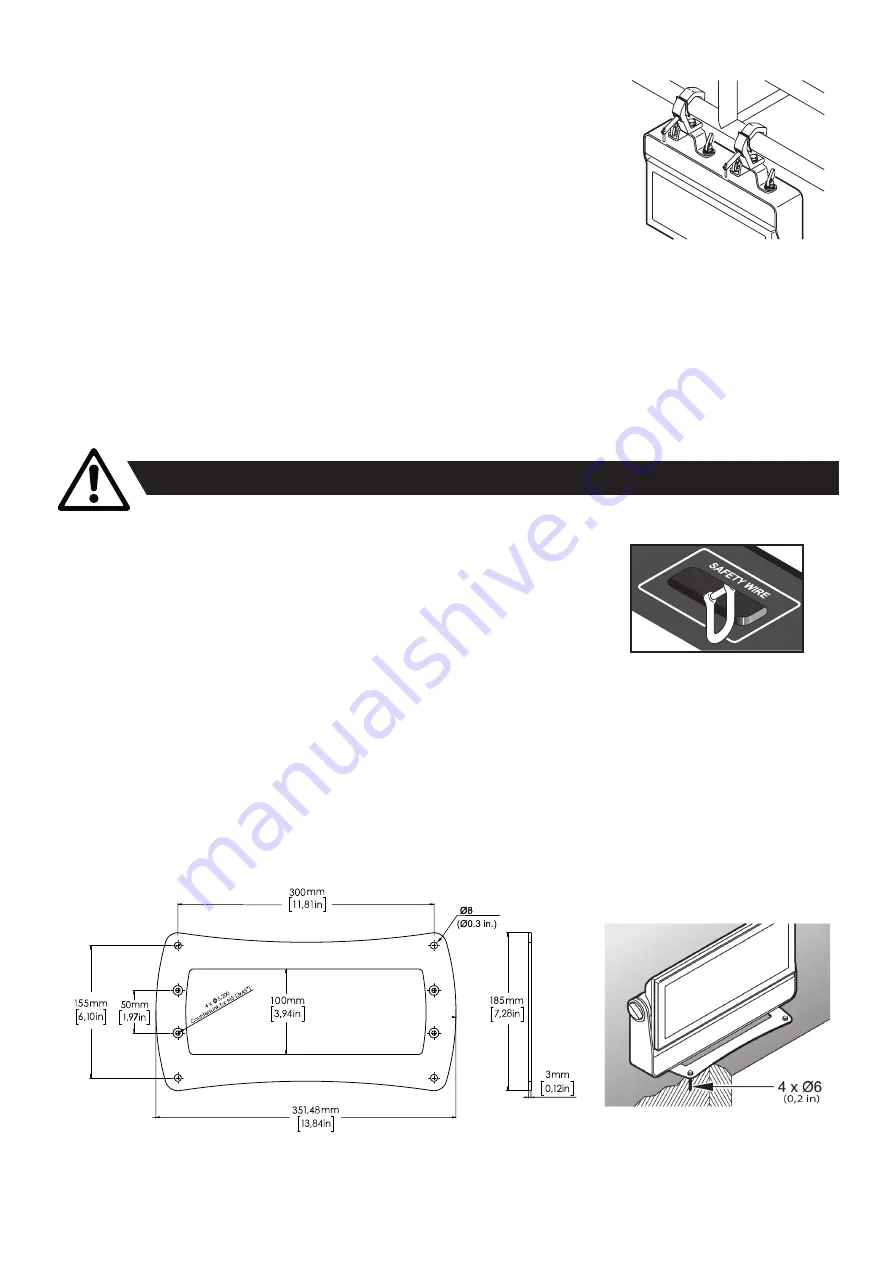
The standard i-5 includes a mounting bracket with fasteners that can be attached to the fixture. The four rubber push-in bumpers 

prevent the fixture from sliding while operating, and protect delicate surfaces from scratching. 

Please note this item is not intended for permanent outdoor installation. 

When installing the fixture indoors on the ground or on a wall, remove the four rubber push-in bumpers from the mounting bracket. 

Then securely fasten the fixture on the ground/wall by using 4 x 6 mm (1/4 in.) fasteners on the resulting holes.

WARNING!  Always secure an elevated fixture with a safety wire

Fasten a safety wire (not shown) between the load-bearing support structure and the safety wire attachment point on the device.

The safety cable (not included in the package) must:

•  Bear at least 10 times the weight of the device (SWL).

•  Have a minimum gauge of 4 mm.

• 

Have a maximum length (free fall) = 30 cm (12 in.).

CAUTION!!

• 

Always use a safety wire of a grade AISI 316 steel.

•  Make sure the slack of the safety wire is at a minimum.

•  Never use the yoke for secondary attachment.

Figure 3: Installing the i-5

Figure 4: Safety wire attachment point


Figure 5: i-5 mounting bracket

Summary of Contents for I-SERIES

Page 1: ...USER MANUAL I SERIES I 5 RGBW POI I 5 RED POI I 5 GREEN POI I 5 BLUE POI I 5 WHITE POI I 5 UV POI...

Page 2: ...es disclaim liability for any injury damage direct or indirect loss consequential or economic loss or any other loss occasioned by the use of inability to use or reliance on the information contained...

Page 3: ...l device 10 Configuring the device for DMX control 11 Setting a static color manually 12 Using standalone operation 12 Fixture personality settings 13 Fixture properties 14 Control menu part I 15 Cont...

Page 4: ...height to prevent injury due to falls For Permanent Outdoor Installations POI ensure that the fixture is securely fastened to a load bearing surface with suitable corrosion resistant hardware For a t...

Page 5: ...ixing and adjustable color temperature correction CTC from 2 000K to 10 000K i 5 RGBW only Optional accessories such as barndoors diffusers and anti glare shields Optional internal honeycomb to elimin...

Page 6: ...acket with fasteners standard only 1 x Omni CRMX Antenna standard only 1 x Spanner with magnet POI only 4 x M 10 screws POI Only Safety information leaflet Location application The standard fixture is...

Page 7: ...e materials cables or surfaces to be illuminated within 0 3 m 12 in of the fixture 7 Check that there is no risk of the head yoke colliding with other fixtures or structures i 5 Mounting bracket The s...

Page 8: ...to pages 20 21 for connecting AC power in POI fixtures After connecting the i 5 to power run the on board test by selecting the option TEST AUTOMATED TEST in the menu to ensure that the fixture and e...

Page 9: ...e or through RDM Please note In POI versions there is no display mounted in the fixture The adjustments are made through RDM See page 19 for more information The OLED display is the human interface of...

Page 10: ...isn t connected to maintain IP rating Attaching the CRMX wireless receiver POI n a The CRMXTM wireless receiver antenna is an included accessory and is recommended for long range wireless operation Be...

Page 11: ...ddress sharing can be useful for diagnostic purposes and symmetrical control Set edit DMX address The DMX address is shown on the OLED display in the control panel To change the address setting press...

Page 12: ...atic color go to MANUAL QUICK COLOR in the menu Note that once the MANUAL QUICK COLOR settings are changed the fixture will be set by default to automatically start in quick color mode whenever it is...

Page 13: ...t the default fan speed by going to SETTINGS FAN MODE in the menu NOTE In POI version the fan mode adjustment is possible through RDM Setting the LED refresh rate Frequency When using LED lighting wit...

Page 14: ...Blue White and UV The i 5 RGBW version contains 148 Red 51 Green 48 Blue and 56 White LEDs and can be operated in RGB calibrated mode which ensures that colors are compatible across the range of SGM...

Page 15: ...ne program Quickcolor Default operating mode Fixture starts up with defined quickcolor Startup Program 1 3 Select program to run at start up program 1 is default Only used if the startup mode is set t...

Page 16: ...g internal sequence or Quick Color Master Slave Set fixture to operate as Master or Slave fixture Editor Program 1 3 Currently selected program 1 2 or 3 Scene 1 24 Currently selected scene 1 24 Red i...

Page 17: ...ons allowed Name 0x0080 GET Device Model Description 0x0081 GET Manufacturer Label 0x0082 GET SET Device label 0x0090 SET Factory Defaults 0x1000 GET SET Identify 0x00F0 GET SET DMX Start Address 0x00...

Page 18: ...pect and enter the correct DMX address or mode DMX cable polarization is inverted pin 2 3 Install a phase inverter to reverse the polarity or replace cables DMX link is not terminated Install a XLR 12...

Page 19: ...cabled installation and termination When setting addresses through RDM and using USB dongles disable the USB selective suspend to ensure a proper voltage on the DMX link If any lag or trouble occurs w...

Page 20: ...nstallation and rigging The SGM Omega bracket not included or a customized bracket is needed to install the fixture Consider the dimensions below of the i 5 POI base for customized mounting brackets p...

Page 21: ...low Ground DMX IN Data DMX IN Data DMX OUT Data DMX OUT Data SGM POI DMX Cable Shield GND White DMX in Data Red DMX in Data Shield GND Black DMX out Data Yellow DMX out Data Junction box DMX cable DMX...

Page 22: ...he accessory holder The i 5 Series barndoors are also compatible with the use of color frame and diffusion filters Floorstand The i 5 Series have available an optional floorstand ideal when there is a...

Page 23: ...accessory that must be fitted between the glass front and the optics Although is must be ordered as an accessory the fixture can be customized with the honeycomb at request when ordering Note This acc...

Page 24: ...l SGM IP rated fixtures made for testing the IP validity after having reassembled the fixture In order to ensure the IP rating of the i 5 Series it s highly recommended that the fixture is always vacu...

Page 25: ...5 Series can be ordered in any RAL color and with Honey Comb at request Contact your local SGM dealer for ordering customized color housings or for more information i 5 Series accessories Omega brack...

Page 26: ...2014 35 EU Low Voltage Directive Conforms to 2014 30 EU EMC Directive Conforms to 2011 65 EU RoHS2 Directive Conforms to ANSI UL Std 1573 Certified to CSA Std C22 2 No 166 Approvals and certification...

Page 27: ...27 User Notes...

Page 28: ...28 SGM Light A S Sommervej 23 8210 Aarhus V Denmark Tel 45 70 20 74 00 info sgmlight com www sgmlight com...

Reviews: