background image


LISST-Holo2 

User’s Guide          

17 

excluded from further consideration when computing size 
distribution etc.  
 

Alpha Radius

 is the radius of the circle used to produce the 

alpha shape of a particle. The alpha shape is used to determine 
the area of particle. More information on alpha shapes can be 
found here: http://doc.cgal.org/latest/Alpha_shapes_2/index.html. 
 
Click OK when you are satisfied with your selections. 


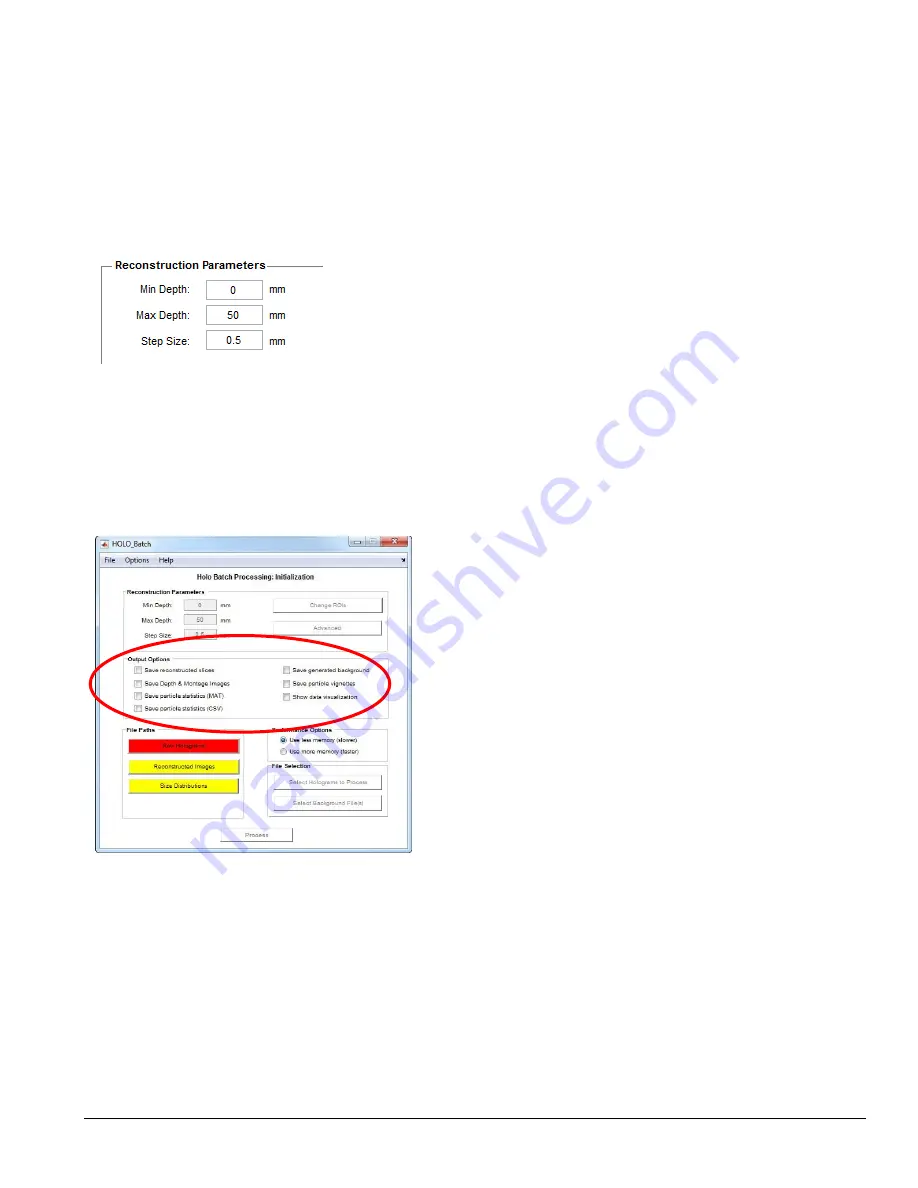
If you wish, you can change the Reconstruction Parameters.  
 

Min Depth

 indicates where to start reconstructing images. A 

value of 0 mm will start reconstruction at the receiving window of 
the LISST-HOLO2. 

Max Depth

 indicates where to stop 

reconstruction. A value of 50mm will stop the reconstruction at 
the opposite window (transmit window) of the LISST-HOLO2. 

Step Size

 determines how many millimeters apart the 

reconstructed images will be.  
 
In the example to the left, the entire sampling volume will be 
reconstructed (0-50mm), at an interval of 0.5mm. This will result 
in 101 reconstructed images. 
 
Note that the processing time increases linearly with the number 
of Steps. Upon processing, all particles in all intervals (slices) will 
be combined into one focused image.  


The next step is to select output options.    
 
A csv file containing the size distribution for each hologram is 
written by default, even if none of the check boxes or the right 
are selected. 
 
During hologram reconstruction, an image containing both in 
focus and out of focus particles is created at every step. Check 
‘Save reconstructed slices’ if all slices are to be saved.   
 
‘Save Dep/Mon Images’ saves depth and montage images of 
particles. These are composite images that show all the detected 
particles in one 2D plane. Examples are show on page 32. 
 
The ‘Save particle statistics (MAT)’ option creates a particle 
statistics file in MATLAB .mat format for every image processed. 
It will contain information about each particle detected in the 
image. See page 33 for details. 
 
The ‘Save particle statistics (CSV)’ option creates a particle 
statistics file in Comma-separated values (ASCII) format for 
every image processed. It will contain the bulk properties of the 
image. See page 32 for details. 
 
The ‘Save generated background’ option saves the background 
image used for processing 

if

 background files are selected 

(background removal is discussed later in this section).   
 
‘Save particle vignettes’ will save a small image of each 
individual particle. 
 
‘Show data visualization’ will show continually updated plots of 
total volume concentration, number of particles per hologram, 
temperature, and depth. This option is the fastest way to 
visualize data after it has been collected. 
 

Summary of Contents for LISST-Holo2

Page 1: ...equoia Scientific Inc 2700 Richards Road Suite 107 Bellevue WA 98005 USA Tel 1 425 641 0944 Fax 1 425 643 0595 info SequoiaSci com www SequoiaSci com LISST Holo2 User s Manual Version 1 0 January 2018...

Page 2: ......

Page 3: ...cal distributor a list of our international distributors can be found on www SequoiaSci com or Sequoia Scientific Inc directly Please be sure to include the instrument serial number with any correspon...

Page 4: ...ection 35 5 6 Stop Data Collection 35 5 7 Downloading Raw Holograms 35 5 8 Viewing raw holograms in OpenSeeIt 37 5 9 Next Deployment or Powering Down 39 6 Reviewing Instrument Info and Other Settings...

Page 5: ...11 7 5 Pin Bulkhead Connector Pin Assignments 53 11 8 6 Pin Bulkhead Connector Pin Assignments 54 12 Warranty 55 13 Index 57...
Page 6: ...Thus from one hologram 100 in focus photographic frames are produced and particles appear in sharp focus at the plane where they existed The reconstruction software is provided Holography is data inte...

Page 7: ...t IP address and can be changed Set up Sampling The LISST Holo2 can be set up with 4 different sampling programs Pressing the Home tab on the top of the page will display a summary of each sampling pr...

Page 8: ...on the stands Take out the clear plastic box and open it up Inside you will find a few cables and power supplies described below The blue cable is an Ethernet cable used for communication with the LI...

Page 9: ...port Use one of the other four available ports Connect the router power cable to the router Plug the router power supply into a 110 220VAC power source When the router completes its booting procedure...

Page 10: ...ght indicators NOTE When external power is provided the LISST Holo2 will run off external power instead of the internal batteries If external power is disconnected the LISST Holo2 will automatically s...

Page 11: ...s need to save it to a folder on your PC pgm format Holograms are stored in pgm format which is a lossless image format To see the holograms on your PC you may need to download and install OpenSeeIt h...

Page 12: ...gap Center the openings of the chamber on the windows and insert the U shaped spacer so that the O rings seal on the area around the window It can be helpful to push the sliding part against the windo...

Page 13: ...acted the installer will open Follow the onscreen instructions to install the MCR The installation may take a significant amount of time depending on your machine The Holo Batch and Holo Detail applic...

Page 14: ...struction Parameters Select Output Options Select Particle Bin Size Select Paths Folders Select Files The Holo Batch is shipped with factory default settings for the Reconstruction Parameters and thes...

Page 15: ...overlapping ROI s with a size of 1024 1024 pixels are chosen Particle counts will then be obtained from both ROIs and adjusted so that particles in the overlapping parts are only counted once If you c...

Page 16: ...th is 658 nm The reconstruction software needs this value in order to properly reconstruct the holograms DO NOT CHANGE THIS VALUE The Index of Refraction is for the medium in which the LISST HOLO2 is...

Page 17: ...s A csv file containing the size distribution for each hologram is written by default even if none of the check boxes or the right are selected During hologram reconstruction an image containing both...

Page 18: ...omputer with at least 6 GB of RAM and are using a reconstruction step size of 0 5 mm or more If this option is selected a warning message will remind you of the requirements of running the higher memo...

Page 19: ...Finally click the Size Distributions button to select the folder where you want the particle size distributions to be stored If you have selected to output CSV or MAT files this is where they will be...

Page 20: ...nd files which will be averaged into one background file before subtracting It is not necessary to supply a background hologram in order to process your holograms if you do not select a background non...

Page 21: ...sing to exit If the data visualization option is selected the plots shown at the left will be updated after each hologram is processed A status bar will be displayed at the bottom of the screen showin...

Page 22: ...t window blue particles very close to the receive window Using a pair of red and blue 3 D glasses will display the particles with a 3 D effect where the red particles will appear closer to the viewer...

Page 23: ...ened up in MATLAB It contains a structure called PartStats It has dimensions N 17 where N is the number of particles detected in the ROI The 10 columns have the following information about each partic...

Page 24: ...s particles that appear on that particular slice The distance from the transmit window of each slice is given in the image filename For example the image on the left is 016 0270 z22 500 TIFF meaning i...

Page 25: ...o select a folder for browsing your holograms Select the folder where your holograms are stored then click OK If you are just getting stated navigate to the Example Holograms folder located on the shi...

Page 26: ...ether and subtract from a hologram when computing the Hologram Content Rating discussed later This is a rolling background subtraction For example the default value is 10 therefore the holograms avera...

Page 27: ...t button to initiate the reconstruction process Upon reconstruction the individual slices can be viewed on the right by clicking on the left and right arrows The X Y and Z axes of the reconstructed im...

Page 28: ...click to mark the end of the transect a figure similar to the one on the left will pop up showing the pixel intensities along the selected transect Zoom and Reset Buttons Clicking the zoom button enab...

Page 29: ...tures for sorting holograms based on time stamp depth or content After a long deployment that has generated thousands of holograms this can be useful tool to sort or organize holograms before processi...

Page 30: ...w view and reconstruct these holograms as described in the previous section Holo Detail also allows you view plots of the hologram meta data Switching to Plot View under the Data View Panel allows you...

Page 31: ...r the batteries to charge The vent is the white plastic tab on the LISST Holo2 endcap Unscrew the vent until the red O ring is clearly visible as shown on the left Do not open the vent past the point...

Page 32: ...but fast charging still doesn t start also connect the external power supply through the 5 pin bulkhead connector this is necessary when the batteries are so deeply discharged that the battery supervi...

Page 33: ...switch is in the 1 position If it is past the specified time the sampling will start immediately if the magnetic switch is in the 1 position Be sure to check the homepage to make sure your LISST HOLO2...

Page 34: ...e in GMT The Stop after setting will stop the sampling after the specified amount of time from the start of data collection The Depth value will stop when the depth is deeper than the specified depth...

Page 35: ...move the switch to the 0 position Within a few seconds the LED on the endcap should change from Red to Green If the data collection has already stopped the LED will be blinking green regardless of the...

Page 36: ...ndow To the left is the destination folder selection Navigate to the desired destination folder In this example we will offload to a folder on the C drive called HOLO Offload Note that the destination...

Page 37: ...holograms straight across to the destination folder window on the left side of the screen The selected holograms will then transfer to the destination folder To DELETE the holograms right click on th...

Page 38: ...follow the instructions below Open up OpenSeeIt and select Browser Mode from the View Menu Navigate to the folder where your holograms are stored They will all be displayed in the bottom left of the O...

Page 39: ...the current sampling program For short term or long term storage of the LISST Holo2 it should be put into Sleep mode The instrument will automatically go into lower power sleep mode after 10 minutes...

Page 40: ...user select which program should control the LISST HOLO2 sampling Up to 4 programs can be loaded in the LISST HOLO2 In the example to the left Program 1 is selected If another program is to be selecte...

Page 41: ...cting Configure on the home page main menu will bring up a window listing many parameters and allows their values to be changed Values on this page should not be changed without detailed knowledge of...

Page 42: ...ISST Holo2 goes to sleep you will lose connection with the instrument Click the Reboot button to reboot the LISST HOLO2 If you reboot you must re enter the LISST HOLO2 IP address in your browser windo...

Page 43: ...dates the next time it reboots This requires connection to the Internet Use the Reboot button above when ready Network parameters Use Network parameters to change the IP address of the LISST HOLO2 Cli...

Page 44: ...e top of the About page contains information about the hardware and firmware loaded in the instrument as well as the serial number of the instrument Below this section are a few FAQ s as well as links...

Page 45: ...nce Make sure that the windows are as clean as possible The windows can be cleaned with Windex but often a mild lukewarm soap solution is the best for cleaning optical windows Dip a finger in the soap...

Page 46: ...uter you need to enter the WAP PSK password which is manyholograms Then power up the LISST HOLO2 and initiate communication as described in section 3 2 Updating LISST HOLO2 software via the Internet T...

Page 47: ...ke effect immediately so you will need to enter the new IP address in your browser to continue working with the LISST HOLO2 8 4 Recovering Lost IP Address Using the Serial Port In order to communicate...

Page 48: ...LISST Holo2 is fully booted press the enter key several times You should see a response similar to the one on the left The error messages displayed in the terminal are normal and should be ignored The...

Page 49: ...sables automatic sleep and click the Apply button Why can t the LISST Holo2 be used when the flow speed is more than 2 m s It takes 2 microseconds to capture the hologram using the digital camera The...

Page 50: ...more thorough explanation The optional Path Reduction Module can be used to shorten the optical path which will allow up to a factor of 5 increase in the maximum concentration Mean Particle Diameter W...

Page 51: ...rnet communication GREEN followed by BLUE every 2 seconds A sampling program is active but is waiting for the start condition to be met GREEN flashing continuously twice per second A sampling program...

Page 52: ...ta processing yields in focus particle images and volume distribution Automated firmware updates possible when instrument is connected to the Internet 11 2 Parameters Measured and Derived Particle ima...

Page 53: ...40 seconds when all systems are turning on 11 6 Dimension Drawing LISST Holo2 dimensions in inches mm 11 7 5 Pin Bulkhead Connector Pin Assignments Pin Function Teledyne Impulse part MCBH WB 5 MP SS M...

Page 54: ...6 Pin Bulkhead Connector Pin Assignments Pin Function Teledyne Impulse part MBCH WB 6 MP SS MALE FACE VIEW 1 Power Ground 2 Battery Charge Input 3 Digital Output active low 4 Digital Input active high...

Page 55: ...tomer based on this noncompliance provided that Customer gives SEQUOIA prompt written notice of the claim SEQUOIA has exclusive control over the defense and settlement of the claim Customer provides s...

Page 56: ...erating Products Customer will not use any such software for any other purpose modify adapt translate or create derivative works based on any such software or disassemble decompile or reverse engineer...

Page 57: ...truction parameters 14 ROI Region Of Interest 15 HOLO_Detail 25 Hologram 49 details 41 download from internal drive 35 41 enter comment 42 processing 13 view in OpenSeeIt 37 Home page 10 40 Images pag...

Reviews: