background image

3

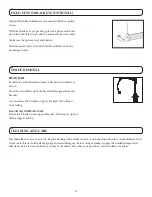
OUTSIDE MOUNT

The minimum mounting height for 

outside mounted shades is 2

.

Make sure the brackets are level and 

aligned.

Attach each bracket using two screws.

Outside Mount

Minimum 2” surface

SPACER BLOCKS  

(OPTIONAL)

Each spacer block projects brackets 

3

8


away from mounting surface.

Make sure the brackets are level and 

aligned.

Attach each bracket using two screws.  

Screws should be long enough to secure 

the bracket to the mounting surface.

Outside Mount 

with Spacer Blocks

Additional 

3

8

” projection

Summary of Contents for CORD LOOP

Page 1: ...CORDLESS Installation Care Instructions 152740 1 9 2018 Roller Shades ...

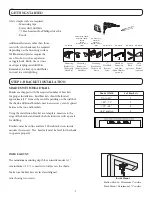
Page 2: ...be required depending on the mounting surface Wallboard and plaster require the use of anchors such as expansion or toggle bolts Brick tile or stone need special plugs and drill bits Remember to always pre drill holes in wood to avoid splitting 1 1 4 Hex Head Bracket Screw Spacer Block optional Left Mounting Bracket PN CSRD1000W PN 20201012 PN CS2000 Right Mounting Bracket with Insert PN CSRD1001W...

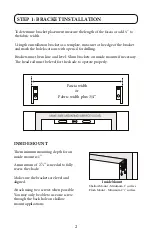
Page 3: ...kets on inside mounts if necessary The head rail must be level for the shade to operate properly INSIDE MOUNT The minimum mounting depth for an inside mount is 1 A minimum of 2 1 4 is needed to fully recess the shade Make sure the brackets are level and aligned Attach using two screws when possible You may only be able to use one screw through the back hole on shallow mount applications Inside Mou...

Page 4: ...two screws Outside Mount Minimum 2 surface SPACER BLOCKS OPTIONAL Each spacer block projects brackets 3 8 away from mounting surface Make sure the brackets are level and aligned Attach each bracket using two screws Screws should be long enough to secure the bracket to the mounting surface Outside Mount with Spacer Blocks Additional 3 8 projection ...

Page 5: ...post on the left endcap Be sure the cross shapes are lined up Align the tabs on the bracket insert with the slots in the end of the roller tube Insert the post of the right bracket insert into the right end of the roller tube Next slide the right bracket insert up into the right bracket until it snaps into place 1 2 ...

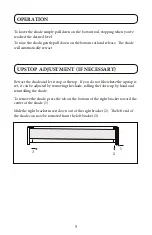
Page 6: ...IF NECESSARY Retract the shade and let it stop at the top If you do not like where the upstop is set it can be adjusted by removing the shade rolling the fabric up by hand and reinstalling the shade To remove the shade press the tab on the bottom of the right bracket toward the center of the shade 1 Slide the right bracket insert down out of the right bracket 2 The left end of the shade can now be...

Page 7: ... the sticky side facing the roller up as far as possible The tape should be running parallel to the roller Roll the shade up and check for skewing If the shade is still skewing add another strip of tape on top of the first one If the shade is now skewing in the opposite direction tear off about 1 of tape from the last strip installed Tear the tape off the end closest to the center of the shade Pla...

Page 8: ...feather duster or vacuum cleaner brush is recommended Most stains can be blotted with a damp sponge and mild detergent Before using anything stronger than mild detergent and lukewarm water test an unobtrusive corner of the shade If you have any questions call your dealer for advice ...

Page 9: ...CORD LOOP Head Rail Fascia and No Head Rail Installation Care Instructions 152038 H 5 30 2017 Roller Shades ...

Page 10: ...roximately 3 from either end Depending on the width of the shade additional brackets may be necessary evenly spaced between the two end brackets Using the installation bracket as a template measure to the edge of the bracket and mark the hole locations with a pencil for drilling Brackets must be in line and level Shim brackets on inside mounts if necessary The head rail must be level for the shade...

Page 11: ...nstalled and properly positioned attach the mounting brackets using the nuts and bolts provided Side Mount Minimum 2 surface height Minimum 1 1 8 surface depth Outside Mount with Extension Brackets Minimum 2 surface SPACER BLOCKS OPTIONAL Each spacer block projects brackets 3 8 away from mounting surface Make sure the brackets are level and aligned Attach each bracket using two screws Screws shoul...

Page 12: ...ill need to be placed approximately 1 16 in from the window casing Make sure that the brackets are placed so that the shade is securely engaged with the tabs on the brackets OUTSIDE MOUNT Outside mount brackets should be installed so that the measurement from the outside of the left bracket to the outside of the right bracket is the ordered shade width plus 3 16 Make sure the brackets are level an...

Page 13: ...own Be sure the shade is fully rolled on the tube Insert the foot of the control side bracket into the slotted center hole of the clutch Set the post of the end plug into the V of the support bracket Rotate the T hook on the support bracket to lock in the post and secure the fabric roll Fig 15 End Plug Post V slot SHADES WITH HEAD RAIL SHADES WITH FASCIA OR NO HEAD RAIL Bracket No head rail bracke...

Page 14: ...down on the front cord will raise the shade If shade was ordered as a reverse roll the front cord will lower the shade and the back cord will raise the shade SKEW ADJUSTMENT IF NECESSARY If the shade does not raise evenly first make sure the mounting brackets are mounted level with each other If the shade is level and it still skews operate the shade to the full down position Prepare a strip of ma...

Page 15: ... shown Twist the screwdriver until the head rail disengages from the bracket As you release the brackets support the head rail to keep it from falling FASCIA OR NO HEAD RAIL Rotate the T hook on the support bracket Lift the post up and off the support bracket CLEANING AND CARE The shade fabric is easy to care for Regular dusting with a feather duster or vacuum cleaner brush is recommended Most sta...

Page 16: ...MOTORIZED SHADE With rechargeable motor Installation Care Instructions 152709I 5 1 2019 Roller Shades ...

Page 17: ...red depending on the mounting surface Wallboard and plaster require the use of anchors such as expansion or toggle bolts Brick tile or stone need special plugs and drill bits Remember to always pre drill holes in wood to avoid splitting 1 1 4 Hex Head Bracket Screw Head rail Extension and Sidemount Bracket optional Spacer Block optional Mounting Bracket Hold Down Bracket optional PN CS5402 PN 2020...

Page 18: ...ts must be in line and level Shim brackets on inside mounts if necessary The head rail must be level for the shade to operate properly Shade Width of Brackets Up to 40 2 40 72 3 72 84 4 84 and up 5 SHADES WITH HEAD RAIL 3 3 INSIDE MOUNT The minimum mounting depth for an inside mount is 1 A minimum of 3 3 4 is needed to fully recess the shade Make sure the brackets are level and aligned Attach usin...

Page 19: ...rackets are used to project the back of the shade up to 2 1 2 from the mounting surface Attach the mounting bracket to the extension bracket with the nut and bolt provided Outside Mount with Extension Brackets Minimum 2 surface 2 2 1 2 EXTENSION BRACKETS OPTIONAL SIDE MOUNT OPTIONAL Measure from window sill up to desired mounting position on each side of the window frame Mark position Mount side m...

Page 20: ...ening and push the head rail into the mounting brackets as shown SHADES WITH HEAD RAIL Once the brackets are secured and level the fabric roll can be inserted Make sure your hands are clean to avoid soiling the fabric Insert the foot of the motor side bracket into the slotted center hole of the motor end of the fabric roll The wire should be positioned so that it goes up on an inside mount or back...

Page 21: ...mote If battery is not already installed in the remote follow the instructions on page 22 1 Select the channel that you want to program using the CHANNEL selector buttons 2 Press the SETTING button on the motor until the shade jogs once 3 Press and hold the CONFIRM button until the shade s jogs once The shade is now linked to the remote 4 Repeat steps 1 3 to program the rest of the shades channels...

Page 22: ...ed TIMER REMOTE Shades can be manually operated while in manual mode Tap the MODE button until you see MANUAL in the display Select the desired channel with the CHANNEL button The channel will show in the display screen If all 6 channel numbers are shown the remote will control all 6 channels at once Press the UP or DOWN buttons to raise or lower the shade Press the STOP button to stop the shade a...

Page 23: ...re is only a single shade on the channel proceed to setting limits on the next page If there is more than one shade on the channel all shades will need to be unlinked Press and release the CONFIRM button Continue to press and release until the shades jog All shades previously linked to selected channel will now be unlinked Follow the steps in STEP 3 LINK REMOTE found on pages 5 7 to link only the ...

Page 24: ...pper limit Use the UP and DOWN buttons to adjust the upper limit more accurately Hold the CONFIRM button until the shade jogs This locks in the upper limit Note If you also desire to set a favorite position you should do so prior to relinking other shades on that channel See the next page for setting favorites 1 2 3 4 5 Channel Display Up Stop Favorite Down Channel Channel 5 Channel Remote front C...

Page 25: ...imply press the STOP FAVORITE button to bring the shade to the favorite position To go to the favorite position from any other location make sure the shade has been stopped for at least three seconds before pressing the STOP FAVORITE button To unlink a shade Press and release the CONFIRM button Continue to press and release until the shades jog All shades previously linked to selected channel will...

Page 26: ...1 2 3 4 5 Channel Display Stop Favorite Down Channel Channel FRONT C L Confirm Limit BACK Up 5 Channel Remote ...

Page 27: ... the shade at the desired favorite position While holding the LIMIT button quickly press and hold the UP button Release both buttons when the shade jogs To erase a favorite position bring the shade to the upper limit Press and hold the LIMIT button on the back of the remote then press and hold the UP button Release both buttons when the shade jogs When complete relink turned off shades by followin...

Page 28: ...jogs once 4 Repeat steps 1 3 to program the rest of the channels on a multi channel remote REPLACE ORIGINAL REMOTE ADD ADDITIONAL REMOTE OR ADD SHADE TO AN ADDITIONAL CHANNEL 1 2 3 4 5 Channel Display Up Stop Favorite Down Channel Channel 5 Channel Remote front C L Confirm Limit Back of all Remotes Channel Display Stop Favorite Down Channel Rail Selector 14 Channel Remote front Up 00 00 MANUAL Dis...

Page 29: ...T REMOTE OR CHANNEL Link the motor to the new remote or channel 1 Follow the steps for replacing the remote on page 15 1 2 3 4 5 Channel Display Up Stop Favorite Down Channel Channel 5 Channel Remote front C L Confirm Limit Back of all Remotes Channel Display Stop Favorite Down Channel Rail Selector 14 Channel Remote front Up 00 00 MANUAL Display Screen Stop Favorite Down Channel Mode Timer Remote...

Page 30: ... format military time For example 1 00 PM will be displayed as 13 00 Press CHANNEL button to confirm hour and advance to minutes FF FF Auto 1 STOP Channel Select Confirm Use the UP and DOWN buttons to set the current minute Press CHANNEL button to confirm minute and advance to day Use the UP and DOWN buttons to set the current day Hold the MODE button for 3 seconds Display will flash and then disp...

Page 31: ... SKEW ADJUSTMENT IF NECESSARY If the shade does not raise evenly first make sure the mounting brackets are mounted level with each other If the shade is level and it still skews roll the shade all the way down Prepare a strip of masking tape approximately 5 long On the side of the shade opposite of the skewing direction and as close to the end of the roller as possible apply the tape with the stic...

Page 32: ...G THE MOTOR When the shade begins to operate slower than normal it is time to charge the motor Plug the 8 4v charger into the port on the motor Plug the charger into an electrical outlet P Setting red button Setting red button Charging Port Charging Port A red light on the charger indicates that the battery is charging Allow the batteries to charge until the light on the charger turns green A typi...

Page 33: ...y inserting a fingernail into the indentation on the back of the remote To avoid the battery falling out of the remote remove the tray while the remote is face up Insert the new battery CR2430 lithium into the battery tray so that the writing is facing up positive up when the remote is face up Slide the tray back into the remote ...

Page 34: ...r vacuum cleaner brush is recommended Most stains can be blotted with a damp sponge and mild detergent Before using anything stronger than mild detergent and lukewarm water test an unobtrusive corner of the shade If you have any questions call your dealer for advice TROUBLESHOOTING PROBLEM SOLUTION The motor does not work or runs slow Recharge motor The motor continues to run in one direction The ...

Page 35: ...Have in hand the home WiFi password It will be necessary to connect the Smart Controller to the Internet Note Some Android users won t be connected quickly to the hotspot If it is the case please wait about 10 seconds before returning to the app During this time your device may notify you that the hotspot does not have Internet access and will prompt you whether you want to remain connect ed You n...

Reviews: