background image


3. Product Introduction 

SMF-MP10S User guide V1.1 Shanghai Seer Intelligent Technology Corporation


8


3. Product Introduction 

3.1 Overview 

SMF-MP10S (Seer Mini Fork) is a laser SLAM mini automatic forklift. The product provides 

core map building, positioning and navigation functions to help users quickly realize various 

applications of mobile robots. 
This product is developed and manufactured by Shanghai Seer Intelligent Technology 

Corporation. All rights © are reserved by Shanghai Seer Intelligent Technology Corporation. 
Although some names in this document and possible other names are not marked with the 

registered trademark symbol®, but they are registered trademarks of Shanghai Seer 

Intelligent Technology Corporation, including 

仙工智能

, SEER and SRC. 

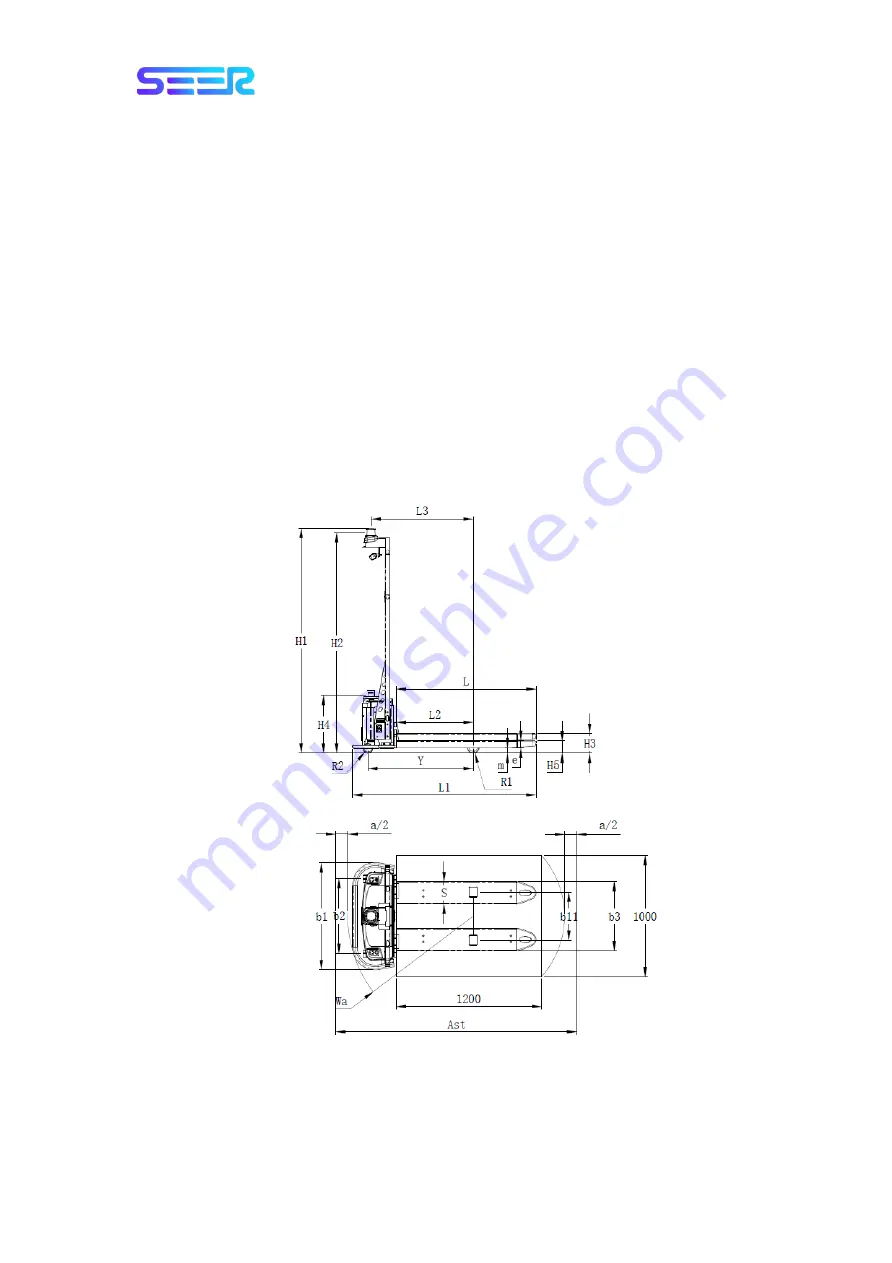
3.2 Product Dimensions 

3.2.1 Dimensions of Robot 


Summary of Contents for SFL-MP10S

Page 1: ...Shanghai Seer Intelligent Technology Corporation www seer group com AMR AI User Guide SFL MP10S ...

Page 2: ...igent Technology Corporation Revision History Version Date of Issue Description V1 0 2020 12 First edition V1 1 2020 12 Add gyroscope coordinate system laser obstacle avoidance precautions For more information Please visit https www seer group com ...

Page 3: ...nsistent with the product Technical data may be changed without further notice This document is copyrighted solely by Shanghai Seer Intelligent Technology Corporation and may not be reproduced or distributed in any form by any organization or individual without our written permission If quoted the source must be indicated and this document shall not be quoted abridged or modified contrary to the o...

Page 4: ...essment 6 2 6 Residual Risk 6 2 7 Environmental Safety 6 2 7 1 Noise 6 2 7 2 Scrap Disposition 7 3 Product Introduction 8 3 1 Overview 8 3 2 Product Dimensions 8 3 2 1 Dimensions of Robot 8 3 2 2 Coordinate System of gyroscope 10 3 3 Main Labels 12 3 3 1 Precautions 12 3 3 2 Nameplate 13 3 3 3 Daily Maintenance of Robot 14 3 4 Configuration of Body 14 3 5 Operation Panel 15 3 6 Audio Video System ...

Page 5: ...2 Obstacle Avoidance Laser 36 6 7 Localization 39 6 8 Motor drivers and motors 40 7 Debugging 41 7 1 Connect the Robot 41 7 2 Map Building and Editing 42 7 3 Path Navigation and Obstacle Verification 45 7 4 Establishment and Configuration of Workstation AP with Fork Action 46 7 4 1 Workstation AP 46 7 4 2 Special Workstation CP or Charging Point 47 7 4 3 Work Path 47 7 5 Navigate the Path to Speci...

Page 6: ...Floor Cleaning 65 9 4 2 Robot Cleaning 66 9 4 3 Laser Cleaning 67 9 5 Storage 67 9 5 1 Storage of Robot 67 9 5 2 Storage of Charger 68 10 Loading Unloading and Transportation 69 11 Load Center 71 12 Software Update 72 Appendix I Hydraulic Schematic Diagram 75 Appendix II Electrical Schematic Diagram of SMF MP10S 76 ...

Page 7: ...cal Agreement 1 2 Use Prohibitions It is prohibited to use it in an outdoor environment It is prohibited to use it in an environment that strongly interferes with navigation equipment It is prohibited to use it in an environment full of dust powder and other explosive hazards It is prohibited to use it in an environment with high salt content marine climate It is prohibited to use it in extremely ...

Page 8: ...pt to avoid unsafe behavior Appropriate preventive measures shall be taken to avoid damage or injury Notice Indicates important information including conditions that may cause damage to equipment or property 2 2 General Safety Precautions This chapter contains the general safety precautions Precautions for Robot Rolling Over If the load is not placed or secured correctly the load may drop out or t...

Page 9: ...nal knowledge and experience in related fields be familiar with the application of protective equipment on the machine and be guided by the machine user 2 3 2 Running Safety 2 3 2 1 Safety of Running Environment The ground shall be flat and free from grooves damages pores greasy dirt glue or other contaminants There shall be no foreign objects on the floor such as screws rags gloves and thread cab...

Page 10: ...ter Ensure that the elevator or lifter can bear the full weight of the robot and its load Ensure that no part of the robot is in contact with the car wall of the elevator or lifter Ensure that the robot would not move unexpectedly Ensure that the elevator meets the standard GB 7588 2003 2 3 3 Load Safety SMF MP10S and its load shall not exceed the allowable range of the road surface The load carri...

Page 11: ...by the breaching party Please use the original charger It is prohibited to use the chargers of other brands otherwise it will cause irreversible damage to the battery To avoid damages or personal injury caused by abuse of the battery pack please carefully read the following safety guidelines The battery pack is exposed to the risks such as fire and explosion Do not disassemble crush incinerate hea...

Page 12: ...for the Integrator to realize safe installation The on site commissioning personnel are usually responsible for the risk assessment It is recommended to carry out the risk assessment with reference to the guidelines in ISO 12100 ISO 3691 4 ANSI B56 5 or other relevant standards including but not limited to It shall be demonstrated in the robot installation development and use process The robot equ...

Page 13: ...S contains the following materials that affect environmental factors Plastic Battery Lubricant Disposal requirements SMF MP10S shall be disposed of by the user and the final scrap processor in accordance with the Law on Prevention and Control of Environmental Pollution by Solid Wastes of the People s Republic of China ...

Page 14: ...ly realize various applications of mobile robots This product is developed and manufactured by Shanghai Seer Intelligent Technology Corporation All rights are reserved by Shanghai Seer Intelligent Technology Corporation Although some names in this document and possible other names are not marked with the registered trademark symbol but they are registered trademarks of Shanghai Seer Intelligent Te...

Page 15: ...60 1154 b3 Outer width of fork 570 m Minimum ground clearance 40 L3 Distance from laser to drive wheel 856 L2 Distance from fork baffle to drive wheel 636 Ast 1000X1200Aisle width 1000x1200mm pallet crosswise 1200 along the fork edge 1990 Wa Minimum radius of pivot steering 1035 H2 Height of laser scanning 1800 H4 Height of obstacle avoidance scanning 478 R1 Size of drive wheel 50 R2 Size of load ...

Page 16: ...nstalled in the y axis of the coordinate system 158 38mm z Refers to the offset of the position where the controller is installed in the z axis of the coordinate system 278mm yaw Refers to the degree of yaw where the controller is installed relative to the coordinate system of the cart 90 qx Refers to the x component of the quaternion reserved no need to be filled in qy Refers to the y component o...

Page 17: ...s to the offset of the position where the controller is installed in the z axis of the coordinate system 180mm yaw Refers to the degree of yaw where the controller is installed relative to the coordinate system of the cart 90 qx Refers to the x component of the quaternion reserved no need to be filled in qy Refers to the y component of the quaternion reserved no need to be filled in qz Refers to t...

Page 18: ...3 Product Introduction SMF MP10S User guide V1 1 Shanghai Seer Intelligent Technology Corporation 12 3 3 Main Labels 3 3 1 Precautions ...

Page 19: ...3 Product Introduction SMF MP10S User guide V1 1 Shanghai Seer Intelligent Technology Corporation 13 3 3 2 Nameplate ...

Page 20: ...3 Product Introduction SMF MP10S User guide V1 1 Shanghai Seer Intelligent Technology Corporation 14 3 3 3 Daily Maintenance of Robot 3 4 Configuration of Body ...

Page 21: ... Fork 8 Charger brush board 19 Fork point photoelectric switch 9 Anti collision bumper 20 Cargo in place switch 10 Emergency stop button 21 Manual charging interface 11 SRC network interface 22 Emergency stop button 3 5 Operation Panel There is an operation panel above the front of the SMF MP10S and there are two emergency stop buttons on both sides of the frame The specific definition is shown in...

Page 22: ... stop button is pressed the robot can be moved by pushing Precautions for Emergency stop of Robot When using our dispatching system it is strictly prohibition to move the robot by pushing after pressing the emergency stop button otherwise it will cause the robot task to go wrong 3 6 Audio Video System 3 6 1 Ambient Light The robot indicates the current running status through the color and shape ch...

Page 23: ...ditions will no longer be judged The time interval between each update is about 300ms 3 6 2 Searchlight SMF MP10S is equipped with a searchlight which will be lit up when it is turned on indicating that the robot is on 3 7 Technical Parameters Model Parameters SMF MP10S Quantity of navigation lasers 1 Pepperl Fuchs R2000 HD SICk nanoScan3 Core Quantity of obstacle avoidance Lasers 1 OLEI LR 1BS2L ...

Page 24: ...thout compression condensation IP rating 8 IP20 Supported Not supported Optional 1 The road surface should be smooth clean and free of obvious ups and downs Ramp 5 arctan 0 05 2 8 The robot must not stop or turn at the ramps steps or gaps but can pass quickly perpendicular to them 2 The localization accuracy usually refers to the repeatability of the robot navigating to the target site When the en...

Page 25: ...harging pile of SEER 6 Need to be used with a special camera 7 Need to be used with A 3D camera in the peripheral extension to realize this function 8 SMF MP10S is designed for indoor transportation only and is not recommended for outdoor use 3 8 Software Functions Map editing Model editing Localization module Navigation module Peripheral expansion API interface Visible operation Multi robot dispa...

Page 26: ...tup of Robot 1 Turn the key switch clockwise 2 Press on the Start button until the green start indicator is lit up and then release it Now the ambient light searchlight and laser will be lit up 4 3 Shutdown of Robot 1 Make sure that the robot currently has no tasks and is in a stopped state 2 Press on the Start Stop button for 2s then release it and wait a few seconds for the power indicator to tu...

Page 27: ... voltage 54 6V Maximum continuous charge current 20A Discharge parameters Standard discharge current 15A 0 5C Discharge cut off voltage 35 7V Maximum continuous discharge current 35A Operating temperatur e Charging temperature 0 45 Discharging temperature 20 to 65 Storage temperature 0 40 Safety protection Overcharge over discharge overcurrent overtemperature short circuit and balance The specific...

Page 28: ...age 2 75V single series Adjustable Over discharge protection delay 3S Over discharge release voltage 3 0V single series Adjustable Overcurrent protection Overcurrent detection current 110A 3S Overtemperature protection Temperature protection Charge 55 discharge 65 Short circuit protection Short circuit protection Disconnected load recovery Balancing Balancing method Passive balancing 5 2 Parameter...

Page 29: ...10S User guide V1 1 Shanghai Seer Intelligent Technology Corporation 23 2 Manual charging interface Charging Curve Note Please refer to the User Guide for SMF MP10S Charging Pile for the usage and configuration of the charging pile ...

Page 30: ...ge and battery depletion it is recommended to turn off the robot when charging with a charger If you use the same charger to charge two robots sequentially please wait one minute after the first robot is fully charged and then charge the second robot to ensure that the charger can correctly identify the second robot Please use the original charger 5 4 Storage of Battery The battery pack shall be s...

Page 31: ... path Task Planning The task planner generates a task queue based on the subtask instructions of current path and then the model file information Then it calls the path navigation module or the action execution module Local Path Planning Based on the nature localization and sensors of the current path the robot is controlled to travel on the current path If an obstacle is encountered the robot wil...

Page 32: ...ete the corresponding task action 6 2 User Input Information To enable the robot to navigate automatically the user must provide the following information On the map where the robot is located you need to scan the robot map through RoboShop software and set the working point location and path on the map Configure the robot model files Determine the current location of the robot Send the destinatio...

Page 33: ... point location the robot will plan a path from the current location to the destination point as short as possible 6 3 Global Path Planning The global path planning means that the robot generates a path to the destination point The global path planning is performed only at the beginning of the task During the global path planning the obstacles on the path will not be considered but the deviation d...

Page 34: ...le running When encountering obstacles the robot will avoid obstacles For the local path navigation the speed of the robot will also be planned to ensure smooth speed during the operation of the robot When the robot is beyond the path it will automatically plan a route back to the path When the robot is beyond the path the local path navigation function will generate a route back to the path ...

Page 35: ...the cargo 3 Perform the pickup action Only after each action is successfully actuated the task instruction is considered to be complete The action planning is to plan the robot s own equipment to perform each action For example 1 To recognize the location of the cargo the action planning will call the camera to recognize the location of the cargo based on the appropriate recognition files 2 To nav...

Page 36: ...rporation 30 6 6 Obstacle Detection The obstacle detection function of the robot is realized by the following three sensors Laser Obstacle avoidance laser 3D laser optional The following figure shows how the robot sees the environment and how it behaves in the robot system Human Vision Laser Vision ...

Page 37: ... 6 6 1 Navigation Laser Precautions for laser use Do not open the top cover of the navigation laser otherwise it may cause damage or failure of the laser SMF MP10S is equipped with a Pepperl Fuchs R2000 laser or SICK nanoScan3 Core The main functions are as follows Map scanning Localization and navigation Obstacle recognition ...

Page 38: ...l System SMF MP10S User guide V1 1 Shanghai Seer Intelligent Technology Corporation 32 6 6 1 1 Detection Range Model S N Definition Parameter SMF MP10S R1 Detection distance 30m θ Detection angle 360 H Detection height 1800mm ...

Page 39: ...onfiguration of Robot The collision detection will be turned off when ObsStopDist is set as 0 A collision may occur at this time Be careful 6 6 1 4 Characteristics and Use Restrictions of Navigation Laser Noise The noise of the laser is caused by the principle of laser measurement During laser ranging a light spot is emitted which usually has a fixed divergence angle Therefore the longer the measu...

Page 40: ...served Reflectivity The reflectivity of the laser is usually related to the intensity of the energy returned by the laser so objects with high reflectivity reflectors will have a higher reflectivity and ordinary objects will have a lower reflectivity Usually we normalize the reflectivity to 0 255 where 0 is the lowest reflectivity and 255 is the highest reflectivity The reflectivity of general obj...

Page 41: ...onment and thus can t navigate stably and accurately Objects with Specular Reflection For the purpose of laser measurement the distance is calculated based on the reflected laser received so the objects of different materials will have different effects on the laser measurement For the surface of natural object that produces uniform diffuse reflection the noise will be relatively low after the las...

Page 42: ...LAM The principle of laser SLAM is to build a point cloud map of the environment by scanning the contour of the environment with the laser radar and then perform localization and navigation by matching the built point cloud map with the real time point cloud scanned with the laser Therefore if the contour of the environment changes significantly 30 after map building the robot may not achieve the ...

Page 43: ...6 Navigation and Control System SMF MP10S User guide V1 1 Shanghai Seer Intelligent Technology Corporation 37 6 6 2 1 Detection Range ...

Page 44: ... objects lower or higher than its detection height can t be detected 6 6 2 3 Actions after Detecting the Obstacles When SMF MP10S is delivered the default deceleration ObsDecDist and stop ObsStopDist districts have been set In the deceleration district default value 3m the robot will decelerate when the laser detects an obstacle In the stop district default value 1m the robot will stop when the la...

Page 45: ... the robot on the map IMU and Encoder The data of inertial measurement unit IMU and motor encoder can be used to calculate the distance and speed of the robot from the initial location The combined use of these two sets of data results in a more accurate position Laser and Particle Filtering The robot controller uses a particle filter algorithm to confirm the best match by comparing the laser inpu...

Page 46: ...ogy Corporation 40 Make sure that the current location of the robot is correct 6 8 Motor drivers and motors The robot keeps adjusting how much power is sent to each motor based on sensory input This means the robot can correct its speed when going up slopes or when carrying a heavier payload ...

Page 47: ...he robot via a network cable 2 Set the computer s Ethernet IP to the network segment 192 168 192 xxx xxx must be more than 200 and the subnet mask as 255 255 255 0 the gateway can be omitted 3 Open Roboshop and click the Refresh button on the Homepage or manually Enter the IP address as 192 168 192 5 to add the robot 4 Find the robot with the IP address 192 168 192 5 in the robot list on the Homep...

Page 48: ...ormation of the robot are displayed on the robot tab 7 2 Map Building and Editing Precondition The robot is connected and the robot model has been successfully configured and synchronized 1 Map Building a Open Roboshop Pro and double click the robot to enter the Map and Control interface after successfully connecting the robot Click Map Building in the module toolbar and all methods for Map Buildi...

Page 49: ...in the pop up interface generally there is no need to modify the parameters of this interface and click the OK button c Use the keys W Forward A Left turn S Reverse D Right turn on the keyboard for robot control to make the robot move in the scene and click the Finish Map Scanning button in the upper right corner when you finish scanning the map ...

Page 50: ...ghai Seer Intelligent Technology Corporation 44 d Wait for the completion of the map building and then click the Save button in the upper right corner e Select the desired path and enter the desired name in the pop up interface to save the map ...

Page 51: ...with inconsistent map data will pop up Select Push the Map Pull the Map or Cancel according to your needs 7 3 Path Navigation and Obstacle Verification Precondition There are at least two sites on the map which are connected by a Bezier curve The robot conducts path navigation on the path Click Path Navigation in the module toolbar and then click a site such as clicking the point LM2 the robot wil...

Page 52: ...il the obstacle disappears The blocking reason will be displayed in the status bar 7 4 Establishment and Configuration of Workstation AP with Fork Action a Use the robot to build a map in the area where the robot needs to work b Establish the AP point on the shelf and place it in the daily work position c Configure the workstation 7 4 1 Workstation AP The AP point is a workstation where the forkli...

Page 53: ...ain path and needs to enter the storage location directly from the main path when the distance between the main path and the storage location is big the front point can be placed between the AP point and the main path otherwise the front point can only be placed on the main path 7 4 3 Work Path Notice When entering and exiting the AP point the attributes on the path shall be set to LM AP backward ...

Page 54: ...n along another path Here you need to adjust the sites according to the actual location Note that the site location and the path can overlap The connection between the sites needs to be clearly distinguished Special attention must be paid when drawing to prevent dangerous accidents 7 4 3 2 Without Recognition and Rich Site Space When the forklift works in the mode without recognition but with rich...

Page 55: ...ode and non recognition mode Recognition mode Use the 3D recognition camera to recognize the location and height of the shelf in the environment for the purpose of realizing the pickup function for the AP point on the map it is necessary to set a front point in front of the shelf and it is unnecessary to accurately set the location of AP point Note Refer to 7 7 Recognition Function for details Non...

Page 56: ...and remove Recognize enter Start Height front height and End Height final height in the pop up dialog box and select Load Unload option then the robot will go to the front point of AP35 for Start Height action and then enter AP35 to execute End Height action and perform corresponding Load Unload action b Load unload in the recognition mode Click Path Navigation in the module toolbar click the left...

Page 57: ...l the rising dropping of the fork via upper computer Confirm that the relocation status of the robot is normal and the P button at the lower right corner of the motor Roboshop a Click Rise the fork to rise the robot fork from the current location to the highest height b Click Drop the fork to drop the robot fork from the current location to the lowest height ...

Page 58: ...ipio camera is taken as an example below 7 7 1 Pallet Recognition For specific operations and parameter settings refer to the document at https shimo im docs ZzkLVrp0o8fBKN3Q Obstacle Avoidance and Pallet Recognition Instructions for Percipio Camera 1 For forklift recognizing the pallet it is necessary to set the pallet data in advance as follows Recognition File Pull All Select p001 in the pallet...

Page 59: ...tion 53 2 Set up three sites on the map LM1 LM2 and AP3 Connect them in order set LM2 AP3 to go backwards click AP3 to modify Execution Object to fork and Recognition Model File to p001 pallet the specific file is selected according to the actual situation then save and push the map ...

Page 60: ...tions and parameter settings refer to the document at https shimo im docs jJLOpLRfnYguimmA QR Code Recognition Instructions for AprilTag 1 For forklift recognizing the material cage it is necessary to set the material cage data in advance as follows Recognition File Pull All Select t001 in the tag on the left to modify or right click Copy and add to create a new one material cage then modify the p...

Page 61: ...LM2 AP3 to go backwards click AP3 to modify Execution Object to fork and Recognition Model File to p001 pallet the specific file is selected according to the actual situation then save and push the map 3 Click the Path navigation move to AP3 click the left button select the action AP3 check Recognize in the pop up action box and click Load to send the instruction ...

Page 62: ...ai Seer Intelligent Technology Corporation 56 7 8 Error Code When the robot reports an error you can find the corresponding error reason in the document according to the error code in Roboshop https docs seer group com robokit_netprotocol 688125 ...

Page 63: ...entation the ground Detect obstacles on the non laser scanning surface in the running direction of the forklift 3D camera pallet recognition Percipio FM830 RI Rear location of the forklift installation orientation Fork tooth direction Recognize the pallet to ensure accurate connection of the forklift 3D camera QR code recognition Percipio FM830 RI Rear location of the forklift installation orienta...

Page 64: ...Parts Only approved parts can be used If unapproved parts are used without authorization we will not bear any responsibility We will not responsible for any damage to the robot accessories or any other equipment caused by the use of unapproved parts Precautions for Robot Maintenance Perform maintenance in strict accordance with the description in this manual Do not dismantle or change any parts no...

Page 65: ...ed Fasten 1 4 Inspect for the fork damage and deformation Inspect visually Whether the welds are cracked Every month replace or contact with the manufacturer Electrical System 2 1 Inspect the functions of operating switches display devices and photoelectric switches Power on and start the robot for test The function shall be normal Every month troubleshoot or contact with the manufacturer for assi...

Page 66: ...damaged line shall be replaced immediately the loose connecting wire shall be tightened timely to the standard value 2 6 Inspect the securing situation of the motor Inspect visually The marks of bolts shall not be misplaced Every quarter if the securing bolt deviates from the original location it shall be tightened to the standard value and re marked Traveling 3 1 Inspect and test the running func...

Page 67: ...responding balancing wheel is φ60 the standard diameter of drive wheel is φ100 and the standard diameter of corresponding balancing wheel is φ80 Every week when the wheel wear is more than 3mm it must be replaced It is recommended to replace regularly every 6 months 3 6 Inspect whether the steel pipe of balancing wheel is abnormal Inspect visually the steel pipe for bending deformation and oil lea...

Page 68: ...me of the oil tank and replace the oil Inspect with reference to the specific method for maintenance It is recommended to replace regularly every 12 months Every half a year 4 3 Clean the suction filter element in the oil tank It is recommended to replace regularly every 12 months Every half a year 4 4 Clean up foreign objects in the oil tank It is recommended to replace the hydraulic oil regularl...

Page 69: ...whether the lifting structure runs flexibly or gets stuck Inspect visually It is recommended to apply grease on the contact parts regularly every month and replace the lubricating parts every 6 months Normal Every month troubleshoot or contact with the manufacturer for assistance Batteries 5 1 Inspect whether the appearance of the battery is damaged whether the liquid leaks from the space between ...

Page 70: ...ntelligent Technology Corporation 64 S N Maintenance Content Maintenance Content Criteria Maintenance Intervals connecting wire is loose 15N m loose connecting wire timely to the specified value 5 4 Inspect the battery voltage Measure with a multimeter Every month ...

Page 71: ...1 5X16X75 3 Charging pile 5 Flanger bearing bush SF1612F 40 6 Tension spring 2 2 8 7 Composite sealing gasket 12 4 8 Composite sealing gasket G1_4 4 9 Double row roller chain 2 10 Double row chain wheel 2 11 Battery 48V 35Ah 1 It is recommended to inspect every 1 or every 400 charge discharge cycles 12 Fork point photoelectric switch 2 13 Fork tooth in place switch 2 9 4 Cleaning 9 4 1 Floor Clean...

Page 72: ...used for cleaning Precautions for Robot Cleaning Never rinse the robot directly with water Do not clean the robot with thinner or gasoline etc otherwise it will damage the electronic and plastic parts of the robot 1 Before assembling the body use an air gun to clean the dust and sundries in the body and inspect the body after cleaning there shall be no defects such as residues and dirt on it 2 Aft...

Page 73: ... following measures for the following parts Battery Charge the battery and then perform maintenance according to the daily maintenance method for the battery Perform charging maintenance and inspect the electrolyte level every 3 months Hydraulic System When the forklift has been stored for more than one year the hydraulic oil of the hydraulic system should be replaced Please refer to the maintenan...

Page 74: ...dity shall be 5 90 and there shall be no harmful gas flammable explosive corrosive and other chemicals in the warehouse or strong mechanical vibration shock and magnetic field influence The packaging box must be placed at least 20cm high from the ground and 50cm away from the wall heat source and vent The charger can be stored for two years under this storage condition and it must be tested again ...

Page 75: ...vement Use industrial forklift handling robots that exceed the carrying capacity of the machine s dead weight marked on the nameplate Ensure that the operator responsible for loading and unloading has professional skills It is prohibited to stand within the range of loading and unloading activities of the robot Follow the instructions below to load and unload the robot When loading and unloading p...

Page 76: ...is chapter when transporting the battery The battery should be packed in boxes for transportation During transportation avoid severe vibration impact or squeezing and protect it from sun and rain The battery used in SMF MP10S has passed UN 38 3 certification Please contact us for more information Precautions for Battery Transportation According to the UN Dangerous Goods Transportation Regulation U...

Page 77: ... Center SMF MP10S User guide V1 1 Shanghai Seer Intelligent Technology Corporation 71 11 Load Center The figure below illustrates that the load center is 600mm at a full load of 500kg and a cargo height of 1m ...

Page 78: ...ct the prepared computer and the robot to the same network wired or wireless please set the IP address appropriately to ensure that the computer can connect to the robot normally 3 Open the browser it is recommended to use Chrome browser for ensuring compatibility enter the robot IP address 192 168 192 5 for wired connection or corresponding IP for wireless connection to access the robot upgrade i...

Page 79: ...kage Usually the name of the package is a zip package beginning with Robokit Please upload the zip package directly and do not decompress the package 6 Wait patiently for the software package to upload as shown below It may take a few minutes for the software package to be uploaded Please ensure the stability of the network connection during this period ...

Page 80: ... this period It indicates that the update is finished if the following prompt pops up 8 After the upgrade is finished the robot will be automatically restarted to make the update take effect 9 Click the version information to view the relevant software version of the robot as shown below Notice If it prompts that the upgrade fails please try to upload again or contact our after sales department fo...

Page 81: ...Diagram SMF MP10S User guide V1 1 Shanghai Seer Intelligent Technology Corporation 75 Appendix I Hydraulic Schematic Diagram M Motor T Return oil port P Oil outlet SCV Solenoid valve RV 06 Overflow valve CV 03 One way throttle valve ...

Page 82: ...Appendix II Electrical Schematic Diagram of SMF MP10S SMF MP10S User guide V1 1 Shanghai Seer Intelligent Technology Corporation 76 Appendix II Electrical Schematic Diagram of SMF MP10S ...

Page 83: ...ices is subject to the terms of the contract and we reserve the right to change the technology and modify the contents of the document Specifications and appearance may change with product improvements For the latest product information or after sales problems please call our company or visit the official website It is strictly forbidden to copy use or disclose any related content to any third party ...

Reviews:

Related manuals for SFL-MP10S