Step 7 — Calibrating your printer
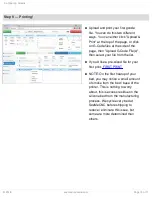
We have setup a custom macro to
take care of all the heavy lifting for
your first calibration. On the
"Machine Control" tab, you can click
"First Probe" under "User-Defined
Macros" to do your first calibration.
The macro will do an initial
calibration that starts extra high off
the bed to account for slight
variances in build height. Once it's
completed, it will do a second
calibration, double checking each
height reading, and save the final
results to your SD card. Don't worry,
future calibrations go much faster
than the first one.
Test your calibration by putting a
sheet of paper on the bed and
running: "G0 Z0" in the gcode
console. Your nozzle should just
touch and pinch the paper so it's
hard to move. If it's too loose, run
the following GCode: "G31 P500 X0
Y0 Z-0.25", then run "G32" to
recalibrate, then "M500" To save all
your current calibrations and
settings.
If it's too tight, you want to try "G31
P500 X0 Y0 Z-0.35", then run "G32".
If it's still too tight, make the number
after Z a larger negative number. If
it's still too loose, make it a smaller
negative number.
Configuring Artemis
© 2018
seemecnc.dozuki.com/
Page 7 of 11


