background image

15

Menu Setup

Press the 

Menu

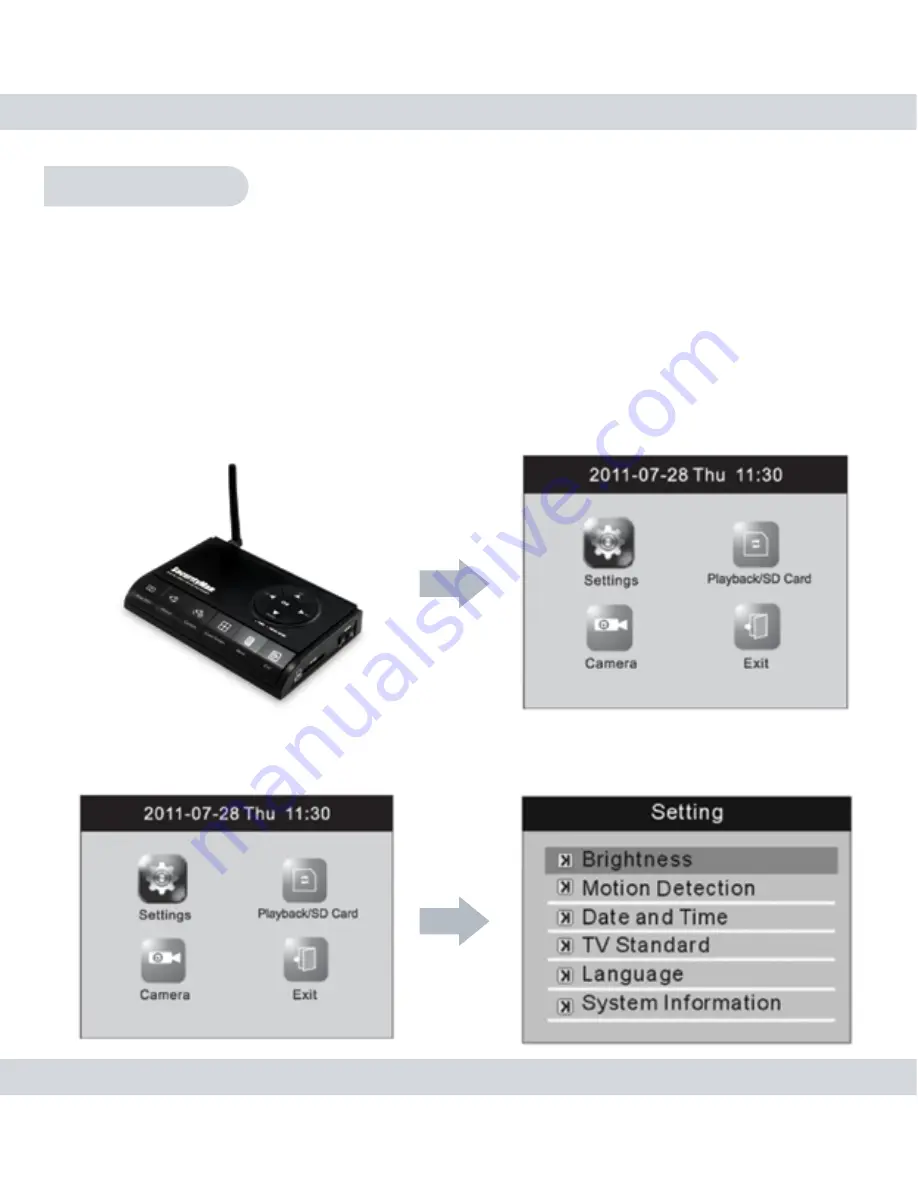
 button on the DVR/Receiver at any time to enter the 

Main Menu Setup window as shown below. Then use the 

UP

,

 DOWN

,

 LF

and

 RT

 buttons to toggle through the menu options, press the 

OK

 button 

to select, save the changes, and press the 

EXIT

 button to exit from the 

selected menu screen.

NOTE: 

The system will automatically exit from the menu options if inactive 

for more than 20 seconds. When the system is in recording mode, pressing 
on the Menu button will temporary stops the system from recording until 
exiting out from the Menu, then the recorder will resume the recording.

Settings

From the menu screen select system 

Settings

 as illustrated below. The 

system Settings consists of 

Brightness

,

 Motion Detection

,

 Date and Time

,


TV Standard

,

 Language

, and

 System Information

.

Summary of Contents for DigiairWatch SM-816DT

Page 1: ...DigiairWatch Series User s Manual 4 Channel Wireless Digital Video Recorder with Wireless Camera s Night Vision Audio and SD Card Recorder...

Page 2: ...ot cause any harmful interference 2 The equipment must receive and process any interference including any possible interference caused by operation mistakes After testing the product we confirm that t...

Page 3: ...any warranty for merchantability or fitness for a particular purpose The exclusion of implied warranties is not permitted in some states and the exclusions specified herein may not apply to you This w...

Page 4: ...ton Menu button Exit button Menu Setup Settings Brightness Motion Detection Sensitivity Motion Detection Actions Motion Detection Alert Date and Time TV Standard Language System Information Playback S...

Page 5: ...Watch series are less complicated to operate much more affordable and can be installed in minutes Simply insert a SD card not included into the receiver position and mount the camera plug in all the p...

Page 6: ...microphone for audible recording up to 30ft away Motion detection and manual recording with optional video or picture selection Auto overwrite function when SD card is full Records 15 second video cl...

Page 7: ...ate and local statutes DO NOT place this product too close to medical equipments 1 Radio waves might potentially cause breakdown of medical electrical equipments and thus cause incidents 2 Place the p...

Page 8: ...relevant peripheral equipments by yourself Improper disassembly might cause damages to the product or the peripheral equipment DO NOT put the camera in quaky paces The camera may be unstable or out o...

Page 9: ...y Keep it dry dustless and avoid lens exposure in direct sunlight Keep product away from heat sources such as electric heaters Do not use the camera near harmful chemicals Do not place product near an...

Page 10: ...a SM 816DT AC Adapter Mounting Screws Mounting Bracket 1 x AV Cable User s Manual 1 for DigiairWatch 2 for DigiairWatch2 1 for DigiairWatch 2 for DigiairWatch2 2 for DigiairWatch 3 for DigiairWatch2 2...

Page 11: ...DVR Receiver SM 804DR Power LED Motion Dectect LED Power LED Microphone Audio Out 1 2 Video Out DC IN Pair Button Camera Lens Sun Visor Light Sensor IR LED s Mounting Bracket Power Socket Antenna Angl...

Page 12: ...he camera s power connections if being used as an outdoor application 2 Plug in the receivers power supply 12VDC 1 0A and connect the AV audio video cable from the AV output of the DVR Receiver to you...

Page 13: ...nput that you connected the DVR receiver to For example A V 1 INPUT 1 VIDEO 1 LINE 1 or GAME Once the TV is on the proper input channel and the receiver is powered ON you will see a brief start up scr...

Page 14: ...ange the time and date Snap Shot A small camera icon will appear at the top of the screen during manual or motion detected Snap Shot recording Record The red REC icon and recording duration time will...

Page 15: ...SD card initializing notification will be displayed whenever an SD card is inserted into the DVR for the first time Quad Screen Display Camera In Quad Screen the camera numbers located in the center o...

Page 16: ...is being played back video mp4 photo jpg Play The green Play icon will only be displayed during video playback and will change to a Loop icon when applicable The green Play and the Loop icon will not...

Page 17: ...d so they can be viewed later Record button The Manual Record button offers continuous recording 15 min increments per file and can be utilized in two different methods Single Channel Full Screen Disp...

Page 18: ...amera in full screen display In Quad mode you can press the Camera button to start and stop recording by highlighting the camera and pressing the Record button Quad Screen button Pressing the Quad Scr...

Page 19: ...menu screen NOTE The system will automatically exit from the menu options if inactive for more than 20 seconds When the system is in recording mode pressing on the Menu button will temporary stops th...

Page 20: ...F and RT buttons to make your adjustments and press the OK button to save your changes Motion Detection To access and modify the Motion Detection settings simply highlight and press OK on the Motion D...

Page 21: ...rding will have a 3 seconds pre alarm recording before each events NOTE Multi channel motion detection recording only works in Quad screen display The DVR will NOT record if camera 1 is being viewed a...

Page 22: ...e ON and Off Date and Time It is highly recommended to set the date and time on the system prior to recording To do this simply highlight and press OK on the Date and Time option Use the UP DOWN LF an...

Page 23: ...e OK button to save your changes Options include NTSC North America and PAL UK Europe NOTE Please contact technical support if you are unsure of what this setting refers to prior to making a selection...

Page 24: ...ght and press OK on the System Information option Playback SD Card The Playback SD Card menu consists of 3 options the Play Folder used to view and playback recorded files SD Unmount used prior to eje...

Page 25: ...ess the sub folders Videos All recorded video events are stored in the Videos folder which also consists of sub folders that are automatically created according to the DATE and then the HOUR that the...

Page 26: ...r RT buttons to rewind or fast forward every 15 seconds jump press the Up and Down buttons to adjust the playback volume To enable the auto play feature plays all events in the current folder in the o...

Page 27: ...ch 7th 2012 will be stored in the folder labeled 03 07 2012 and categorized in subfolders by the hour they were created as shown below To access these sub folders simply highlight and press the OK but...

Page 28: ...d by inserting the card into your computers card reader To playback recorded video on a PC 1 Unmount and remove the SD card from the wireless receiver by gently pushing on the SD card allowing it to p...

Page 29: ...back utilizes your default media player and photo gallery viewer If the default media player and photo gallery viewer does not work well please reference other shareware media players such as FLV play...

Page 30: ...ption and press the OK button Next use the LF and RT buttons to make your selection yes or no and the OK button to confirm NOTE The SD Format option will erase everything on the SD Card Camera Camera...

Page 31: ...the user is utilizing the manual recording feature and will only record the current camera being displayed during motion detection recording Add Remove Camera The Add Remove Camera option is used to...

Page 32: ...Add Remove Camera will be displayed for approximately 10 seconds At this time press the pairing button located on the back of the camera a few times until you get a confirmation stating that pairing...

Page 33: ...s to make your selection and press the OK button to confirm Refresh Rate Refresh Rate is a video filter that reduces flickering effects in the interlaced video and eliminates flash caused by fluoresce...

Page 34: ...0 Exit The monitor icon shown below is only used to exit from the main menu Use the Up Down LF and RT buttons to scroll over to monitor icon and press the OK button to exit back to the live view scree...

Page 35: ...IR on Up to 30ft B W IP54 1 x Angle adjustable antenna 500mA Angle adjustable 1 DC 5V 1 0A 6 0 x 2 3 x 1 8 camera body only 1 Single auto switchable for multi cameras or Quad no audio Selectable from...

Page 36: ......

Reviews: