9
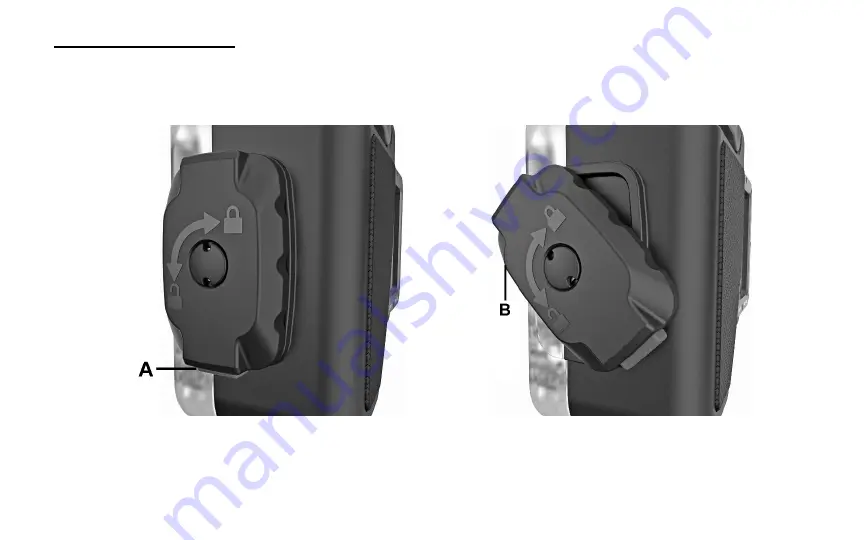
IV. Setting up the housing
1. Open the underwater housing. Push and hold release button (A) and rotate cam-lock (B) counter-
clockwise.
Page 1: ...0 ...
Page 2: ...duct functions in accordance with SeaLife s applicable published specifications some risk of flooding or other failure remains when the Product is used which risk the Purchaser assumes See page 49 for details We recommend that you insure your smartphone through your wireless carrier for accidental loss and damages We also recommend that you utilize cloud back up storage i e iCloud to preserve your...
Page 3: ... the housing for underwater use 16 VI After using the housing underwater 27 VII Operating the housing 28 VIII About the Settings Menu 33 IX Great Pictures Made Easy 39 X Replacing the O rings 41 XI Care and Maintenance 43 XII Specifications 45 XIII Troubleshooting 47 XIV Spare parts and service 47 XV FCC statement 47 XVI Warranty statement 49 ...
Page 4: ... SL4001 Color correction filter SL40007 Vacuum pump SL40006 Rubber grip tabs 12 each small medium and large SL40008 10 medium tabs pre installed in UW housing Spare O rings 1x Main O ring and 1x Vacuum Check Port O ring SL40010 O ring lubricant SL9807 ...
Page 5: ...with BCD clip SL72070 Moisture Muncher sampler pack 1 capsule SL2523 Instruction manual English SL40024 AAA alkaline batteries 2 SL40011 EVA carry case SL40009 Note Smaller accessories are packed in fabric bag which is not shown in the above package contents ...
Page 6: ...e dealer or www sealife cameras com for a complete listing of accessories Sea Dragon Photo Video Light Best color and image quality Moisture Muncher desiccant capsules 10 pack SL911 SeaLife Photo Pro Backpack SL940 Screen Shield SL4005 Waterproof screen protector for SportDiver ...
Page 7: ...lor correction filter removable 4 Optical glass lens port showing iPhone inside 5 Display window showing iPhone inside 6 Mode button Photo Video Settings Playback 7 Up button Scroll up or increase zoom focus 8 Down button Scroll down or decrease zoom focus 9 OK button Confirm selection ...
Page 8: ...Holding spring with rubber grip pad 13 Moisture Muncher capsule cavity 14 Battery compartment fits 2x AAA batteries 15 Leak alarm status LED 16 Power Bluetooth connection status LED 17 Power On Off switch 18 Water sensor Activates leak alarm when water touches sensor ...
Page 9: ...8 19 Triple 20 tripod mounts 20 Lanyard connection point 21 Cam Lock Opens closes housing ...
Page 10: ...9 IV Setting up the housing 1 Open the underwater housing Push and hold release button A and rotate cam lock B counter clockwise ...
Page 11: ...he batteries are inserted correctly according to the polarity markings Notes NiMH rechargeable AAA batteries may also be used The Housing battery strength indicator on the top right of the app display will only show 3 bars with fully charged NiMH batteries DO NOT use single use lithium AAA batteries Single use batteries will last for approximately 50 hours of continuous use ...
Page 12: ...g and prevents fogging A fresh new capsule is blue in color Replace the capsule when granules turn pink in color One sample capsule is included with the SportDiver 10 packs of Moisture Muncher in resealable foil pouch may be purchased at your local SeaLife dealer Insert one Moisture Muncher 10 Pack Moisture Muncher SL911 ...
Page 13: ...rwater housing as shown below Loop the end of the lanyard through the lanyard hole A The clip B is used for attaching the housing to your BCD D ring You may also attach the lanyard around your wrist using the sliding lock C to tighten the lanyard ...
Page 14: ...pp Store Search for SportDiver After installing the app accept all the permissions which includes access to Photos Camera Microphone and Bluetooth SeaLife does not collect data track location or gather any personal information from the SportDiver app ...
Page 15: ...led to avoid contacting the iPhone s side buttons Do not install grip tabs in areas where the phone s side buttons are located Exchange the medium sized grip tabs with small or large sized tabs depending on your specific iPhone model see the size chart below The grip tab end is tapered Make sure to install the grip tabs with the longer side up and shorter side down which keeps the phone held down ...
Page 16: ... touch buttons on the side of the phone Remove the phone by pushing up on the bow spring and lifting the phone up iPhone 7 with large rubber grip tabs installed iPhone 8 Plus with small rubber grip tabs installed Note Some phones with protective case may be small enough to securely fit inside the housing without removing the protective case In that case you may try leaving on the protective case W...
Page 17: ...ot Disturb ON True Tone OFF and Auto Lock OFF This ensures the SportDiver camera app operates without interruption while the phone is sealed inside the underwater housing True tone applies to iPhone 8 and later Go to Settings and turn On Airplane mode Bluetooth Do Not Disturb Go to Display Brightness Settings turn True Tone Off and Auto Lock to Never ...
Page 18: ...er a Low Battery warning will pop up This message is generated by the iPhone operating system iOS not from the SportDiver app The iPhone s operating system does not allow disabling the Low Battery message Consider lowering your iPhone s display brightness to preserve battery power The SportDiver app has a Power Save settings that will dim the display after 1 3 or 5 minutes depending on your settin...
Page 19: ...18 3 To optimize image quality use a lint free cotton or micro fiber cloth to clean the iPhone lens es and underwater housing glass port ...
Page 20: ...e cloth Replace the O rings if damaged or every year The SportDiver Spare O ring Set Item SL40010 includes the main O ring and vacuum check port O ring 5 Put a small dab of silicone O ring on your fingertip Apply a thin film of silicone lube to the exposed surface of the main O ring and vacuum check port O ring Use your fingertip to evenly spread the lube over the exposed O ring surfaces Only a th...
Page 21: ...ing A The housing has two status LED s to indicate Power Bluetooth connectivity B and Leak Alarm status C The blue Power Bluetooth LED and red Leak Alarm LED will both be blinking If not check that the batteries are installed correctly ...
Page 22: ...te to blue Once the housing has connected the app will display a pressure gauge If so proceed to the next step If the phone does not automatically connect power Off the housing and repeat step 6 Make sure your phone is close to the housing and app is open Waiting for connection message Once connected a pressure gauge is displayed Note Do not touch the gold water sensor located on the inside bottom...
Page 23: ... door Note Do not touch the gold water sensor located on the inside bottom right of the housing That will cause the Leak Alarm to activate and display a Leak Detected message If that happens power the housing Off and repeat steps 6 through 8 It is normal for there to be a small gap between the waterproof door and the front housing after the door is closed Applying vacuum pressure in step 10 will c...
Page 24: ...23 9 Unscrew Vacuum Check Port cap You will see a yellow rubber one way valve A which allows air to be removed from the inside of the housing using the vacuum hand pump ...
Page 25: ... on the vacuum check port cap Hand pump pressed against vacuum check port Pump until gauge needle reaches GOOD Note If you pumped too much use your fingertip to move the yellow rubber one way valve sideways and release some air pressure Then pump again until pressure is GOOD If the gauge needle does not move when pumping apply thin film of lube to the O ring and try again ...
Page 26: ...ars go to step 12 Important Do not expose the housing to direct sunlight during the leak analysis That may cause heat to build up inside the housing increasing internal air pressure and resulting in a leak alarm failure Make sure to screw on the vacuum check port cap The vacuum check port without the cap is NOT waterproof and will cause the housing to leak The internal vacuum pressure needs to be ...
Page 27: ...d Clean the O rings and repeat steps 6 through 11 Note You may disable the leak alarm in the app settings Refer to page 37 for more details Disabling the leak alarm will stop the housing from alerting you if an air pressure or water leak is detected If you disable the leak alarm it is still important to apply internal vacuum pressure which helps the waterproof seal ...
Page 28: ...erproof door 3 Release the internal vacuum pressure before opening the housing Unscrew the vacuum check port cap and use your fingertip to move the yellow rubber one way valve sideways to release vacuum pressure 4 Make sure water drops around the O ring sealing areas do not drip into the housing Use a clean dry towel to dry any water drops that have entered the housing 5 The leak alarm may activat...
Page 29: ...o Video Settings and Playback Push the Mode button to switch modes A blue line appears under the selected mode icon Photo mode for taking pictures Video mode for recording video Settings Menu mode for adjusting camera settings Playback mode for reviewing photos and videos ...
Page 30: ... Recording video Set mode to Video and push the shutter lever A to start video recording Push shutter lever again to stop recording A red elapse time will appear on top of the display when video is being recorded Push shutter to take picture or start stop video recording ...
Page 31: ...ings menu and push to enter a setting sub menu In the setting sub menu use the Up and down buttons to scroll through setting options and push to confirm the setting Example of main setting with EV setting sub menu Note For information about each setting in the Setting Menu please refer to chapter VIII page 33 ...
Page 32: ...l Videos will start playing automatically when selected You may delete any one file by pushing the OK button selecting Yes and pushing OK to confirm Single view photo with thumbnail strip on the right Push OK button to open Delete this file option Note Files are also saved in your iPhone s Photos app in a folder titled SportDiver Deleting a file in the SportDiver app will also delete the file in t...
Page 33: ...decreases zoom Example of 1X zoom no zoom Example of 4X zoom Note You may zoom from 1X no zoom to 10X zoom in 0 5x step increments Zooming is disabled when Dual Lens RAW JPEG or Background Blur settings are enabled When Focus is set to Manual pushing the OK button switch between zoom and Manual Focus MF ...
Page 34: ...ou may change camera settings in the Settings Menu Available settings vary depending on what iPhone model you are using For example single lens iPhone models will not allow you to change the lens setting Some settings are blocked out when other settings are enabled For example Background Blur setting is blocked out unless dual lens is selected Here is detailed information about each setting ...
Page 35: ... focus can be adjusted from 0 00 closest focus to 1 00 infinity focus in 0 05 increments This setting is useful when photographing smaller subjects in the foreground but the camera attempts to focus on the larger background area WB White Balance The white balance setting adjusts the color temperature of light that you are shooting in so natural colors can be restored For example shooting a white o...
Page 36: ...to help restore the lost colors Tint The Tint setting is only available when a manual WB setting is selected You cannot adjust tint if WB is set to Auto Tint allows you to fine tune the manual WB color setting Lens If your iPhone has multiple camera lenses you may select the lens of choice depending on what you are shooting For most shots the normal lens produces excellent results The wide lens is...
Page 37: ...oom This setting is best used by photographers experienced in RAW image editing It will take time and experience to acquire the skills needed to convert a RAW image file into a good quality image that is better than a standard processed JPEG image file Photo 3 sec Video When Photo 3 sec Video is On the app will capture a 3 second video clip with each still image The video clip is captured 1 5 seco...
Page 38: ...ower Save time is 3 minutes Display Brightness This setting adjusts the screen brightness It ranges from 1 0 brightest to 0 0 darkest in 0 1 step increments 0 8 is the default display brightness Using a higher screen brightness makes it easier to see the display in bright sunny conditions but also uses more battery power Leak Alarm The leak alarm can be turned Off if you want to bypass the 3 5 min...
Page 39: ...isplay a leak alarm alert if water or any conductive object like your finger touches the sensor This leak alarm cannot be disabled Blocked out settings The following chart shows which settings will be blocked out not available depending on other settings For example Dual Lens may not be selected when Focus is set to Manual ...
Page 40: ...lens selected but is typically about 2 5cm The iPhone can shoot excellent macro photos and videos so take advantage of that feature Move calmly and control your buoyancy It is awfully hard to take good photos or videos when you are moving around or if your buoyancy is not controlled Look around for great picture opportunities Position yourself at the best angle and neutralize your buoyancy Use the...
Page 41: ...correction filter The filter is most effective in blue water conditions at depth less than 50ft 15m Do not use the filter when shooting with a Sea Dragon photo video light Visit the SeaLife website for updates and how to tutorials Any updates to the manual or additional tips and advice can be found on the SeaLife website at www sealife cameras com Ask your local SeaLife dive dealer about underwate...
Page 42: ...roof seal the main O ring A and vacuum check port O ring B Replace the O rings if damaged or every year One spare O ring set is included See your authorized SeaLife dealer to purchase additional O ring Sets Item SL40010 Remove the O rings Use the O ring removal tool to lift and remove the O ring from its groove ...
Page 43: ...licone lube to each O ring Use your fingertips to evenly spread the lube Do not stretch the O rings Apply thin film of lube to O rings Install O rings Clean the O ring grooves with a slightly damped lint free cloth Carefully install the O rings making sure not to twist the O rings Be careful not to twist the O ring when installing ...
Page 44: ...Do not directly or indirectly expose the underwater housing to spray on sunscreens Most spray on sunscreens contain chemicals that may react with polycarbonate and other plastics causing cracks that compromise the waterproof seal If sunscreen gets on the housing clean it with moistened soft cloth Soak the sealed housing in fresh water for about 20 minutes after underwater use or if the housing bec...
Page 45: ...ating Do not disassemble or attempt to repair the housing as this will void your warranty Contact your local authorized SeaLife dealer or the SeaLife Service Center in your country for repairs Use the included lanyard to strap the underwater housing to your wrist or clip the housing to your BCD buoyancy control device Do not let any moisture or dirt get inside housing when opening This may result ...
Page 46: ...ve 2 8 oz 80g UW housing only with batteries red filter and Moisture Muncher without phone Subtract weight of phone for total UW buoyancy Controls Top Shutter lever Back Mode Up Down and OK Operating Temp Underwater 33 F to 110 F 1 C to 43 C Land 0 F to 120 F 17 C to 49 C O ring Rabalon TPE material item SL40010 Lens port Optical glass lens port with anti reflective coating on internal surface Tri...
Page 47: ...tooth Low Energy LE Frequency Band 2402 2480MHz RF Power 1 95dBm Battery 2x AAA Alkaline or NiMH rechargeable battery Battery life Approx 50 hours Weight 24 0 oz 680g UW housing only with batteries filter Moisture Muncher Dimensions External 8 4 x 4 9 x 2 2 213 1 mm x 125 7 mm x 54 8 mm Internal 6 3 x 3 1 x 0 6 160 mm x 79 mm x 15mm Warranty 1 year limited warranty ...
Page 48: ...sponsible for any radio or TV interference caused by unauthorized modifications or changes to this equipment Such modifications or changes could void the user s authority to operate the equipment NOTE This equipment has been tested and found to comply with the limits for a Class B digital device pursuant to part 15 of the FCC Rules These limits are designed to provide reasonable protection against...
Page 49: ...eptible d en compromettre le fonctionnement Radio Frequency RF Exposure Information The radiated output power of the Wireless Device is below the Industry Canada IC radio frequency exposure limits The Wireless Device should be used in such a manner such that the potential for human contact during normal operation is minimized This device has been evaluated for and shown compliant with the IC Speci...
Page 50: ...of purchase specifying the purchase date of the Product For more information about repair service or to locate a service center in your country please visit the SeaLife website at www sealife cameras com Important The foregoing limited warranty applies only to the Product sold by Manufacturer This limited warranty does not cover and does not provide any remedy for damage to any smart phones other ...
Page 51: ...DIRECT CONSEQUENTIAL OR PUNITIVE DAMAGES INCLUDING WITHOUT LIMITATION LOSS OF PROFITS INJURIES TO PERSONS OR PROPERTY OR DAMAGES FOR WHICH PURCHASER MAY BE LIABLE TO OTHER PERSONS OR ENTITIES EVEN IF MANUFACTURER HAS BEEN ADVISED OF THE POSSIBILITY OF SUCH DAMAGES AND WHETHER THE CLAIM IS FOR BREACH OR REPUDIATION OF CONTRACT BREACH OF WARRANTY TORT NEGLIGENCE OR OTHERWISE SOME JURISDICTIONS DO NO...
Page 52: ...51 ...