4.4
VS4922 Pulley Remover Set – Removal of crankshaft pulley
NOTE:
To remove the crankshaft pulley, the Holding Tool and
the Pulley Remover are assembled together onto the pulley.
The VS4921 Holding Tool is used to prevent the crankshaft
pulley from rotating whilst the force screw of the Pulley Remover
is screwed in to remove the crankshaft pulley (fig.14).
4.4.1 Pre-assemble the Bridge Piece, Force Screw and Securing
Bolts (the longer bolts in VS4895 Set) to make up the VS4922
Pulley Remover.
IMPORTANT:
Insert the Thrust Plate into the centre hole of the
pulley (fig.15).
4.4.2 Screw the Guide Pin in to one of the threaded holes in the
pulley (fig.15a).
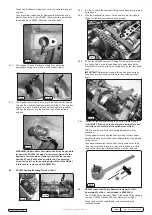
4.3.5 Using a breaker bar and socket, release the bolt of the
crankshaft pulley whilst counter-holding with the VS4921
Holding Tool (fig.13)
4.3.6 Undo the bolts attaching the VS4921 and remove the Holding
Tool (fig.13a).
4.4.3 Slide the VS4921 Holding Tool over the Guide Pin and into the
recess to the pulley (fig.16).
4.4.4 Attach the VS4922 Remover on to the Holding Tool, and to
the crankshaft pulley, by inserting one of the securing bolt
through the opposite hole to the Guide Pin (in the VS4921
Holding Tool), and into the crankshaft pulley threaded hole
(fig.16a).
fig.14
fig.15
fig.16
fig.15a
fig.16a
The VS4922 Holding Tool is also used to counter-hold the
crankshaft pulley during installation.
WARNING: Some crankshaft pulley bolts require a torque
as high as 375Nm. making the tools in VS4895 Set an
essential part of the procedures requiring removal/
installation of the crankshaft pulley.
Crankshaft pulley removal
WARNING: The Flywheel Locking Pin MUST NOT be used
to counter-hold flywheel/crankshaft for releasing or
tightening the crankshaft pulley bolt as engine damage will
result.
4.3.1
VS4921 Crankshaft Pulley Holding Tool – releasing and
tightening pulley bolt.
The VS4921 Holding Tool is attached to the pulley using the
shorter securing bolts supplied in the Set. The bolts pass
through the Holding Tool and are screwed in to the threaded
holes in the pulley.
IMPORTANT:
The threaded holes in the crankshaft pulley,
which accept the securing bolts, can be corroded or blocked.
Always check these threads and ensure they are clean and clear
to accept the securing bolts.
NOTE:
It can be difficult to align the threaded holes in the pulley
when attaching the Holding Tool, therefore utilise the Special
Guide Pin from the VS4922 Remover Set (fig.11).
4.3.2 First, screw the Guide Pin into one of the threaded holes in the
pulley and then locate one of the holes in VS4921 Holding Tool
on to the Guide Pin and slide the Holding Tool in place in to the
recess of the pulley (fig.11a).
4.3.3 Insert a bolt in to the opposite hole in the Holding Tool and
screw it into the pulley (fig.12). Remove the Guide Pin and
replace it with the second bolt, screwing in to the pulley (fig.12a).
4.3.4 Tighten both bolts,
firmly
, to secure the Holding Tool to the
crankshaft pulley.
fig.11
fig.10
fig.12
fig.11a
fig.12a
fig.13
fig.13a
Original Language Version
© Jack Sealey Limited
VS4980
Issue No: 3 (SP) 08/07/15


