


9
Before each use check abrasive attachments for condition. If worn or damaged replace immediately.
9
Ensure there are no flammable or combustible materials near the work area.
WARNING!
Wear approved eye safety protection, ear defenders and, if dust is generated, respiratory protection.
9
Maintain correct balance and footing. Ensure the floor is not slippery and wear non-slip shoes.
9
Remove ill fitting clothing. Remove ties, watches, rings, and other loose jewellery, and contain and/or tie back long hair.
9
Keep children and unauthorised persons away from the working area.
9
Secure unstable work piece with a clamp, vice or other adequate holding device.
8
DO NOT
use equipment for any purpose other than that for which it is designed.
8
DO NOT
operate the sander/polisher if any parts are damaged or missing as this may cause failure and/or possible personal injury.
WARNING!
DO NOT
sand any materials containing asbestos.
8
DO NOT
switch the sander/polisher on whilst the head is in contact with the work-piece and avoid unintentional starting.
8
DO NOT
get the sander/polisher wet or use in damp or wet locations or areas where there is condensation.
8
DO NOT
operate spindle lock button while pad is rotating.
8
DO NOT
operate power control while spindle lock is operating.
8
DO NOT
allow untrained persons to operate the sander/polisher.
8
DO NOT
operate the sander/polisher when you are tired or under the influence of alcohol, drugs or intoxicating medication.
8
DO NOT
use the sander/polisher where there are flammable liquids, solids or gases such as paint solvents, etc.
8
DO NOT
leave the sander/polisher operating unattended.
8
DO NOT
carry the sander/polisher with your finger on the power switch.
8
DO NOT
pull the cord to remove the plug from the power supply.
9
Use a qualified person to lubricate and maintain the sander/polisher.
9
When not in use unplug from the mains power supply and store in a safe, dry, childproof area.
LEAD PAINT WARNING!
Paint once contained lead as a traditional ingredient. Contact with the dust from the removal of such paint is
toxic and must therefore be avoided. The following action must be taken before using machine as a sander:
1. User must determine potential hazard relating to age of paint to be removed. (Modern paints do not have lead content).
2.
DANGER
! Keep all persons and pets away from the working area. The following are particularly vulnerable to the effects of lead
paint dust: Expectant women, babies and children.
3. We recommend personal protection by using the following safety items:
A) Paint Spray Respirator. B) PE Coated Hooded Coverall. C) Latex Gloves.
4. Take adequate measures to contain paint dust, flakes and scrapings. Wear safety equipment, as in (3) above, and thoroughly clean
all areas when task is complete.
5. Ensure the paint waste is disposed of in sealed bags or containers according to local regulations.
2. INTRODUCTION
F
eatures variable speed control giving a range suitable for sanding and polishing between 600 and 3300rpm. Heavy duty aluminium gear head
with composite motor housing. Supplied with Ø180mm backing pad, polishing bonnet, D-handle and side handle allowing use for various tasks.
Suitable for left or right handed use.
3. SPECIFICATION
Model no: .............................................................. MS875PS
Pad size: ................................................................. Ø180mm
Thread size: .......................................................... M14x2mm
No load speed: ..................................................
600-3300rpm
Power: .........................................................................
1200W
Supply: ...........................................................................230V
W
eight: .......................................................................... 3.2kg
Noise power: ..................................................................
99dB
Noise pressure: ..............................................................
88dB
Vibration: ..................................................................
8.16m/s²
Uncertainty: ................................................................
1.5m/s²
4. ASSEMBLY
WARNING!
Ensure unit is not plugged into the mains
before assembly.
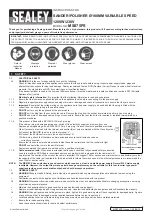
Refer to fig.1
4.1.
Attach D handle using hex headed screws on either side
of the gear head.
4.2.
Or screw side handle onto either side of gear head.
Note:
Handles are reversible to suit operator and/or
application.
4.3.
Fit backing pad. Hold spindle locking button in and spin on backing pad tightly.
4.4.
Fit sanding disc/polishing bonnet as required.
5. OPERATION
WARNING!
Ensure you read, understand and apply the safety instructions in Section 1.
Refer to fig.1
5.1.
Hold the sander/polisher firmly with one hand on the handle grip and the other on the side/D-Handle. To select the required speed
rotate the speed selector switch, see fig.1, to the required speed.
5.2.
To start the machine pull the trigger. Press the trigger lock button in to keep the sander/polisher running.
WARNING!
The high speed settings are intended for sanding. If used for polishing an excessive amount of surface material may be
removed.
M
S875PS | Issue 1- 09/08/16
Original Language Version
© Jack Sealey Limited
Fig.1


