background image


Description 

21 

E

n

g

lis

h


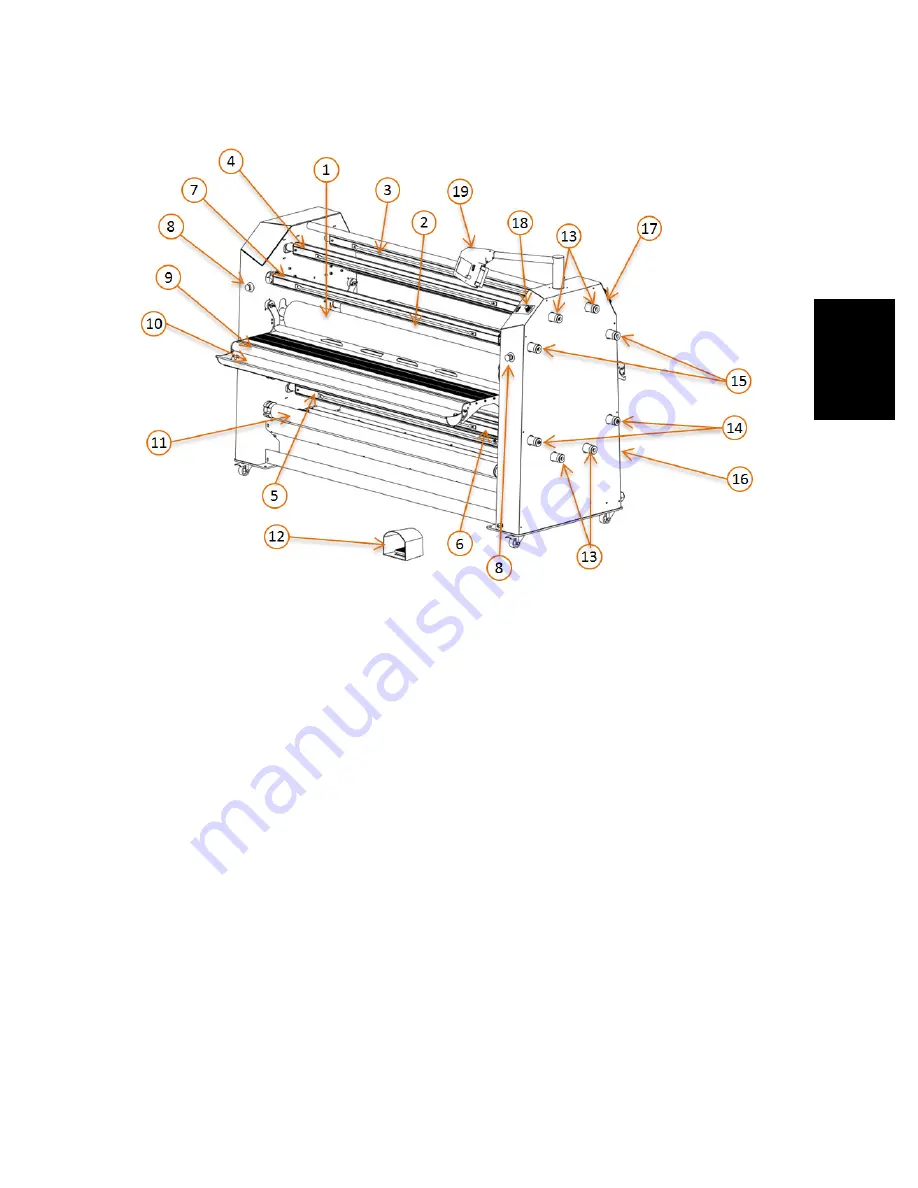
4.2 Parts identification 


Figure 5: Parts Idenification. 

1.  Main roll (top front) 
2.  Pull roll (top rear) 
3.  Swing out supply shaft (top rear) 
4.  Swing out supply shaft (top front) 
5.  Swing out supply shaft (bottom Front) 
6.  Take up autogrip shaft (bottom front) 
7.  Take up autogrip shaft (top front) 
8.  Emergancy Stop 
9.  Infeed table 
10. Roll trough 
11. Roll feed idler 
12. Foot switch (front) 
13. Supply shaft brakes 
14. Combi shaft brake / clutches 
15. Take up clutches 
16. Power circuit breaker 
17. Rear control panel 
18. Front control panel 
19. Easy Operator Interface

TM

  (EOI) 

Summary of Contents for 65ProMD

Page 1: ...English Fran ais Deutsch Espa ol Italiano 65ProMD High Production Laminator Encapsulator and Mounter User Manual 7003338 May 2013...

Page 2: ...reten k nnen noch bernimmt SEAL Graphics Europe BV keinerlei ausdr ckliche oder implizite Garantie in Bezug auf dieses Material einschlie lich jedoch nicht begrenzt auf die implizierte Garantie der Ma...

Page 3: ...Introduction 3 English...

Page 4: ...y lamination Panel mounting of images Decaling Encapsulating images Numerous laminating products are available under the SEAL brand each with their own application and processing specifications This m...

Page 5: ...nty information It also describes the safety features installed on the machine and gives a number of safety instruction and warnings Read this chapter carefully Chapter 2 specifies the machine machine...

Page 6: ...ons 13 2 1 Identification 13 2 2 Machine specifications 14 3 Installation 15 3 1 Unpacking 15 3 2 Installation 18 3 3 Transport 19 4 Description 20 4 1 General description 20 4 2 Parts identification...

Page 7: ...decals 50 5 5 2 Pre coating panels 51 5 5 3 Single sided lamination 52 5 5 4 Double sided lamination 52 5 5 5 Encapsulation 52 5 5 6 Over lamination 53 5 5 7 Decaling 53 6 Maintenance 56 6 1 Cleaning...

Page 8: ......

Page 9: ...ects only The manufacturer or its representative shall not be liable for any damage caused by the machine nor loss of productivity Warranty is voided when Changes or modifications are made to this mac...

Page 10: ...This device performs a check of the operation between transmitter and receiver When an error is detected e g the signal is interrupted the motor will stop and the motor controller will be disabled Th...

Page 11: ...THROUGH LAMINATING ROLLERS WILL CAUSE BUILD UP OF ELECTROSTATIC CHARGES An anti static floor coating wearing anti static clothing and footwear and controling the room humidity can reduce the risk of...

Page 12: ...NGER OF GETTING INJURED BY ROTATING PARTS MAKE SURE THAT THESE ROTATING PARTS DO NOT CATCH YOUR FINGERS CLOTHING HAIR ETC This symbol is placed on the cabinets just in front of each nip and on the ima...

Page 13: ...f the right hand cabinet on the rear side of the machine This label indicates the model version and the power supply requirements CAUTION The mains supply must match the values indicated on the machin...

Page 14: ...x 51 2311 x 1575 x 1320mm With roll trough 91 x 62 x 55 2311 x 1575 x 1397mm Shipping dimensions w x h x d 99 x 63 5 x 42 6 2515 x 1613 x 1083mm Weight Net Weight 1850 lbs 839 kg Shipping Weight 1955...

Page 15: ...skid it may be moved using a forklift to position it near its place of use CAUTION Set the forks of the forklift to the maximum lifting width of the laminator so the laminator s center of gravity is...

Page 16: ...lift off the carton box b Remove the plastic bag Figure 2 Removing transport parts c Put all the loose accessories aside Accessories Included Spare Fuses Snitty Safety Knife Image Roll Cleaner Spare...

Page 17: ...to keep them from moving when unloading the machine j Unlock the casters k Roll the machine off carefully from the pallet using the ramps WARNING ROLL THE MACHINE OFF WITH 2 PERSONS IT IS HEAVY AND CA...

Page 18: ...cm Note Anti static clothing and footwear of the operator and an anti static floor coating will help reduce the build up of electrostatic dis charges ESD A relative humidity of at least 70 also helps...

Page 19: ...le capacity Unroll the extension cable completely WARNING MAKE SURE THE POWER SUPPLY CABLE AND OR THE EXTENSION CABLE IS NOT BLOCKING YOUR WAY AROUND THE MACHINE 3 3 Transport The machine can be trans...

Page 20: ...llers are equipped with heaters heat activated materials can be processed with these rollers Each main roller has its own temperature control so top and bottom roller temperature must be set separatel...

Page 21: ...p front 5 Swing out supply shaft bottom Front 6 Take up autogrip shaft bottom front 7 Take up autogrip shaft top front 8 Emergancy Stop 9 Infeed table 10 Roll trough 11 Roll feed idler 12 Foot switch...

Page 22: ...ive laminate it often has a release liner as shown in Figure 7 that has to be removed It runs over a splitter bar 7 where the release liner is removed This release liner is rolled up onto a cardboard...

Page 23: ...Description 23 English The optional slitters 11 can be used to cut off the edges when processing roll to roll Figure 7 Creating Pop up art including image supply roll trough 1 2 3 6 5 7 11 4...

Page 24: ...ro MD it is important to become familiar with the new Easy Operator InterfaceTM The Easy Operator InterfaceTM is the first windows based control panel for a laminator As such it can be updated and enh...

Page 25: ...arate description 2 Bottom Roll temperature button a Action Call up Bottom Roll Temperature Control screen see separate description 3 Fan button a Action Toggle fan on and off no separate screen calle...

Page 26: ...or forward button is always selected d This button can only be used if the motor is not running 10 Forward button a Action Sets the machine to forward direction b Black arrow turns to green when dire...

Page 27: ...s are displayed individually when any one of the photo eyes are interrupted Each photo eye symbol represents a location on the machine b These symbols are not displayed when photo eyes are operational...

Page 28: ...perature make sure to click the green apply button The result will probably be a set of RED numbers in the roller icons on the Home screen These numbers will turn green when the roll is heated to your...

Page 29: ...point display window 4 Nudge buttons a Action Increments the number in the Temperature set point display on the number pad by 1 degree up or down each time the button is depressed b If the button is h...

Page 30: ...30 7003338 User Manual 65 Pro MD Setting the roll temperature Be sure to turn the heater on or off using the icon near the slider bar...

Page 31: ...Machine Operation 31 English...

Page 32: ...erature and then turn green 5 1 1 3 The Help Screen You can click the Question mark to open the help file Currently this allows you to change from Fahrenheit to Celsius but will include more help as n...

Page 33: ...Machine Operation 33 English...

Page 34: ...arrow allow for adjustments of 1 100 inches The number near the top of this menu indicates the current pressure setting in this example 35 The pressure is controlled by manual dials on the laminator b...

Page 35: ...a decimal number into the nip height display that is equal to the fraction shown on the button 3 Nudge buttons a Action Increments the number in the nip height display by 01 inch each time the button...

Page 36: ...36 7003338 User Manual 65 Pro MD Setting the Nip Height...

Page 37: ...ll be RED until the nip reaches the desired position Then the numbers will turn green The nip will not go to a new position if the rolls are down You can change the set point with the rolls down and t...

Page 38: ...o raise and lower the rolls This switch will always raise the rolls but it will only lower the rolls if the emergency stop is not depressed and the photo eyes in front and behind the roll are not bloc...

Page 39: ...ency stop is not depressed and the photo eyes in front and behind the roll are not blocked The foot switch can be used to override the photo eyes and lower the rolls You may want to turn the speed pot...

Page 40: ...se the brake and therefore release the tension Wind up tension control 2 knob By turning this knob clockwise an amount of friction is set between the shaft and the driving sprocket wheel so this will...

Page 41: ...e standby switch After the switch is toggled a confirmation message will appear on the EOI Press the check button to enter the standby mode In standby the rolls will be moved to the raised position th...

Page 42: ...lls will start in the slow mode Press the slow mode icon on the EOI to resume normal mode Roll rotation can also be started when the footswitch is pressed Roll rotation control is taken over by the fo...

Page 43: ...ine to run at 2 ft per minute unless the potentiometer is turn all the way to zero counter clockwise WARNING KEEP CLEAR OF THE NIP WHEN RUNNING AT SLOW MODE SPEED When running at slow mode speed the i...

Page 44: ...ntil it locks in Check the auto grip mechanism on each shaft The rubber cords should just touch the edges of the recess 14A d 3 1 8 2 5 mm If not see chapter 6 maintenance Figure 14 Auto grip shaft Wh...

Page 45: ...he shaft into the core cylinder of the film roll holding the auto grip shaft as in figure 15 Figure 15 Auto grip shaft position d Place the shaft and film back into the shaft holders see figure 15 Unw...

Page 46: ...e On the unwind shaft this will prevent film from unwinding without tension On the motor driven wind up shaft it allows the shaft to slip and adapt its rotation speed to the speed of the film 5 3 5 Pr...

Page 47: ...thin leader panel can be used when laminating images When this panel is through the nip is set to zero and the images can be fed 5 4 1 Upper section only a Remove the image guide b Unwind the film fro...

Page 48: ...the splitter bar f Pull the film forward until the end reaches above the nip and stick it to the film from the upper section If the film has a release liner Peel off the release liner Pull it underne...

Page 49: ...s This means the top laminate with or without release liner must be webbed on the top unwind shaft in the upper section and in the lower section only a laminate without a release liner can be used The...

Page 50: ...leader board pushed through the main roller nip and the pull roller nip 5 5 Processes and settings 5 5 1 Mounting images or decals In this process the machine is not webbed with film When mounting im...

Page 51: ...board as it is slowly fed into the nip one section at a time without stopping Note Removing the release liner completely exposes the adhesive to dirt and dust that will get trapped under the image j W...

Page 52: ...a pressure sensitive adhesive with release liner The image is put on the carrier board with the image side up All steps in this process are the same as when pre coating a board 5 5 4 Double sided lami...

Page 53: ...adhesive backing is put on the backside of the image The process is the same as double sided lamination This decal can later be mounted onto a panel or other substrate Figure shows the cross section o...

Page 54: ...__________ Bottom Front Combi Shaft ____________________________ Top Rear Wind up shaft ______________________________ Bottom Rear Combi Shaft _____________________________ Front Control Panel Setting...

Page 55: ...Machine Operation 55 English Figure 1 Blank Webbing Diagram...

Page 56: ...marks Clean the shafts and the rubber cords on it as required 6 1 1 Cleaning the silicone covered rollers The rollers must be cleaned regularly to prevent a build up of adhesive residue This may even...

Page 57: ...If not correct as follows Loosen the clamp 2 with the screw 1 until the cord is free on one side Shorten the cord by approximately 10 mm 4 in Put the end of the cord back underneath the clamp 2 Secur...

Page 58: ...inkles due to low unwind tension Increase the unwind tension until the wrinkles 6 in the film on the roller disappear The lines 7 in the process result will disappear as well 6 3 4 Pull tension too lo...

Page 59: ...ce installed 6 3 6 Roller alignment fault Figure 8 Wrinkles due to faulty roller alignment The wrinkles occur on one side only left or right This is a machine adjustment error Contact Neschen Americas...

Page 60: ...rst heating up Images or Prints are rippling or jumping as they are fed into the nip Apply tension to images or prints as they are fed into the nip Hold cut sheets back by hand The film output is ripp...

Page 61: ...cal Support at 1 800 486 6502 Make a clear description of the problem before contacting Technical assistance Please have the Model number and the Serial Number of your machine at hand You can find thi...

Page 62: ...ilm Adhesive backing to make an image self adhesive On the side that is in contact with the image the carrier has an adhesive with or without release liner The carrier can function as release liner or...

Page 63: ...7325 Fax 1 800 966 4554 Email csorders neschenamericas com Neschen Americas Neschen Americas Canada Neschen AG SEAL Asia Pacific 7091 Troy Hill Drive 1601 Matheson Blvd E Hans Neschen Str 1 Unit A 8...

Reviews: