


9711QOR-86 C & Ku-Band TXRX
Maintenance
19-19
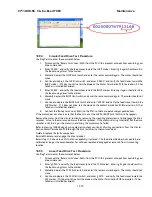
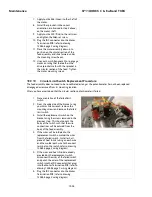
19.9.4.
Circular Feed Drive Test Procedure:
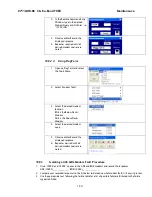
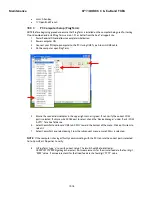
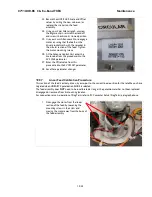
Use ProgTerm to enter the commands below.
1.
Disconnect the “Rotary Joint” coax (SMA) from the PCU (this prevents auto-pol from overriding your
drive commands).
2.
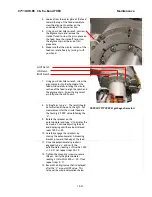
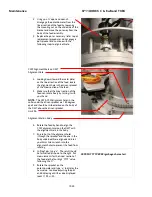
Enter “h0350”, and verify the feed moves toward the LHCP marker. Entering it again should result in
the feed moving closer to the marker.
3.
Manually depress the LHCP limit switch, and enter the same command again. The motor should not
move.
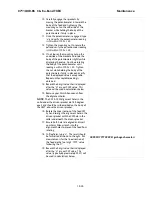
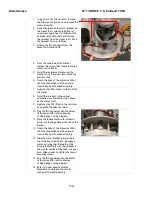
4.
Continue to depress the LHCP limit switch, and enter “h0800”, and verify the feed moves toward the
RHCP marker. (If it does not drive, test the diode on the Motor Termination PCB to ascertain if it has
failed or is installed backwards).
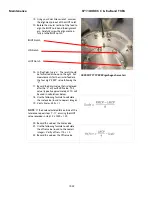
5.
Enter “h0800”, and verify the feed moves toward the RHCP marker. Entering it again should result in
the feed moving closer to the marker.
6.
Manually depress the RHCP limit switch, and enter the same command again. The motor should not
move.
7.
Continue to depress the RHCP limit switch, and enter “h0350”, and verify the feed moves toward the
LHCP marker. (If it does not drive, test the diode on the Motor Termination PCB to ascertain if it has
failed or is installed backwards).
8.
Connect the “Rotary Joint” coax (SMA) to the PCU (so that auto-pol can target polarization).
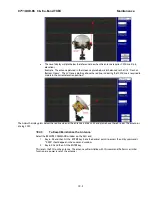
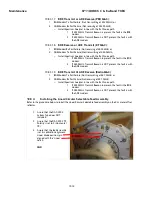
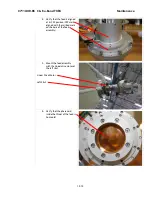
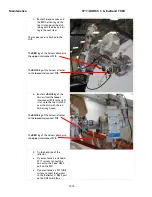
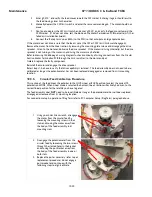
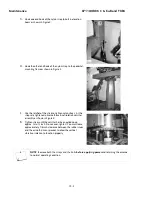
If the motor does not drive, assure that the feed is not at the LHCP or RHCP limit (limit switch engaged).
Remove the motor from the circular section by removing the mounting plate screws and disengage the drive
sprocket. Listen to the motor and observe the drive sprocket. If the motor is driving (internally) but the drive
sprocket is not turning or the motor is not driving, the motor may be failed.
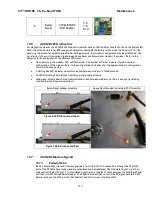
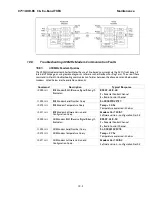
Refer to drawing 134868 page 2 wiring diagram to check continuity of wiring connections from the Circular
Section Motor Termination PCB through the limit switch(es) to the motor and pot.
Isolate & replace the faulty component.
Reinstall the motor and engage the drive sprocket.
Retest steps 1-6 above to verify that drive capability is restored. The feed assembly does not need to be re-
calibrated as long as the potentiometer has not been replaced, disengaged or removed from its mounting
location.
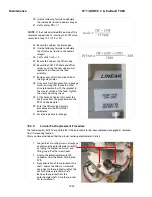
19.9.5.
Linear Feed Drive Test Procedure:
Use ProgTerm to enter the commands below.
1.
Disconnect the “Rotary Joint” coax (SMA) from the PCU (this prevents auto-pol from overriding your
drive commands).
2.
Enter “g0030”, and verify the feed moves toward the CCW marker. Entering it again should result in
the feed moving closer to the marker.
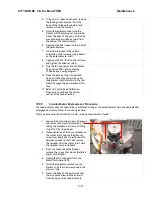
3.
Manually depress the CCW limit switch, and enter the same command again. The motor should not
move.
4.
Continue to depress the CCW limit switch, and enter “g0210”, and verify the feed moves toward the
CW marker. (If it does not drive, test the diode on the Motor Termination PCB to ascertain if it has
failed or is installed backwards).
Summary of Contents for 9711QOR-86
Page 4: ......
Page 14: ...Table of Contents xiv This Page Intentionally Left Blank ...
Page 26: ...Site Survey 9711QOR 86 C Ku Band TXRX 2 8 This Page Intentionally Left Blank ...
Page 70: ...Installation 9711QOR 86 C Ku Band TXRX 3 44 This Page Intentionally Left Blank ...
Page 74: ...Basic Setup of the ACU 9711QOR 86 C Ku Band TXRX 4 4 This Page Intentionally Left Blank ...
Page 78: ...Setup Ships Gyro Compass 9711QOR 86 C Ku Band TXRX 6 2 This Page Intentionally Left Blank ...
Page 80: ...Setup Band Reflector Select 9711QOR 86 C Ku Band TXRX 7 2 This Page Intentionally Left Blank ...
Page 86: ...Setup Home Flag Offset 9711QOR 86 C Ku Band TXRX 9 4 This Page Intentionally Left Blank ...
Page 90: ...Setup Targeting 9711QOR 86 C Ku Band TXRX 10 4 This Page Intentionally Left Blank ...
Page 96: ...Setup Searching 9711QOR 86 C Ku Band TXRX 11 6 This Page Intentionally Left Blank ...
Page 122: ...Antenna Specific Operation 9711QOR 86 C Ku Band TXRX 16 12 This Page Intentionally Left Blank ...
Page 126: ...Functional Testing 9711QOR 86 C Ku Band TXRX 17 4 This Page Intentionally Left Blank ...
Page 190: ...Drawings 9711QOR 86 C Ku Band TXRX 23 2 This Page Intentionally Left Blank ...
Page 196: ......
Page 199: ......
Page 233: ......
Page 234: ......
Page 239: ......
Page 241: ......
Page 243: ......