S
ECTION
4 • B
ILGE
& U
NDERWATER
G
EAR
4.6
270 Select EX
3. U
NDERWATER
G
EAR
A. P
ROPELLER
G
ENERAL
I
NFORMATION
Propellers should be free of nicks, excessive
pitting and any distortions that alter them from
their original design. Badly damaged propellers
should be replaced, but those that are chipped,
bent or merely knocked out of shape can be
reconditioned by your marine dealer.
When doing extensive cruising, it is advisable
to carry an extra propeller aboard.
B
ASIC
P
ROPELLER
C
HARACTERISTICS
Propellers have two basic characteristics:
• Diameter
• Pitch.
Diameter is that distance measured across the
propeller hub line from the outer edge of the 360°
that is made by the propeller’s blade during a single
rotation. Pitch is that distance in inches that a
propeller will travel if rotated one revolution without
any slippage.
For example, a propeller with a 12-inch pitch, when
rotated 360° would, theoretically, advance 12
inches through the water. Actually, no propeller
applied to any boat is 100% efficient. No 12-inch
pitch blade will, in a single rotation, advance a boat
12 inches. This variance is referred to as slippage.
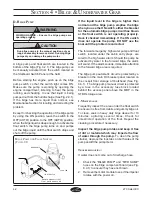
PITCH
DIAMETER
P
ROPELLER
P
ITCH
AND
D
IAMETER
(F
IG
. 4.6.2)
P
ROPELLER
P
ARTS
(F
IG
. 4.6.1)
REAR
PROPELLER
NUT
SHAFT
ANODE
PROPELLER
SHAFT
REAR
THRUST HUB
REAR
PROPELLER
FRONT
PROPELLER
NUT
FRONT
PROPELLER
FRONT
THRUST HUB
D
UAL
P
ROPELLER
D
RIVE
U
NIT
:
1. Shut off engine, remove key, shift into neutral
and put tape over ignition switch key slot.
IMPORTANT: Correct rotation propeller MUST
match direction or rotation of propeller shaft.
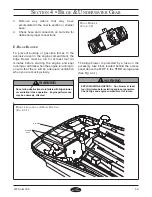
2. Remove Propeller shaft anode and rear prop
nut. Pull the propeller straight off the shaft.
Remove the rear thrust washer that is behind
the rear propeller. If the propeller is seized to
the shaft and cannot be removed by hand,
special tools are needed. Have the propeller
removed by an authorized dealer or trained
mechanic.
3. Remove the front prop nut, propeller and thrust
washer in the same manner.
4. Coat the propeller shaft with an anti-seize
lubricant.
5. Slide front thrust hub onto propeller shaft, with
tapered side toward propeller hub.
6. Align splines and place front propeller on
propeller shaft.
7. Install front prop nut and torque. (Refer to drive
owners manual for specific torque value.)
8. Install rear thrust hub, propeller and nut in same
manner.
9. Install propeller shaft anode.
Summary of Contents for 270 Select EX
Page 1: ...Owner s Manual Part Number MRP 1803645 Sea Ray Owner s Manual 270 Select EX...
Page 2: ......
Page 4: ...270 Select EX ii THIS PAGE LEFT INTENTIONALLY BLANK...
Page 46: ...2 16 SECTION 2 GENERAL BOAT ARRANGEMENT 270 Select EX THIS PAGE LEFT INTENTIONALLY BLANK...
Page 66: ...5 4 SECTION 5 FUEL SYSTEM 270 Select EX THIS PAGE LEFT INTENTIONALLY BLANK...
Page 102: ...7 12 SECTION 7 OPTIONS ACCESSORIES 270 Select EX THIS PAGE LEFT INTENTIONALLY BLANK...
Page 106: ...270 Select EX Index 4 INDEX THIS PAGE LEFT INTENTIONALLY BLANK...

