background image

2

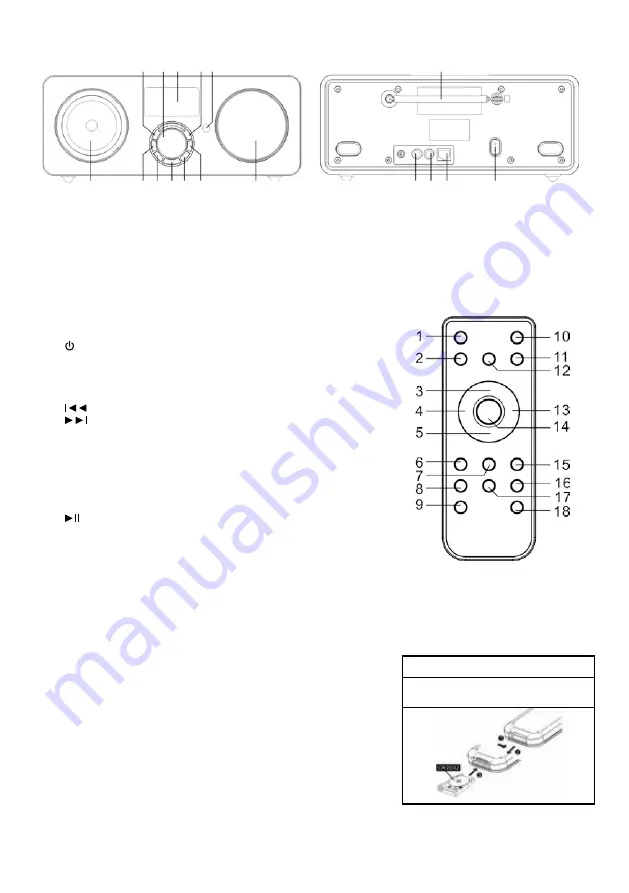
FEATURES AND CONTROLS

1.  INFO BUTTON

2.  SCROLL CONTROL/SELECT BUTTON

3.  LCD DISPLAY

4.   BUTTON

5.  IR SENSOR

6.  SPEAKER

7.  MENU BUTTON

8.  MODE BUTTON

9.  BUTTON

10. BACK BUTTON

11. VOLUME - BUTTON

12. ROD ANTENNA

13. HEADPHONE JACK

14. AUX IN JACK

15. NETWORK SOCKET

16. AC CORD SOCKET

REMOTE CONTROL

1.  ( ) BUTTON

2.  MENU BUTTON

3.  (▲) BUTTON

4.  (◄) BUTTON

5.  (▼) BUTTON

6.  (

) BUTTON

7.  (

) BUTTON

8.  MUTE BUTTON

9.  VOLUME - BUTTON

10. MODE BUTTON

11. INFO BUTTON

12. SLEEP/SNOOZE BUTTON

13. (►) BUTTON

14. SELECT BUTTON

15. (

) BUTTON

16. ALARM BUTTON

17. MEMORY BUTTON

18.  BUTTON

PUTTING THE BATTERY INTO THE REMOTE CONTROL

1.  Press the battery compartment gently according to the direction 

indicated in the illustration.

2.  Slide to open the battery compartment.

3.  Insert the supplied CR2032 battery into the compartment according to 

the polarity markings (“+” and “-”) inside the compartment and on the 

battery. Replace the battery compartment until it clicks.

REMOTE SENSOR

To operate the unit with the remote control, point the remote at the Remote Sensor on the front of the main unit and press 

the appropriate button. The remote control has an effective operating range of approximately 20 feet and an angle of no 

more than 30°.

NOTE: Bright sunlight may interfere with the operation of the remote control.

** BATTERY INCLUDED **

PLEASE REMOVE SAFTEY STRIP 

BEFORE USING UNIT

CHANGE OF BATERY

BATTERY COMPARTMENT 

OPEN/CLOSE

1

6

7 8 9 10 11

6

13 14 15

16

2 3

4 5

12

Downloaded from www.vandenborre.be

Summary of Contents for IN300

Page 1: ...UK User Manual DK Brugervejledning DE Bedienungsanleitung FR Guide d instructions IT Manuale di istruzioni D o w n l o a d e d f r o m w w w v a n d e n b o r r e b e...

Page 2: ...nit CAUTION RISK OF ELECTRIC SHOCK DO NOT OPEN DANGEROUS VOLTAGE Conductor dangerous voltage that may be of sufficient magnitude to constitute a risk of electric shock to persons is present within thi...

Page 3: ...he direction indicated in the illustration 2 Slide to open the battery compartment 3 Insert the supplied CR2032 battery into the compartment according to the polarity markings and inside the compartme...

Page 4: ...o show menu for the current mode Press again to show Now playing screen BACK Press to return to previous screen In play mode this button may be used to return to the last track list or station list AL...

Page 5: ...Main menu The following modes can be selected in the main menu Internet radio Music player FM radio AUX in Sleep Alarms System settings To select your desired function rotate the SCROLL control follo...

Page 6: ...ork View settings You can check the following information on the currently connected network Active connection MAC address WLAN region DHCP SSID IP address subnet mask gateway address first and second...

Page 7: ...e stored in the Internet radio portal and are available to all Internet radios that are registered with the same account You must register the radio in the Internet radio portal before making use of t...

Page 8: ...tle Press the or button on the remote control to select previous or next track Press and hold the or button on the remote control to rewind or fast forward Press the button on the remote control to in...

Page 9: ...good signal strength press the MENU button then enter into the Scan setting section and select YES by the use of the SCROLL control Audio settings The radio will automatically switch between FM stere...

Page 10: ...ep time has been set it will return to the main menu MUTE FUNCTION REMOTE CONTROL ONLY Press the MUTE button on the remote control to stop the sound from the speakers temporarily the sound stops and t...

Page 11: ...d the radio unit s you wish to control 2 1 Network Connection Setup 2 1 1 If the radio unit is using IR 2 2 or IR 2 5 firmware On the radio unit navigate to Menu Main menu System settings Network Keep...

Page 12: ...pair of screens which are arranged side by side in left and right columns The menu screens presenting lists of options are on the left and the Now Playing screens presenting information and controls...

Page 13: ...will depend on the images and information associated with the audio file or broadcast by the radio station The controls available on the Now Playing screen vary dependent on the current listening mode...

Page 14: ...te or unmute playback Volume Set the output volume of the radio unit 4 2 Music player This mode is used to play files from a computer with shared media on the same network as the radio unit Now Playin...

Page 15: ...up or down the FM frequencies 4 4 Aux In If there is a device such as an MP3 Player connected via an Auxilliary port on your radio you can control the playback volume using the application From the a...

Page 16: ...isplays the available preset radio stations in Internet radio or FM modes Only the presets for the currently selected mode are listed To return to the Now playing screen without selecting a preset sta...

Page 17: ...llowing options can be accessed when appropriate Settings Menu Option Function Radio Scans for available radios and presents a list of connectable radios Tap on required radio Disable Auto Lock Stops...

Reviews: