background image


Sauter GmbH


Ziegelei 1 
D-72336 Balingen 
E-Mail: [email protected]


Tel:  +49-[0]7433- 9933-199 
Fax: +49-[0]7433-9933-149 
Internet: www.sauter.eu 


Instruction Manual 

HMR 


HMR-BA-e-1212 


7


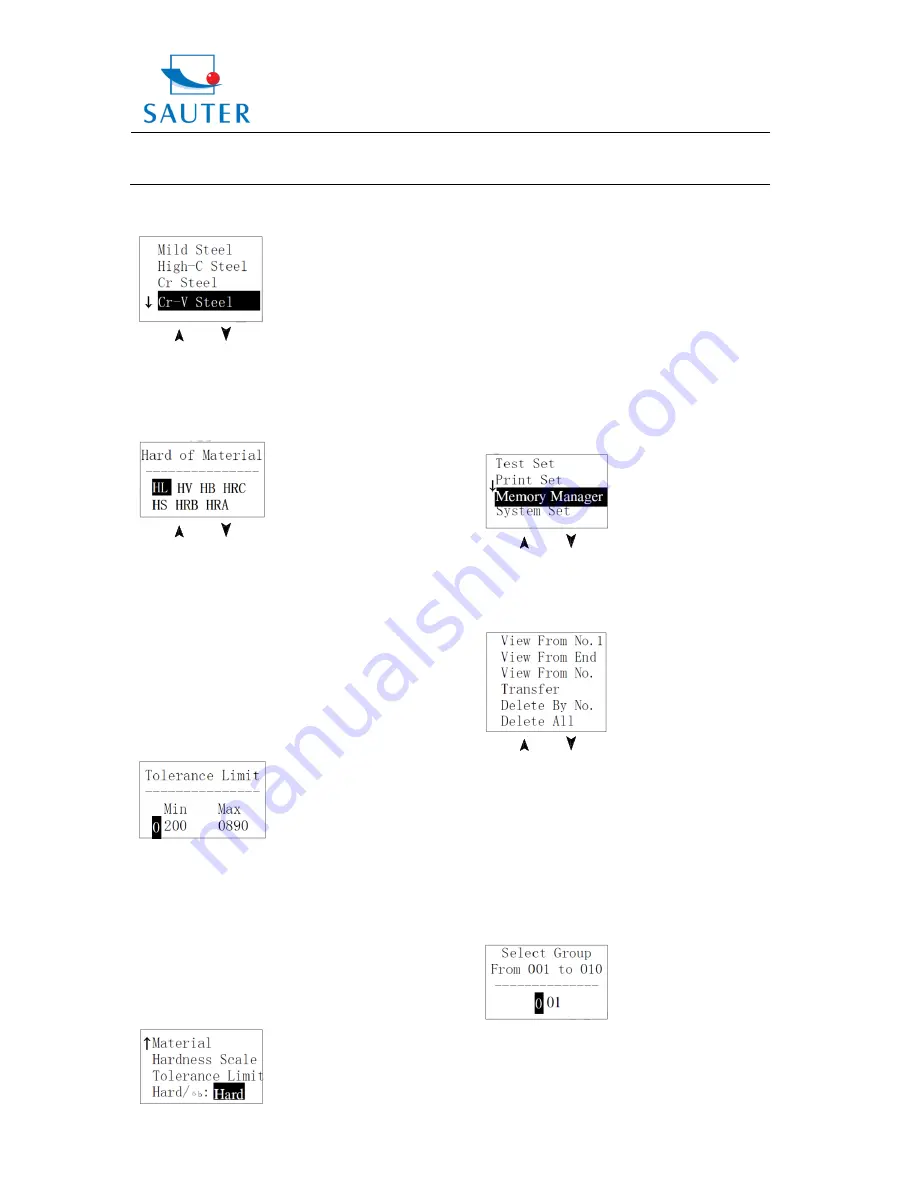
Steel,  Cr-Ni  Steel,  Cr-Mo  Steel,  Cr-Ni-Mo  Steel,  Cr-Mn-Si 
Steel, Super Strength Steel and Stainless Steel. 


The 

or 

key  has  to  be  pressed  to  move  the 

cursor to the material desired to preset. 

ETR  

has to be pressed to confirm. 

ESC  

has to be pressed to cancel. 


6.5.4 Hardness Scale Setting 


The 

or 

key  has  to  be  pressed  to  move  the 

cursor to the hardness scale desired to preset. 

ETR  

has to be pressed to confirm. 

ESC  

has to be pressed to cancel. 


Note:  1.  Only  the valid  hardness  scale  for  the present 
selected impact device and material are displayed.  
An invalid hardness scale will not be displayed. 
2. Please select material first and then select hardness 
scale. 
3.  Presetting  the  hardness  scale,  HL  is  automatically 
recovered after material presetting has been changed. 
 

6.5.5 Tolerance Limit Setting 


The 

~     

key  has  to  be  pressed  to  input  the 

number  value.  The  cursor  will  shift  right  around 
automatically when inputting. 

ETR  

has to be pressed to confirm. 

ESC  

has to be pressed to cancel. 

Note:  1.  If  the  preset  value  exceeds  the  measurement 
range, the user will be reminded by the Tester to reset. 
2. If the bottom limit is larger than the upper limit, they 
will be exchanged automatically. 
 

6.5.6 Hardness / 

бb Setting 


ETR   

has  to  be  pressed  to  switch  between  Hard  and 

бb. 

Note:  Only  D  and  DC  type  of  impact  device  have  got 
the function of 

бb measurement. So, “Hard” is the only 

selection if the impact device is not D or DC type. 
 

6.6    Print Set 
 

At  the  main  display  interface, 

MENU 

key  has  to  be 

pressed  to  enter  the  main  menu.  Printing  function  is  not 
available at Hardness Tester HMR. 
 

6.7    Memory Management 
 

At the main display interface, the 

MENU 

key has to be 

pressed to enter the main menu. 


The 

or 

key  has  to  be  pressed  to  move  the 

cursor  to 

Memory  Manager

ETR   

key  has  to  be 

pressed in 

Memory Manager

menu. If there is no data in 

memory,  <No  Data!>  will  be  displayed.  Then  it  has  to  be 
returned. 


The 

or 

key  has  to  be  pressed  to  move  the 

cursor to the desired function. 

ETR  

has to be pressed to confirm. 


6.7.1 View from No.1 Group/ View from Ending Group 
 

View From No.1 

: values in the memory from the first            

                                  group are displayed. 

View From End 

:  values in the memory from the 

                                  ending group are displayed. 
 

6.7.2 View from Selected No. Group 


The  digit  figure  keys  have  to  be  pressed  to  input  the 
number.  

ETR   

has  to  be  pressed  to  start  displaying  memory 

data from the selected beginning group.  

ESC  

has to be pressed to cancel. 

Summary of Contents for HMR

Page 1: ...6 7 Memory Management 6 7 1 View from No 1 Group View from Ending Group 6 7 2 View from Selected No Group 6 7 3 Data Transfer 6 7 4 Delete by Group No 6 7 5 Delete all Data 6 7 6 Deletion Confirmation 6 8 Browsing Memory Data Groups 6 9 System Reset 6 9 1 LCD Brightness Setting 6 9 2 Date Time Setting 6 10 Software Information 6 11 System Calibration 6 12 EL Background Light 6 13 Auto Power Off 6 ...

Page 2: ...able 1 1 No Item Qua ntity Remarks Stan dard Config uration 1 Main body 1 2 D type impact device 1 With cable 3 Standard test block 1 4 Cleaning brush I 1 5 Small support ring 1 6 Alkaline battery 4 AA size 7 Manual 1 8 Instrument case 1 9 Optio nal Config uration 11 Cleaning brush II 1 For use with G type impact device 12 Other type of impact devices and support rings Refer to Table 3 and Table 4...

Page 3: ...RC HRA HV HS Display dot matrix LCD 128 x 64 dots Data memory max 500 groups Power supply 3V 2AA size Alkaline batteries Continuous working period about 50 hours with backlight off Communication interface USB1 1 4 Preparation Testing 4 1 Preparation and Inspection before Testing 4 1 1 Preparation of Sample Surface Preparation of the sample surface should conform to the relative requirements in APP...

Page 4: ...b hardness tester and a corresponding hardness tester have to be used to test at the same sample respectively For each hardness value each homogeneous measurement 5 points of Leeb hardness value are needed They are in the surroundings of more than three indentations which need conversion of hardness The Leeb hardness arithmetic average value and the corresponding hardness average value as correlat...

Page 5: ...he mean value will be displayed 6 3 3 Key Operation at the Main Display The SAVE key has to be pressed to store the present group of measured values into memory This operation is only valid after displaying the mean value The DEL key has to be pressed to delete the latest single measured value After pressing this key on the screen will be shown following The key or the key has to be pressed to mov...

Page 6: ...ncel 6 5 2 Average Times Setting Average times can be modified within the range of 1 to 32 The 0 9 key has to be pressed to input the number value The cursor will shift right around automatically when inputting the number ETR has to be pressed to confirm ESC has to be pressed to cancel 6 5 3 Material Setting If Hard бb is preset to hardness following material will be displayed Steel and Cast Steel...

Page 7: ...ceeds the measurement range the user will be reminded by the Tester to reset 2 If the bottom limit is larger than the upper limit they will be exchanged automatically 6 5 6 Hardness бb Setting ETR has to be pressed to switch between Hard and бb Note Only D and DC type of impact device have got the function of бb measurement So Hard is the only selection if the impact device is not D or DC type 6 6...

Page 8: ...ssed to see details of that group The or key has to be pressed to browse details including average value test set and each single value ESC has to be pressed to return to previous display 6 9 System Set At the main display interface MENU key has to be pressed to enter the main menu or key has to be pressed to move the cursor to System Set Menu ETR has to be pressed to enter System Set Menu Auto Sa...

Page 9: ... if it hasn t been used for a longer time or after having reset the system The key and the ETR key have to be pressed to power on the system Then the software calibration screen will display following The impact direction has to be set at 5 points have to be measured on the standard hardness block The average value will be displayed after measuring 5 times or key has to be pressed to input the nom...

Page 10: ...e unscrewed first Then the impact body has to be taken out The nylon brush has to be spiralled in counter clock direction into the bottom of the guide tube It has to be taken out and repeated for 5 times At last the impact body and the support ring have to be installed again The impact body has to be released after use Any lubricant is absolutely prohibited inside the impact device 8 2 Normal Main...

Page 11: ... 7 68 2 22 6 70 2 HV 80 898 80 935 100 941 82 1009 Stainless steel HRB 46 5 101 7 HB 85 655 HV 85 802 Grey cast iron HRC HB 93 334 92 326 HV Nodular cast iron HRC HB 131 387 127 364 HV Cast aluminium alloys HB 19 164 23 210 32 168 HRB 23 8 84 6 22 7 85 0 23 8 85 5 BRASS copper zinc alloys HB 40 173 HRB 13 5 95 3 BRONZE copper alum tin alloys HB 60 290 Wrought copper alloys HB 45 315 Table 2 No Mat...

Page 12: ...1 6μm Min weight of sample Measure directly Need support firmly Need coupling tightly 5kg 2 5kg 0 05 2kg 5kg 2 5kg 0 05 2kg 1 5kg 0 5 1 5kg 0 02 0 5kg 15kg 5 15kg 0 5 5kg 5kg 2 5kg 0 05 2kg Min Thickness of sample Coupling tightly Min layer thickness for surface hardening 5mm 0 8mm 5mm 0 8mm 1mm 0 2mm 10mm 1 2mm 5mm 0 8mm Size of tip indentation Hardness 300HV Indentation diameter Depth of indenta...

Reviews: