background image

55 


Shooting 


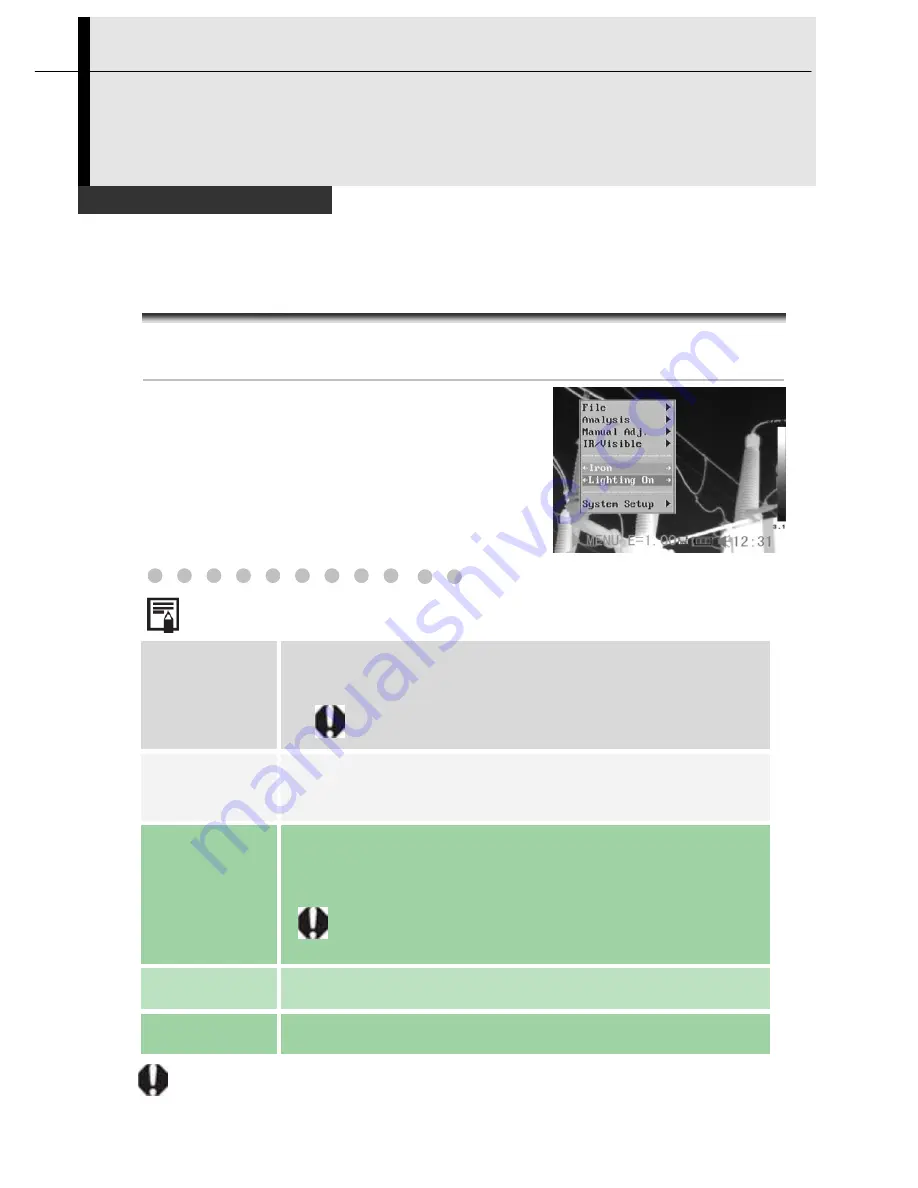
Setting the Trigger 

You can set the definable trigger with different function,such as saving   
image,laser and turning on the illuminator. 
 

Setting definable trigger


Press the 

MENU/ENTER

 key.


Press the 

UP or DOWN

arrow on the 

omni selector to select [Lighter On].   


• 

Press the 

LEFT

 or 

RIGHT

arrow on 

the omni selector to select 

Lighter 

On

/

Save File

/

Laser On/ Freeze Live.


About the function of definable trigger 

*Lighting on 

You  can  activate  the  illuminatorby  pressing  the 
trigger. 


You can get clear visible images in darkness 
when you turn on the illuminator.


Save File 

 
Save  the  image  by  pressing  the  trigger  for  3 
seconds. 

*Laser on 

 
You can activate the laser pointer by pressing the 
trigger. 


Do not trigger the laser pointer in human or animal 
eyes.Exposure to the laser produced by the laser 
pointer may damage eyesight. 

Freeze/Live 

Freeze or activate an image. 

Auto adjust 

Automatically adjust the brightness and contrast. 


www.

GlobalTestSupply

.com

Quality SATIR Products Online at:

[email protected]

Summary of Contents for E8-GN

Page 1: ...nformation displayed on the LCD Monitor p 18 TrademarkAcknowledgments SDSistrademarksofSDSLTD Microsoft WindowsandWindowslogoiseitherregisteredtrademarksortradema rksofMicrosoftCorporationintheUnitedS...

Page 2: ...s working with the camera from each analysis settings tousing the camera svarious analysis tools Shooting Explains how toreview recorded images erase images and playback voice memos Playback and erase...

Page 3: ...Local Settings 21 Basic Functions 23 Using the LCD Monitor 23 Selecting Menus and Settings 24 Resetting the Setting to Default 26 Shooting 27 IR Camera Adjustment 27 Focus 27 Manual Focus 27 Display M...

Page 4: ...Download via SD Card 58 Connecting and Download 59 Connecting to the dock 59 Charging via the dock 60 Connecting to a Monitor 61 Connecting to a computer 62 Connecting to a computer 61 Installing Dri...

Page 5: ...tsinthefailureofanimagetobe recordedortoberecordedinaformatthatismachinereadable WarningAgainstCopyrightInfringement Safety Precautions Beforeusingthecamera pleaseensurethatyoureadand understandthesaf...

Page 6: ...Stop operating immediately if it is dropped or the casing is damaged Failure to do so may result in fire or electrical shock Immediately turn the IR camera s power off remove the IR camera battery or...

Page 7: ...r expose them to directly to flame or heat Neither should you immerse them in water Such exposure may damage the batteries and lead to the leakage of corrosive liquids fire electrical shock explosion...

Page 8: ...nd when the IR camera is not in use to avoid fires and other hazards Continuous use over a long period of time may cause the unit to overheat and distort resulting in fire Do not use the battery charg...

Page 9: ...era Stop using the camera immediately if you detect condensation Continue to use may damage the IR camera Remove the PC card and battery or a household power source from the IR camera and wait until m...

Page 10: ...igger Illuminator Visual CCD Camera Focus Ring Thermal Lens Lens Locking Ring Multi function Dock E8 N is not equipped with illuminator visual CCD camera and laser pointer www GlobalTestSupply com Qua...

Page 11: ...11 Component Guide Back Bottom View Key Pad LCD Display Battery SD Card Cover USB Terminal Video out Terminal www GlobalTestSupply com Quality SATIR Products Online at sales GlobalTestSupply com...

Page 12: ...on Dock Menu Enter Key Cursor Key Cancel Key Freeze Activate Power Switch Auto Adjust Key Power Indicator USB Terminal Video Output Terminal Power Terminal www GlobalTestSupply com Quality SATIR Produ...

Page 13: ...omponent Guide Bottom Connectors Lock Battery Lock SD Card Slot Battery insertion slot Multi connector Multi connector www GlobalTestSupply com Quality SATIR Products Online at sales GlobalTestSupply...

Page 14: ...battery pack is charging and it turns green when charging is complete After charging unplug the battery charger and remove the battery pack This is a lithium ion battery pack so there is no need to di...

Page 15: ...e first time 1 Check if the power is off and slide the battery cover in the direction of the arrow 2 Insert the battery pack Insert the battery in the direction of the arrow 3 Insert SD card Insert th...

Page 16: ...therwise the IR camera may not recognize the SD card Battery Status Symbols The following icons indicate the battery status on the LCD display Sufficient battery charge Low battery Replace or recharge...

Page 17: ...key pad and put your forefinger in front of the definable trigger 2 Press and hold the power switch for 3 seconds The power indicator lights green 3 After a while a startup image will appear on the s...

Page 18: ...tion view About the operation indicator The operation indicator shows the current operation status of the camera Upper limit of color scale Operation indicator Battery Charge Time Color scale Reading...

Page 19: ...eprents the current analysis tool is profile ISO Represents the current analysis tool is isotherm analysis E Current Emissivity value SD card has been inserted Bluetooth headset has been paired The st...

Page 20: ...p menu 3 Press the UP or DOWN arrow on the omni selector to select Date Time then press the MENU ENTER key 4 Setting Date and Time Press the UP or DOWN arrow on the omni selector to select anitem to c...

Page 21: ...up menu 3 Press the UP or DOWN arrow on the omni selector to select Local Setup then press the MENU ENTER key 4 Local Setup Press the UP or DOWN arrow on the omni selector to select afield to change P...

Page 22: ...ormat of the video output of the camera PAL or NTSC Temp unit Sets the format of the displayed temperature unit of the camera C or F Distance unit Sets the format of the displayed distance unit of the...

Page 23: ...ow the instructions below 1 Open the LCD displayer in the direction of the arrow 2 Aim the IR camera at a subject 1 For a better temperature measurement please do make the subject in center of the ima...

Page 24: ...T or RIGHT arrow on the omni selector 3 Press the UP or DOWN arrow on the omni selector 4 Press the MENU ENTER button Selecting Menus and Settings 1Menu 2Select a function item using File Menu Analysi...

Page 25: ...e operation and setting contents The menu items are different according to different type of camera 4 Change the settings using 3 Select setting contents using Exit www GlobalTestSupply com Quality SA...

Page 26: ...default 1 Turn off the IR camera p 17 2 Press and hold the power switch and C key for seconds The data in storage will not be deleted when you reset the menu and button operation settings to default...

Page 27: ...Manually Focus 1 Aim that the IR camera at the subject 2 Turn the focus ring to focus on the target 3 Do not stop turning until the image is clear www GlobalTestSupply com Quality SATIR Products Onli...

Page 28: ...ct the IR Visible menu 3 IR Visible Setup Press the UP or DOWN arrow on the omni selector to select anitem to change Press the LEFT or RIGHT arrow on the omni selector to set the values 4 Press UPor D...

Page 29: ...seudo color Vision Only In this mode you can see the image with full color But you can not use any analysis tools to analyze the target Duo Vision In this mode you can see the background image is full...

Page 30: ...e area right C RIGHT About the IR Visible settings IR Percentage Sets the ratio of IR images and Visual images The value is from 1 to 100 In the IR and Vision Mix mode you can press UP or DOWNarrow to...

Page 31: ...31 The items above are activated only in Duo Vision mode www GlobalTestSupply com Quality SATIR Products Online at sales GlobalTestSupply com...

Page 32: ...uto adjust The IR camera will automatically adjust the brightness and or contrast and calibrate when you press the A key for the first time If you press A key a second time in 15 seconds the camera wi...

Page 33: ...u 1 Press the MENU ENTER key 2 Press the UP or DOWN arrow on the omni selector to select the Manual Adj menu 3 Setting Level and Span Press the UP or DOWN arrow on the omni selector to select anitem t...

Page 34: ...ress the LEFT or RIGHT arrow to choose the palette 3 After this operation press the MENU ENTER key to save changes or press the C key close the menu without saving The camera provides 6 kinds of palet...

Page 35: ...r to select Camera Setup then press the MENU ENTER key 4 Set the Image Settings Press the UP or DOWN arrow on the omni selector to select anitem to change Press the RIGHT or LEFT arrow on the omni sel...

Page 36: ...d contrast of the the image shown on the screen are adjusted automatically Level and span The brightness and contrast is adjusted automatically Level The brightness is adjusted automatically None The...

Page 37: ...R key 3 Selecting measurement range for different lens After selecting the Range field press UP and DOWN arrow on the omni selector at the same time to change the measurement range for different lens...

Page 38: ...eze a thermal image by pressing the S key on the keypad 1 Check that the IR camera is in null mode p 19 2 Press the S key then the image is freezing 3 Press the S key again then the image is active ww...

Page 39: ...the MENU ENTER key 3 Press UP or DOWN arrow on the omni selector to select Object Para then press the MENU ENTER key 4 Setting analysis parameter Press the UP or DOWN arrow on theomni selector to sele...

Page 40: ...different distance to measure different object Amb Temp Input ambient temperature Humidity Input ambient humidity Comp Obj Comp Obj1 can be set as any spot and area Comp Obj2 can be set as ref temp a...

Page 41: ...41 Reading www GlobalTestSupply com Quality SATIR Products Online at sales GlobalTestSupply com...

Page 42: ...ctor to select Analysis Setup then press the MENU ENTER key 4 Setting analysis parameter Press the UP or DOWN arrow on theomni selector to select anitem to change Press the LEFT or RIGHT arrow on the...

Page 43: ...the value you set in alert temp the reading on top right screen will turn into RED and also sound of beepin Note select spot analysis tools capture max capture min in menu Analysis Alert Temp Sets the...

Page 44: ...n the upper limit of the isothermal interval in the same color Below Display the isothermal interval and the parts with the lower temperature than the lower limit of the isothermal interval in the sam...

Page 45: ...e UP or DOWN arrow on the omni selector to select the Spot menu 4 Setting the spot analysis Press the UP or DOWN arrow on the omni selector to select a spot then press MENU ENTERKey Spot 10 will autom...

Page 46: ...ot Temperature reading of spot changes in real time 6 Removing the spot Start from Step 1 to set or select an analysis spot Press C key to remove the spot E8 N has only one analysis spot E8 TN has fou...

Page 47: ...e omni selector to select aarea then press MENU ENTERKey One or more box will appear on the screen A reading will appear at the top right corner It is the reading of the highest lowest average tempera...

Page 48: ...IGHT arrow on the omniselector to move the activated area Temperature readingchanges in real time 6 Removing the area Start from Step 1 to set or select an area analysis Press C key to remove the acti...

Page 49: ...rrow LOWER and RIGHT arrow E8 N and E8 TN don t have the area analysis function so you won t see the Area item in their analysis menu www GlobalTestSupply com Quality SATIR Products Online at sales Gl...

Page 50: ...4 Moving the profile analysis Start from Step 1 to set or select a profile analysis Press the UP DOWN arrow on the omni selector to move the profile 5 Removing the profile analysis Start from Step 1...

Page 51: ...g isotherm range Start from Step 1 to set or select isotherm analysis Press the UP or DOWN arrow on the omni selector to select isotherm range IL and IH will appear at the bottom right corner It is th...

Page 52: ...to select the Analysis menu 3 Press the UP or DOWN arrow on the omni selector to select Remove Spot Press the LEFT or RIGHTarrow on the omni selector to select to remove all the spots areas profile or...

Page 53: ...y 2 Press the UP or DOWN arrow on the omni selector to select the File menu 3 Press UP or DOWN arrow on the omni selector to select Save then press the Menu Enter key to save the image The display mod...

Page 54: ...UP or DOWNarrow on the omni selector to select the File menu 4 Press UP or DOWN arrow on the omni selector to select Voice REC then press the Menu Enter key The Voice Recording message will appear on...

Page 55: ...le trigger Lighting on You can activate the illuminatorby pressing the trigger You can get clear visible images in darkness when you turn on the illuminator Save File Save the image by pressing the tr...

Page 56: ...56 E8 N is not equipped with laser and illuminator www GlobalTestSupply com Quality SATIR Products Online at sales GlobalTestSupply com...

Page 57: ...mni selector to select Open then press the MENU ENTERkey 4 Press LEFT or RIGHT arrow on the omni selector to select an image then press MENU ENTER key to open it How to select an image refer to p 54 Y...

Page 58: ...n the current folder press the LEFT or RIGHT arrow on the omni selector repeatlyto select the image 3 Press the S key you can activate the image 00001 00003 002 003 DIR GZSAT001 Open SAT00001 SAT File...

Page 59: ...enu then press the MENU ENTER key 4 Press the UPorDOWN arrow on the omni selector to select the Directory Name menu then press the LEFTorRIGHT arrow to select the folder File number is the number of f...

Page 60: ...R key then press UPorDOWN arrow on the omni selector to select the File menu 4 Press UPorDOWN arrow on the omni selector to select Voice Play then press the Menu Enter key A Playing Record message wil...

Page 61: ...press UPorDOWN arrow on the omni selector to select the File menu 2 Press UPorDOWN arrow on the omni selector to select Delete then press the MENU ENTER key 3 Select an image refer to p 54 then press...

Page 62: ...images to the computer via the supplied SD card reader 1 Open the battery SD card cover 2 Press the SD card lightly then the SD card will pop up automatically 3 You can download the IR images via the...

Page 63: ...pen the battery SD card cover in the direction of the arrow 2 Lay the dock on a horizontal flat then put the camera on the dock in the direction of the arrow Press the camera gently down to the dock i...

Page 64: ...ti functional dock 2 3 Attachthe power cord to the dock and plug the other end into a power outlet 4 The power LED of camera flickers while the battery pack is charging and it lights green when chargi...

Page 65: ...lied can be used to view and analyze images you shoot 1 Attach video cable to the video out terminal on the multi functional dock 2 Plug the other end of the video cable to the video in jack on the mo...

Page 66: ...8 GN has the USB function You do not need to turn off the computer or camera when making this connection Please refer to your computer manual for information regarding the location of the USB port The...

Page 67: ...disk optional to the CD ROM driver UsersofWindowsXPProfessionalmustfirstloginasanAdministrator computersystemadmi nistrator toinstallprogram 1 After a few moments the following dialog will appear 2 S...

Page 68: ...rowse Locate the directory of the driver and click Ok to return to the previous window Then click Next 5 Click ContinueAnyway 6 Click Finish to finish the driver installation www GlobalTestSupply com...

Page 69: ...connect the camera and the dock p 59 2 Connect the dock and computer via USB cable optional p 62 3 The operation system will recognize the camera after install the driver p 61 4 You can analyze the r...

Page 70: ...62forconnectioninstructions 3 Isthebatterychargedsufficiently Youshoulduseahouseholdpowersourcetopowerthecamerawheniti s connectedtoacomputer IftheProblemIsNotMentionedAbove IftheUSBDriverisnotcorrect...

Page 71: ...e indicator flashes at the same time In this mode camera is preparing to pair the Bluetooth headset 4 Press the power button of Bluetooth headset to pair the headset and camera When the pairing is suc...

Page 72: ...Enter key together to free the Bluetooth headset 6 Wear the headset you can record the vioce memos p 51 or play back the memos p 56 now Bluetooth headset is not the standard accessory of E8 N and E8...

Page 73: ...sun shield when you are shooting outdoors in the sun 1 Install the sun shield inthe direction of the arrow by followintg the below guide 2 Use the sun shield www GlobalTestSupply com Quality SATIR Pr...

Page 74: ...as follow 2 Set up the measurement range Press UP and Down key on the arrow at the same time to change to type of lens p 36 Refer to the below table to see what type of lens the letterstands for Type...

Page 75: ...orrectly Format the internal memory in FAT32 format Battery pack consumed quickly Battery pack capacity reduced because of disuse for one year or more after being fully charged Replace the battery pac...

Page 76: ...se synthetic cleaners on the camera body or lens LCD monitor Use a lens blower brush to remove dust and dirt If necessary gently wipe the LCD monitor with soft cloth or an eyeglass lens wiper to remov...

Page 77: ...ina 25 600 0 10 0 20 Strong alumina 25 600 0 30 0 40 Brass Brass mirror highly polished 28 0 03 Brass oxide 200 600 0 61 0 59 Chrome Polished chrome 40 1090 0 08 0 36 Copper Copper mirror 100 0 05 Str...

Page 78: ...plate 100 0 74 Oxidized steel 198 600 0 64 0 78 Cast iron Oxidizing at 600 C 198 600 0 79 Steel Oxidizing at 600 C 125 520 0 78 0 82 Electrolytic ferric oxide 500 1200 0 85 0 89 Iron plate 925 1120 0...

Page 79: ...polishing 25 0 05 Electroplate 20 0 01 non polishing Nickel wire 185 1010 0 09 0 19 Nickel plate oxidized 198 600 0 37 0 48 Nickel oxide 650 1255 0 59 0 86 Nickel alloy Nickel chrome heat resistance a...

Page 80: ...ion 0 200 0 60 Zinc Oxidizing at 400 C 400 0 01 galvanized shining iron plate 28 0 23 Ash zinc oxide 25 0 28 Non metal materials Brick 1100 0 75 Fire brick 1100 0 75 Graphite lamp black 96 225 0 95 Po...

Page 81: ...n enamel designs 0 83 0 95 Solid materials 0 80 0 93 Ceramics vase type 0 90 Film 0 90 0 93 Mica 0 94 0 95 Flume mica 0 90 0 93 Glass 0 91 0 92 Semiconductor 0 80 0 90 Transistor plastics sealed 0 30...

Page 82: ...Electric materials Epoxy glass plate 0 86 Epoxy hydroxybenzene plate 0 80 Gilded sheet copper 0 30 Solder coated copper 0 35 Tin coated lead wire 0 28 Brass wires 0 87 0 88 Block talcum terminal 0 87...

Page 83: ...mal Visible DuoVision Fusion No Yes Yes Image Annotation No No Voice Annotation Display 2 5 TFT Screen Visible Light Camera Resolution 640 x 480 Full color Measurement Temperature Range 20 C 250 C Acc...

Page 84: ...F to 122 F Storage Temperature Range 40 C to 70 C 40 F to 158 F Humidity 95 relative humidity 25 C to 40 C 77 F to 104 F non condensing Encapsulation IP54 Shock Vibration 25G 2G Physical Characterist...

Reviews: