Sanyo Xacti VPC-A5 Instruction Manual Download Page 53

English

52

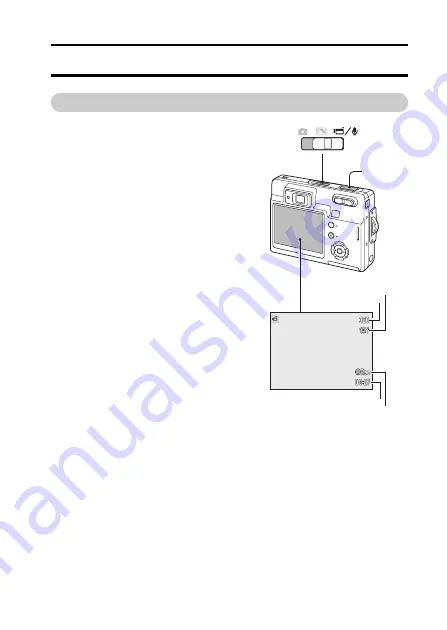
RECORDING - ADVANCED OPERATION

MOVIE RECORDING

This camera can record digital video with 
sound. Simply slide the mode switch to 
the movie/audio recording position 

1

Total recording time varies with the frame 
rate and the card capacity (page 72). 
Some changes can be made with the 
movie menu (page 57). 

Place the subject in the focus frames and 
press the shutter release button partway 
down to lock focus 

2

Press the shutter release button all the 
way down and release to begin recording 

3

A digital zoom is available during 
recording. The camera continues to 
record until the recording time is used or 
the shutter release button is pressed 
again. 
When recording, the frame counter 
displays the elapsed time. During the last 
ten seconds, the counter turns red and 
counts down the time. 
Take care not to cover the microphone 
while recording. 

2

,

3

1

Image size

Frame rate

Recording indicator

Recording time

Summary of Contents for Xacti VPC-A5

Page 1: ...read and understand the section USING YOUR DIGITAL CAMERA SAFELY AND CORRECTLY on pages 7 to 23 Keep this manual in a safe place for later reference Important note This manual explains how to safely operate the VPC A5EX and VPC A5 Any information regarding only one of these products will be labeled as such Digital Camera ...

Page 2: ...nstalling the SD Memory Card page 32 4 Formatting the SD Memory Card page 93 NOTE i This camera uses an SD Memory Card instead of photographic film to record images Be sure to install the SD Memory Card before operating the camera i Be sure to format the SD Memory Card with this digital camera before using it A card that is not formatted using the digital camera may interfere with the operation of...

Page 3: ...ther an SD Memory Card or a Multi Media Card for data storage This manual is written with the premise that SD Memory Cards are used In this manual SD Memory Card and Multi Media Card are both referred to as card You may find the answers to questions or problems concerning camera operation in TROUBLESHOOTING page 107 ...

Page 4: ...ION INDICATOR 31 AUTO POWER SAVE 31 INSTALLING AND REMOVING A CARD 32 ABOUT CARDS 33 TURNING THE CAMERA ON 33 SETTING THE DATE AND TIME 34 RECORDING MODE BASIC OPERATION 35 HANDLING THE CAMERA 35 SETTING THE CAMERA TO RECORD IMAGES 36 LCD MONITOR DISPLAY 37 CAMERA SHAKE WARNING 37 USING THE ZOOM LENS 38 BASIC RECORDING OPERATION 39 AUTOMATIC DIGITAL SUBJECT PROGRAM SELECTION 40 FOCUS LOCK 41 FOCUS...

Page 5: ...54 Self timer 55 Sequential High speed sequential 56 NAVIGATING THE RECORDING MENUS 57 IMAGE SIZE AND IMAGE QUALITY 59 COLOR MODE 60 WHITE BALANCE 61 CUSTOM KEY FUNCTION 62 AUTO RESET 63 CAMERA SENSITIVITY ISO 64 FLASH RANGE AND CAMERA SENSITIVITY 64 METERING MODES 65 INSTANT PLAYBACK 65 EXPOSURE COMPENSATION 66 VOICE MEMO 67 DATE IMPRINTING 69 DIGITAL ZOOM 70 RECORDING MODE 71 AUDIO RECORDING 71 ...

Page 6: ...E MAIL COPY 84 FRAME CAPTURE 85 MOVIE EDITING 86 ABOUT DPOF 88 DPOF SETUP 88 DATE PRINT 89 INDEX PRINT 90 SETUP MODE 91 NAVIGATING THE SETUP MENU 91 LCD MONITOR BRIGHTNESS 93 FORMATTING CARDS 93 FILE NUMBER MEMORY 94 FOLDER NAME 94 LANGUAGE 95 AUDIO SIGNALS 95 FOCUS SIGNAL 96 SHUTTER FX 96 VOLUME 96 AUTO POWER SAVE 96 RESET DEFAULT 97 DATE AND TIME 98 TRANSFER MODE 98 VIDEO OUTPUT 99 VIEWING IMAGE...

Page 7: ...English 6 APPENDIX 107 TROUBLESHOOTING 107 CARE AND STORAGE 109 WHAT IS AN EV 112 SPECIFICATIONS 113 ...

Page 8: ...high risk of fire or electric shock if they are touched Any internal check setting or repair should be performed by the dealer k Do not use while driving i Do not capture images play back images or watch the LCD monitor while driving a vehicle Doing so may cause an accident i Be careful where you put down the digital camera inside an automobile During sudden stops or turns it may fall behind the b...

Page 9: ...Quickly seek refuge in a place that will protect you from lightning k Do not place on an unstable surface i The digital camera may fall resulting in damage to the digital camera or injury i If the digital camera has fallen and its body is damaged turn it off remove the battery pack and take it to the dealer for repair Using the digital camera after its body has been damaged may cause a fire or ele...

Page 10: ...igital camera k Cautions when carrying the digital camera i Do not walk around holding the digital camera by the handstrap It may hit other objects and get damaged When walking around hold the digital camera in your hand or place it in a pocket i Be careful not to drop the digital camera or subject it to strong shocks i Make sure direct sunlight does not hit the digital camera lens as that may dam...

Page 11: ...s in direct sunlight h Places where humidity and temperature are high h Places that may get wet h Places close to an air conditioner or heater h Inside a car h Places where there is dust and dirt h Places where there is a fire burning h Places where volatile products are stored h Places subject to vibration Operating environment i Temperature 0 to 40 C 32 to 104 F i Humidity 45 to 85 no condensati...

Page 12: ...cord i The voltage rating for the power cord supplied with this camera conforms to the standards of the country in which the camera was sold k Do not disassemble or modify the battery pack charger i It is dangerous to touch the inside of the battery pack charger Doing so may cause a fire or electric shock i Do not use the battery pack charger as a direct current generator k Do not get the battery ...

Page 13: ...the cord portion may damage the power cord and cause a fire or electric shock k Do not pull on the power cord to unplug it i Do not leave the power cord plugged into the power outlet while the other end is not plugged into the battery pack charger The loose end can cause electrocution if touched with wet hands or if handled by children i Use only the power cord supplied with the battery pack charg...

Page 14: ...use a fire or electric shock i If strange conditions such as these occur immediately unplug the battery pack charger remove the battery pack and wait to make sure no more smoke is emitted Then contact the place of purchase Do not try to repair or open the battery pack charger yourself k Do not handle with wet hands i Handling the battery pack charger with wet hands may cause an electric shock k Do...

Page 15: ...e place of purchase k Do not place on an unstable surface i The battery pack charger may fall causing injury or damage i If the battery pack charger falls and the charger body is damaged remove the battery pack and contact the place of purchase If used while damaged it may cause a fire electric shock or other damages k Operating and storage conditions i Do not use close to a heat source close to a...

Page 16: ...ransform take apart or modify i Safety mechanisms and protective devices have been in incorporation in the battery pack for the purpose of preventing danger Any modification by transforming disassembling or directly soldering to it etc will defeat these safety devices and possibly cause the battery pack to catch fire explode or leak or spew battery pack fluid k Do not connect the and terminals wit...

Page 17: ...ions in which the temperature reaches 60 C 140 F or higher At high temperatures the safety mechanisms and protective devices inside the battery pack may be damaged by corrosion causing an abnormal chemical reaction to occur or cause the battery pack to catch fire explode leak or spew battery pack fluid or generate heat If the safety mechanisms and protective devices are damaged the battery pack wi...

Page 18: ...ck etc may cause a short circuit inside the battery pack or cause the battery pack to catch fire explode leak or spew battery fluid or generate heat k If the battery pack is leaking and the electrolyte gets on your skin or clothing immediately rinse with clean water i If the electrolyte gets into your eyes you risk losing your eyesight Immediately rinse your eyes with clean running water and seek ...

Page 19: ...r it has been kept in storage for a long time During recharging the battery pack may be warm This is normal and does not indicate a malfunction k Note concerning the battery pack after use i The battery pack may be warm immediately after the digital camera is used If removing the battery pack turn off the digital camera and allow the battery pack to cool down before removing it k Recycling the bat...

Page 20: ...damage the digital camera and cause a fire or electric shock i Normally when using an AC adaptor remove the battery pack Otherwise the battery pack may cause excess heat leakage injury or damage to nearby objects i For complete information on how to use the AC adaptor refer to the instructions accompanying it k Cautions concerning the card i Immediately after use the card will be very hot Before r...

Page 21: ...loration or paint peeling k Cautions before capturing important images i Before capturing important images make sure that the digital camera is operating properly and in condition to capture the image properly i Sanyo Electric shall not be held responsible for any losses that result from images that could not be recorded are erased destroyed or damaged in any way due to a problem with the digital ...

Page 22: ...the battery pack and check the digital camera functions i If the battery pack is left in the digital camera a small amount of power is still used even if the digital camera is turned off If the battery pack is left in the digital camera for a long period it may become completely discharged and lose its ability to be recharged again k Caution concerning condensation i Using the digital camera with ...

Page 23: ...ge i It is recommended that any important data be copied onto a separate media such as a hard disk MO disk or CD R disk i Stored data may be lost or corrupted in cases such as those listed below Sanyo Electric will not be held responsible for any damage or lost profits arising from the loss of data h If the card is used incorrectly h If the card is not inserted correctly into the digital camera h ...

Page 24: ...ions where strong static electrical charges or electrical noise can be easily generated i Do not allow the edges of the cards to become contaminated with foreign materials Gently wipe away any contamination with a soft dry cloth i Do not carry the cards in trouser pockets as the cards may become damaged when you sit down or make other movements that may apply forces i Before using a new card or a ...

Page 25: ...INCLUDED ACCESSORIES i Handstrap i Software 1 CD ROM i Lithium ion battery pack battery pack 1 i Lithium ion battery pack charger and power cord i Dedicated AV cable 1 i Dedicated USB interface cable 1 i SD Memory Card 16 MB 1 ...

Page 26: ...25 English CHECKING THE INCLUDED ACCESSORIES ATTACHING THE HANDSTRAP ...

Page 27: ...a are i SD Memory Card i Multi Media Card WHAT CARD MEANS IN THIS MANUAL i In this manual SD Memory Cards and Multi Media Cards that can be used in this digital camera are referred to as card The cards in the illustrations in this manual are SD Memory Cards but all installation removal and formatting procedures are the same for both SD Memory Cards and Multi Media Cards ...

Page 28: ...nt Care should be taken to keep these surfaces clean Please read the care and storage instructions in the back of this manual page 109 1 Microphone 2 Self timer lamp 3 Viewfinder window 4 Flash 5 Speaker 6 Battery chamber door 7 Lens 8 Lens cover Main switch 1 2 3 8 7 6 4 5 ...

Page 29: ...lay button 5 Zoom switch 6 Shutter release button 7 USB port AV out terminal 8 Playback button 9 Handstrap holder 0 DC terminal A Card chamber door B Menu button C LCD monitor D Up key E Right key F Left Down keys G Center button 3 C 0 9 8 5 6 7 B A 1 2 4 D F E G ...

Page 30: ... unit 1 Plug the other end of the cord into a live household outlet The included AC cord is designed for the current used in the region of sale Only use the cord in the region in which it was purchased page 119 With the battery pack terminals forward lower the battery pack into the charger so the guides in the charger bed enter the channels on the battery pack Slide the battery pack forward into t...

Page 31: ...n the door 2 Slide the battery pack into the battery chamber with the battery pack terminals first 3 Close the battery chamber door and slide it toward the back of the camera to engage the safety catch After installing the battery pack the set time date message may appear on the monitor See page 34 on how to set the clock An internal battery pack protects the clock calendar and memory settings for...

Page 32: ...ntil the battery pack is recharged Movie recording is not possible If the power level falls below this level when the camera is on the battery exhausted message appears just before the camera shuts down If power is insufficient for camera operation the indicator lamp next to the viewfinder will turn orange and blink for three seconds The shutter will not release The battery pack must be recharged ...

Page 33: ... camera to release the safety catch Open the door 2 Insert the card all the way into the card slot and then release The card should catch in the slot Insert the card so the face is toward the back of the camera Always push the card in straight never at an angle Never force the card If the card does not fit check that it is orientated correctly If a Multi Media Card is inserted incorrectly it will ...

Page 34: ...e monitor may turn off for a few seconds while the flash charges when the camera is turned on Slide the lens cover in the opposite direction to turn off the camera Always store and transport the camera with the lens cover closed h Recording images and sounds and erasing are inhibited accidental erase protect function when the tab is set to the LOCK position h The card is normally used with the tab...

Page 35: ...tery pack for a long period Use the left and right keys of the controller 1 to select Yes No cancels the operation Press the center of the controller to open the date time setup screen Use the left and right keys to select the item to be changed Use the up and down keys to adjust the item Press the center button to set the clock and calendar The date time setup screen can be opened in section 3 of...

Page 36: ...e read pages 29 through 34 HANDLING THE CAMERA Hold the camera securely with both hands keeping your elbows close to your body and making sure the camera is stable Make sure that the lens lens opening and flash are not blocked by your fingers or the handstrap Correct hold Incorrect hold A finger is blocking the lens ...

Page 37: ...English 36 SETTING THE CAMERA TO RECORD IMAGES Slide the mode switch to the appropriate position Still image recording Digital Subject Programs Movie and audio recording pages 52 and 71 ...

Page 38: ...rring caused by subtle hand motion and is more pronounced at the telephoto position of the lens than at the wide angle position Although the warning appears the shutter can still be released If the warning appears place the camera on a tripod or use the built in flash Recording mode Flash modes page 43 Automatic digital subject program display page 40 Image size page 59 Image quality page 59 Batte...

Page 39: ...ecording menu page 58 Shooting tips The zoom lens not only affects how large the subject is in the picture but it also influences the depth of field and perspective Depth of field is the area between the closest object in focus and the furthest object in focus As the lens zooms in to the telephoto position the depth of field becomes shallower separating the subject from the background Many portrai...

Page 40: ...down to lock the focus and exposure Automatic Digital Subject Selection will choose the appropriate exposure mode see the facing page The white monitor focus signal appears and the viewfinder indicator lamp turns green to confirm focus lock If the focus signal is red or the indicator lamp blinks the camera was unable to locate the subject Repeat the previous steps Press the shutter release button ...

Page 41: ...te Automatic Digital Subject Program Selection is active Press the shutter release button partway down the AF system locates the subject and the Automatic Digital Subject Program Selection chooses a subject program If no indicators are displayed programmed AE is active Press the shutter release button all the way down to take the picture Hold the camera steady when the sunset subject program is se...

Page 42: ...utter release button partway down to lock the focus The focus signal on the monitor and the green viewfinder indicator lamp will indicate that the focus is locked Without lifting your finger from the shutter release button recompose the subject within the image area Press the shutter release button all the way down to take the picture FOCUS RANGE The focus range is 10 cm 4 in to infinity Both the ...

Page 43: ...eady Focus is locked Cannot focus The LCD monitor focus signal is red and the viewfinder indicator lamp is green and blinks rapidly SPECIAL FOCUSING SITUATIONS The camera may not be able to focus in certain situations In these situations the focus lock function page 41 can be used to focus on another object at the same distance as your main subject and then the image can be recomposed to take the ...

Page 44: ...d backlit conditions Red eye reduction The flash fires multiple bursts before the main flash burst to reduce red eye an effect caused by light reflected from the retina Used in low light conditions when taking photographs of people or animals the pre flashes contract the pupils of the subject s eyes Fill flash The flash fires with each exposure regardless of the amount of ambient light Fill flash ...

Page 45: ...ft FLASH SIGNALS The indicator lamp next to the viewfinder indicates the status of the flash When the lamp is orange and blinks quickly the flash is charging and the shutter will not release The lamp glows steadily for three seconds when the flash is charged DISPLAY BUTTON RECORDING MODE The display button controls the LCD monitor display The display cycles to the next position each time the butto...

Page 46: ...rait Optimized to reproduce warm soft skin tones and a slight defocusing of the background Most portraits look best at a telephoto setting the longer focal length does not exaggerate facial features and the shallower depth of field softens the background Use fill flash with strong direct sunlight or backlight to reduce harsh shadows Sports Used to capture action by maximizing shutter speeds When u...

Page 47: ...distances the flash may cause overexposure or uneven illumination set the flash mode to flash cancel page 43 The use of a tripod is recommended Night view For deep subtle night scenes The use of a tripod is recommended When used with flash the subject and background exposures are balanced The flash can only be used with close subjects such as with a portrait of a person When using the flash ask yo...

Page 48: ...ith the digital zoom page 70 the spot focus area is enlarged Press and hold the center button of the controller to display the spot focus area press and hold the button again to return to the wide focus frame Take the picture as described in the basic recording operation section on page 39 When the LCD monitor is off the camera cannot be switched between wide and spot AF the last AF mode set is ac...

Page 49: ... left right keys 2 of the controller to scroll through the images on the card Press the playback button again to return to the recording mode or turn the camera off SINGLE FRAME PLAYBACK DISPLAY 1 2 Mode indicator Magnification display page 51 Image size display page 59 Image quality indicator page 59 Battery condition indicator page 31 Folder number file number page 94 Frame number total number o...

Page 50: ... right and horizontally The image is displayed in the selected orientation until changed DELETING SINGLE IMAGES To delete a displayed file press the up key of the controller 1 A confirmation screen appears Use the left right keys to select Yes No cancels the operation Press the center button of the controller to delete the file 1 1 ...

Page 51: ...ex thumbnails When the image is highlighted with the border the date of recording audio track indicator the lock and printing status e mail copy indicator and the frame number of the image are displayed at the bottom of the screen The accompanying audio track of the highlighted image can be played by pressing the center button of the controller When the display button is pressed again the highligh...

Page 52: ...witch T to increase the image magnification Press the left side of the switch W to decrease the magnification Use the four way keys of the controller to scroll the image When scrolling the arrows in the display disappear when the edge of the image has been reached The locator in the top right corner of the monitor indicates the area of the image being displayed The display button switches between ...

Page 53: ...ess the shutter release button partway down to lock focus 2 Press the shutter release button all the way down and release to begin recording 3 A digital zoom is available during recording The camera continues to record until the recording time is used or the shutter release button is pressed again When recording the frame counter displays the elapsed time During the last ten seconds the counter tu...

Page 54: ...ller to select the drive mode 1 1 Single frame advance To take a single image each time the shutter release button is pressed This is the camera s default setting Self timer To delay the release of the shutter page 55 Used for self portraits Multi Frame To create a composite image of a nine frame series when the shutter release button is pressed once see the following page Sequential To take up to...

Page 55: ...rts the shutter button can be released the camera continues recording until all nine frames have been captured Flash cannot be used Because of the limits to the shutter speeds images may be underexposed in low light conditions Image size refers to the total area of all nine images not the size of each individual thumbnail ...

Page 56: ...ntdown Because focus and exposure are determined when the shutter release button is pressed do not stand in front of the camera when taking a self timer image Always confirm the focus with the focus signals before beginning the countdown page 42 During the countdown the self timer lamp on the front of the camera starts to blink and is accompanied by an audio signal A countdown timer is displayed o...

Page 57: ... taken Sequential To take up to four images when the shutter release button is pressed and held With the image size setting of 2 560 1 920 the maximum rate of capture is 1 9 fps The built in flash can be used but the rate of capture is reduced because the flash must recharge between frames Date imprinting page 69 also reduces the rate of capture High speed sequential To capture up to eleven 1 280 ...

Page 58: ...ighlighted Use the up down keys to scroll through the menu options Highlight the option whose setting needs to be changed With the menu option highlighted press the right controller key the settings are displayed with the current setting highlighted To return to the menu options press the left key Use the up down keys to highlight the new setting Press the center button of the controller to select...

Page 59: ...igital zoom page 70 Exp compensation page 66 Frame rate page 72 Image size page 59 Instant playback page 65 Key function page 62 Metering mode page 65 Movie mode page 72 Quality page 59 Recording mode page 71 Sensitivity page 64 Voice memo page 67 White balance page 61 Image size 2560x1920 Standard Auto Off Quality White balance Key func Sensitivity Auto MultiSegment 0 Off Metering mode Exp comp A...

Page 60: ...ust be set before the picture is taken Changes are displayed on the LCD monitor Image size and quality must be reset manually Image size and quality are set in section 1 of the still image recording menu See NAVIGATING THE RECORDING MENUS section on page 57 If image size or quality are changed the frame counter displays the approximate number of images that can be recorded at that setting on the i...

Page 61: ...ction 3 of the still image recording menu or in section 2 of the movie audio recording menu page 57 The color mode cannot be changed with digital subject programs The color mode can be assigned to the controller page 62 The black white mode produces neutral monochrome images Sepia creates warm tone monochrome images The monitor live image reflects the selected color mode The color option displays ...

Page 62: ...tes for the color temperature of a scene In most cases the auto setting balances the ambient light and creates beautiful images even under mixed lighting conditions When the built in flash is used the white balance is set to the color temperature of the flash When one of the preset white balance settings is selected an indicator is displayed on the LCD monitor to indicate the active white balance ...

Page 63: ...for information on exposure compensation page 66 white balance page 61 camera sensitivity page 64 and color mode page 60 In the still image recording mode use the left right controller keys to change the function set with the menu The LCD monitor displays the settings as they are changed The changes are visible in the monitor image The function is set automatically after five seconds or when anoth...

Page 64: ...7 Flash mode page 43 Autoflash The flash mode is reset to autoflash or autoflash with red eye reduction depending on which of those two flash modes was last set Drive mode page 53 Single frame advance White balance page 61 Auto Camera sensitivity page 64 Auto Exposure compensation page 66 0 0 Metering mode page 65 Multi segment Color mode page 60 Color AF area page 47 Wide focus frame Monitor disp...

Page 65: ...eases with speed noise increases with the sensitivity in digital imaging an ISO setting of 50 has the least noise and 400 has the most Camera Notes Noise reduction is applied automatically to exposures of one second or longer Processing is applied to each image after it is captured The processing time varies from image to image a processing message is displayed during this period FLASH RANGE AND C...

Page 66: ...ndicating the measuring area The spot allows precise exposure measurements of a particular object without being influenced by extremely bright or dark areas within the scene If the LCD monitor is turned off the spot metering mode remains active INSTANT PLAYBACK After a still image is captured it can be displayed on the monitor for two seconds before being saved Instant playback shows the last fram...

Page 67: ...ontroller button to set this value If any value other than 0 0 is set an indicator is displayed on the monitor as a warning Shooting tips Sometimes the camera s exposure meter is deceived by certain conditions Exposure compensation can be used in these situations For example a very bright scene such as a snowy landscape or a white sandy beach can appear too dark in the captured image Before taking...

Page 68: ...e is captured a screen appears indicating the audio recording has started A bar graph displays the amount of recording time elapsed To stop the recording press the shutter release button or the center button of the controller The recording will stop automatically when the fifteen second limit has elapsed A voice memo is attached to the last image of a sequential series page 53 When played back ima...

Page 69: ...ng audio recordings be careful not to touch or cover the microphone The quality of the recording is proportional to the subject to microphone distance For best results hold the camera approximately 20 cm 8 in from your mouth Microphone ...

Page 70: ...57 Date imprinting has two menu options The YYYY MM DD option prints the date The MM DD hr min option prints the month day and time of recording The date and time are imprinted in the lower right corner of the image when viewed horizontally It is printed directly on the photograph writing over the image information The date can be imprinted in three formats year month day month day year and day mo...

Page 71: ...er the power of the digital zoom the lower the image quality The effect of the digital zoom is visible on the LCD monitor only not through the viewfinder The digital zoom function is canceled if the LCD monitor is turned off page 44 At the maximum telephoto position continue to press the right side T of the zoom switch 1 to engage the digital zoom The zoom magnification is displayed in the top rig...

Page 72: ...dio recording position In section 1 of the menu change the recording mode to audio page 57 Before recording the approximate recording time available is displayed on the frame counter To begin recording press and release the shutter button The frame counter counts down the time The recording stops when the shutter release button is pressed again or the remaining time has elapsed When making audio r...

Page 73: ... rate The actual file size is determined by the scene some subjects can be compressed further than others The writing speed of the card may prematurely end the recording of a movie clip MOVIE MODE The movie mode option selects the type of movie recorded Standard produces a normal movie clip Night Movie uses high camera sensitivity to record under low light levels camera sensitivity increases autom...

Page 74: ...ce bar is displayed at the top of the monitor Press the center button of the controller to start the audio playback Playback time is displayed at the top of the image The display returns to the playback mode when the audio track finishes Pressing the menu button cancels the playback During playback the up down keys of the controller adjust the volume Camera Notes When playing back voice memo or mo...

Page 75: ...io playback To cancel the playback press the menu button During playback the up down keys adjust the volume and the left right keys rewind and fast forward the recording When the movie is paused the displayed frame can be copied and saved as a still image Press the up key of the controller to capture the frame a confirmation screen appears When saved the file name of the captured image is displaye...

Page 76: ...menu changes as the tabs are highlighted Use the up down keys to scroll through the menu options Highlight the option whose setting needs to be changed Press the right controller key to display the settings with the current setting highlighted To return to the menu options press the left key If Enter is displayed press the center button to display the setting screen Use the up down keys to highlig...

Page 77: ...Press the center button of the controller to complete the operation The menu button cancels the screen and any operation made Indicators may be displayed on the right of each index image to indicate movie audio and E mail copy files Audio caption page 78 Crop frame page 83 Date print page 89 Delete page 77 Dissolve page 82 DPOF setup page 88 Edit movie page 86 E mail copy page 84 Frame capture pag...

Page 78: ...s All unlocked files are deleted MarkedFrames To delete multiple files When this setting is chosen the frame selection screen is displayed page 75 Use the left right keys of the controller to highlight the first file to be deleted Pressing the up key marks the thumbnail with the trash can indicator To deselect a file for deletion highlight it with the yellow border and press the down key the trash...

Page 79: ...light the Enter setting in the audio caption option Press the center button of the controller to start recording If an audio track is already attached to the image a confirmation screen appears Choosing and entering Yes starts the audio caption recording replacing the previous audio track No cancels the audio caption operation A status bar and clock display the recording time The audio caption can...

Page 80: ... is already locked All frames All files on the card are locked MarkedFrames To lock or unlock multiple files When this setting is chosen the frame selection screen is displayed page 76 Use the left right keys of the controller to highlight the file to be locked Pressing the up key marks the file with the lock indicator To unlock a file highlight it with the yellow border and press the down key the...

Page 81: ...ack menu and press the center button to start the pasting process Nine frame choices are shown on the LCD monitor Select the frame with the controller Press the center button to continue Pressing the menu button at any time during the operation cancels the routine The camera memorizes any settings entered The frame is displayed on the background image Change the frame size using the up and down ke...

Page 82: ...ive image is displayed in the frame Compose the subject inside the frame and press the shutter release button partway down to lock the focus The current recording settings are used to capture the image and the optical zoom can be used Press the shutter release button all the way down to take the picture and complete the operation enter move Press shutter to paste ...

Page 83: ...oller pauses and restarts the presentation The left right keys advance the next still image or return to the previous one During a movie the keys forward or rewind the clip Press the menu button to cancel the presentation DISSOLVE The dissolve function randomly selects a dissolve effect for transitions between still images in the slide show This function can be turned on and off in section 2 of th...

Page 84: ...e the image size The degree of magnification is displayed on the LCD monitor Use the controller to scroll the image 2 The locator in the top right corner of the monitor indicates the area of the image being displayed The display button 3 switches between showing the full display and the image only When the image area to be cropped is displayed press the center button of the controller to save the ...

Page 85: ...in the playback mode MarkedFrames To copy single or multiple files When selected the frame selection screen appears page 76 highlight the file to be copied with the yellow border and then press the up key of the controller to mark it To deselect a file to be copied highlight the selected thumbnail and press the down key the indicator disappears Continue until all the files to be copied are marked ...

Page 86: ...o display the frame to be captured Press the center button of the controller to capture the frame a confirmation screen appears The audio from approximately 7 5 seconds before and after the point of the captured frame can be saved Choosing Yes records the movie soundtrack and saves it as an audio caption WAV file Selecting No records no soundtrack Or press the menu button to cancel the operation a...

Page 87: ...s Use the left right keys of the controller to display the first frame of the section to be cut The bar under the image and the timer in the top right corner of the screen show the approximate location of the point Use the down key to select the next step Use the left right keys of the controller to display the last frame of the section to be cut The bar under the image and the timer in the top ri...

Page 88: ... edit operation press the menu button Press the center controller button to save the edit a confirmation screen is displayed Select Yes to continue After the edited movie clip is saved the file name is displayed The original movie file can be deleted from the card by selecting Yes on the screen Once deleted it cannot be recovered By selecting No both the original and edited file remain on the card...

Page 89: ...ted image All frames To create a DPOF file for all images on the card MarkedFrames To chose a group of images to be printed or when the number of copies of each image varies When selected the frame selection screen appears page 76 Use the left right keys of the controller to highlight an image to be printed Pressing the up key marks the image The number indicates the number of copies that will be ...

Page 90: ...int order any additional images recorded afterwards will not be included in the order DPOF files created with another camera are canceled After the pictures have been printed the DPOF file remains on the card and must be canceled manually DATE PRINT To print the date of capture with each image with a DPOF compatible printer turn this option on in the section 3 menu To cancel date print simply turn...

Page 91: ... setting to No If an index print order is created any additional images saved afterwards on the card will not be included in the index print The number of images printed per sheet differs between printers The information printed with the thumbnails can vary Camera Notes DPOF files and images can be printed directly from the camera with a DPOF compatible PictBridge printer pages 101 and 106 ...

Page 92: ...menu button closes the setup menu and returns to the recording or playback mode Index to menu functions Audio signals page 95 Date Time setup page 98 File memory page 94 Focus signal page 96 Folder name page 94 Format page 93 Language page 95 LCD brightness page 93 Power save page 96 Reset default page 97 Shutter FX page 96 Transfer mode page 98 Video output page 99 Volume page 96 Image size 2560x...

Page 93: ...scroll through the menu options Highlight the option whose setting needs to be changed With the menu option highlighted press the right controller key the settings are displayed with the current setting highlighted If Enter is displayed press the center button of the controller to continue Use the up down keys to highlight the new setting Press the center button of the controller to select the hig...

Page 94: ...data to a computer or storage device Locking images will not protect them from being deleted when the card is formatted Always format the card using the camera never use a computer to format a card When the format option is selected and entered in section 1 of the setup menu page 91 a confirmation screen appears Choosing Yes formats the card choosing No cancels the formatting operation A message a...

Page 95: ...and date Standard folders have an eight character name The initial folder is named 100SANPH The first three digits are the folder s serial number which will increase by one each time a new folder is created A date folder name also starts with the three digit serial number and is followed by one register for the year two registers for the month and two registers for the day 101YMMDD The folder 1014...

Page 96: ...ight the new menu language Press the center button of the controller to set the language AUDIO SIGNALS Every time a button is pressed an audio signal gives a positive confirmation of the operation The audio signals can be changed or turned on or off in section 2 of the setup menu page 91 Two audio signals are available LCDbrightness Format File memory Folder name Language English Enter JPN English...

Page 97: ... VOLUME The volume of the audio signals and shutter FX can be increased or decreased in section 2 of the setup menu page 91 This affects the camera s audio signals only and will not change the playback levels of an audio track AUTO POWER SAVE To conserve battery pack power the camera shuts down if an operation is not made within a certain period To restore power press the shutter release button or...

Page 98: ...posure compensation 0 0 p 66 Flash mode Autoflash p 43 Drive mode Single frame advance p 53 Image size 2 560 1 920 p 59 Image quality Standard p 59 White balance Auto p 61 Custom key function Off p 62 Metering mode Multi segment p 65 Camera sensitivity ISO Auto p 64 Color mode Color p 60 Auto reset On p 63 Voice memo Off p 67 Date imprinting Off p 69 Digital zoom Off p 70 Instant playback Off p 65...

Page 99: ...data between the camera and computer This option must be selected when moving image files to the computer or using the camera with the SANYO Software Pack PictBridge To print images with a PictBridge compatible printer For more on these options refer to the data transfer section of the relevant manual Setup menu LCD Brightness Normal p 93 File number memory Off p 94 Folder name Standard p 94 Audio...

Page 100: ... television set VIEWING IMAGES ON A TELEVISION The supplied AV cable is used to view camera images on your television 1 Turn off the television and the camera 2 Slide the terminal cover open Insert the small plug of the AV cable into the camera s AV out terminal The arrow mark on the plug should face the front of the camera 3 Plug the other end of the AV cable into the video and audio input termin...

Page 101: ...sion to the video channel 6 Press and hold the playback button until the playback display is visible on the television screen The camera s monitors do not activate when the camera is attached to a television 7 View images as described in the playback section ...

Page 102: ...ions see the menu navigation section on page 103 The display button switches between the single frame and index playback formats Enlarged playback activated with the zoom switch can be used to examine image files on the screen Use the left right keys of the controller to display the image to be printed Press the up key to select the number of copies to be printed To deselect an image for printing ...

Page 103: ...NTING ERRORS If the battery pack is exhausted before the print run is complete printing is canceled Use a fully charged battery pack or the optional AC adaptor If a minor problem occurs during printing such as the paper runs out follow the procedure recommended for the printer no action is required for the camera If a major printer error occurs press the center button of the controller to end the ...

Page 104: ...p down keys to scroll through the menu options Highlight the option whose setting needs to be changed With the menu option highlighted press the right controller key the settings are displayed with the current setting highlighted If Start or Enter is displayed press the center of the controller to continue Use the up down keys to highlight the new setting Press the center button of the controller ...

Page 105: ...he print selection screen Index print An index print of all still images on the card can be made The quality and size of the print can be specified with the camera menu The number of images per page varies with the printer The print setup confirmation screen is displayed before the print routine starts Batch print page 104 Data print page 106 DPOF print page 106 Index print page 104 Layout page 10...

Page 106: ...he paper size Printing Notes The following are the dimensions for postcard L and 2L paper sizes in both millimeters and inches for your reference Layout The layout of the print can be set in section 2 of the PictBridge menu The printer setup option uses the layout parameters of the printer Borderless printing can be specified with the camera as well as the number of images per page Postcard L 2L 1...

Page 107: ...g options in section 3 of the playback menu to be printed from a DPOF compatible PictBridge printer Simply select the start option from the menu to begin the routine The number of prints in the print run are displayed an index print is counted as one Press the center button of the controller to begin printing or press the menu button to return to the PictBridge menu Once printing begins the operat...

Page 108: ... a live electrical outlet Shutter will not release Card full warning appears on the monitor Card is full and unable to store an image at the image quality or image size setting on the camera Insert a new card delete some images or change the image quality or image size setting 32 49 59 Card locked warning appears on the monitor Card is locked Unlock the card using the write protect tab 33 Subject ...

Page 109: ...e lens Pictures are not sharp Focus signal is red Subject is too close Make sure the subject is within the autofocus range or use the macro mode 41 45 A special situation is preventing the autofocus system from focusing Use the focus lock function to focus on an object at the same distance as the subject 41 42 Pictures are taken indoors or in low light situations without flash Slow shutter speeds ...

Page 110: ...ens is dirty gently wipe it with a soft clean dry cloth If the camera or lens comes in contact with sand gently blow away loose particles Wiping may scratch the surface i To clean the lens surface first blow away any dust or sand then gently wipe the lens with a cloth or tissue designed for optics Use lens cleaning fluid if necessary i Never use organic solvents to clean the camera i Never touch t...

Page 111: ...r damage to data It is recommended that a copy of the card data be made Battery packs i Battery pack performance decreases with temperature In cold environments we recommend keeping a spare battery pack in a warm place such as the inside of a coat Battery packs can recover their power when they warm up i Do not store the battery pack when it is fully charged i When storing the battery pack for ext...

Page 112: ...recorded image i Do not apply pressure to the surface of the LCD monitor it may be permanently damaged i In cold temperatures the LCD monitor may become temporarily dark When the camera warms up the display will function normally i If fingerprints are on the LCD monitor surface gently wipe with a soft clean dry cloth Copyright i TV program films video tapes photographs and other materials may be c...

Page 113: ...ands for exposure value A change of one EV adjusts the exposure calculated by the camera by a factor of two 2 0 EV 4X as much light 1 0 EV 2X as much light 0 0 EV Calculated exposure 1 0 EV 1 2 as much light 2 0 EV 1 4 as much light ...

Page 114: ...y devices for the images stored on removable memory cards However it is not guaranteed that all devices will support the DCF standard Video clips Motion JPEG MOV Audio wav monaural Data storage media SD Memory Card Multi Media Card Camera effective number of pixels Approx 5 000 000 pixels Image sensor 1 2 5 inch CCD Virtual number of pixels Approx 5 360 000 pixels interlace scan primary color filt...

Page 115: ...105 mm Autofocus 9 groups 11 elements Focus modes 5 point range autofocus spot autofocus Aperture F 2 8 Wide to 5 0 Tele Exposure control type Programmable AE Manual setting possible 0 2 0 EV in 1 3 EV steps Light measuring modes Multi section measuring spot measuring Range 10 cm 3 93 in to infinity normal photography 6 cm 2 36 in to infinity super macro photography Digital zoom For shooting 1x to...

Page 116: ...t Tele Flash modes Auto flash fill flash flash cancel red eye reduction Focus TTL type AF Self timer 10 second delay including interval shooting Time date Recorded with image data Ambient environment Temperature 0 to 40 C 32 to 104 F operation Power supply Battery pack Lithium ion battery pack DB L30 1 AC adaptor sold separately Model VAR G6EX for the VPC A5EX and model VAR G6U for the VPC A5 Dime...

Page 117: ...s drastically reduced DIGITAL AV communication sound and image output terminal Regrouped jack Audio output 265 mVrms 9 dBs 6 kΩ or less monaural Video output 1 0 Vp p 75 Ω unbalanced sync negative composite video NTSC color TV system PAL TV system switchable from the setting screen USB USB 2 0 In full speed mode equivalent to 1 1 DC IN external DC power input terminal DC 4 7 V for exclusive use wi...

Page 118: ...uential mode 2 560 1 920 5 images 25 images 204 images 11 images 49 images 397 images 21 images 94 images 766 images 2 048 1 536 8 images 38 images 314 images 17 images 74 images 604 images 31 images 138 images 1 120 images 1 600 1 200 14 images 61 images 498 images 27 images 117 images 952 images 47 images 203 images 1 650 images 1 280 960 High speed sequential only 21 images 94 images 766 images...

Page 119: ...deo clip will differ depending for example on the card capacity environmental conditions temperature and shooting conditions etc Shooting recording mode Resolution setting Compression rate frame rate setting SD Memory Card 16 MB 64 MB 512 MB Video clip mode 320 240 21 sec 1 min 32 sec 12 min 28 sec 40 sec 2 min 56 sec 23 min 49 sec Sound recording mode 30 min 28 sec 2 hr 12 min 3 hr ...

Page 120: ...mpatible batteries Supplied or separately sold Lithium ion battery pack DB L30 Ambient environment Temperature 0 to 40 C 32 to 104 F recharge Dimensions 45 W 31 H 85 D mm 1 77 W 1 22 H 3 35 D Weight without power cord Approx 64 g 2 3 oz Power cord rated value VPC A5 AC 125 V 7 A VPC A5EX AC 250 V 2 5 A Model number DB L30 Voltage 3 7 V Capacity 660 mAh Ambient environment Temperature 0 to 40 C 32 ...

Page 121: ...ndows and Windows NT are registered trademarks of Microsoft Corporation All other company and product names are registered trademarks or trademarks of their respective owners Memory capacity 16 MB Ambient environment Temperature 0 to 55 C 32 to 131 F Humidity 20 to 85 no condensation Dimensions 32 0 L 24 0 W 2 1 H mm 1 26 L 0 94 W 0 08 H ...

Page 122: ...ailure to adhere to the instructions given in this manual or repairs or changes done by those other than a technician authorized by the manufacturer i Sanyo Electric shall not be held responsible for any damage caused by optional devices or consumable items used with the digital camera other than those supplied with the digital camera or those specified by Sanyo Electric i Sanyo Electric shall not...

Page 123: ...SANYO Electric Co Ltd ...

Reviews: