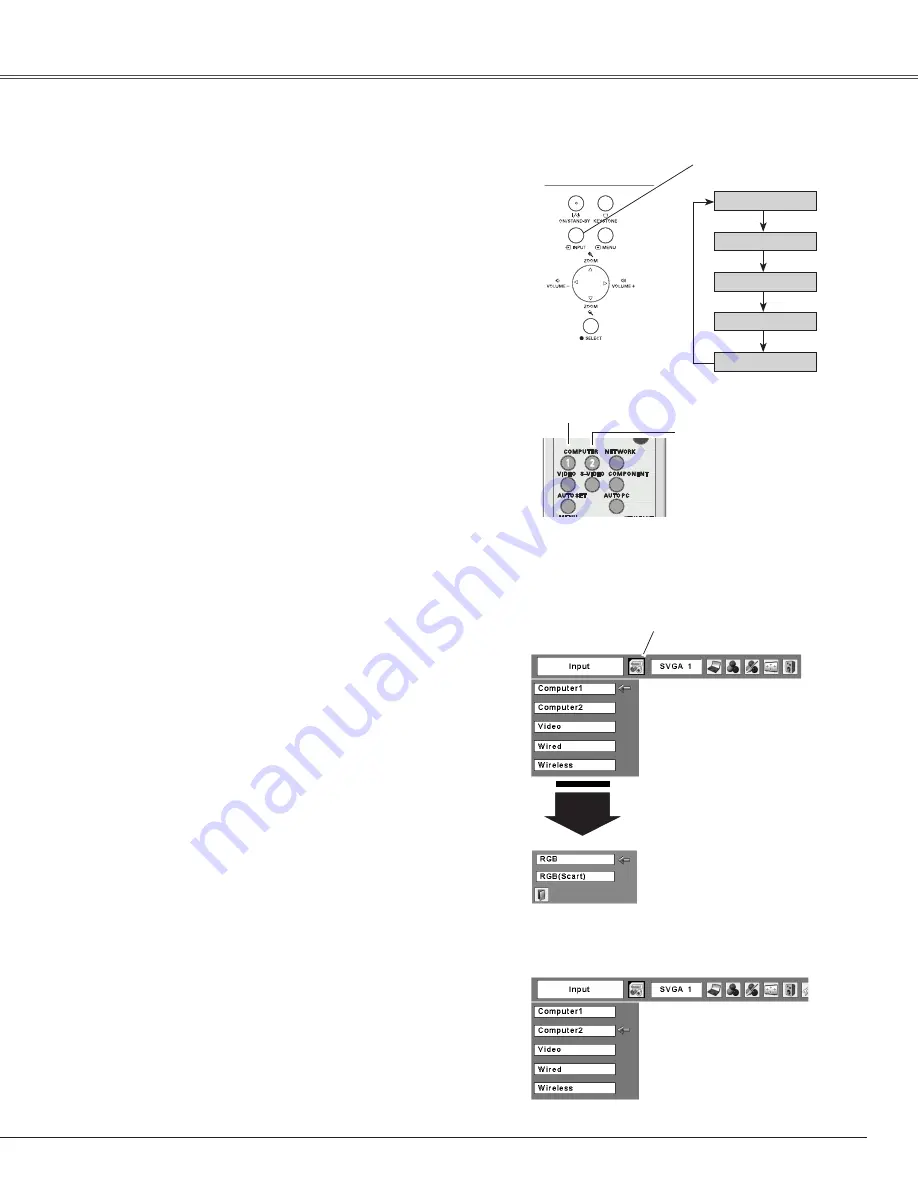
Press the MENU button to display the On-Screen
Menu. Use the Point
7 8
buttons to move the red
frame pointer to the Input Menu icon.
1
Input Menu
Use the Point
ed
buttons to move the red arrow
pointer to either Computer 1 or Computer 2, and then
press the SELECT button.
2
After the Source Select Menu appeared for Computer
1, move the pointer to RGB and then press the
SELECT button.
3
Input Menu
COMPUTER 1 button
Input Source Selection
Direct Operation
Menu Operation
Computer Input
Move the pointer (red arrow)
to Computer 1 and press the
SELECT button.
Input Menu icon
Move the pointer (red arrow)
to Computer 2 and press the
SELECT button.
Move the pointer to RGB
and press the SELECT
button.
Source Select Menu
Remote Control
COMPUTER 2 button
✔
Note:
• Computer 2 is not displayed when the COMPUTER IN 2/
MONITOR OUT terminal is set as Monitor out (p.49).
• Computer 2 (COMPUTER IN 2/MONITOR OUT) can
accept only the RGB signal.
• Wired and Wireless are for the Network function. See
owner’s manual “Network Set-up and Operation”.
Computer
1
*See Notes at the bottom of this page.
27
Computer 1
Video
Computer 2*
INPUT button
Top Control
INPUT button
Wireless
Wired
Press the INPUT button on the top control to select either
Computer 1 or Computer 2, or press the COMPUTER 1 on
the remote control to select Computer 1 button or press
the COMPUTER 2 button on the remote control to select
Computer 2.
Before using the INPUT or COMPUTER 1 / 2 buttons,
select the correct input source through Menu operation as
described below.
Summary of Contents for PLC-XL51A
Page 74: ...SANYO Electric Co Ltd KV7AE ...


