background image

Maintenance

English

48

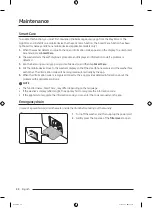
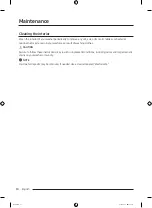
4. 

Clean the drawer components in running water using 
a soft brush.

NOTE

Other parts of the drawer can also be removed. They can 
fall out if you hold the drawer upside down.

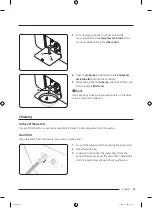
5. 

Clean the drawer recess using a soft brush.

6. 

Reinsert the 

liquid detergent container

 into the 

detergent drawer.

7. 

Slide the drawer into the drawer recess, and then 
push it inward until it is fully closed.

NOTE

To remove remaining detergent, run the 

RINSE+SPIN


cycle with the drum empty.

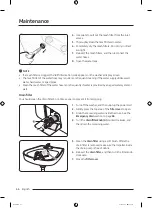
Door diaphragm

A

1. 

Open the door, and then empty the drum.

2. 

Combine 3/4 cups of liquid chlorine bleach and 1 
gallon of warm tap water.

3. 

Wearing rubber gloves, use a soft, clean cloth 
dipped in the water and bleach solution to clean the 
diaphragm.

4. 

Let stand 5 minutes, and then wipe up and dry well.

CAUTION

Use bleach carefully and be sure to follow the bleach manufacturer’s use and care instructions.

Untitled-4   48

2023-08-07     12:16:57

Summary of Contents for WF51CG8000AWA5

Page 1: ...Washer Usermanual WF51CG80 A Untitled 4 1 2023 08 07 12 16 44...

Page 2: ...tions 9 Critical cleaning warnings 12 Regulatory notice 13 FCC Notice 13 IC Notice 14 Open Source Announcement 15 Installation 16 Unpacking yourwasher 16 What s included 17 Installation requirements 1...

Page 3: ...g 49 Care foran extended period of non use 49 Cleaning the exterior 49 Cleaning the interior 50 Troubleshooting 51 Checkpoints 51 Information codes 55 Specifications 57 Fabric care chart 57 Protecting...

Page 4: ...rwasher Because the following operating instructions covervarious models the characteristics of yourwashermay differslightly from those described in this manual and not all warning signs may be applic...

Page 5: ...l be exposed to the weather 7 Do not tamperwith controls 8 Do not repairorreplace any part of the appliance orattempt any servicing unless specifically recommended in the user maintenance instructions...

Page 6: ...ire Plug the powerplug into the wall socket so that the cord is running towards the floor If you plug the powerplug into the socket in the opposite direction the electric wires within the cable may be...

Page 7: ...positioned so that the powerplug the watersupply taps and the drain pipes are accessible Installation cautions CAUTION This appliance should be positioned in such a way that the powerplug is easily a...

Page 8: ...underthe washerwhile an operation is in progress This may result in injury Do not touch the powerplug with wet hands This may result in electric shock Do not turn the appliance off by unplugging the p...

Page 9: ...s broken it may result in injury Aftera watersupply failure orwhen reconnecting the watersupply hose open the faucet slowly Open the faucet slowly aftera long period of non use The airpressure in the...

Page 10: ...injury due to a malfunction Waterdrained during a high temperature wash ordrying cycle is hot Do not touch the water This may result in burns orinjury Do not wash spin ordrywater proof seats mats orcl...

Page 11: ...nd do not wash rinse orspin laundry contaminated by dry cleaning detergent This may result in spontaneous combustion orignition due to the heat from the oxidation of the oil Do not use waterfrom water...

Page 12: ...o not clean the appliance by spraying waterdirectly onto it Do not use a strong acidic cleaning agent Do not use benzene thinner oralcohol to clean the appliance This may result in discoloration defor...

Page 13: ...ergy and if not installed and used in accordance with the instructions may cause harmful interference to radio communications However there is no guarantee that interference will not occurin a particu...

Page 14: ...mplies with Canadian ICES 003 Cet appareil num rique de la classe B est conforme la norme NMB 003 du Canada Forproducts sold in the US and Canadian markets only channels1 11 are available You cannot s...

Page 15: ...e required The following URL http opensource samsung com opensource SMART_AT_051 seq 0 leads to the open source license information as related to this product This offeris valid to anyone in receipt o...

Page 16: ...ourwasherwas damaged during shipping oryou do not have all of the items call 1 800 SAMSUNG 1 800 726 7864 To prevent personal injury orstrain wearprotective gloves whenever lifting orcarrying the unit...

Page 17: ...contact the Samsung customercare centerat1 800 SAMSUNG 1 800 726 7864 oryourretailer 01 02 03 04 09 10 12 05 06 07 08 11 01 Release lever 02 Detergent drawer 03 Door 04 Drum 05 Worktop 06 Control pane...

Page 18: ...aps The number 3 to 6 of bolt caps provided depends on the model The appearance of the washerand provided accessories may differwith the model To purchase an accessory orlost part contact a local Sams...

Page 19: ...he absence of local codes in accordance with the National Electrical Code ANSI NFPA No 70 Latest Revision forthe U S orthe Canadian Electrical Code CSA C22 1 Latest Revisions and local codes and ordin...

Page 20: ...tly during the spin cycle CAUTION Do NOTinstall the washeron a platform ora poorly supported structure Watertemperature Do not install the washerin areas where watermay freeze as the washeralways reta...

Page 21: ...tions Minimum clearance forstable operation Sides Top Rear Front 1 in 25 mm 1 in 25 mm 2 in 50 mm 1 in 25 mm If both the washerand a dryerare installed in the same location the front of the alcove orc...

Page 22: ...front more than the washer A 1 in 25 mm B 2 in 50 mm This clearance requirement only applies to the washer Fordryer s clearance requirement see the dryer s usermanual C 4 6 in 117 mm D 6 in 152 mm E 7...

Page 23: ...ng bolts on the rearof the machine using the spanner NOTE Use the enclosed end of the supplied wrench to remove the shipping bolts 2 Fill the holes with the supplied plastic bolt caps Keep the shippin...

Page 24: ...TEP 4 Connect thewaterhose B A CAUTION Make sure to use newwaterhoses and that rubber gaskets B are inside the couplings A at both ends of the hoses Waterhoses without the gaskets may leak Allow 5 in...

Page 25: ...nds of the hoses into a bucket and then open the watertaps for10 15 seconds to remove impurities When done close the taps 4 Attach the waterhoses to the hot and cold water inlets on the back of the wa...

Page 26: ...below are met Minimum 18 in 46 cm Maximum 96 in 245 cm NOTE Make sure to measure the height from the floor where the washeris placed Draining efficiency may be reduced if the drain system is at the ma...

Page 27: ...ose must be placed no lowerthan 24 in 60 cm and no higherthan 35 in 90 cm from the floor To keep the spout of the drain hose bent use the supplied plastic hose guide A Secure the guide to the wall usi...

Page 28: ...rayon Color Separate whites from colors Size Mixing different sized items togetherin the drum improves the washing performance Sensitivity Wash delicate items separately Forpure newwoolen items curtai...

Page 29: ...information code is displayed redistribute the load Unbalanced laundry may reduce spinning performance STEP 5 Add the correct detergent type The type of detergent you use general purpose specifically...

Page 30: ...a three compartment dispenser the front left compartment forthe main wash the front right forfabric softeners and the rear right forthe liquid chlorine bleach 9 A A Main wash compartment Add main wash...

Page 31: ...1 9 3 Add fabric softenerto the softenercompartment Do not exceed the max line B CAUTION Powdered fabric softeneris not recommended Use liquid fabric softeneronly Concentrated fabric softenermust be d...

Page 32: ...e such as weakening of the fibers or colorloss if not used properly To use oxygen boosters orcolor safe bleach Oxygen boosters orcolor safe bleach can increase washing performance Make sure to add the...

Page 33: ...1 Uses only cold waterwithout utilizing the washer s heater No warm wateris supplied 04 Rinse Press to change the rinse count forthe current cycle You can select1 to 5 rinses 05 Spin Press to change t...

Page 34: ...smartphone 10 Delay End Set the washerto finish yourwash automatically at latertime Choose a delay of between1 to 24 hours in1 hourincrements Formore information about Delay End see page 40 11 Sound...

Page 35: ...orturns on You can open the doorwhen this icon disappears SELF CLEAN reminder This icon indicates that you should clean the drum using the SELF CLEAN cycle Afterevery 40 cycles this icon appears foran...

Page 36: ...as necessary 4 Select desired options as necessary 5 Press and hold Start Pause Hold to Start To change the cycle during operation 1 Press Start Pause Hold to Start to stop operation 2 Select a diffe...

Page 37: ...ys training pants shirts tops and otherperformance clothing This cycle provides effective soil removal with controlled drum rotation forspecial fabric care PERM PRESS Forwash and wear synthetic fabric...

Page 38: ...5 can be selected 4 Level 4 4 Level 4 4 Level 4 4 Level 4 3 Level 3 3 Level 3 3 Level 3 3 Level 3 2 Level 2 2 Level 2 2 Level 2 2 Level 2 1 Cold Level1 1 1 time Level1 1 No spin Level1 1 Light Level1...

Page 39: ...HEAVY DUTY WHITES BEDDING ACTIVEWEAR PERM PRESS QUICKWASH DELICATES TOWELS RINSE SPIN SELF CLEAN Cycle Options Pre Soak DelayEnd NORMAL HEAVY DUTY WHITES BEDDING ACTIVEWEAR PERM PRESS QUICKWASH DELICA...

Page 40: ...ld Start Pause Hold to Start at 2 00 pm The washerstarts operating at 3 00 pm and ends at 5 00 pm Provided below is the time line forthis example 2 00 pm Set Delay End to 3 hours 3 00 pm Start 5 00 pm...

Page 41: ...activated If you do not close the doororthe dooris not properly closed the alarm keeps sounding for2 minutes To add laundry afteractivating Child Lock deactivate Child Lock orrestart the washer To can...

Page 42: ...TE If you have a Samsung account use the account to log in A registered Samsung smartphone user automatically logs in To registeryourappliance to SmartThings 1 Make sure yoursmartphone is connected to...

Page 43: ...N 4 Press and hold Start Pause Hold to Start NOTE The watertemperature forSELF CLEAN is defaulted to Hot This temperature cannot be changed In the case where residue is present in the washerdrum add l...

Page 44: ...e 4 Put the mobile device close to the washer s display so that the smartphone camera and the washerface each other The information code will be recognized automatically by the app 5 When the informat...

Page 45: ...e a spacious containerbecause the waterin the drum may be more than expected Cleaning Surface of thewasher Use a soft cloth with a nonabrasive household cleaner Do not spraywateronto the washer Mesh f...

Page 46: ...ilterof the waterhose more frequently if wateris provided by an aged watersystem or well Drain filter You should clean the drain filter5 or6 times a yearto prevent it from clogging 1 Turn off the wash...

Page 47: ...filtercover make sure the drain filter is properly inserted NOTE If the drain filteris clogged the 5C information code appears on the washer s display screen CAUTION Make sure the filterknob is close...

Page 48: ...push it inward until it is fully closed NOTE To remove remaining detergent run the RINSE SPIN cycle with the drum empty Doordiaphragm A 1 Open the door and then empty the drum 2 Combine 3 4 cups of l...

Page 49: ...Empty the drum and then press and hold Start Pause Hold to Start 3 When the cycle is complete close the watertaps and disconnect the waterhoses 4 Turn off the washer and then unplug the powercord 5 O...

Page 50: ...cterial residue that may remain in yourwasheras a result of washing clothes CAUTION Failure to follow these instructions may result in unpleasant conditions including odors and orpermanent stains on y...

Page 51: ...pressure Aftera cycle detergent remains in the detergent drawer Make sure the washeris running with sufficient waterpressure Make sure you add liquid detergent to the liquid detergent container Make s...

Page 52: ...orthe doorlock mechanism to disengage Make sure all the waterin the drum is drained The doormay not open if waterremains in the drum Drain the drum and open the doormanually Make sure the doorlock lig...

Page 53: ...peraturewater Fully open both taps Make sure the temperature selection is correct Make sure the hoses are connected to the correct taps Flush waterlines Make sure yourwaterheateris set to supply hot w...

Page 54: ...e sure wateris not leaking from the watertap If it is repair the watertap Has odors Excessive suds collect in recesses and can cause foul odors Run cleansing cycles to sanitize periodically Clean the...

Page 55: ...eron Depending on the model the drain system may drain waterautomatically The Power and Start Pause Hold to Start buttons may be disabled during this process 4C Check thewatersupplyline Check the conn...

Page 56: ...sheron and then try again OC Watermayoverflow Close the watervalve and call forservice 3C Check the motor Powerthe washeroff Wait 2 3 minutes powerthe washeron and then try again AC6 Check the PBA com...

Page 57: ...t Wrinkle control Gentle Delicates Hand wash Watertemperature Hot Warm Cold NOTE The temperature range forHot is135 F 57 C or below 95 F 35 C orbelow forWarm and 68 F 20 C orbelow forCold Wash waterte...

Page 58: ...disposal regulations Cut off the powercord so that the appliance cannot be connected to a power source Remove the lid so that animals and small children cannot get trapped inside the appliance Do not...

Page 59: ...a 20 116 137 800 NETweight lb kg 216 98 0 Spin revolution 1200 rpm Heating Rating 900 W Power consumption Washing 120V 200 W Washing and Heating 1150 W Spin 550 W Drain 80 W NOTE You can fill the tub...

Page 60: ...proof of delivery must be presented upon request to SAMSUNG orSAMSUNG s authorized service centerto receive warranty service SAMSUNG will provide in home service within the contiguous United States du...

Page 61: ...uations and surges damage caused by failure to operate and maintain the product according to instructions in home instruction on how to use yourproduct and service to correct installation not in accor...

Page 62: ...SAMSUNG HAS BEEN ADVISED OF THE POSSIBILITY OF SUCH DAMAGES Some states do not allow exclusion orlimitation of incidental or consequential damages so the above limitations orexclusions may not apply...

Page 63: ...aced parts and products become the property of SAMSUNG and must be returned to SAMSUNG Replacement parts and products assume the remaining original warranty or ninety 90 days whicheveris longer This l...

Page 64: ...EIR PROPERTY ARISING OUTOF THE USE MISUSE OR INABILITY TO USE THIS PRODUCT THIS LIMITED WARRANTY SHALL NOTEXTEND TO ANYONE OTHER THAN THE ORIGINAL PURCHASER OF THIS PRODUCT IS NONTRANSFERABLE AND STAT...

Page 65: ...Memo Untitled 4 65 2023 08 07 12 17 02...

Page 66: ...Memo Untitled 4 66 2023 08 07 12 17 02...

Page 67: ...Memo Untitled 4 67 2023 08 07 12 17 02...

Page 68: ...Untitled 4 68 2023 08 07 12 17 02...

Page 69: ...Lave linge Manueld utilisation WF51CG80 A Untitled 5 1 2023 08 07 12 19 26...

Page 70: ...ion 9 Avertissements importants concernant le nettoyage 12 Notification de r glementation 13 Avis concernant la FCC 13 Notification IC 14 D claration de logiciel open source 15 Installation 16 D balla...

Page 71: ...as de p riode d inutilisation prolong e 51 Nettoyerl ext rieur 51 Nettoyerl int rieur 52 D pannage 53 Contr les effectuer 53 Codes d information 58 Caract ristiques techniques 60 Tableau des symboles...

Page 72: ...il se peut que les caract ristiques devotre lave linge diff rent l g rement de celles d crites dans ce manuel ainsi certaines ic nes d avertissement peuvent ne pas s appliquer votre lave linge Pourtou...

Page 73: ...appareil 8 Ne proc dez pas la r paration ou au remplacement des pi ces de l appareil et ne tentez pas non plus de le r parervous m me sauf si le manuel d entretien ou de r paration contient des recomm...

Page 74: ...sec D branchez le cordon d alimentation et nettoyez le l aide d un chiffon sec Le non respect de cette consigne peut entra nerune lectrocution ou un incendie Branchez la prise d alimentation dans la...

Page 75: ...objet lourd surle cordon d alimentation ne l ins rez pas entre des objets et ne le coincez pas dans l espace situ derri re l appareil Cela pourrait entra nerune lectrocution ou un incendie Ne tirez pa...

Page 76: ...eraient de s asphyxieret d en mourir Assurez vous de retirerl emballage mousse polystyr ne fix au bas du lave linge avant d utilisercelui ci Dans le lave linge ne lavez jamais de linge ayant t en cont...

Page 77: ...ect de cette consigne peut entra nerune lectrocution ou un incendie Si une substance trang re p n tre dans l appareil d branchez le et contactezvotre service client le Samsung le plus proche Cela pour...

Page 78: ...utilisation domestique uniquement L utilisation des fins professionnelles est consid r e comme une utilisation non conforme de l appareil Si l appareil est utilis des fins professionnelles il ne sera...

Page 79: ...v e de lessive N utilisez pas le bac lessive liquide surles mod les applicables uniquement pourde la lessive en poudre Retirez le bac etversez de la lessive en poudre directement dans le compartiment...

Page 80: ...es pierres peuvent occasionnerd importants d g ts l appareil vitez de laverdans le lave linge desv tements comportant de grandes boucles des boutons ou d autres accessoires en m tal lourd Triez le lin...

Page 81: ...et peut mettre de l nergie radio lectrique et s il n est pas install et utilis conform ment aux instructions peut provoquerdes interf rences nuisibles aux communications parsignal radio Cependant il n...

Page 82: ...st conforme la norme ICES 003 du Canada Cet appareil num rique de classe B est conforme la norme NMB 003 du Canada Pourles appareilsvendus aux tats Unis et au Canada seuls les canaux1 11 sont disponib...

Page 83: ...s L URLsuivante http opensource samsung com opensource SMART_AT_051 seq 0 conduit la page d informations relatives la licence open source pourcet appareil Cette offre estvalable pourtoute personne ay...

Page 84: ...ents illustr s en page suivante Sivotre lave linge a t endommag pendant le transport ou sivous ne disposez pas de tous les l ments appelez le1 800 SAMSUNG 1 800 726 7864 Afin de pr venirtout risque de...

Page 85: ...sistance client le de Samsung au1 800 SAMSUNG 1 800 726 7864 ou avecvotre revendeur 01 02 03 04 09 10 12 05 06 07 08 11 01 Manette d ouverture 02 Tiroir lessive 03 Hublot 04 Tambour 05 Dessus du lave...

Page 86: ...nd du mod le L aspect du lave linge et des accessoires fournis peut diff rerselon le mod le Pouracheterun accessoire ou une pi ce gar e prenez contact avec un centre de d pannage Samsung local ou avec...

Page 87: ...lle l int gralit du c blage et de la mise la terre doit tre r alis e conform ment aux r glementations locales ou en l absence de ces derni res au code lectrique national National Electrical Code la de...

Page 88: ...s une bonne r sistance auxvibrations et peut entra nerun l ger d placement devotre lave linge durant l essorage ATTENTION N installez JAMAISvotre lave linge surune plate forme ou surune structure frag...

Page 89: ...installation dans un placard D gagement minimal pourune stabilit optimale C t s Haut Arri re Avant 1 po 25 mm 1 po 25 mm 2 po 50 mm 1 po 25 mm Si le lave linge et un s che linge sont tous deux instal...

Page 90: ...mm B 2 po 50 mm Le d gagement requis s applique uniquement au lave linge Pourconna tre le d gagement requis pourle s che linge reportez vous au manuel d utilisation du s chelinge C 4 6 po 117 mm D 6...

Page 91: ...tu s l arri re de l appareil l aide de la cl REMARQUE Utilisez l extr mit ferm e de la cl fournie pourretirerles boulons de transport 2 Bouchez les trous avec les cache boulons en plastique fournis Co...

Page 92: ...d eau B A ATTENTION Veillez utiliserdes tuyaux d eau neufs et assurez vous que les joints en caoutchouc B se trouvent l int rieur des raccords A aux deux extr mit s des tuyaux En l absence de joints l...

Page 93: ...puis ouvrez les robinets d eau pendant10 15 secondes afin d vacuerles impuret s Une fois termin fermez les robinets 4 Branchez les tuyaux d eau surles arriv es d eau chaude et d eau froide l arri re...

Page 94: ...respect es Minimale 18 po 46 cm Maximale 96 po 245 cm REMARQUE Veillez effectuerla mesure en partant du sol surlequel le lave linge se trouve L efficacit d vacuation peut tre d t rior e si le syst me...

Page 95: ...s de maximum 8 po 203 mm dans le conduitvertical 4 Fixez le tuyau devidange en place l aide de serre c ble A A Surle bord d un lavabo Le tuyau devidange doit tre plac au plus bas 24 po 60 cm et au plu...

Page 96: ...imentation surune prise lectrique agr e de120 VCA 60 Hz 15 A prot g e parun fusible ou un disjoncteur Ensuite appuyez surle bouton Marche Arr t pourmettre le lave linge sous tension AVERTISSEMENT N ut...

Page 97: ...s parez le blanc des couleurs Taille m langez ensemble des articles de diff rentes tailles dans le tambourpouram liorerles performances de lavage Sensibilit lavez les articles d licats s par ment V r...

Page 98: ...est mal quilibr et que le code d information UB est affich redistribuez la charge Le linge mal quilibr peut r duire les performances d essorage TAPE 5 Ajouterle type de lessive appropri Le type de les...

Page 99: ...rtiment avant gauche est destin la lessive du cycle de lavage principal le compartiment avant droit l adoucissant et le compartiment arri re droit l eau de Javel chlor e liquide 9 A A Compartiment de...

Page 100: ...agents de lavage en poudre dans le bac lessive liquide Pourutiliserde la lessive en poudre reportez vous en page 33 9 3 Ajoutez de l adoucissant pourtissus dans le compartiment d adoucissant Ne d pas...

Page 101: ...Javel chlor e liquide non dilu e directement surle linge ou dans le tambour Ce produit chimique puissant peut endommageret d colorerles fibres s il n est pas utilis correctement Utiliserdes produits d...

Page 102: ...du cycle actuel et le temps restant estim ou encore un code d information si le lave linge doit trev rifi 03 Temp Permet de modifierla temp rature de l eau du cycle s lectionn Hot Chaude Niveau 5 ling...

Page 103: ...lavage pourmieux liminerles taches 08 Spin Only Essorage uniquement Poureffectueruniquement le cycle d essorage Lorsque la dur e du cycle s affiche surl cran appuyez surle bouton Spin Essorage autant...

Page 104: ...a trappe sontverrouill es et qu elles ne peuvent pas tre ouvertes La porte et la trappe severrouillent automatiquement pendant un cycle et cevoyant s allume Vous pouvez ouvrirla porte et la trappe lor...

Page 105: ...i n cessaire 5 Maintenez le bouton D part Pause Hold to Start maintenirenfonc pourcommencer enfonc Pourchangerde cycle pendant l utilisation 1 Appuyez surle bouton D part Pause Hold to Start maintenir...

Page 106: ...rticles dans le tambourcarils pourraient s ycoincer ACTIVEWEAR V TEMENTS QUOTIDIENS V tements de sport comme les maillots shorts T shirts d bardeurs etc Ce cycle permet d liminerefficacement la salet...

Page 107: ...rchoisird autres cycles disponibles sur l application SmartThings survotre smartphone Cycles disponibles WOOL LAINE ECO COLD CO FROID OUTDOOR IMPERM ABLE DENIM JEANS COLORS COULEURS POWER RINSE RIN AG...

Page 108: ...4 Niveau 4 3 Niveau 3 3 Niveau 3 3 Niveau 3 3 Niveau 3 2 Niveau 2 2 Niveau 2 2 Niveau 2 2 Niveau 2 1 Cold Froide Niveau 1 1 1 fois Niveau 1 1 No Spin Sans essorage Niveau 1 1 Light Peu sale Niveau 1 0...

Page 109: ...XPRESS DELICATES D LICATS TOWELS SERVIETTES RINSE SPIN RIN AGE ESSORAGE SELF CLEAN AUTO NETTOYAGE Cycle Options Pre Soak Pr trempage DelayEnd Arr t diff r NORMAL HEAVY DUTY GRAND RENDEMENT WHITES BLAN...

Page 110: ...tenez le bouton D part Pause Hold to Start maintenirenfonc pourcommencer enfonc 14 h 00 Le lave linge d marre son fonctionnement 15 h 00 puis termine 17 h 00 Voici la chronologie de cet exemple 14 h 0...

Page 111: ...tive Sivous ne fermez pas le hublot ou si ce dernierest mal ferm l alarme continue de retentirpendant 2 minutes Pourajouterdu linge apr s avoiractiv la fonction S curit enfants d sactivez la fonction...

Page 112: ...urvous connecter Un utilisateurayant un smartphone Samsung enregistr peut se connecterautomatiquement Pourenregistrervotre appareil surSmartThings 1 Assurez vous quevotre smartphone est connect un r s...

Page 113: ...ELF CLEAN AUTO NETTOYAGE 4 Maintenez le bouton D part Pause Hold to Start maintenirenfonc pourcommencer enfonc REMARQUE La temp rature de l eau pourle cycleAUTO NETTOYAGE est r gl e pard faut surHot C...

Page 114: ...oximit de l cran du lave linge de sorte que l appareil photo du smartphone et le lave linge soient l un en face de l autre Le code d information sera automatiquement reconnu parl application 5 Lorsque...

Page 115: ...it d eau dans le tambour peut tre plus importante quevous ne le pensez Nettoyage Surface du lave linge Utilisez un chiffon doux avec un produit d entretien m nagernon abrasif Ne pulv risez pas d eau s...

Page 116: ...e filtre maille du tuyau d eau si l eau est fournie parun syst me d eau ancien ou un puits Filtre devidange Vous devez nettoyerle filtre devidange 5 ou 6 fois paran pourpr venirson obstruction 1 teign...

Page 117: ...dufiltre assurez vous que le filtre devidange est correctement ins r REMARQUE Si le filtre devidange est bouch le code d information 5C appara t surl cran d affichage du lave linge ATTENTION Assurez v...

Page 118: ...soit compl tement ferm REMARQUE Pourretirerla lessive restante lancez un cycle RINSE SPIN RIN AGE ESSORAGE en laissant le tambourvide Joint du hublot A 1 Ouvrez le hublot puisvidez le tambour 2 M lang...

Page 119: ...puis maintenez le bouton D part Pause Hold to Start maintenirenfonc pourcommencer enfonc 3 Lorsque le cycle est termin fermez les robinets d eau et d branchez les tuyaux d eau 4 teignez le lave linge...

Page 120: ...rraient s y tre accumul es apr s une lessive ATTENTION Le non respect de ces instructions peut avoirdes cons quences d sagr ables comme le d gagement d odeurs d sagr ables ou le transfert de traces in...

Page 121: ...s cliquetis indiquent qu ilv rifie que le hublot est bienverrouill et qu il effectue unevidange rapide V rifiez les fusibles ou r armez le disjoncteur L arriv e d eau est insuffisante ou interrompue O...

Page 122: ...avez uniquement les taies Le lave linge ne sevidange pas et ou n essore pas Assurez vous que le tuyau devidange n est ni emm l ni bouch dans l ensemble du syst me devidange Si lavidange ne s effectue...

Page 123: ...pas avant un d lai de 3 minutes apr s l arr t du lave linge ou la mise hors tension La porte ne s ouvre pas sivous avez d branch le cordon d alimentation alors que l appareil tait en marche Branchez...

Page 124: ...tion lectrique est nouveau suffisante le lave linge fonctionne normalement La temp rature de l eau lors du remplissage n est pas correcte Ouvrez enti rement les deux robinets V rifiez le choix de la t...

Page 125: ...Si la pression d arriv e d eau est trop importante il peutyavoirune fuite d eau Fermez l g rement le robinet d eau Assurez vous que l eau ne fuit pas au niveau du robinet d eau Si c est le cas r pare...

Page 126: ...d vacuation Une fois le probl me de fuite r solu mettez le lave linge sous tension En fonction du mod le le syst me d vacuation peutvidangerl eau automatiquement Il se peut que les boutons Marche Arr...

Page 127: ...inge hors tension Attendez 2 3 minutes mettez le lave linge sous tension puis r essayez OC L eau risque de d border Fermez lavanne d arriv e d eau et appelez le service d assistance 3C Contr lez le mo...

Page 128: ...Normal Infroissables Infroissable Anti froissage Gentle D licat Lavage main Temp rature de l eau Chaude Ti de Froide REMARQUE La plage de temp ratures pourChaude est135 F 57 C ou en dessous de 95 F 35...

Page 129: ...pecterles normes locales en mati re de traitement des d chets Coupez le cordon d alimentation de fa on ce que l appareil ne puisse pas tre raccord une source lectrique Enlevez le couvercle pourque des...

Page 130: ...n d eau psi kPa 20 116 137 800 Poids NET lb kg 216 98 0 Vitesse d essorage 1200 tr min Puissance de chauffe 900W Consommation d nergie Lavage 120V 200W Lavage et chauffage 1150W Essorage 550W Vidange...

Page 131: ...eurest tenu de pr senterla facture d achat dat e originale et ou une preuve de livraison sur demande pourpouvoirb n ficierd une intervention dans le cadre de la pr sente garantie SAMSUNG assurera grat...

Page 132: ...tension de ligne lectrique incorrect e dommages caus s parle non respect des instructions d utilisation et d entretien de l appareil intervention domicile pourexpliquercomment utiliserl appareil et i...

Page 133: ...ILIT DE TELS DOMMAGES Certains tats n autorisent pas les exclusions ou limitations relatives aux dommages accessoires ou immat riels il se peut donc que les limitations ou exclusions sp cifi es ci des...

Page 134: ...urdoit contacter la soci t SAMSUNG afin qu elle d termine l origine du probl me et une proc dure de r paration Les services de garantie peuvent tre pris en charge uniquement parun centre de service ag...

Page 135: ...e ou toute r installation de l appareil tout probl me r sultant d une prolif ration d insectes nuisibles Cette garantie limit e ne couvre pas les probl mes r sultant d un courant d une tension ou d un...

Page 136: ...vince une autre Pourb n ficierd un service d assistance couvert parvotre garantie contactez SAMSUNG l adresse suivante Samsung Electronics Canada Inc 2050 DerryRoadWest Mississauga Ontario L5N 0B9 Can...

Page 137: ...M mo Untitled 5 69 2023 08 07 12 19 44...

Page 138: ...M mo Untitled 5 70 2023 08 07 12 19 44...

Page 139: ...M mo Untitled 5 71 2023 08 07 12 19 44...

Page 140: ...Untitled 5 72 2023 08 07 12 19 44...

Page 141: ...Lavadora Manualdelusuario WF51CG80 A Untitled 6 1 2023 08 07 12 31 32...

Page 142: ...uciones de uso 9 Advertencias fundamentales para la limpieza 12 Aviso regulatorio 13 Aviso para FCC 13 Aviso IC 14 Anuncio sobre c digo abierto 15 Instalaci n 16 Desempaque de la lavadora 16 Component...

Page 143: ...iento luego de un per odo prolongado sin utilizarla lavadora 50 Limpieza del exterior 50 Limpieza del interior 51 Soluci n de problemas 52 Verificaciones 52 C digos de informaci n 57 Especificaciones...

Page 144: ...strucciones de funcionamiento sirven paravarios modelos las caracter sticas de su lavadora pueden diferirligeramente de las que se describen en este manualyes posible que no todos los signos de advert...

Page 145: ...expuesto a los factores clim ticos 7 No modifique los controles 8 No repare reemplace ni intente realizarel mantenimiento de ninguna pieza del electrodom stico salvo que est recomendado espec ficament...

Page 146: ...n un pa o seco De lo contrario se puede provocaruna descarga el ctrica o un incendio Enchufe el cable de alimentaci n en un tomacorriente de pared de manera que el cable baje hacia el piso Si enchufa...

Page 147: ...descarga el ctrica o un incendio El electrodom stico debe colocarse en una posici n en la que el tomacorriente las llaves de suministro de aguay los tubos de drenaje sean accesibles Precauciones para...

Page 148: ...fuerza puede da arel producto o causarlesiones personales No introduzca las manos bajo la lavadora cuando est en funcionamiento Puede provocarlesiones No toque el enchufe con las manos mojadas Puede...

Page 149: ...desenchufe el cable de alimentaci nylimpie la lavadora con un pa o suave humedecido Si no lo hace se puede producirdecoloraci n deformaci n da os u xido Elvidrio frontal se puede rompercon un impacto...

Page 150: ...dem s de serperjudiciales para las personas tambi n pueden provocaruna descarga el ctrica un incendio o problemas con el producto No coloque objetos que generen campos electromagn ticos cerca de la la...

Page 151: ...adoren el tambordurante per odos prolongados Estas dos acciones pueden oxidarel tambor Si comienza a aparecer xido en la superficie del tambor aplique un agente limpiador neutro sobre la superficieyut...

Page 152: ...parlos dedos de los ni os Si no lo hace se pueden provocarlesiones personales Advertenciasfundamentales para la limpieza ADVERTENCIA No limpie el electrodom stico rociando directamente agua dentro de...

Page 153: ...a instalaci n residencial Este equipo genera utilizaypuede irradiarenerg a de frecuencias de radioy si no se lo instalayutiliza de acuerdo con las instrucciones puede provocarinterferencia da ina a la...

Page 154: ...digital Clase B cumple con la norma canadiense ICES 003 Cet appareil num rique de la classe B est conforme la norme NMB 003 du Canada En los productosvendidos en los mercados de Estados UnidosyCanad s...

Page 155: ...uiente URLhttp opensource samsung com opensource SMART_AT_051 seq 0 encontrar la informaci n de la licencia de c digo abierto relacionada con este producto Esta oferta esv lida para quienes reciban es...

Page 156: ...p gina siguiente Si la lavadora sufri da os durante el transporte o si falta alg n elemento llame al1 800 SAMSUNG 1 800 726 7864 Para evitar lesiones f sicas o distensiones musculares use guantes pro...

Page 157: ...ci n al cliente de Samsung al1 800 SAMSUNG 1 800 726 7864 o con elvendedor 01 02 03 04 09 10 12 05 06 07 08 11 01 Palanca de seguridad 02 Caj n para detergente 03 Puerta 04 Tambor 05 Encimera 06 Panel...

Page 158: ...nillos La cantidad de tapas para tornillos 3 a 6 provista depende del modelo El aspecto de la lavadoraylos accesorios provistos puede diferirdependiendo del modelo Para compraraccesorios o piezas perd...

Page 159: ...os locales o en ausencia de ellos de conformidad con el C digo El ctrico Nacional ANSI NFPANro 70 su ltima revisi n para EE UU o el C digo El ctrico Canadiense CSAC22 1 sus ltimas revisionesylos c dig...

Page 160: ...el ciclo de centrifugado PRECAUCI N NO instale la lavadora sobre una plataforma o sobre una estructura con soportes poco resistentes Temperatura del agua No instale la lavadora en reas donde el agua...

Page 161: ...abinete o en un hueco Espacio libre m nimo para un funcionamiento estable Laterales Arriba Posterior Frente 1 pulg 25 mm 1 pulg 25 mm 2 pulg 50 mm 1 pulg 25 mm Si se instalan una lavadorayuna secadora...

Page 162: ...B 2 pulg 50 mm Este requisito de espacio libre solo se aplica a la lavadora Para conocerel requisito de espacio libre para la secadora consulte el manual del usuario de la secadora C 4 6 pulg 117 mm D...

Page 163: ...orte de la parte posteriorde la m quina con la llave NOTA Use el extremo cerrado de la llave inglesa provista para retirarlos tornillos de transporte 2 Cubra los orificios con las tapas de pl stico pa...

Page 164: ...Conectarla manguera de agua B A PRECAUCI N Aseg rese de usarmangueras de agua nuevas yde que las juntas de goma B est n dentro de los acoplamientos A en ambos extremos de las mangueras Es posible que...

Page 165: ...betayabra las llaves de agua durante10 a15 segundos para eliminarlas impurezas Cuando haya terminado cierre las llaves de agua 4 Conecte las mangueras de agua a las entradas de agua fr aycaliente en l...

Page 166: ...s M nimo 18 pulg 46 cm M ximo 96 pulg 245 cm NOTA Aseg rese de medirla altura desde el piso donde se apoya la lavadora Es posible que la eficacia del drenaje sea menorsi el sistema est a la altura m x...

Page 167: ...se a una altura entre 24 pulgadas 60 cm y35 pulgadas 90 cm del piso Para mantenerdoblado el extremo de salida de la manguera utilice la gu a de pl stico para la manguera A suministrada Fije la gu a a...

Page 168: ...la ropa seg n su composici n algod n mezclas sint tica seda lanay ray n Color Separe la ropa blanca de la de color Tama o Mezclarprendas de distintos tama os en el tambormejora el desempe o del lavado...

Page 169: ...tra en la pantalla redistribuya la carga Una carga desequilibrada puede disminuirel desempe o del centrifugado PASO 5 Agregarel tipo de detergente adecuado El tipo de detergente a utilizar para uso ge...

Page 170: ...s compartimientos el delantero izquierdo para el lavado principal el delantero derecho para el suavizanteyel trasero derecho para el blanqueadorl quido 9 A A Compartimiento para el lavado principal Ag...

Page 171: ...gue suavizante en el compartimiento para el suavizante No sobrepase la l nea m xima B PRECAUCI N No se recomienda el suavizante en polvo Utilice solo suavizante l quido Antes de agregarsuavizante conc...

Page 172: ...ela porejemplo desgastando las fibras o causando decoloraci n Para utilizarpotenciadorde lavado o blanqueadorcon protecci n para ropa de color Los potenciadores de lavado o blanqueadores con protecci...

Page 173: ...nte del ciclo que se est ejecutando o un c digo de informaci n si la lavadora necesita revisi n 03 Temp Temperatura Presione para cambiarla temperatura del ciclo que se est ejecutando Hot Caliente Niv...

Page 174: ...ias Nivel 3 Para prendas moderadamente sucias Esta opci n es la mejorpara la mayor a de las cargas Nivel 2 Para prendas ligeramente sucias Light Poco sucia Nivel1 Para prendas apenas sucias 07 Pre Soa...

Page 175: ...t Presione para Inicio para pausarel cicloy luego abra la puerta Para reanudarel ciclo cierre la puertay luego mantenga presionado Inicio Pausa Hold To Start Presione para Inicio Seguro de puerta Este...

Page 176: ...one las opciones deseadas seg n sea necesario 5 Mantenga presionado Inicio Pausa Hold To Start Presione para Inicio Para cambiarel ciclo durante elfuncionamiento 1 Presione Inicio Pausa Hold To Start...

Page 177: ...opa de ejercicio como buzosypantalones deportivos camisetasy otras prendas de entrenamiento Este ciclo proporciona una eliminaci n efectiva de la suciedad con un giro controlado del tamborpara prendas...

Page 178: ...ciclos disponibles en la aplicaci n SmartThings desde su tel fono inteligente Ciclos disponibles WOOL LANA ECO COLD ECO FR A OUTDOOR ROPA IMPERMEABLE DENIM JEANS COLORS ROPADE COLOR POWER RINSE ENJUAG...

Page 179: ...4 3 Nivel 3 3 Nivel 3 3 Nivel 3 3 Nivel 3 2 Nivel 2 2 Nivel 2 2 Nivel 2 2 Nivel 2 1 Cold Fr a Nivel1 1 1vez Nivel1 1 No Spin Sin centrifugado Nivel1 1 Light Poco sucia Nivel1 0 0vez 0 Sin drenaje Cic...

Page 180: ...IDO DELICATES DELICADOS TOWELS TOALLAS RINSE SPIN ENJUAGUE CENTRIFUGADO SELF CLEAN LIMPIEZADE TAMBOR Ciclo Opciones Pre Soak Prerremojo DelayEnd Final diferido NORMAL HEAVY DUTY CARGAPESADA WHITES ROP...

Page 181: ...ausa Hold To Start Presione para Inicio a las 2 00 p m La lavadora comienza a funcionara las 3 00 p m yse detiene a las 5 00 p m A continuaci n se proporcionan los tiempos para este ejemplo 2 00 pm Co...

Page 182: ...Si no cierra la puerta o no se cierra correctamente la alarma sigue sonando durante 2 minutos Para agregarprendas despu s de activarel Seguro para ni os desactive la funci n Seguro para ni os o reinic...

Page 183: ...ado inicia sesi n de manera autom tica Para registrarsu electrodom stico en SmartThings 1 Aseg rese de que su tel fono inteligente est conectado a una red inal mbrica De lo contrario vaya a Settings A...

Page 184: ...cio Pausa Hold To Start Presione para Inicio NOTA La temperatura del agua del ciclo LIMPIEZADE TAMBOR est configurada en Hot Caliente de manera predeterminada Esta temperatura no se puede cambiar En c...

Page 185: ...do inteligente 4 Coloque el dispositivo m vil cerca del displayde la lavadora de manera que la c mara del tel fono inteligente quede frente a la lavadora La aplicaci n reconocer de forma autom tica el...

Page 186: ...recipiente grande ya que el tamborpuede contener m s agua de la esperada Limpieza Superficie de la lavadora Use un pa o suaveyun limpiadordom stico que no sea abrasivo No roc e agua sobre la lavadora...

Page 187: ...agua proviene de un sistemaviejo o de un pozo Filtro de drenaje Debe limpiarel filtro de drenaje 5 o 6veces pora o para evitarque se obstruya 1 Apague la lavadoray luego desenchufe el cable de aliment...

Page 188: ...las agujas del reloj Antes de cerrarla tapa delfiltro aseg rese de que el filtro de drenaje est bien colocado NOTA Si el filtro de drenaje est obstruido aparece el c digo de informaci n 5C en la pant...

Page 189: ...te NOTA Para eliminarel detergente restante ejecute el ciclo RINSE SPIN ENJUAGUE CENTRIFUGADO con el tambor vac o Diafragma de la puerta A 1 Abra la puertayvac e el tambor 2 Mezcle 3 4 de taza de blan...

Page 190: ...O 2 Vac e el tambory luego mantenga presionado Inicio Pausa Hold To Start Presione para Inicio 3 Luego de completado el ciclo cierre las llaves de aguaydesconecte las mangueras de agua 4 Apague la lav...

Page 191: ...como consecuencia del lavado de ropa PRECAUCI N El incumplimiento de estas instrucciones puede darcomo resultado situaciones poco satisfactorias tales como olor y o manchas permanentes en la lavadora...

Page 192: ...ese de que la presi n del agua sea suficiente Despu s de un ciclo queda detergente en el caj n para detergente Aseg rese de que la lavadora funcione con suficiente presi n de agua Aseg rese de agregar...

Page 193: ...elada La puerta no se abre Presione o toque Inicio Pausa Hold To Start Presione para Inicio para detenerel funcionamiento de la lavadora Puede llevaralgunos minutos que el mecanismo de cierre de la pu...

Page 194: ...inicie el disyuntor Cierre la puertaypresione Inicio Pausa Hold To Start Presione para Inicio para iniciarla lavadora Porsu seguridad la lavadora no girar ni centrifugar salvo que la puerta est cerrad...

Page 195: ...umple el control de temperatura autom tico dado que la lavadora determina la temperatura del agua La carga est h meda alfinalizar un ciclo Use lavelocidad de centrifugadoAlta o Muyalta Use un detergen...

Page 196: ...l ciclo Limpie el filtro de drenaje siguiendo las instrucciones del manual Los residuos que quedan en el filtro pueden producirolores con el tiempo Alfinalizarun ciclo la lavadora no se apagay o la pu...

Page 197: ...fuga ponga la lavadora en marcha Dependiendo del modelo el sistema de drenaje puede drenarel agua autom ticamente Los botones Encender Apagar e Inicio Pausa Hold To Start Presione para Inicio podr an...

Page 198: ...vadora Espere 2 3 minutos ponga la lavadora en marchayvuelva a intentarlo OC El agua puede desbordar Cierre lav lvula de aguaycomun quese con el servicio t cnico 3C Revise el motor Apague la lavadora...

Page 199: ...s Lavado a mano Temperatura del agua Caliente Tibia Fr a NOTA El rango de temperatura para Caliente es de135 F 57 C o inferior 95 F 35 C o inferiorpara Tibiay 68 F 20 C o inferiorpara Fr a La temperat...

Page 200: ...de desechos Corte el cable de alimentaci n para que el electrodom stico no pueda conectarse a una fuente de alimentaci n Quite la tapa para que los animalesylos ni os peque os no puedan quedar atrapa...

Page 201: ...116 137 800 Peso NETO lb kg 216 98 0 Revoluci n del centrifugado 1200 rpm Potencia del calentador 900W Consumo de potencia Lavado 120V 200W Lavadoycalentamiento 1150W Centrifugado 550W Drenaje 80W NOT...

Page 202: ...d de SAMSUNG o del centro de servicio autorizado de SAMSUNG Samsung brindar servicio t cnico a domicilio dentro del territorio contiguo de Estados Unidos durante el per odo de garant a sin cargo sujet...

Page 203: ...o de acuerdo con las instrucciones instrucci n a domicilio acerca de c mo usarel producto yservicio t cnico para corregiruna instalaci n que no cumpla con los c digos el ctricos o de plomer a o correc...

Page 204: ...ADE LAPOSIBILIDAD DE DICHOS DA OS Algunos estados no permiten la exclusi n o la limitaci n de da os imprevistos o derivados porlo que las limitaciones o exclusiones mencionadas talvez no se apliquen a...

Page 205: ...iezas o productos nuevos o reacondicionados si severifica que es defectuoso durante el per odo limitado de la garant a especificado anteriormente Todas las piezasylos productos reemplazados pasan a se...

Page 206: ...E DELPRESUNTO DA O SIN LIMITAR LO PRECEDENTE EL COMPRADORASUME TODO ELRIESGO Y LARESPONSABILIDAD POR P RDIDA DA O O LESI NALCOMPRADOR YALOS BIENES DELCOMPRADOR YATERCEROS YASUS BIENES DERIVADOS DELUSO...

Page 207: ...Notas Untitled 6 67 2023 08 07 12 31 50...

Page 208: ...Untitled 6 68 2023 08 07 12 31 51...

Reviews: