background image

DEUTSCH

121

ENGLISH

Fehlerbehebung

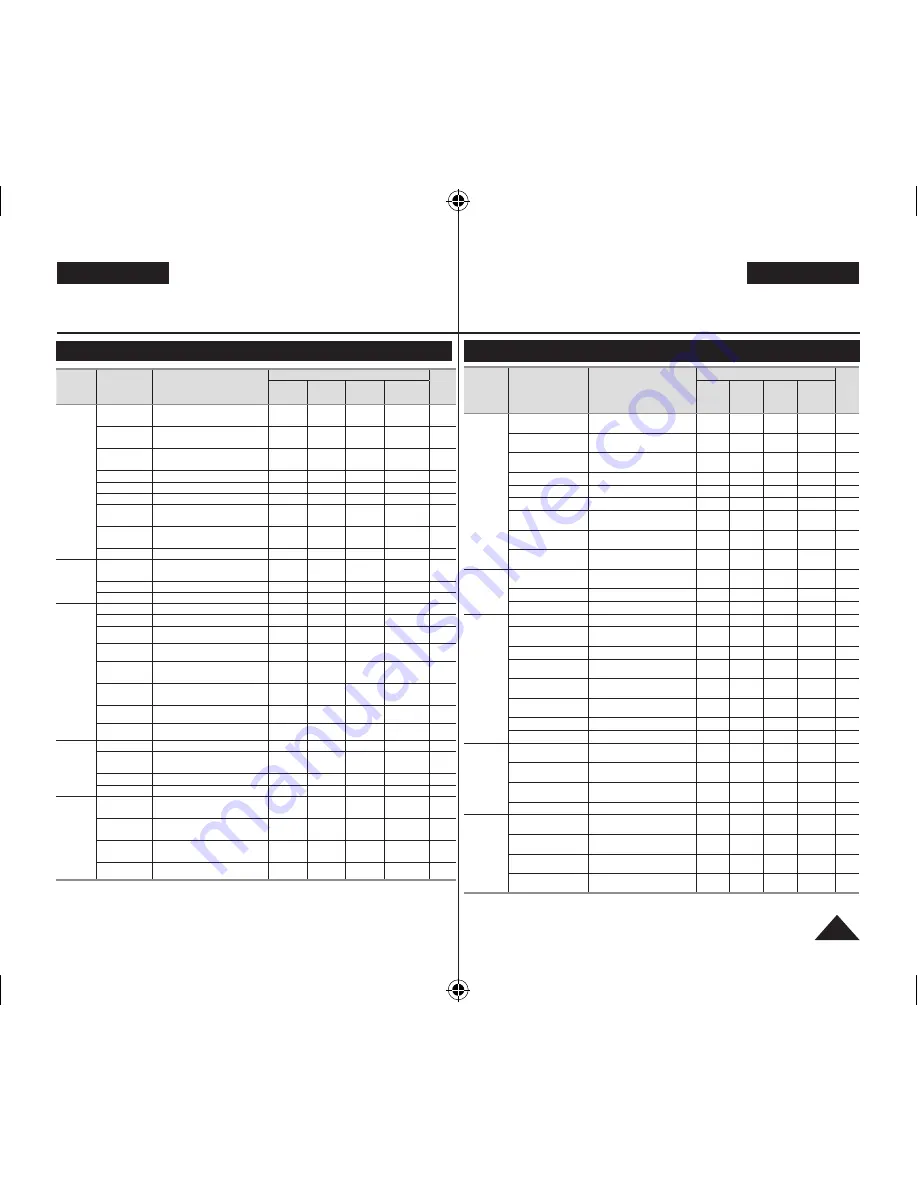
Menüoptionen einstellen

Hauptmenü

Untermenü

Funktionen

Betriebsmodus

Seite

Camera 

Mode 

(Cam-

Modus)

Player 

Mode 

(Player- 

Modus)

M.Cam* 

Mode 

(M.Cam-

Modus)

M.Player*  

Mode 

(M.Play- 

Modus)

Camera

(Aufnahme)

Program AE

(Belichtungsprogramme)

Belichtungsprogramm wählen

54

White Balance 

(Weißabgleich)

Weißabgleich einstellen

56

Digital Effect 

(Digitale Effekte)

Digitale Spezialeffekte einstellen

58

Shutter (Belichtung)

Verschlusszeit einstellen

52

Exposure (Blende)

Blendenwert einstellen

52

16:9 Wide (16:9 Breit)

Modus 16:9 Breitbild einstellen

60

DIS (Digitale

Bildstabilisierung)

Digitale Bildstabilisierung wählen

61

BLC (BLC/

Gegenlichtausgleich)

Gegenlicht ausgleichen

48

Digital Zoom 

(Digitaler Zoom)

Digitalen Zoom wählen

62

Record 

(Aufnahme)

Rec Mode 

(Aufn.modus)

Aufnahmegeschwindigkeit einstellen

43

AV In/Out (AV E/A) 


AV-Eingang/Ausgang wählen

83

Wind Cut (Rauschunt.)

Nebengeräusche reduzieren

51

Memory* 

(Speicher)

Photo Size (Fotogröße) 

Fotogröße auswählen

92

Photo Quality 

(Fotoqualität) 

Bildqualität wählen

91

Delete (Lösch.)

Dateien löschen

97

Delete All 

(Alle löschen)

Alle Dateien löschen

98

Protect (Schützen)

Versehentliches Löschen auf der 

Speicherkarte verhindern

96

Print Mark  

(Druckmark.)

Bilder auf einer Speicherkarte mit 

Druckmarken versehen

  103

Format (Formatieren)

Speicherkarte formatieren

99

File No. (Datei-Nr.)

Optionen für die Dateinummerierung

93

Disc Manager  

(Diskverwaltung)

Disc Finalise  

(Disk finalis.)

Eine Disk fixieren

80

Disc Unfinalise  

(Finalis. aufh.)

Fixierung einer Disk aufheben

82

Disc Format  

(Diskformat)

Eine Disk formatieren

79

Disc Info (Diskinfo)

Informationen zu einer Disk anzeigen

77

Display

(Anzeige)

LCD Bright  

(LCD-Helligkeit)

Helligkeit des Displays einstellen

36

LCD Colour  

(LCD-Farbe)

Farbe des Displays einstellen

36

Date/Time  

(Datum/Uhrzeit)

Datums- und Uhrzeitanzeige einstellen

37

TV Display (TV-Anzeige)

Ausgabe der Bildschirmanzeigen (OSD) 

auf dem Fernsehgerät ein-/ausschalten

38

: nur VP-DC171i/DC171Bi/DC171Wi/DC173i/DC175Wi/DC575Wi

* : nur VP-DC173(i)/DC175WB/DC175W(i)/DC575WB/DC575Wi

: nur VP-DC575WB/DC575Wi

Troubleshooting

Setting menu items

Main 

Menu

Sub Menu

Functions

Available Mode

Page

Camera

Mode

Player

Mode

M.Cam

*

Mode

M.Player

*

Mode

Camera

Program AE Selecting the Program AE 

Function

54

White 

Balance

Setting White Balance

56

Digital Effect Setting the Digital special 

effect

58

Shutter

Setting the Shutter speed

52

Exposure

Setting the Exposure value

52

16:9 Wide

Setting the 16:9 Wide mode

60

DIS

Selecting the Digital Image 

Stabilizing

61

BLC

Performing the backlight 

compensation

48

Digital Zoom Selecting Digital Zoom

62

Record

Rec Mode

Selecting the recording 

speed

43

AV In/Out 

  Selecting the AV input/output

83

Wind Cut

Minimizing wind noise

51

Memory*

Photo Size 

Selecting the Photo Size

92

Photo Quality Selecting Image Quality

91

Delete

Deleting Files

97

Delete All

Deleting all Files

98

Protect

Preventing Accidental 

Erasure in Memory Card

96

Print Mark

Marking images recorded on 

a Memory Card for Printing

103

Format

Formatting the Memory Card

99

File No.

File Numbering Options

93

Disc 

Manager

Disc Finalise Finalising a Disc

80

Disc 

Unfinalise

Unfinalising a Disc

82

Disc Format Formatting Disc

79

Disc Info

Providing a Disc Information

77

Display

LCD Bright Setting the Brightness tone 

of the LCD Screen

36

LCD Colour Setting the Colour tones of 

the LCD Screen

36

Date/Time

Setting the Date and Time 

Display

37

TV Display Setting OSD on/off of TV

38

: VP-DC171i/DC171Bi/DC171Wi/DC173i/DC175Wi/DC575Wi only

*  : VP-DC173(i)/DC175WB/DC175W(i)/DC575WB/DC575Wi only

: VP-DC575WB/DC575Wi only

AD68-01230V_uk_de_R2.indb   121

2007-05-03   ソタネト 7:59:07

Summary of Contents for VP DC 171 i

Page 1: ... vor Inbetriebnahme des Camcorders sorgfältig durch und bewahren Sie sie für den späteren Gebrauch auf DVD Camcorder VP DC171 i DC171Bi DC171W i DC171WB DC171WH DC172W DC173 i DC175WB DC175W i DC575WB DC575Wi AF Auto Focus CCD Charge Coupled Device LCD Liquid Crystal Display Owner s Instruction Book Before operating the unit please read this Instruction Book thoroughly and retain it for future ref...

Page 2: ...4 Demo Funktion verwenden Demo Funktion 35 Voreinstellungen Menü Display Anzeige verwenden 36 LCD Helligkeit und LCD Farbe einstellen LCD Helligkeit LCD Farbe 36 Contents Notes and Safety Instructions 6 Getting to Know Your DVD Camcorder 9 Features 9 Learning available Discs and Their Features 10 How to use the DVD Camcorder easily 12 Accessories Supplied with the DVD Camcorder 13 Front Left View ...

Page 3: ...autstärke einstellen 64 Funktionen im Wiedergabemodus Player Modus 65 Titel löschen Lösch 67 Teil eines Titels löschen Teilw lösch 68 Contents Displaying the Date Time Date Time 37 Setting the TV Display TV Display 38 DVD Camcorder Before Recording 39 Using the Viewfinder 39 Using the LCD ENHANCER 39 Various Recording Techniques 40 Inserting and Removing a Disc 41 Selecting the Record Mode Rec Mode...

Page 4: ...ur VP DC575WB DC575Wi 92 Dateinummerierung einstellen Datei Nr 93 Einzelbilder JPEG auf der Speicherkarte aufnehmen 94 Einzelbilder JPEG betrachten 95 Contents DVD Camcorder Playlist 69 Creating a New Playlist New Playlist 69 Playing the Playlist 70 Deleting a Playlist Delete 71 Adding Scenes to Playlist Scene Add 72 Changing the Order of Scene Playing within a Playlist Scene Move 73 Deleting Scen...

Page 5: ...bung 116 Menüoptionen einstellen 121 Sonstige Informationen 123 Disktyp Beschreibung 123 Technische Daten 124 Index 125 Contents Protection from accidental Erasure Protect 96 Deleting Photo Images and Moving Images Delete 97 Formatting the Memory Card Format 99 Recording Moving Images MPEG on a Memory Card 100 Playing the Moving Images MPEG on a Memory Card 101 Recording Still images onto a Memory...

Page 6: ...amcorder nicht am Sucher am Display oder amAkku an 4 Übermäßige Krafteinwirkung kann den Sucher beschädigen Wichtige Informationen und Sicherheitshinweise Notes and Safety Instructions Notes regarding the Rotation of the LCD Screen Please rotate the LCD Screen carefully as illustrated Over rotation may cause damage to the inside of the hinge that connects the LCD Screen to the DVD Camcorder 1 Open...

Page 7: ...rodukt sollte nicht zusammen mit anderen Gewerbeabfällen entsorgt werden Wichtige Informationen und Sicherheitshinweise Notes regarding Disc Cleaning and Handling Take care not to touch the recording side the rainbow coloured side of the disc with your fingers Discs contaminated by fingerprints or foreign substances may not play properly Use a soft cloth to clean the disc Clean lightly from the cent...

Page 8: ...en und dieselben Eigenschaften wie die Originalteile besitzen Der Einbau ungeeigneter Ersatzteile kann zu Bränden Stromschlägen oder sonstigen Gefahren führen Notes and Safety Instructions Notes regarding DVD Camcorder Do not leave the DVD Camcorder exposed to high temperatures above 60 C or 140 F For example in a parked car in the sun or exposed to direct sunlight Do not let the DVD Camcorder get...

Page 9: ...e Videoclips auf einer Speicherkarte aufzeichnen MMC SD Steckplatz nur VP DC173 i DC175WB DC175W i DC575WB DC575Wi In den MMC SD Steckplatz passen MMC Multi Media Cards und SD Karten Bildschirmmenüs und anzeigen in mehreren Sprachen Sie können die gewünschte Sprache für die Bildschirmmenüs auswählen Getting to Know Your DVD Camcorder Features DVD Disc Camcorder DVD VIDEO recording with 8cm DVD RW ...

Page 10: ...hne Fixieren auf den meisten DVD Playern wiedergegeben werden 12 cm CDs DVDs Nicht geeignete 8 cm CD CD R CD RW DVD ROM DVD R Single Layer DVD RAM DVD R Dual Layer Disketten MO MD iD LD Folgende Disks sind nicht geeignet Getting to Know Your DVD Camcorder Learning available Discs and Their Features This DVD Camcorder can record or play back by using only the 8cm DVD R R DL RW RW disc not supplied ...

Page 11: ...arantie dass die Wiedergabe auf allen Playern möglich ist kann nicht gegeben werden Einzelheiten zur Kompatibilität finden Sie im Handbuch des zur Wiedergabe verwendeten Players Weitere Informationen über die erhältlichen DVD Typen finden Sie auf Seite 123 Getting to Know Your DVD Camcorder Which discs recorded on the DVD Camcorder can be played in DVD players recorders drives Discs must be finalised...

Page 12: ...ard DVD Playern Rekordern abgespielt werden DVD RW Disks können ohne Finalisieren auf anderen Geräten abgespielt werden P H O T O Getting to Know Your DVD Camcorder How to use the DVD Camcorder easily You can record any desired image and edit and playback the disc on a DVD Camcorder most common DVD players and PCs after finalising the disc Recording Selecting the desired disc and disc formatting pa...

Page 13: ...now Your DVD Camcorder Basic Accessories 1 Lithium Ion Battery Pack SB LSM80 2 AC Power Adapter AA E9 TYPE 3 AV Cable 4 Instruction Book 5 Lithium Batteries for Remote Control VP DC172W DC173 i DC175WB DC175W i DC575WB DC575Wi only and Clock TYPE CR2025 6 Remote Control VP DC172W DC173 i DC175WB DC175W i DC575WB DC575Wi only 7 USB Cable VP DC173 i DC175WB DC175W i DC575WB DC575Wi only 8 Software C...

Page 14: ... i DC575WB DC575Wi only page 50 5 Remote Sensor VP DC172W DC173 i DC175WB DC175W i DC575WB DC575Wi only 6 Internal MIC 7 EASY Q Button page 45 8 Q MENU Button page 27 9 Joystick Up Down Left Right OK FADE page 47 10 TFT LCD Screen P H O T O 1 2 10 7 3 4 5 6 8 9 M Player Mode Memory Player Mode Mode Joystick Player Mode Camera Mode M Player Mode VP DC173 i DC175WB DC175W i DC575WB DC575Wi only Phot...

Page 15: ...n page 46 64 4 Start Stop Button page 44 5 MENU Button 6 DISPLAY Button page 29 7 C NITE LIGHT S SHOW Button VP DC175WB DC175W i DC575WB DC575Wi only page 49 50 95 C NITE S SHOW Button VP DC173 i only page 49 95 C NITE Button VP DC171 i DC171Bi DC171W i DC171WB DC171WH DC172W only page 49 8 MULTI DISP MF AF Button page 95 53 Left Side View 1 MENU Button 2 DISPLAY Button 3 Mode Switch DISC CARD VP ...

Page 16: ...schalter DISC CARD nur VP DC173 i DC175WB DC175W i DC575WB DC575Wi 9 Diskfach 10 Handschlaufe Getting to Know Your DVD Camcorder 1 PHOTO Button VP DC173 i DC175WB DC175W i DC575WB DC575Wi only page 94 2 Focus Adjustment Knob page 39 3 Viewfinder 4 Start Stop Button page 44 5 Power Switch ON OFF Camera Player 6 USB Jack VP DC173 i DC175WB DC175W i DC575WB DC575Wi only 7 Zoom W T Lever page 46 8 Mode...

Page 17: ... i DC175WB DC175W i DC575WB DC575Wi 8 Schalter BATT RELEASE Getting to Know Your DVD Camcorder 1 Charging Indicator 2 Lithium Battery Cover 3 AV Jack 4 DC IN Jack 5 Hand Strap Hook 6 Tripod Receptacle 7 Memory Card Slot VP DC173 i DC175WB DC175W i DC575WB DC575Wi only 8 BATT RELEASE Switch Rear Bottom View 1 2 4 3 5 7 8 6 Usable Memory Cards 2GB Max VP DC173 i DC175WB DC175W i DC575WB DC575Wi only...

Page 18: ...sten Search 11 Zeitlupentaste Slow 12 Taste Q MENU Überblick über den DVD Camcorder Fernbedienung nur VP DC172W DC173 i DC175WB DC175W i DC575WB DC575Wi Getting to Know Your DVD Camcorder 1 START STOP 2 DISPLAY page 29 3 Skip 4 Stop 5 Play Still 6 MENU 7 Up Down Left Right OK 8 PHOTO page 94 9 W T Zoom page 46 10 Search 11 Slow 12 Q MENU Remote Control VP DC172W DC173 i DC175WB DC175W i DC575WB DC...

Page 19: ...ringen Drücken Sie beide Tasten am Objektivschutz zusammen und setzen Sie ihn auf so dass das Objektiv bedeckt ist Vorbereitung Preparation Using the Hand Strap Lens Cover It is very important to ensure that the Hand Strap has been correctly adjusted before you begin your recording The Hand Strap enables you to Hold the DVD Camcorder in a stable comfortable position Press the Zoom lever and Start ...

Page 20: ...zur umweltschonenden Entsorgung zurückzugeben Sie können alte Batterien und Akkus bei den öffentlichen Sammelstellen in Ihrer Gemeinde oder überall dort abgeben wo Batterien und Akkus der betreffenden Art verkauft werden Bitte achten Sie darauf Akkus und Lithiumzellen nur im entladenen Zustand in die Sammelbehälter zu werfen Sichern Sie nicht vollständig entladene Akkus gegen Kurzschlüsse Preparat...

Page 21: ... 90 100 Eine Sekunde an eine Sekunde aus Fehler Akku und Kabel des Netzteils lösen und neu anschließen Preparation Using the Lithium Ion Battery Pack Use SB LSM80 or SB LSM160 not supplied Battery Pack only The Battery Pack may be charged a little at the time of purchase Charging the Lithium Ion Battery Pack 1 Turn the Power switch to OFF 2 Attach the Battery Pack to the DVD Camcorder 3 Connect th...

Page 22: ...a mit oder ohne Display usw Es wird empfohlen einen weiteren Akku bereitzuhalten Die oben aufgeführten Zeiten gelten für das Modell VP DC171 Charging Recording Times based on Battery Type If you close the LCD Screen it switches off and the Viewfinder switches on automatically The continuous recording times given in the table below are approximations Actual recording time depends on usage The contin...

Page 23: ...rmieden werden Ein Kurzschluss kann zum Auslaufen des Akkus zu Wärmeentwicklung und damit zu Überhitzung oder Feuer führen Vorbereitung Preparation Battery Level Display The battery level display indicates the amount of power remaining in the Battery Pack a Fully charged b 20 40 used c 40 80 used d 80 95 used red e Completely used Blinking The DVD Camcorder will turn off soon change the battery as...

Page 24: ...an den Camcorder angeschlossen sein Lassen Sie den Akku nicht fallen Er kann dadurch beschädigt werden Preparation Maintaining the Battery Pack Please refer to the Table on page 22 for approximate continuous recording time The recording time is affected by temperature and environmental conditions The recording time shortens dramatically in a cold environment The continuous recording times in the o...

Page 25: ...len der verschiedenen Modi halten Sie die grüne Taste auf dem Betriebsart Wähler gedrückt und drehen ihn auf Position ON oder OFF Preparation Connecting a Power Source There are two types of power source that can be connected to your DVD Camcorder The AC Power adapter used for indoor recording The Battery Pack used for outdoor recording Using a Household Power Source Connect to a household power s...

Page 26: ...operating modes are determined by the position of the Power and Mode VP DC173 i DC175WB DC175W i DC575WB DC575Wi only switch Set the Operation Mode by adjusting the Power and Mode VP DC173 i DC175WB DC175W i DC575WB DC575Wi only switches before operating any functions Each time you move the Power switch downward it toggles between Camera and Player mode Using the Joystick The Joystick is used to m...

Page 27: ...o Indoor Innenaufn Outdoor Außenaufn oder Custom WB Ben WA aus Drücken Sie anschließend den Joystick 4 Um das Menü zu verlassen drücken Sie die Taste Q MENU Preparation Using the Q MENU Q MENU is used to access DVD Camcorder functions by using the Q MENU button Q MENU provides easier access to frequently used menus without using the MENU button Functions available using the Q MENU are as below Cam...

Page 28: ... auf das Modell VP DC175WB Preparation 1 Battery Level page 23 2 Manual focus page 53 EASY Q page 45 3 DIS page 61 4 Program AE page 54 5 White Balance Mode page 56 6 Digital Effects Mode page 58 16 9 Wide page 60 7 Shutter Speed page 52 8 Exposure page 52 9 Date Time page 37 10 Colour Nite pages 49 50 11 USB VP DC173 i DC175WB DC175W i DC575WB DC575Wionly page 109 12 Remote VP DC172W DC173 i DC17...

Page 29: ...n Sie den Modus Datum Uhrzeit Seite 37 Preparation OSD On Screen Display in M Cam Mode M Player Mode VP DC173 i DC175WB DC175W i DC575WB DC575Wi only 1 Photo Quality page 91 2 Photo Size VP DC575WB DC575Wi only page 92 3 Remaining Time Recordable time of moving images 4 CARD Memory Card Indicator 5 Image Counter Total number of recordable photo images 6 Slide Show page 95 7 Erase Protection Indica...

Page 30: ...r Bedienungsanleitung gezeigten Menüpunkten können leichte Abweichungen im Vergleich zu Ihrem DVD Camcorder Modell bestehen Voreinstellungen Menü System verwenden Initial Setting System Menu Setting Setting the Clock Clock Set Clock setup works in Camera Mode Player Mode M Cam Mode M Player Mode page 26 The date time is automatically recorded onto a disc Before recording please set the date time 1...

Page 31: ...ng drei Sekunden auf dem Display und wird wieder ausgeblendet Voreinstellungen Menü System verwenden Initial Setting System Menu Setting Setting the Wireless Remote Control Acceptance Remote VP DC172W DC173 i DC175WB DC175W i DC575WB DC575Wi only The Remote function works in Camera Mode Player Mode M Cam Mode M Player Mode page 26 The Remote function allows you to enable or disable the remote cont...

Page 32: ...en Sie anschließend den Joystick 7 Um das Menü zu verlassen drücken Sie die Taste MENU Initial Setting System Menu Setting Setting the Beep Sound Beep Sound The Beep Sound function works in Camera Mode Player Mode M Cam Mode M Player Mode page 26 You can turn the Beep Sound on or off when on each press of a button sounds a beep 1 Set the Mode switch to DISC or CARD VP DC173 i DC175WB DC175W i DC57...

Page 33: ...Drücken Sie anschließend den Joystick 7 Um das Menü zu verlassen drücken Sie die Taste MENU Initial Setting System Menu Setting Setting the Shutter Sound Shutter Sound VP DC173 i DC175WB DC175W i DC575WB DC575Wi only The Shutter Sound function works only in M Cam Mode page 26 You can turn the Shutter Sound on or off when on with each press of the PHOTO button the Shutter will sound 1 Set the Mode ...

Page 34: ... 7 Um das Menü zu verlassen drücken Sie die Taste MENU Hinweis Die wählbaren Sprachen können ohne vorherige Ankündigung geändert werden Initial Setting System Menu Setting Selecting the OSD Language Language The Language function works in Camera Mode Player Mode M Cam Mode M Player Mode page 26 You can select the desired language to display the menu screen and the messages 1 Set the Mode switch to...

Page 35: ... die Demo Funktion deaktiviert und die mit der Taste aufgerufene Funktion wird aktiviert Initial Setting System Menu Setting Viewing the Demonstration Demonstration The Demonstration function may only be used in the Camera Mode with no disc inserted in the unit page 26 Before you begin Make sure that there is no disc inserted in the DVD Camcorder page 41 Demonstration automatically shows you the m...

Page 36: ...te zwischen 00 und 35 einstellen 7 Um das Menü zu verlassen drücken Sie die Taste MENU Die Einstellungen des Displays haben keine Auswirkungen auf Helligkeit und Farbe der Aufnahmen Initial Setting Display Menu Setting Adjusting the LCD Screen LCD Bright LCD Colour Adjusting the LCD Screen works in Camera Mode Player Mode M Cam Mode M Player Mode page 26 Your DVD Camcorder is equipped with a 2 5 i...

Page 37: ...die Lithiumbatterie zu schwach oder leer ist Stellen Sie Datum und Uhrzeit ein bevor Sie die Funktion Datum Uhrzeit verwenden Seite 30 Initial Setting Display Menu Setting Displaying the Date Time Date Time The Date Time function works in Camera Mode Player Mode M Cam Mode M Player Mode page 26 The date and time are automatically recorded on a special data area of the disc 1 Set the Mode switch to...

Page 38: ...igt Seiten 84 87 7 Um das Menü zu verlassen drücken Sie die Taste MENU Hinweis Wenn die Funktion TV Anzeige auf Aus eingestellt ist werden die Bildschirmanzeigen auch nicht auf dem Fernseher angezeigt 4 Move OK Select MENU Exit Camera Mode Display LCD Bright LCD Colour Date Time TV Display Off On Move OK Select MENU Exit Off On Camera Mode Display LCD Bright LCD Colour Date Time TV Display 6 Vorei...

Page 39: ...chalten der Funktion LCD Optimierung drücken Sie erneut die Taste LCD ENHANCER Hinweis Die LCD Optimierung hat keine Auswirkung auf die Qualität des aufgenommenen Bildes DVD Camcorder Before Recording Using the Viewfinder You can view pictures through the viewfinder to avoid running down the battery or to see correct images when the picture on the LCD Screen is poor In the Camera or Player mode the ...

Page 40: ...lay und DVD Camcorder verbindet DVD Camcorder Before Recording Various Recording Techniques In some situations different recording techniques may be required for more dramatic results 1 General recording 2 Downward recording Making a recording with a top view of the LCD Screen 3 Upward recording Making a recording viewing the LCD Screen from below 4 Self recording Making a recording viewing the LC...

Page 41: ...en the disc cover while loading Set the Mode switch to DISC VP DC173 i DC175WB DC175W i DC575WB DC575Wi only and the Power switch to Camera to view menus and messages displayed on the LCD Screen page 28 Inserting a Disc 1 Push the OPEN switch in the direction of the arrow The disc cover will partially open 2 Gently open the cover the rest of the way by hand 3 Push the disc into the disc compartmen...

Page 42: ...ücken Sie gleichzeitig auf den Diskhalter in der Mitte 4 Drücken Sie vorsichtig auf die mit PUSH CLOSE gekennzeichnete Stelle auf der Klappe des Diskfachs um die Klappe zu schließen Hinweis Die Funktionen Formatieren und Fixieren sind beim Akkuladestand oder nicht verfügbar Siehe S 11 zu Kompatibilitätshinweisen für fixierte Disks DVD Camcorder Before Recording When using a New Disc Formatting a ne...

Page 43: ...ung wird die Bitrate automatisch je nach Aufnahmebedingungen angepasst DVD Camcorder Before Recording Selecting the Record Mode Rec Mode The Record Mode function works in both Camera Mode and Player Mode page 26 This DVD Camcorder can film in the XP extra play the SP standard play and the LP long play modes The SP mode is set as the factory default 1 Set the Mode switch to DISC VP DC173 i DC175WB D...

Page 44: ...derherstellungsmodus Während des Datenwiederherstellungsvorgangs sind alle anderen Funktionen deaktiviert Nach der Datenwiederherstellung schaltet das System in den Modus STBY DVD Camcorder Basic Recording Making your First Recording 1 Connect a power source to the DVD Camcorder pages 21 25 A Battery Pack or a AC Power adapter Insert a disc page 41 2 Remove the Lens Cover 3 Open the LCD Screen Set...

Page 45: ...ktiviert werden Der Modus 16 9 Breit ist im Modus EASY Q nicht verfügbar nur VP DC171 i DC171Bi DC173 i Die Funktionen Digitaler Effekt und Digitaler Zoom sind im Modus Easy Q nicht verfügbar DVD Camcorder Basic Recording Recording with Ease for Beginners EASY Q Mode The EASY Q function works only in Camera Mode page 26 The EASY Q function allows a beginner to easily make good recordings 1 Set the...

Page 46: ...gt 2 T Nahaufnahme Das Motiv erscheint näher 3 W Weitwinkelmodus Das Motiv erscheint weiter entfernt Im Weitwinkelmodus können Sie Motive bis zu einem Abstand von ca 10 mm zum Objektiv aufnehmen DVD Camcorder Basic Recording Zooming In and Out The Zoom function works in both Camera Mode and M Cam Mode page 26 Zooming is a recording technique that lets you change the size of the subject in a scene ...

Page 47: ...blenden ca 4 Sekunden b Fade In Einblenden ca 4 Sekunden DVD Camcorder Basic Recording Using the Fade In and Out FADE The Fade function works only in Camera Mode page 26 You can give your recording a professional look by using special effects such as fade in at the beginning of a sequence or fade out at the end of a sequence To Start Recording 1 Set the Mode switch to DISC VP DC173 i DC175WB DC175...

Page 48: ...inweise Mit der Taste Q MENU können Sie die BLC Funktion direkt aufrufen Seite 27 Die BLC Funktion ist im EASY Q Modus nicht verfügbar DVD Camcorder GrundlegendeAufnahmefunktionen DVD Camcorder Basic Recording Using Back Light Compensation Mode BLC BLC works in both Camera Mode and M Cam Mode page 26 Back lighting exists when the subject is darker than the background The subject is in front of a w...

Page 49: ...g DIS wird die Funktion Colour Nite Lange Belichtungszeit automatisch deaktiviert DVD Camcorder GrundlegendeAufnahmefunktionen Using the Colour Nite Colour Nite function works only in Camera Mode page 26 You can make the subject recorded appear to be in slow motion by controlling the shutter speed or a brighter image in dark places without a compromise in colours Please disable 16 9 Wide mode to u...

Page 50: ...ährend der Aufnahme nicht ein oder ausgeschaltet werden Die Reichweite der LED Leuchte beträgt ca zwei Meter Bei eingeschalteter LED Leuchte kann der Modus 16 9 Breit nicht genutzt werden DVD Camcorder GrundlegendeAufnahmefunktionen Using the LIGHT VP DC175WB DC175W i DC575WB DC575Wi only The LIGHT function works only in Camera Mode page 26 The LIGHT enables you to record a subject in dark places ...

Page 51: ...inweis Die Funktion Rauschunt muss ausgeschaltet sein Off Aus wenn das Mikrofon besonders empfindlich sein soll DVD Camcorder WeiterführendeAufnahmefunktionen Cutting Off Wind Noise Wind Cut The Wind Cut function works only in Camera Mode page 26 Use the Wind Cut when recording in windy places such as the beach or near buildings The Wind Cut function minimizes wind noise or other noise while record...

Page 52: ... Blende und Belichtung verwendet Wenn eine Belichtungszeit von 1 1000 oder kürzer eingestellt wurde darf kein direktes Sonnenlicht in das Objektiv der Kamera fallen DVD Camcorder WeiterführendeAufnahmefunktionen Setting the Shutter Speed Exposure Shutter Exposure The Shutter Speed function works only in Camera Mode page 26 The Shutter Speed refers to to the amount of time it takes the shutter to o...

Page 53: ...tergrund 5 Um das Menü zu verlassen drücken Sie die Taste MF AF Hinweis Im EASY Q Modus steht die manuelle Fokuseinstellung nicht zur Verfügung DVD Camcorder WeiterführendeAufnahmefunktionen Auto Focus Manual Focus The Auto Focus Manual Focus function works in both Camera Mode and M Cam Mode page 26 In most situations it is better to use the automatic focus feature as it enables you to concentrate...

Page 54: ...Aufnahmen von Personen oder Objekten in sehr schneller Bewegung z B Golf oder Tennis DVD Camcorder WeiterführendeAufnahmefunktionen Programmed Automatic Exposure Modes Program AE The Program AE function works only in Camera Mode page 26 The Program AE mode allows you to adjust shutter speeds and apertures to suit different recording conditions They give you creative control over the depth of field ...

Page 55: ...terführendeAufnahmefunktionen Setting the Program AE 1 Set the Mode switch to DISC VP DC173 i DC175WB DC175W i DC575WB DC575Wi only 2 Set the Power switch to Camera 3 Press the MENU button The menu list will appear 4 Move the Joystick up or down to select Camera then press the Joystick 5 Move the Joystick up or down to select Program AE then press the Joystick The available options are listed 6 Mo...

Page 56: ...eigt Wenn der Modus Auto gewählt ist wird kein Symbol angezeigt DVD Camcorder WeiterführendeAufnahmefunktionen Setting the White Balance White Balance The White Balance function works in both Camera Mode and M Cam Mode page 26 The White Balance is a recording function that preserves the unique image colour of the subject in any recording condition You may select the appropriate White Balance mode ...

Page 57: ...abgleich neu ein wenn sich die Lichtverhältnisse ändern Bei normalen Außenaufnahmen erzielen Sie mit der Einstellung Auto in der Regel die besten Ergebnisse DVD Camcorder Advanced Recording Setting the Custom White Balance You can adjust the white balance as you wish based on the recording environment 1 Set the Mode switch to DISC or CARD VP DC173 i DC175WB DC175W i DC575WB DC575Wi only 2 Set the ...

Page 58: ...emalt 10 Modus Pastell2 Der Pastellfarbeneffekt wird nur auf den das Objekt umgebenden Bereich angewandt DVD Camcorder Advanced Recording Applying Digital Effects Digital Effect The Digital Effect function works only in Camera Mode page 26 The Digital Effects enable you to give a creative look to your recording Select the appropriate Digital Effect for the type of picture that you wish to record a...

Page 59: ...ur Verfügung nur VP DC171 i DC171Bi DC173 i DVD Camcorder WeiterführendeAufnahmefunktionen Selecting the Digital Effects 1 Set the Mode switch to DISC VP DC173 i DC175WB DC175W i DC575WB DC575Wi only 2 Set the Power switch to Camera 3 Press the MENU button The menu list will appear 4 Move the Joystick up or down to select Camera then press the Joystick 5 Move the Joystick up or down to select Digi...

Page 60: ... Wenn Sie im Modus 16 9 Breit die Funktionen Colour Nite Digitale Bildstabilisierung EASY Q oder Digitale Effekte aktivieren wird der Breitbildmodus deaktiviert nur VP DC171 i DC171Bi DC173 i DVD Camcorder Advanced Recording Setting the 16 9 Wide mode 16 9 Wide The 16 9 Wide function works only in Camera Mode page 26 Select to record a picture to be played back on a 16 9 Wide TV 16 9 Wide is the d...

Page 61: ...DC171Bi DC173 i Die Funktion DIS im Modus 16 9 Breit kann zu einer schlechteren Bildqualität als im normalen Modus führen nur VP DC171W i DC171WB DC171WH DC172W DC175WB DC175W i DC575WB DC575Wi DVD Camcorder Advanced Recording Setting the Digital Image Stabilizer DIS The DIS function works only in Camera Mode page 26 DIS Digital Image Stabilizer is a function that compensates for any shaking or ha...

Page 62: ...l2 einschalten wird der digitale Zoom deaktiviert Die Einstellungen des digitalen Zoom Modus werden gespeichert Wenn Sie die digitale Bildstabilisierung einschalten wird der digitale Zoom deaktiviert DVD Camcorder Advanced Recording Zooming In and Out with Digital Zoom Digital Zoom The Digital Zoom works only in Camera Mode page 26 Zooming more than 34x VP DC171 i DC171Bi DC171W i DC171WB DC171WH ...

Page 63: ...ylist What is the Thumbnail Index The thumbnail index displays multiple titles scenes that have been recorded A title scene is created between the points where you start and stop a recording Once deleted you cannot recover the title scene again What s a Playlist DVD RW VR mode You can create a playlist on the same disc by gathering your favorite scene from the recorded title scenes You can edit th...

Page 64: ...angezeigt Die Lautstärke kann auf einen Wert zwischen 00 und 19 eingestellt werden Wenn Sie das Display während der Wiedergabe zuklappen wird der Ton nicht mehr über den Lautsprecher ausgegeben DVD Camcorder Playing Title Scenes DVD RW RW R R DL The recorded title scenes are displayed as a thumbnail index multiple images on the LCD Screen You can find the desired scene quickly using this convenient...

Page 65: ... den Joystick ein weiteres Mal nach rechts und halten Sie ihn in dieser Position Szene 1 Szene 2 Szene 3 Abgespielter Abschnitt Bewegen Sie den Joystick ein weiteres Mal nach links und halten Sie ihn in dieser Position Bewegen Sie den Joystick nach rechts und halten Sie ihn in dieser Position Bewegen Sie den Joystick ein weiteres Mal nach rechts und halten Sie ihn in dieser Position Szene 1 Szene ...

Page 66: ...tzen drücken Sie die Taste Hinweise Bei Bildsuchlauf und Zeitlupe wird kein Ton ausgegeben Bei Zeitlupe oder Wiedergabe können sich schnell bewegende Objekte verzerrt dargestellt werden DVD Camcorder Picture Search Forward Reverse Moving the Joystick left right once while a disc is playing back will increase the play speed to approximately X2 and pressing twice plays at approx x16 When the number ...

Page 67: ...ugehörige Einträge werden aus der Wiedergabeliste gelöscht DVD RW nur im VR Modus Hinweis Ein gelöschter Titel kann nicht wiederhergestellt werden DVD Camcorder Deleting a Title Scene Delete DVD RW RW Delete function works only in Player Mode page 26 Individual or all title scenes can be deleted 1 Set the Mode switch to DISC VP DC173 i DC175WB DC175W i DC575WB DC575Wi only 2 Set the Power switch t...

Page 68: ...tick um zurück zum Übersichtsbildschirm mit den Miniaturansichten zu gelangen Hinweise Der gelöschte Teil eines Titels kann nicht wiederhergestellt werden WennSiewährenddesLöschvorgangsdieTaste MENU drücken wird derLöschvorganggestoppt unddasUntermenüwirdgeschlossen DVD Camcorder Deleting a Section of a Title Scene Partial Delete DVD RW VR mode PartialDeletefunctionworksonlyinPlayerMode page26 Ati...

Page 69: ...ine neue Wiedergabeliste wird erstellt Hinweise Es können bis zu 99 Wiedergabelisten erstellt werden Bis zu 999 Szenen können in einer Wiedergabeliste enthalten sein DVD Camcorder Wiedergabeliste Creating a New Playlist New Playlist DVD RW VR mode This function works only in Player Mode page 26 The editing function only works on a DVD RW VR Mode You should format the DVD RW to VR Mode before recor...

Page 70: ...n von der ausgewählten Szene bis zum Ende der Wiedergabeliste wird das Menü Scene Szene geöffnet 7 Stellen Sie mit den Tasten VOL die Lautstärke ein Der Ton wird über den eingebauten Lautsprecher ausgegeben DVD Camcorder Playlist Playing the Playlist DVD RW VR mode This function works only in Player Mode page 26 The playlist scenes are displayed in the form of a thumbnail index on the LCD Screen I...

Page 71: ... Drücken Sie anschließend den Joystick Delete Löschen wird angezeigt 8 Wählen Sie mit dem Joystick Yes Ja aus Drücken Sie anschließend den Joystick Alle ausgewählten Wiedergabelisten werden gelöscht Deleting a Playlist Delete DVD RW VR mode Delete function works only in Player Mode page 26 You can delete undesired playlists The editing function only works on a DVD RW VR Mode You should format the ...

Page 72: ... Drücken Sie anschließend den Joystick Die Meldung Now adding Wird hinzugefügt wird angezeigt Die ausgewählten Szenen werden zur Wiedergabeliste hinzugefügt Neu hinzugefügte Szenen werden am Ende der Wiedergabeliste angezeigt DVD Camcorder Playlist Adding Scenes to Playlist Scene Add DVD RW VR mode This function works only in Player Mode page 26 You can add more scenes in an existing playlist The ...

Page 73: ...chieben wird angezeigt 10 Wählen Sie mit dem Joystick Yes Ja aus Drücken Sie anschließend den Joystick Die Meldung Now moving Verschieben wird angezeigt Sie können Szenen beliebig oft verschieben DVD Camcorder Playlist Changing the Order of Scene Playing within a Playlist Scene Move DVD RW VR mode This function works only in Player Mode page 26 You can change the order of scene playing within a pl...

Page 74: ...ie mit dem Joystick Yes Ja aus Drücken Sie anschließend den Joystick Die Meldung Now deleting Löschvorgang läuft wird angezeigt Die ausgewählten Szenen werden gelöscht DVD Camcorder Playlist Deleting Scenes from Playlist Scene Delete DVD RW VR mode This function works only in Player Mode page 26 You can delete the scenes inside the playlist The editing function only works on a DVD RW VR Mode You s...

Page 75: ...e Szene aus die Sie teilweise löschen möchten und drücken Sie anschließend den Joystick Der Bildschirm Partial Delete Teilw lösch wird angezeigt Fortsetzung DVD Camcorder Playlist Deleting a Section of a Playlist Scene Partial Delete DVD RW VR mode This function works only in Player Mode page 26 A scene inside the playlist can be partially deleted The editing function only works on a DVD RW VR Mod...

Page 76: ...d drücken Sie anschließend auf den Joystick um zurück zum Übersichtsbildschirm mit den Miniaturansichten zu gelangen Hinweis Wenn Sie während des Löschvorgangs die Taste MENU drücken wird der Löschvorgang gestoppt und das Untermenü wird geschlossen DVD Camcorder Playlist 8 Use the Joystick to search the start point of deletion Whenever you press the Joystick right it toggles between forward at spe...

Page 77: ...Disc Manager Diskverwaltung zurückzukehren DVD Camcorder Disc Manager Disc Information Disc Info DVD RW RW R R DL This function works in both Camera Mode and Player Mode page 26 It shows you the disc information as disc name disc type disc format etc 1 Set the Mode switch to DISC VP DC173 i DC175WB DC175W i DC575WB DC575Wi only 2 Set the Power switch to Camera or Player 3 Press the MENU button The...

Page 78: ...ltung DVD Camcorder Disc Manager Editing the Disc Name Disc Info Rename DVD RW RW R R DL This function works in both Camera Mode and Player Mode page 26 You can specify a disc name 1 Set the Mode switch to DISC VP DC173 i DC175WB DC175W i DC575WB DC575Wi only 2 Set the Power switch to Camera or Player 3 Press the MENU button The menu list will appear 4 Move the Joystick up or down to select Disc M...

Page 79: ...eschädigt werden Schließen Sie zum Formatieren der Disk das Netzteil an damit keine Gefahr besteht dass der Camcorder sich während des Formatierens ausschaltet DVD Camcorder Disc Manager Formatting a Disc Disc Format DVD RW RW This function works only in Camera Mode page 26 You can format a recorded disc to be used again By formatting all existing data will be deleted 1 Set the Mode switch to DISC...

Page 80: ...weiter zu beschreiben müssen Sie die Fixierung zuerst aufheben DVD Camcorder Diskverwaltung DVD Camcorder Disc Manager Finalising a Disc Disc Finalise DVD RW R R DL This function works only in Camera Mode page 26 To play the contents of a DVD RW R R DL on other DVD Players Recorders you must finalise the disc When finalising there should be enough power in the batteries If an the AC Power adapter is...

Page 81: ...R Modus aufgenommene DVD RW wiedergeben Fixierte DVD RW Disks im VR Modus können auf einem DVD Rekorder abgespielt werden der mit im VR Modus aufgenommenen DVD RW Disks kompatibel ist Playing Back on a PC with DVD drive The DVD disc can be played on a PC with a DVD running media DVD drive 1 Turn on your PC 2 Insert a finalised disc into the DVD drive of the PC Starts DVD playback application softwa...

Page 82: ...onen kommen DVD Camcorder Diskverwaltung DVD Camcorder Disc Manager Unfinalizing a Disc Disc Unfinalise DVD RW This function works only in Camera Mode page 26 If a DVD RW disc had been finalised in the VR mode or Video mode you can unfinalise the disc for further recording When unfinalizing there should be enough power in the batteries If an AC Power adapter is to be used make sure that the jack is pro...

Page 83: ...ungen von einem externen Gerät auf den Camcorder überspielt werden sollen Um das Menü zu verlassen drücken Sie die Taste MENU DVD Camcorder Anschließen DVD Camcorder Connection Setting theAV In Out VP DC171i DC171Bi DC171Wi DC173i DC175Wi DC575Wi only AV In Out function works only in Player Mode page 26 AV In Out setting enables you to record signals from external sources Also you can send your vi...

Page 84: ...Kabel mit dem AV Anschluss verbinden wird der Ton über die integrierten Lautsprecher des DVD Camcorders ausgegeben Falls Ihr Fernsehgerät nur über einen Mono Audioeingang verfügt verwenden Sie das Audiokabel mit dem weißen Stecker Audio links DVD Camcorder Connection Viewing Recordings on TV The Playback function works only in Player Mode page 26 Playing back on a TV Monitor To play back a disc th...

Page 85: ... 66 Hinweis Falls Ihr Videorekorder nur über einen Mono Audioeingang verfügt verwenden Sie das Audiokabel mit dem weißen Stecker Audio L DVD Camcorder Anschließen DVD Camcorder Connection Connecting to a TV that has no Audio Video Input Jacks You can connect your DVD Camcorder to a TV through a VCR 1 Connect the DVD Camcorder to your VCR with the AV cable The yellow jack Video The white jack Audio...

Page 86: ...e auf Off Aus Seite 38 Wenn der Kopiervorgang abgeschlossen ist Stoppen Sie die Aufnahme am Videorekorder und bewegen Sie anschließend den Joystick am DVD Camcorder nach unten DVD Camcorder Anschließen DVD Camcorder Connection Copying a Disc onto a Tape The copying function works only in Player Mode page 26 Connect your DVD Camcorder to a VCR using the AV jack to dub the recording from a disc onto...

Page 87: ...u Rückkopplungsgeräuschen kommen kann Stellen Sie vor dem Anschließen sicher dass die Lautstärke am externen Gerät heruntergeregelt ist Wird dies vergessen kann es zu Rückkopplungsgeräuschen kommen DVD Camcorder Anschließen DVD Camcorder Connection Using the Voice Plus The Voice Plus function works only in Player mode page 26 This function enables you to narrate over a pre recorded disc via the DV...

Page 88: ...e den Kopiervorgang zu beenden Hinweise Wenn Sie den DVD Camcorder an ein anderes Gerät anschließen sollten Sie ihn über das Netzteil mit Strom versorgen Inhalte mit Kopierschutz z B Macrovision oder unsaubere Fernsehsignale können mit diesem DVD Camcorder nicht aufgenommen werden DVD Camcorder Anschließen DVD Camcorder Connection Recording Copying a TV Programme or Video Tape onto a Disc VP DC171...

Page 89: ...nn geringer sein da die interne Firmware Speicherplatz belegt Digital Still Camera Mode VP DC173 i DC175WB DC175W i DC575WB DC575Wi only Using a Memory Card Usable Memory Card not supplied This DVD Camcorder can use SD memory cards and MMC Multi Media Cards Some cards are not compatible depending on the memory card manufacturer and memory card type The Memory Card stores and manages Photo Moving i...

Page 90: ...EG Format Joint Photographic Experts Group komprimiert Die Bildgröße beträgt 800 600 oder 1152 864 nur VP DC575WB DC575Wi Seite 92 Videoclips Videoclips werden im MPEG4 Format Moving Picture Experts Group komprimiert Die Bildgröße beträgt 720 576 Pixel Digital Still Camera Mode VP DC173 i DC175WB DC175W i DC575WB DC575Wi only Notes Do not apply excessive force when you insert eject the Memory Card...

Page 91: ...r unter normalen Aufnahmebedingungen Auf der Speicherkarte können bis zu 20 000 Foto Dateien JPEG gespeichert werden nur VP DC575WB DC575Wi Selecting the Photo Quality Photo Quality Photo Quality function works in both Player Mode and M Cam Mode page 26 You can select the quality of a photo image to be recorded Select the Photo Quality 1 Set the Mode switch to DISC or CARD 2 If the Mode switch is ...

Page 92: ...nger aufgelöste Bilder Je höher die Auflösung desto weniger Bilder können gespeichert werden Setting the Photo Size Photo Size VP DC575WB DC575Wi only Photo Size function works only in M Cam Mode page 26 You can select the size of a photo image to be recorded 1 Set the Mode switch to CARD 2 Set the Power switch to Camera 3 Press the MENU button The menu list will appear 4 Move the Joystick up or do...

Page 93: ...ine andere Nummer zugewiesen so dass doppelte Dateinamen vermieden werden Dies ist vor allem dann nützlich wenn Sie die Dateien auf einem PC verwalten Digital Still Camera Mode VP DC173 i DC175WB DC175W i DC575WB DC575Wi only Setting the File Number File No File Number setting works only in M Cam Mode page 26 File Numbers are given to images in the order they were recorded when they are stored on ...

Page 94: ...tos werden auf der Speicherkarte im Format 800 600 oder 1152 864 nur VP DC575WB DC575Wi gespeichert DieAnzahl von Einzelbildern die gespeichert werden können hängt von der Bildqualität ab Digital Still Camera Mode VP DC173 i DC175WB DC175W i DC575WB DC575Wi only Taking a Photo Image JPEG on a Memory Card You may take photo images while in M Cam Mode and store the images on the Memory Card page 26 ...

Page 95: ... Um die Diashow zu beenden drücken Sie erneut die Taste S SHOW Hinweise Die jeweilige Ladezeit hängt von der Bildgröße ab Bilder mit besonders hoher Auflösung die von anderen Geräten aufgezeichnet wurden werden nur in der Miniaturansicht angezeigt Digital Still Camera Mode VP DC173 i DC175WB DC175W i DC575WB DC575Wi only Viewing Photo Images JPEG This function works only in M Player Mode page 26 Yo...

Page 96: ...em Symbol versehen Wenn der Schreibschutz der Speicherkarte aktiviert ist LOCK können Sie die Löschschutzeinstellungen nicht verändern Digital Still Camera Mode VP DC173 i DC175WB DC175W i DC575WB DC575Wi only Protection from accidental Erasure Protect The Protect function works only in M Player Mode page 26 You can protect important images from accidental erasure If you execute format all images ...

Page 97: ...Löschen zu verhindern Seite 96 Geschützte Bilder können nicht gelöscht werden Digitalkamera Modus nurVP DC173 i DC175WB DC175W i DC575WB DC575Wi Deleting Photo Images and Moving Images Delete The Delete function works only in M Player Mode page 26 You can erase the photo images and moving images recorded on the Memory Card If you want to delete protected images you must first deactivate the image p...

Page 98: ...e Speicherkarte auch formatieren Sichern Sie dazu zunächst alle noch benötigten Dateien auf einem anderen Speichermedium Seite 99 Digital Still Camera Mode VP DC173 i DC175WB DC175W i DC575WB DC575Wi only Deleting All Images at Once Steps from 1 to 5 are the same as described in p 97 6 Move the Joystick up or down to select Delete All then press the Joystick The message Delete all is displayed 7 M...

Page 99: ...cht auf einem Computer Not formatted Nicht formatiert wird unter Umständen angezeigt wenn die eingelegte Speicherkarte auf einem Computer formatiert wurde Digital Still Camera Mode VP DC173 i DC175WB DC175W i DC575WB DC575Wi only Formatting the Memory Card Format The Format function works only in M Player Mode page 26 You can use the Format functions to completely delete all images and options on ...

Page 100: ...rf diese nicht entfernt werden da sonst Daten auf der Karte oder die Karte selbst beschädigt werden können Wenn Sie das Gerät ausschalten während auf die Speicherkarte zugegriffen wird können auf der Speicherkarte gespeicherte Daten beschädigt werden Digital Still Camera Mode VP DC173 i DC175WB DC175W i DC575WB DC575Wi only Recording Moving Images MPEG on a Memory Card You can record moving images...

Page 101: ...re Sprachversionen des Microsoft Windows Media Player können bei Microsoft unter http www microsoft com windows windowsmedia download default asp heruntergeladen werden Videoclips auf der Speicherkarte können nicht auf einem Macintosh Computer wiedergegeben werden Digital Still Camera Mode VP DC173 i DC175WB DC175W i DC575WB DC575Wi only Playing the Moving Images MPEG on a Memory Card The moving i...

Page 102: ...die von der DVD auf die Speicherkarte kopiert werden werden im Format 640 480 gespeichert Die Anzahl von Bildern die gespeichert werden können hängt von der Bildqualität ab Digital Still Camera Mode VP DC173 i DC175WB DC175W i DC575WB DC575Wi only Recording Still images onto a Memory Card during DVD playback DVD RW RW R R DL This function works only in Player Mode page 26 If you press the PHOTO bu...

Page 103: ...die gewünschte Anzahl von Kopien und drücken anschließend den Joystick 9 Um das Menü zu verlassen drücken Sie die Taste MENU Das Symbol für die Druckmarkierung und die Kopienanzahl werden angezeigt Digital Still Camera Mode VP DC173 i DC175WB DC175W i DC575WB DC575Wi only Marking Images for Printing Print Mark The Print Mark function works only in M Player Mode page 26 This DVD Camcorder supports ...

Page 104: ... Ausführen der Option Alle Dateien einige Zeit in Anspruch nehmen Drucker mit DPOF Unterstützung sind im Handel erhältlich Verwenden Sie das im Lieferumfang des DVD Camcorders enthaltene USB Kabel Digital Still Camera Mode VP DC173 i DC175WB DC175W i DC575WB DC575Wi only Removing the Print Mark To remove all Print Marks select All Off To remove an individual file s Print Mark select the file and set...

Page 105: ...tick Sie können auch den Joystick nach rechts oder links bewegen wenn der Pfeil zum Seitenwechsel hervorgehoben ist PictBridge VP DC173 i DC175WB DC175W i DC575WB DC575Wionly Printing Your Pictures Using PictBridge PictBridge function works only in M Player Mode page 26 By connecting the DVD Camcorder to printers with PictBridge support sold separately you can send images from the Memory Card dire...

Page 106: ... können Sie verschiedene Druckoptionen einstellen Weitere Informationen hierzu finden Sie in der Bedienungsanleitung des Druckers Die Option zum Einblenden von Date Time Datum Uhrzeit erlaubt dieAnzeige der Aufnahmezeit 24 Stunden Format PictBridge VP DC173 i DC175WB DC175W i DC575WB DC575Wionly Setting the Number of Prints 1 Move the Joystick up or down to select Copies then press the Joystick 2 M...

Page 107: ...peed Unter Windows VISTA 64 Bit sowie den Betriebssystemen von Macintosh wird die USB Schnittstelle nicht unterstützt Die genannten Systemanforderungen sind Empfehlungen Jedoch kann der fehlerfreie Betrieb auch auf einem System das den Anforderungen entspricht nicht gewährleistet werden USBInterface VP DC173 i DC175WB DC175W i DC575WB DC575Wionly Using USB Interface Transferring a Digital Image th...

Page 108: ...tig noch andere Geräte über USB angeschlossen sind können Konflikte und in der Folge Funktionsprobleme auftreten In diesem Fall trennen Sie alle anderen Geräte vom PC und starten die Datenübertragung zwischen Camcorder und PC neu USBInterface VP DC173 i DC175WB DC175W i DC575WB DC575Wionly Notes On a slower PC than recommended movie playback may not be smooth or video editing may take a long time O...

Page 109: ...ion PictBridge zu verwenden Seite 105 7 Um das Menü zu verlassen drücken Sie die Taste MENU USBInterface VP DC173 i DC175WB DC175W i DC575WB DC575Wionly Selecting the USB Device USB Connect The USB Connect function works only in M Player Mode page 26 Using the USB cable you can connect your DVD Camcorder to a computer to copy your moving images and photo images from the Memory Card or to a printer...

Page 110: ...corder mit dem Computer über ein USB Kabel verbunden haben stehen Ihnen folgende Möglichkeiten zur Verfügung Videoaufnahmen und Fotos auf dem PC ansehen DV Driver DirectX9 0 Video Codec PC Kamera USB Streaming DV Driver DirectX9 0 Video Codec Fotos bearbeiten Photo Express USBInterface VP DC173 i DC175WB DC175W i DC575WB DC575Wionly Installing DV Media PRO Program Before your start Turn on your PC...

Page 111: ...gefunden oder etwas ähnliches angezeigt wird ignorieren Sie die Meldung und setzen Sie die Installation fort Wenn während der Installation eine Microsoft LOGO Testwarnung angezeigt wird klicken Sie auf Continue C um fortzufahren USBInterface VP DC173 i DC175WB DC175W i DC575WB DC575Wionly Application Installation Photo Express 1 Click Photo Express on the Setup screen It is a photo editing tool th...

Page 112: ...dnungsgemäß Trennen Sie in diesem Fall alle anderen USB Geräte vom PC und schließen Sie den DVD Camcorder erneut an Wählen Sie für den Menüpunkt USB Verbind die Einstellung Computer aus Seite 109 USBInterface VP DC173 i DC175WB DC175W i DC575WB DC575Wionly Connecting to a PC 1 Connect a USB cable to the USB jack on the PC 2 Connect the other end of the USB cable into the USB jack on the DVD Camcor...

Page 113: ...ähler auf Camera 3 Verbinden Sie ein Ende des USB Kabels mit dem USB Anschluss des DVD Camcorders und das andere Ende mit dem USB Anschluss des Computers USBInterface VP DC173 i DC175WB DC175W i DC575WB DC575Wionly Using the PC Camera Function This function works only in Camera Mode page 26 To use the PC Camera function the DV Driver Video Codec and DirectX 9 0 programs must be installed in the PC...

Page 114: ... Anschluss des DVD Camcorders das andere Ende mit dem USB Anschluss des Computers 3 Öffnen Sie Windows Explorer und überprüfen Sie ob der Wechseldatenträger angezeigt wird USBInterface VP DC173 i DC175WB DC175W i DC575WB DC575Wionly Using the USB Streaming Function This function works in both Camera Mode and Player Mode page 26 To use USB streaming the DV Driver Video Codec and DirectX 9 0 program...

Page 115: ...Taiwan USA usw Hinweis Sie können mit Ihrem Camcorder in jedem Land Aufnahmen erstellen und auf dem Display wiedergeben Maintenance Using Your DVD Camcorder Abroad Each country or region has its own electric and colour systems Before using your DVD Camcorder abroad check the following items Power sources You can use your DVD Camcorder in any country or area with the supplied AC Power adapter withi...

Page 116: ...während die Datenwiederherstellung läuft Die Disk könnte dadurch beschädigt werden Die Datenwiederherstellung kann durch zu frühes Ausschalten des Geräts fehlschlagen Falls sich auf der Disk Aufnahmen befinden die mit einem anderen DVD Camcorder oder Rekorder gemacht wurden können diese Daten unter Umständen nicht wiederhergestellt werden Troubleshooting Troubleshooting Before contacting a Samsung ...

Page 117: ...tzlich in einer sehr warmen Umgebung verwendet wird kann Kondensation entstehen 1 Wenn im Winter bei kaltem Wetter Außenaufnahmen gemacht werden und das Gerät direkt im Anschluss drinnen verwendet wird 2 Wenn bei heißem Wetter Außenaufnahmen gemacht werden nachdem das Gerät in Gebäuden oder in einem Fahrzeug mit Klimaanlage benutzt oder gelagert wurde Troubleshooting Self Diagnosis Display in M Ca...

Page 118: ...ld im Sucher ist unscharf Der Sucher ist falsch eingestellt Verschieben Sie den Fokusregler am Sucher bis die Anzeige im Sucher scharf ist Troubleshooting If these instructions do not solve your problem contact your nearest Samsung authorized service certre Symptom Explanation Solution You cannot switch the DVD Camcorder on Check the Battery Pack or the AC Power adapter Replace it with a fully cha...

Page 119: ...ildschirm ist ausgeschaltet Setzen Sie den DVD Camcorder keinen starken Magnetfeldern aus Halten Sie den DVD Camcorder von magnetischem Material fern Wenn magnetisches Material in die Nähe der linken Seite des DVD Camcorders gelangt kann dies das Ausschalten des LCD Bildschirms bewirken Dies ist keine Fehlfunktion Troubleshooting Symptom Explanation Solution Auto focus does not work Check the Manu...

Page 120: ...Sie ob die Disk ordnungsgemäß eingelegt ist Wenden Sie sich an den Kundendienst wenn die Abdeckung nicht schließt Samsung Hotline für allgemeine Infos Tel 0180 5 12 12 13 EUR 0 14 Min aus Festnetz DTAG Fax 0180 5 12 12 14 Troubleshooting Symptom Explanation Solution Playback screen interrupted unexpectedly Check the Power supply Battery Pack or AC Power Adapter is properly connected and stable Can...

Page 121: ... Colour LCD Farbe Farbe des Displays einstellen 36 Date Time Datum Uhrzeit Datums und Uhrzeitanzeige einstellen 37 TV Display TV Anzeige Ausgabe der Bildschirmanzeigen OSD auf dem Fernsehgerät ein ausschalten 38 nur VP DC171i DC171Bi DC171Wi DC173i DC175Wi DC575Wi nur VP DC173 i DC175WB DC175W i DC575WB DC575Wi nur VP DC575WB DC575Wi Troubleshooting Setting menu items Main Menu Sub Menu Functions ...

Page 122: ...Warenzeichen von Dolby Laboratories Weitere vorstehend nicht genannte Produktnamen sind möglicherweise Marken oder eingetragene Marken Ihrer jeweiligen Inhaber Troubleshooting Main Menu Sub Menu Functions Available Mode Page Camera Mode Player Mode M Cam Mode M Player Mode System Clock Set Setting the date time 30 Remote Using the remote control 31 Beep Sound Setting the Beep sound 32 Shutter Soun...

Page 123: ...k gespeicherten Daten gelöscht und die Speicherkapazität wiederhergestellt so dass die Disk wiederverwendet werden kann O möglich X nicht möglich nicht erforderlich Sonstige Informationen Miscellaneous Information Disc Type Description DVD R 3 1 2inch 8cm DVD R DL 3 1 2inch 8cm DVD RW 3 1 2inch 8cm DVD RW 3 1 2inch 8cm Mode VR Video Recording Video Capacity 1 4G 2 6G 1 4G 1 4G 1 4G Formatting a ne...

Page 124: ... technischen Daten und des Designs vorbehalten Specifications Model Name VP DC171 i DC171Bi DC171W i DC171WB DC171WH DC172W DC173 i DC175WB DC175W i DC575WB DC575Wi System Video signal PAL Picture Compression format MPEG 2 Audio Compression format DOLBY DIGITAL STEREO CREATOR Recording Quality XP about 9Mbps SP about 6Mbps LP about 3Mbps Image device VP DC171 i DC171Bi DC171W i DC171WB DC171WH DC17...

Page 125: ...nü 27 R Reinigung 7 Remote Fernbedienung 31 Remote control Fernbedienung 18 S Shutter sound Verschlussgeräusch 33 Speicherkarte 89 Sprache der Bildschirmanzeigen 34 Stromversorgung 25 Suchermonitor 39 T TV Display TV Anzeige 38 U Unfinalise Finalisierung aufheben 82 USB Schnittstelle 107 114 V Videoclip 100 Voice Plus Nachverton 87 W White Balance Weißabgleich 56 Wind Cut Rauschunterdrückung 51 Z Z...

Page 126: ...rieben werden für das es ursprünglich entwickelt und produziert wurde müssen eventuell Veränderungen am Gerät vorgenommen werden um es an die technischen und oder sicherheitstechnischen Normen dieses anderen Landes anzupassen Solche Veränderungen sind nicht auf Material oder Verarbeitungsfehler des Gerätes zurückzuführen und werden von dieser Garantie nicht abgedeckt Die Kosten für solche Veränder...

Page 127: ...rheitstechnischen Normen dieses anderen Landes anzupassen Solche Veränderungen sind nicht auf Material oder Verarbeitungsfehler des Gerätes zurückzuführen und werden von dieser Garantie nicht abgedeckt Die Kosten für solche Veränderungen sowie für dadurch am Gerät entstandene Schäden werden nicht erstattet 5 Ausgenommen von der Garantieleistung sind a Regelmäßige Inspektionen Wartung und Reparatur...

Page 128: ...ieses anderen Landes anzupassen Solche Veränderungen sind nicht auf Material oder Verarbeitungsfehler des Gerätes zurückzuführen und werden von dieser Garantie nicht abgedeckt Die Kosten für solche Veränderungen sowie für dadurch am Gerät entstandene Schäden werden nicht erstattet 5 Ausgenommen von der Garantieleistung sind a Regelmäßige Inspektionen Wartung und Reparatur oder Austausch von Teilen...

Page 129: ... Min www samsung com fr GERMANY 01805 121213 0 14 Min www samsung de HUNGARY 06 80 SAMSUNG 7267864 www samsung com hu ITALIA 800 SAMSUNG 7267864 www samsung com it LUXEMBURG 0032 0 2 201 24 18 www samsung lu NETHERLANDS 0900 20 200 88 0 10 Min www samsung com nl NORWAY 231 627 22 www samsung com no POLAND 0 801 801 881 www samsung com pl PORTUGAL 80 8 200 128 www samsung com pt SLOVAKIA 0800 SAMSU...

Page 130: ...in electrical and electronic equipment Wir verwenden keinen der sechs schädlichen Stoffe Cadmium Cd Blei Pb Quecksilber Hg sechswertiges Chrom CR 6 polybromierten Diphenylether PBDE und polybromiertes Diphenyl PBB in unseren Produkten DIESER DVD CAMCORDER WURDE HERGESTELLT VON THIS DVD CAMCORDER IS MANUFACTURED BY RoHS compliant Our product complies with The Restriction Of the use of certain Hazar...

Reviews: