background image

10

English

Connections

Connecting to an Audio Device

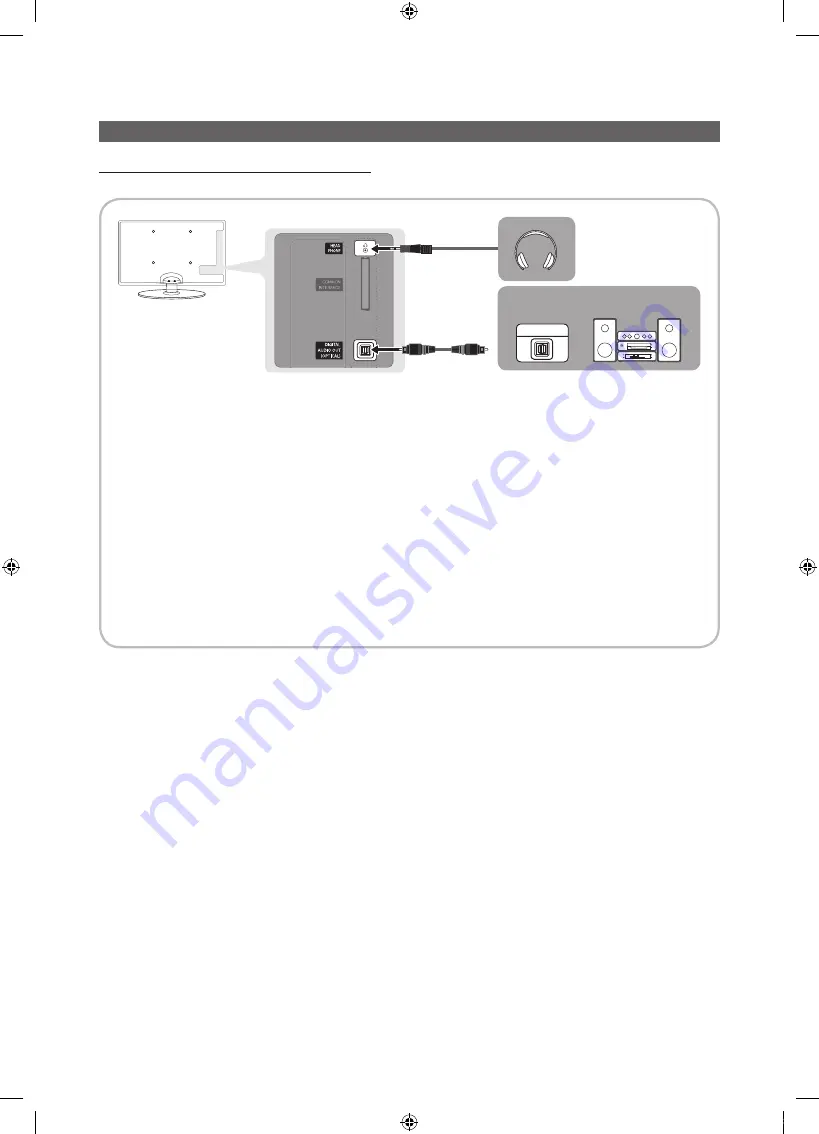
Using an Optical (Digital) or Headphone Connection

Available devices: Digital Audio System, Amplifier, Home Theatre


DIGITAL AUDIO OUT (OPTICAL)


x

When a Digital Audio System is connected to the 

DIGITAL AUDIO OUT (OPTICAL)

 jack, decrease the volume 

of both the TV and the system. 


x

5.1 CH (channel) audio is available when the TV is connected to an external device supporting 5.1 CH.


x

When the receiver (amplifier or DVD home theatre) is set to on, you can hear sound output from the TV’s 
optical jack. When the TV is receiving a DTV signal, the TV will send 5.1 CH sound to the amplifier or DVD 
home theatre. When the source is a digital component such as a DVD / Blu-ray player / cable box / STB 
(Set-Top-Box) satellite receiver and is connected to the TV via HDMI, only 2 CH audio will be heard from the 
amplifier or DVD home theatre. If you want to hear 5.1 CH audio, connect the digital audio out jack from your 
DVD / Blu-ray player / cable box / STB satellite receiver directly to an amplifier or home theatre.


HEADPHONE


H

: You can connect your headphones to the headphones output on your set. While the 

headphones are connected, the sound from the built-in speakers will be disabled.


x

Sound function may be restricted when  connecting headphones to the TV.


x

Headphone volume and TV volume are adjusted separately.

OPTICAL

digital audio system

[UC4000_32]BN68-02722E-XU.indb   10

2010-03-04   오전 3:34:15

Summary of Contents for UE32C4000PW

Page 1: ...w samsung com ie U K 0845 SAMSUNG 7267864 www samsung com uk 2010 Samsung Electronics Co Ltd All rights reserved BN68 02722E 00 LED TV user manual imagine the possibilities Thank you for purchasing th...

Page 2: ...hich will affect image quality To reduce risk of this effect please follow below recommendations Avoid displaying the same TV channel for long periods Always try do display any image on full screen us...

Page 3: ...nu 18 Sound Menu 20 Setup Menu 22 Support Menu Advanced Features 24 24 Connecting to a PC 25 Media Play 31 Anynet Other Information 35 35 Analogue Channel Teletext Feature 36 Assembling the Cables 37...

Page 4: ...uick Setup Guide y y Cleaning Cloth y y Power Cord y y Blanking Bracket Screw X1 y y Holder Ring 4EA y y Holder Wire stand y y Power Cord Clamp y y Cable Tie y y Holder Wire 3EA y y Component Adapter...

Page 5: ...OSD use the Y buttons as you would use the and buttons on the remote control z Changes the channels In the OSD use the z buttons as you would use the and buttons on the remote control Power Indicator...

Page 6: ...annels Displays channel lists on the screen p 14 Displays the EPG Electronic Programme Guide p 12 Displays information on the TV screen Exits the menu Have direct access to channels Adjusts the volume...

Page 7: ...the ENTERE button Select the appropriate country If the desired country does not exist on the menu select Others 4 Selecting an antenna Press the or button then press the ENTERE button Select Air or...

Page 8: ...ce such as a DVD Blu ray player cable box STB satellite receiver supporting HDMI versions older than 1 3 is connected the TV may operate abnormally e g no screen display no sound annoying flicker abno...

Page 9: ...best picture quality the Component connection is recommended over the A V connection If the size of the cable mold part was an abnormal shape the part may not be connected to the input port properly Y...

Page 10: ...to the amplifier or DVD home theatre When the source is a digital component such as a DVD Blu ray player cable box STB Set Top Box satellite receiver and is connected to the TV via HDMI only 2 CH aud...

Page 11: ...ng information containing a telephone number the CI or CI CARD ID the Host ID and other information will be displayed in about 2 3 minutes If an error message is displayed please contact your service...

Page 12: ...The adjustment in the OSD may differ depending on the selected menu 6 ENTER E Press ENTERE to complete the configuration 7 EXIT e Press EXIT Using the INFO button Now Next guide The display identifie...

Page 13: ...the same time The c mark appears to the left of the selected channels x x Blue Sort Change the list ordered by channel name or channel number x x k Page Move to next or previous page x x T Tools Displ...

Page 14: ...annel source to memorise When selecting Cable Digital Analogue or Digital Provide a value to scan for cable channels Search Mode Full Network Quick Scans for all channels with active broadcast station...

Page 15: ...and viewed NOTE x x This function is available only when the Child Lock is set to On x x The PIN input screen appears Enter your 4 digit PIN the default of which is 0 0 0 0 Change the PIN using the C...

Page 16: ...C is in power saving mode Changing the Picture Options Advanced Settings available in Standard Movie mode You can adjust the detailed setting for the screen including colour and contrast In PC mode yo...

Page 17: ...080p mode Adjusts the Position or Size by using button x x If you use the Screen Fit function with HDMI 720p input 1 line will be cut at the top bottom left and right as in the overscan function Scree...

Page 18: ...x will appear 4 Navigate to the Settings tab on the display dialog box y y The correct size setting resolution Optimum 1920 X 1080 pixels y y If a vertical frequency option exists on your display sett...

Page 19: ...Speaker x x TV Speaker Off External Speaker On When Speaker Select is set to TV Speaker x x TV Speaker On External Speaker On If there is no video signal both speakers will be mute Additional Setting...

Page 20: ...er t Automatically shuts off the TV after a preset period of time 30 60 90 120 150 and 180 minutes To cancel Sleep Timer select Off Setting the On Off Timer Timer 1 Timer 2 Timer 3 Three different on...

Page 21: ...ondary Subtitle Language Primary Teletext Language Secondary Teletext Language Select a language which will be the default language when a channel is selected Subtitle Use this menu to set the Subtitl...

Page 22: ...video source simultaneously PIP Picture in Picture does not function in the same mode NOTE x x For PIP sound refer to the Sound Select instructions x x If you turn the TV off while watching in PIP mo...

Page 23: ...ll be automatically searched and downloaded The time required to download the software is determined by the signal status Standby Mode Upgrade A manual upgrade will be automatically performed at selec...

Page 24: ...0 x 600 800 x 600 800 x 600 1024 x 768 1024 x 768 1024 x 768 1280 x 720 1360 x 768 31 469 37 500 37 861 37 879 46 875 48 077 48 363 56 476 60 023 45 000 47 712 59 940 75 000 72 809 60 317 75 000 72 18...

Page 25: ...ded from a non free site cannot be played Digital Rights Management DRM is a technology that supports the creation of content the distribution and management of the content in an integrated and compre...

Page 26: ...VD sub or txt string based Jan 10 2010 Jan 10 2010 Jan 10 2010 Jan 10 2010 Jan 10 2010 Jan 10 2010 Jan 10 2010 Jan 10 2010 Jan 10 2010 Jan 10 2010 Movie 01 avi 1 1 Movie 01 avi SUM Movie 03 avi Movie...

Page 27: ...920x1080 24 25 30 30 AC3 MPEG LPCM AAC MPEG2 1920x1080 24 25 30 30 H 264 1920x1080 6 30 25 ts tp trp TS MPEG2 1920x1080 24 25 30 30 AC3 AAC MP3 DD HE AAC H 264 1920x1080 6 30 25 VC1 1920x1080 6 30 25...

Page 28: ...e If the sound is strange when playing MP3 files adjust the Equalizer in the Sound menu An over modulated MP3 file may cause a sound problem Photos Viewing a Photo or Slide Show 1 Press the or button...

Page 29: ...older Title It sorts and displays the file title in Symbol Number Alphabet Special order Preference It sorts and displays the file by preference You can change the file preference in the file list sec...

Page 30: ...w Zoom You can zoom into images in full screen mode Rotate You can rotate images in full screen mode Information You can see detailed information about the played file Settings Using the Setup Menu Co...

Page 31: ...TV and the Digital Audio Input on the Home Theatre x x When following the connection above the Optical jack only outputs 2 channel audio You will only hear sound from the Home Theatre s Front Left and...

Page 32: ...g Up Anynet Setup Anynet HDMI CEC Off On To use the Anynet Function Anynet HDMI CEC must be set to On When the Anynet HDMI CEC function is disabled all the Anynet related operations are deactivated Au...

Page 33: ...ening through a Receiver You can listen to sound through a receiver i e Home Theatre instead of the TV Speaker 1 Select Receiver and set to On 2 Press the EXIT button to exit If your receiver supports...

Page 34: ...he TV remote control and select a device other than Anynet devices Press P and PRE CH to change the TV mode Note that the channel button operates only when a tuner embedded Anynet device is not connec...

Page 35: ...cs on a Teletext page are colour coded and can be selected by pressing the coloured buttons Press the colour corresponding to the topic of your choice A new colour coded page is displayed Items can be...

Page 36: ...les in the Cable Tie so that the cables are not visible through the transparent stand 1 2 3 1 2 3 Wall Mount Type Do not pull the cables too hard when arranging them This may cause damage to the produ...

Page 37: ...ng the Wall Mount Kit The wall mount kit sold separately allows you to mount the TV on the wall For detailed information on installing the wall mount see the instructions provided with the wall mount...

Page 38: ...w the product installation instructions x x Do not mount the TV at more than a 15 degree tilt Product Family inches VESA Spec A B Standard Screw Quantity LED TV Ultra Slim 19 22 75 X 75 M4 4 23 29 200...

Page 39: ...tionally 2 Remove the screws from the back centre of the TV put the screws into the clamps and then fasten the screws onto the TV again Screws may not be supplied with the product In this case please...

Page 40: ...p 16 Adjust Energy Saving option in the TV menu go to MENU Picture Eco Solution Energy Saving p 16 Try resetting the picture to view the default picture settings go to MENU Picture Picture Reset p 18...

Page 41: ...can cause picture distortion This is not a TV issue PC Connection A Mode Not Supported message appears Set your PC s output resolution and frequency so they matche the resolutions supported by the TV...

Page 42: ...ween the rubber cushion pads on the base stand and the top finish of some furniture To prevent this use felt pads on any surface of the TV that comes in direct contact with furniture This TFT LED pane...

Page 43: ...headset USB cable should not be disposed of with other household waste at the end of their working life To prevent possible harm to the environment or human health from uncontrolled waste disposal pl...

Page 44: ...atre 10 I Installation Space 2 L Language 21 Licence 42 Lock 15 M Media Play 25 Melody 22 Menu Transparency 22 Music 28 N Navigate 12 Now Next guide 12 O Optimal resolution 24 P Photos 28 Picture Size...

Page 45: ...nd adaptors and the point where they exit from the appliance y y To protect this apparatus from a lightning storm or when it is left unattended and unused for long periods of time unplug it from the w...

Page 46: ...ed Kingdom This Samsung product is warranted for a period of twelve 12 months from the original date of purchase against defective materials and workmanship In the event that warranty service is requi...

Page 47: ...This page is intentionally left blank UC4000_32 BN68 02722E XU indb 47 2010 03 04 3 34 45...

Reviews: