background image

4-12 

4. Troubleshooting

4-6-2. Service Function Specifications

Checking the Code Version


„

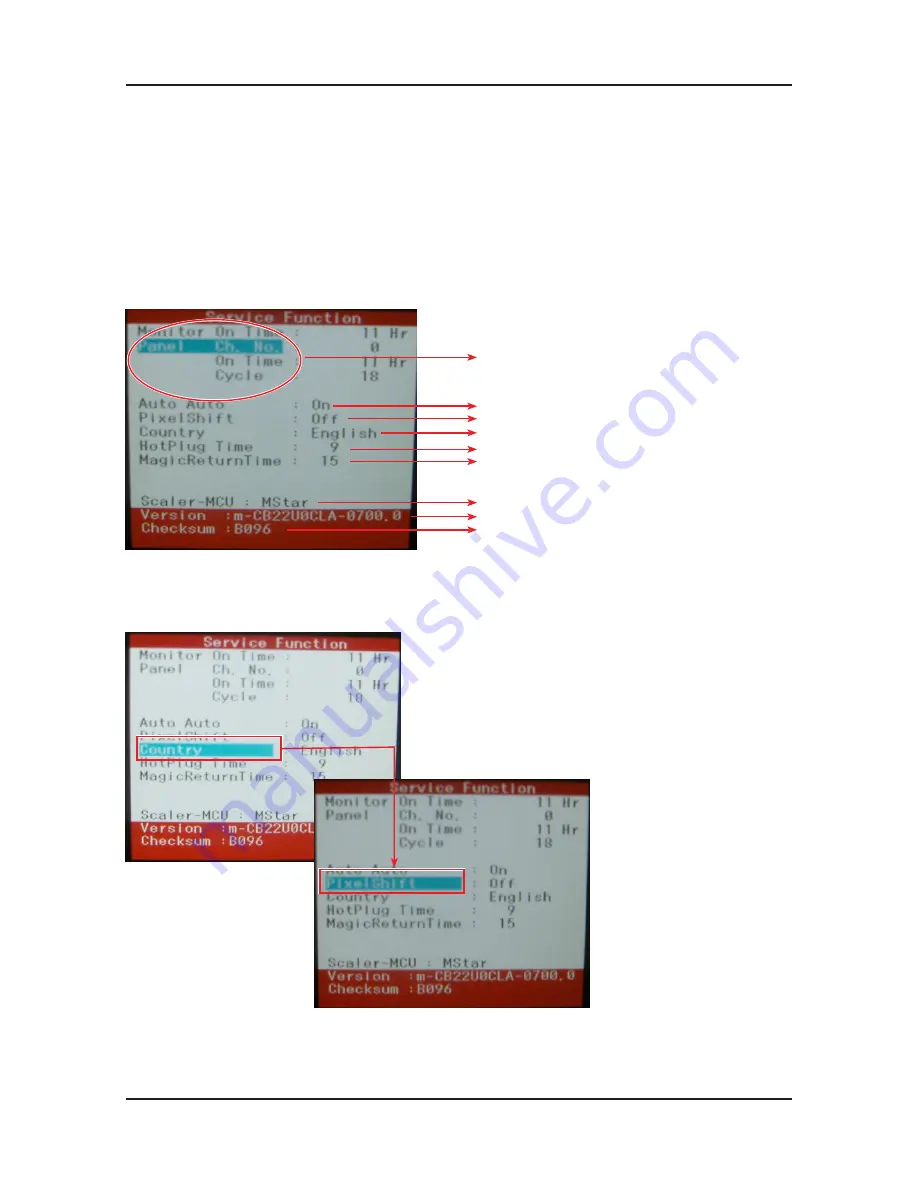
1. Check the MCU code version and checksum after entering SVC Mode.
2.  Entering SVC Mode


- Adjust the Brightness and Contrast values to 0.


- Hold down the Enter button for five (5) seconds.


- The SVC Function OSD is displayed.


- To exit the SVC Function, turn the power off.

3.  Safe Mode


-  When the input signal is higher than the supported frequency of the product, safe mode gives users some time (one 

minute) to change the video card settings to the Recommended Mode settings.

Service Mode (Moving around)


„

1. Press the + button to move to other items.

Panel information

Micom version

Micom checksum

Select the Auto option
Select the PixelShift option.
Country

Select HotPlug 
Select MagicReturn Time when 

MagicReturn is on 

Scaler Vender

Summary of Contents for SyncMaster EX2220

Page 1: ...Manual TFT LCD Monitor Contens EX2220 EX2220X Refer to the service manual in the GSPN see the rear cover for the more information 1 Precautions 2 Product specifications 3 Disassembly and Reassemble 4 Troubleshooting 5 Exploded View Part List 6 Wiring Diagram ...

Page 2: ... Models 2 4 2 3 Accessories 2 6 3 Disassembly and Assembly 3 1 Disassembly 3 1 4 Troubleshooting 4 1 Troubleshooting 4 1 4 2 When the Power Does Not Turn On 4 2 4 3 When the screen is blank 4 4 4 4 Error Examples and Actions 4 8 4 5 Adjustment 4 9 5 Exploded View Part List 5 1 Exploded View 5 1 5 2 Parts List 5 3 6 Wiring Diagram 6 1 Wiring Diagram Main Board 6 1 6 2 Wiring Diagram IP Board 6 4 6 ...

Page 3: ...urope samsungportal com China http china samsungportal com Asia http asia samsungportal com Mideast Africa http mea samsungportal com This Service Manual is a property of Samsung Electronics Co Ltd Any unauthorized use of Manual can be punished under applicable International and or domestic law 2010 Samsung Electronics Co Ltd All rights reserved Printed in Korea P N BN82 00990A 00 ...

Page 4: ...eginning the disassembly process 2 When disassembling the monitor do not use any metal tools except for the provided jig 3 Disassemble the monitor carefully as directed in the following procedures Description Photo Screws 1 Remove the stand body 2 Turn the monitor over and insert your hands into the top of the monitor at the center and separate the front cover in the direction of the arrow as show...

Page 5: ...3 2 3 Disassembly and Assembly Description Photo Screws 3 Turn the monitor over again ...

Page 6: ...ion Photo Screws 4 Turn the monitor over again to remove the back cover 5 Remove the LVDS LAMP wire and FUNCTION cable then remove the SHIELD COVER LAMP WIRE LVDS FUNCTION 6 Remove the LCD panel 7 Remove the four 4 screws shown in the figure ...

Page 7: ... Assembly Description Photo Screws 8 Remove the four 4 screws shown in the figure and remove the Bracket support 9 Remove the main PCB and IP boards from the SHIELD cover The assembly is in the reverse order of disassembly ...

Page 8: ...5 1 5 Exploded View Part List 5 Exploded View Part List 5 1 LS22CLUSF XF Exploded View F001A M0215 M0014 BN63 06705A R001A SB01A SB04A BN63 06367A P002A ...

Page 9: ...BV EN 1 SA M0215 BN07 00795A LCD PANEL M215HW01 V6 AU21507 6bit Hi FR 1 SA P002A BN44 00367A IP BOARD LED DRIVE IP 23155B Cobalt21 5 1 SA R001A BN96 12855A ASSY COVER P REAR Cobalt 21 5 HIPS HB BK 1 SA SB01A BN96 12853A ASSY STAND P BODY COBALT HIPS BK23 ETCH 1 SA SB04A BN96 13094A ASSY STAND P BASE COBALT 19N 21 5 24 ABS 1 SA BN63 06367A SHIELD LAMP PLUM 21 5 SPTE T0 3 1 SNA BN63 06705A SHIELD CO...

Page 10: ...001 BN63 06703C COVER FRONT Cobalt 21 5 PMMA ABS HB BK2 1 SNA 3 M0007 BN64 01309A KNOB FUNCTION Cobalt Project ABS BK23 1 SNA 3 AL093 BN67 00281A LENS LED Cobalt Project PC CLEAR TP26 1 SNA 3 BN68 02382B LABEL TCO5 0 ENERGY STAR TCO5 0 ENERGY S 1 SNA 3 FB01A BN96 13682D ASSY BOARD P FUNCTION Cobalt FUNCTION 25 1 SA 4 BN94 03497C ASSY PCB FUNCTION BN96 13682D COBALT BN9 1 SNA 5 0202 001463 SOLDER W...

Page 11: ...4V 200mW 2 SNA 4 Q101 0501 000445 TR SMALL SIGNAL KTC3875S Y NPN 150mW SOT 1 SA 4 PQ02 0501 002080 TR SMALL SIGNAL 2SC2412K NPN 200mW SC 59 3 SA 4 Q409 0505 001165 FET SILICON Si3443CDV P 20V 4 4A 65mo 1 SA 4 ND51C2 1001 001155 IC ANALOG MULTIPLEX NC7SB3157P6X CMOS SC 1 SA 4 IC112 1103 000129 IC EEPROM 24C02 2Kbit 256x8 SOP 8P 5x4mm 2 SA 4 IC112 1103 001410 IC EEPROM S 24CS08AFJ TB 1GE 8Kbit 1Kx8 ...

Page 12: ...4A ASSY SHIELD P COVER Cobalt 21 5 SECC T0 1 SNA 3 BN61 05973A STUD PEM PLUM23 M4 D8 L20 1 SNA 3 BN63 06705A SHIELD COVER Cobalt 21 5 SECC T0 8 SIMPL 1 SNA 3 M0114 BN61 02500A HOLDER WIRE NYLON6 6 NATURAL 1 SNA 3 BN63 00417A GASKET MINERVA Conductive_Fabric 4mm 10m 2 SNA 3 M0131 BN63 00049A GASKET RB17AS Conductive Fabric 1 5MM 10 3 SNA 0 1 BN92 05486D ASSY LABEL Cobalt BLACK 1 SNA 2 CCM1 BN68 015...

Page 13: ... ETCH 1 SA 3 W392 6003 000282 SCREW TAPTYPE BH B M3 L8 ZPC BLK SW 2 SA 3 T0524 6902 000023 BAG PE LDPE T0 08 W150 L120 TRP 1 650g 1 SNA 3 BN61 06067A STAND BAR COBALT 21 5 HIPS BK23 1 SNA 4 BN61 06068A STAND BAR IN COBALT HIPS BK23 IN 1 SNA 3 BN61 06334A BRACKET PLATE COBALT SECC 1 0 SIMPLE 1 SNA 3 BN68 02822J LABEL STICKER W W ART PAPER T0 05 50 10 1 SNA 2 SB04A BN96 13094A ASSY STAND P BASE COBA...

Page 14: ... American National Standards Institute ANSI C101 1 Leakage Current for Appliances and Underwriters Laboratories UL Publication UL1410 59 7 With the unit completely reassembled plug the AC line cord directly into a 120V AC outlet With the unit s AC switch 4 first in the ON position and then OFF measure the current between a known earth ground metal water pipe conduit etc and all exposed metal parts...

Page 15: ...move the instrument s ground lead last 1 3 Static Electricity Precautions Some semiconductor solid state devices can be easily damaged by static electricity Such components are commonly called Electrostatically Sensitive Devices ESD Examples of typical ESD are integrated circuits and some field effect transistors The following techniques will reduce the incidence of component damage caused by stat...

Page 16: ... it from being exposed 4 to moisture Otherwise it may cause a fire or electric shock Make sure to turn the power off and unplug the power cord from the outlet before repositioning the product Also check 5 the antenna cable or the external connectors if they are fully unplugged Damage to the cord may cause fire or electric shock Keep the antenna far away from any high voltage cables and install it ...

Page 17: ...1 4 1 Precautions Memo ...

Page 18: ... 81kHz Automatic Vertical 56Hz 75Hz Display Colors 16 7 Million colors Maximum resolution Horizontal 1920 Pixels Vertical 1080 Pixels Input Signal Analog DVI digital with HDCP Input Sync Signal Seperate H V sync Composite H V Sync on Green Level TTL level Maximum Pixel Clock rate 164Mhz Active Display Horizontal Vertical 476 64 H x 268 11 V AC power voltage Frequency AC 100V 130V 60Hz AC 200V 240V...

Page 19: ...splayed in a grey tone on the screen Green Images are displayed in a green tone on the screen Aqua Images are displayed in a blue tone on the screen Sepia Images are displayed in a brown tone on the screen Image Size If the resolution is not wide resolution this option allows the screen size to be selected as normal or wide Magic Angle Lean Back Mode1 Select when viewing from a slightly lower angl...

Page 20: ...tronics Service center Warranty Card Not available in all locations BN68 01146D User s Guide Monitor Driver Natural Color Pro Software BN59 00982A D Sub 15 Pin Cable BN39 00244G Power Cord 3903 000452 2 4 Accessories Sold separately Product Description Code No Remark DVI Cable BN39 00246L Samsung Electronics Service center ...

Page 21: ...2 4 2 Product specifications Memo ...

Page 22: ... If the screen is blank check whether the power cord is connected correctly 2 The circuits to check 3 When the raster does not appear The Function PCB Main PCB I P PBA When 5V is generated but a blank screen is displayed Main PCB When 5V is not generated I P PBA Press the MENU button and hold down the 4 Enter Source button for more than five 5 seconds to return the monitor to factory mode ...

Page 23: ...oard inside the monitor Check the Main board power part and also check whether there is any abnormal output at any of the other output terminals Diagnostics CN600 IC601 IC602 Yes Check the connection status for the function assy Yes Replace the IP board No Is DC 5V measured at pins 5 6 of the CN600 connector when pins 3 4 are 0V IIs DC 3 3V measured at pin 3 of IC601 when pin 1 is DC 5V Check the ...

Page 24: ...4 3 4 Troubleshooting 4 2 1 Circuit diagrams when the power does not turn on ...

Page 25: ...01 R206 R210 R213 Yes Check the signal cables and their connections Yes No Check the R206 R210 and R213 input terminals No Check the circuits related to IC400 No Check the circuits related to CN400 Do output signals appear at pins 8 to 30 of CN400 No Is DC 5V measured at pins 1 2 and 3 of the CN400 Do the Hsync and Vsync waveforms appear at pins 32 33 of IC400 respectively Do the RGB inputs appear...

Page 26: ...4 5 4 Troubleshooting 4 3 1 When a blank screen is displayed Analog ...

Page 27: ...4 6 4 Troubleshooting 4 3 2 Waveforms when no screen is displayed Analog ...

Page 28: ...is connected correctly to the IP board Diagnostics CN400 IC400 X401 R109 R110 R113 Yes Check the signal cables and their connections Yes Check and replace the circuits related to X401 No Is X401 oscillating correctly Do the inputs appear at R206 R210 and R213 Check the R206 R210 and R213 input terminals No Yes Do output signals appear at pins 8 to 30 of CN400 Check the circuits related to CN400 No...

Page 29: ...4 8 4 Troubleshooting 4 4 1 Circuit diagrams when a blank screen is displayed Digital ...

Page 30: ...4 9 4 Troubleshooting 4 4 2 Waveforms when a blank screen is displayed Digital ...

Page 31: ...ite screen is displayed regardless of the signals when turning on the monitor Cause This error occurs when only lamp power is supplied and the video signals are not input to the panel due to an LVDS cable connection error Action Replace the LVDS cable or connect the cable correctly so that the video signals can be supplied to the panel A Full White pattern is a feature of a TN panel when no video ...

Page 32: ... Basic Service Items to Perform after Replacing a Board 3 1 Check the PC color adjustment status 2 Input DDC input both of Analog and Digital 3 Check whether the appropriate MCU code for the model is input 4 Hard power the monitor off after entering service mode and performing a reset DDC EDIT Data Input 4 1 Use when updating the AD board code 2 Download the WinDDC program DDC Input program and He...

Page 33: ...yed To exit the SVC Function turn the power off 3 Safe Mode When the input signal is higher than the supported frequency of the product safe mode gives users some time one minute to change the video card settings to the Recommended Mode settings Service Mode Moving around 1 Press the button to move to other items Panel information Micom version Micom checksum Select the Auto option Select the Pixe...

Page 34: ...e setting to On or Off When replacing the panel After replacing the panel move to the Panel item and hold down the Menu button for five 5 seconds The Ch No is incremented by 1 and then both the On Time and Cycle are set to 0 This number is incremented by 1 ...

Page 35: ...or later 1 Click the Open F5 icon 2 Select a port 3 Open a DDC file 4 Select a date and click the OK Save button 5 Click the Next OK button 6 Enter the serial number and then press the Enter button When inputting digital data after inputting analog data repeat steps 2 to 5 1 2 3 4 5 6 ...

Page 36: ...g the MCU Data 1 Check the following options Manufacture MSTAR Device Type TSUMxxx Communication Port DSUB15 Analog External Memory PMC25LV020E 2 Click the LoadFile button select an MCU code file and then click the Open O button 1 2 ...

Page 37: ...4 16 4 Troubleshooting 3 Click the Auto Program button 4 When programming and verification are complete hard power the monitor off and then on again 3 ...

Page 38: ...4 17 4 Troubleshooting Inputting the Code HDCP 1 Run the service exe file 2 Click the HDCP button ...

Page 39: ...4 18 4 Troubleshooting 3 Click the HDCP Write button and select MStar_HDCPKEY 4 Inputting the HDCP key is completed ...

Page 40: ...6 1 6 Wiring Diagram 6 Wiring Diagram 6 1 Wiring Diagram Main Board ...

Page 41: ...6 2 6 Wiring Diagram 6 2 Wiring Diagram IP Board ...

Page 42: ...When a problem occurs The Blank Screen error may occur CN102 Transmits the input power of 90 to 263V to the power board When a problem occurs The No Power error may occur CN101 Connects the function board When a problem occurs The No LED screen and Function failure errors may occur CN102 VGA signal input terminal When a problem occurs The No RGB output error may occur CN400 Transmits the LVDS sign...

Page 43: ...6 4 6 Wiring Diagram Memo ...

Reviews: