background image

ENG-33

ENG-32

Setting Up the Audio Options

1

With the unit in Stop mode, press the MENU button.

2

Select 

DVD

using  ,

buttons, then OK or 

button.

3

Select 

Audio Setup

using  ,

buttons, then press

the OK or 

button.

4

Use the  ,

buttons to select the desired item.

Then press the OK or 

button.

Dolby Digital Out

1. PCM : 

Converts to PCM(2CH) audio.
Select PCM when using the Analog 
Audio Outputs.

2. Bitstream : Converts to Dolby Digital Bitstream 

(5.1CH). Select Bitstream when using 
the Digital Audio Output.

➢  

Be sure to select the correct Digital Output or no 
audio will be heard.

MPEG-2 Digital Out

1. PCM : 

Converts to PCM(2CH) audio. 
Select PCM when using the Analog 
Audio Outputs.

2. Bitstream : Converts to MPEG-2 Digital Bitstream 

(5.1CH or 7.1CH).Select Bitstream 
when using the Digital Audio Output.

DTS

1. Off : 

Doesn’t output digital signal.

2. On : 

Outputs DTS Bitstream via digital 
output only. Select DTS when 
connecting to a DTS Decoder.

DTS

Dolby Digital Out

MPEG-2 Digital Out

PCM Down Sampling

 Setup

 Setup

 Setup       :

 Display Setup

Dynamic Compression

1. On : 

To select dynamic compression.

2. Off : 

To select the standard range.

PCM Down Sampling

1. On : 

Select this when the amplifier 
connected to the player is not 96KHz 
compatible.
In this case, the 96KHz signals will be 
down converted to 48KHZ.

2. Off : 

Select this when the amplifier 
connected to the player is 96KHz 
compatible.
In this case, all signals will be output 
without any changes.

• How to make the SETUP menu disappear or 

return to menu screen during set up; Press 

RETURN or 

button.

• Manufactured under license from Dolby 

Laboratories. “Dolby” and the double-D symbol are

trademarks of Dolby Laboratories.

• “DTS” and “DTS Digital Out” are trademarks of 

Digital Theater Systems, Inc.

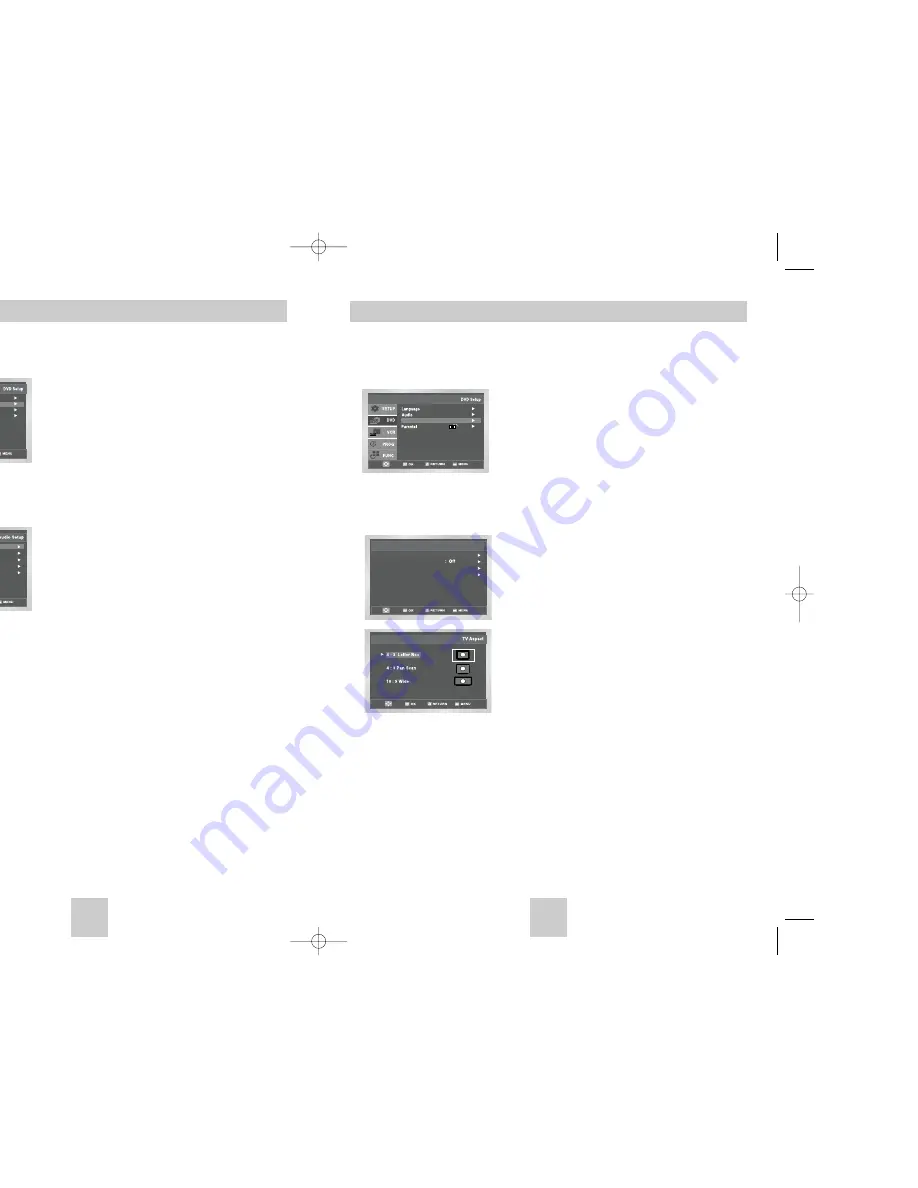
Setting Up the Display Options

1

With the unit in Stop mode, press the MENU button.

2

Select 

DVD

using  ,

buttons, then OK or 

button.

3

Select 

Display Setup

using  ,

buttons, then 

press the OK or 

button.

4

Use the  ,

buttons to select the desired item. 

Then press the OK or 

button.

TV Aspect

Depending on the type of television you have, you 
may want to adjust the screen setting (aspect ratio).

1. 4:3 Letter Box :

Select when you want to see 
the total 16:9 ratio screen DVD 
supplies, even though you have
a TV with a 4:3 ratio screen. 
Black bars will appear at the top
and bottom of the screen.

NTSC Disc Output

DVD Out

TV Aspect

Black Level

Display Setup

:  4:3 L-Box

:  PAL

:  RGB

 Setup

 Setup

 Setup       :

 Display Setup

2. 4:3 Pan Scan :

Select this for conventional size 
TVs when you want to see the 
central portion of the 16:9 
screen. (Extreme left and right 
side of movie picture will be cut 
off.)

3. 16:9 Wide : 

You can view the full 16:9 
picture on your widescreen TV.

Black Level

Adjusts the brightness of the screen.(On/Off)

NTSC Disc Output

“NTSC” if the screen only has one NTSC-video 
entrance. If this is not the case, you can choose 
to leave “ PAL” as is.

DVD Out

RGB : 

Sends RGB signal from the AV JACK 
(SCART terminal).

S-Video : 

Sends S-VIDEO signal from the AV 
JACK (S-Video terminal).

Video : 

Sends COMPOSITE VIDEO signal 
from the AV JACK (SCART terminal).

00374C SV-DVD440/XEU  1/30/04 5:07 PM  Page 32

Summary of Contents for SV-DVD440

Page 1: ......

Page 2: ...Chapter Time Selection 37 Angle View 38 Subtitle 38 A to B Repeat 39 Repeat Chapter Title 39 Audio 39 Marks 40 MP3 WMA Play 40 Program Play Random Play 42 Picture CD Playback 42 Technical Specificati...

Page 3: ...audio quality less distortion and less deterioration of audio quality over time DO NOT play CD ROM CD I and DVD ROM in this player CDGs play audio only not graphics It may not be to play CD R CD RW an...

Page 4: ...R OUT SOCKETS DVD ONLY 5 VIDEO OUT SOCKET 6 OUT TO TV CONNECTOR 7 AV1 EURO AV IN OUT SCART EURO 21 SOCKET 8 DIGITAL AUDIO OUT SOCKET COAXIAL 9 DIGITAL AUDIO OUT SOCKET OPTICAL 10 S VIDEO OUT JACK AUDI...

Page 5: ...RF Coaxial Cable After making this connection you must preset the station received through the satellite tuner RF output channel of the satellite receiver should be adjusted away from channel 60 which...

Page 6: ...channels it may be necessary to change the setting of the DVD VCR output channel see Setting the DVD VCR Output Channel on page 16 and Problems and Solutions on page 45 8 When the picture and sound a...

Page 7: ...manually see page 12 Once the auto scanning procedure has finished some stations may have been stored more than once select the stations with the best reception and delete the ones no longer required...

Page 8: ...splayed 6 Press the corresponding buttons until the required preset TV programme is selected Result The selected station is displayed at the same time on the television screen 7 To change the programm...

Page 9: ...ent Picture Control Colour System Auto NICAM On IPC On VideoPlus Extend Off User Set On Off Colour System Auto NICAM On IPC On User Set On Off may need to be m interference or if VCR output channel to...

Page 10: ...repeat play Off is displayed The Auto Power Off feature automatically turns off your DVD VCR if no signal is received and you do not press any button for the selected time 1 After pressing the MENU pr...

Page 11: ...R stops recording automatically and power off 8 If you wish to cancel the recording before the end press STANDBY ON If the end of the tape is reached while recording The recording stops and power off...

Page 12: ...de marked Off 16 When you have finished press the RETURN button 17 Press the STANDBY ON button to activate the timer Result Before starting recording the DVD VCR compares the timer duration with the r...

Page 13: ...by frame interference may be seen on the screen Press the TRK buttons to minimize this effect REVERSE REVERSE REVERSE SLOW SLOW PLAY PLAY PLAY PLAY PLAY PLAY STILL MOTION MOTION PLAY X3 X5 X9 X9 X5 X...

Page 14: ...2 simply by pressing the SEARCH button 1 After pressing the SEARCH press the corresponding buttons until the Intro Scan option is selected 2 Press the OK or 3 Press the or buttons twice more This will...

Page 15: ...th the remote control If several codes are indicated for your television brand try each one in turn until you find one that works When you change the batteries in the remote control you must reprogram...

Page 16: ...using buttons then press the OK or button 5 Press the buttons to select English Select Original if you want the default soundtrack language to be the original language the disc is recorded in Select O...

Page 17: ...With the unit in Stop mode press the MENU button 2 Select DVD using buttons then OK or button 3 Select Display Setup using buttons then press the OK or button 4 Use the buttons to select the desired...

Page 18: ...l the disc will start over from the beginning Special Playback Features ENG 34 A V Receiver Connections To take full advantage of the movie theater experience that DVD offers you may want to connect y...

Page 19: ...For 16 9 aspect ratio discs 4 3 Letter Box Displays the content of the DVD title in 16 9 aspect ratio The black bars will appear at the top and bottom of the screen 4 3 Pan Scan The left and right of...

Page 20: ...se the buttons to select Chapter When you select Chapter Repeat Chapter will be highlighted 3 Repeat Chapter Press the OK button to repeat the current chapter or track 4 Select Title Use the buttons t...

Page 21: ...sc Program Random playback CD R MP3 WMA discs 1 Press the MODE button in STOP mode to switch between the RANDOM and PROGRAM modes Press the REPEAT button in PLAY mode to hear only music continuously a...

Page 22: ...ote control to display the menu again CD R JPEG Discs Random Play ect PROGRAM ons to select the first lection numbers appear ogrammed order M GRAM 01 order CLEAR WMA WMA ect RANDOM ndom order Program...

Page 23: ...e DVD VCR 1 Remove the aerial input plug from the socket marked aerial TV does not find the Screen symbol on the rear of the DVD VCR or the pattern when found suffers 2 Carry out the instructions Tuni...

Page 24: ...per ventilation or any other cause beyond the control of Samsung 6 This warranty is valid for any person who legally acquired possession of the product during the warranty period 7 The consumers statu...

Page 25: ......

Reviews: