background image

ENG-23

Using the Timer Programming
Feature

The Timer Programming feature allows you to preset
the DVD-VCR to record a programme up to one month
before that programme is to be broadcast. Up to six
programmes can be preset.

Before presetting a recording, check that the 
date and time are correct. 
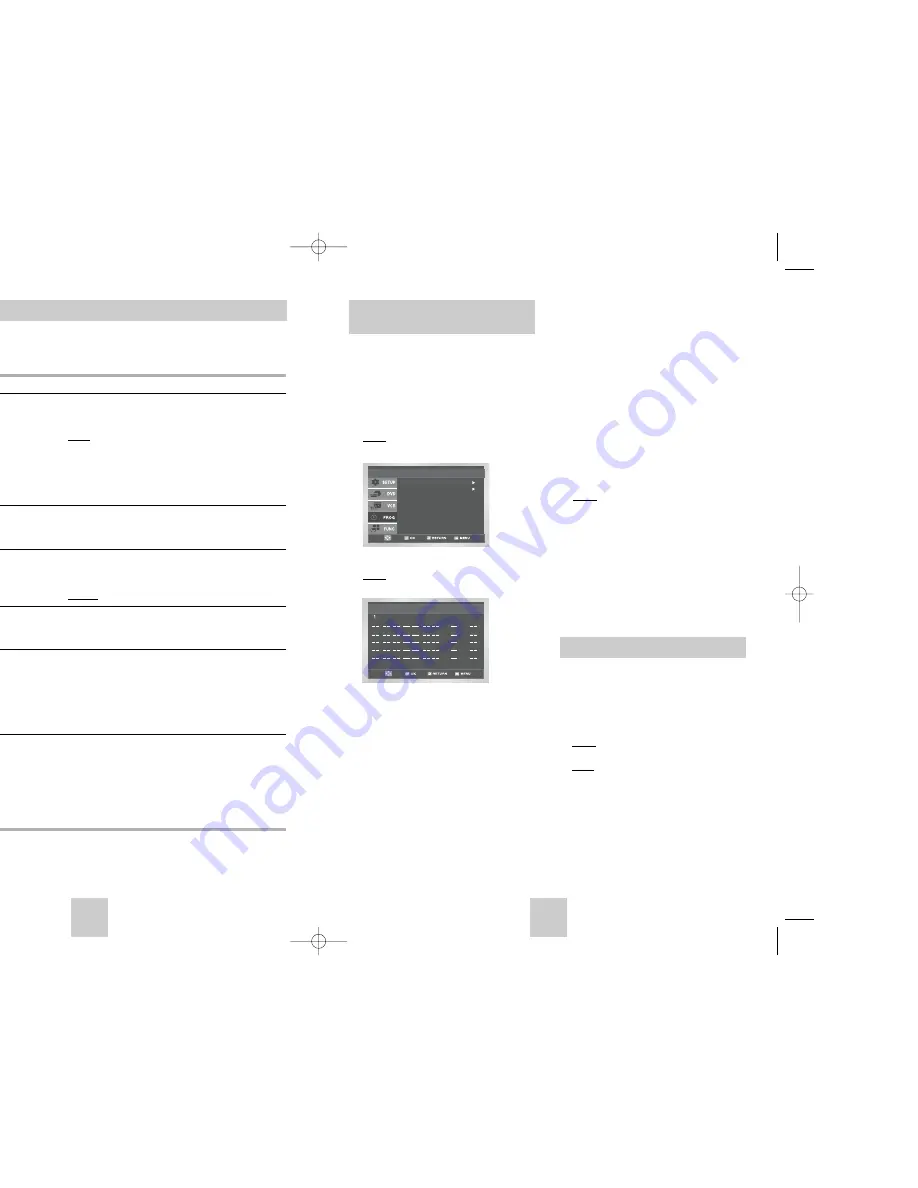
1

Insert the cassette and press TIMER on the remote
control.
Result: The timer selection is displayed.

2

Press the OK button to select 

Standard 

option.

Result: The TIMER PROGRAMMING menu is 

displayed.

3

Press 

to select the input source.

4

Select the required station by pressing the 

,

buttons or INPUT SEL. to select the  AV1, AV2 or
AUX(SV-DVD440/SV-DVD540 Only) input sources.

5

Press 

to select the recording day.

6

Select the required day by pressing the 

,

buttons.

7

Press 

to select the recording start time.

8

Select the required hour value by pressing the 

,

buttons.

9

Press 

to select the minutes.

10

Select the required minute value by pressing the 

,

buttons.

11

Press 

to select the recording stop time. 

You can check your preset recordings:

When you have finished presetting the DVD-VCR

If you have forgotten which programmes will be 
recorded

1

Press TIMER on the remote control.
Result: The timer selection is displayed. 

2

Press the OK button to select 

Standard

option.

Result: The 

TIMER PROGRAMMING

menu is 

displayed.

3

Press the 

,

buttons to select the required 

programme.

4

Press the 

or 

buttons to select and change any 

values as required. For more details, refer to the 
previous page.

5

On completion, press RETURN twice.

Standard

VideoPlus

Timer Method

PR        Day         Start            Stop           Speed        V/P

    WE     1      19  :  00     19  :  30           SP            Off

:

:

:

:

:

:

:

:

:

:

12

Select the required recording stop time by pressing 
the 

,

buttons, following the same procedure as

when selecting the recording start time.

13

Press 

to select the recording speed.

14

Press the 

,

buttons to select the 

SP

(Standard 

Play), 

LP

(Long Play), 

Auto

(Auto Tape speed 

Select) recording speeds.

15

Press the 

,

buttons to toggle between the PDC

mode (marked 

On

) and the non PDC mode (marked 

Off

).

16

When you have finished, press the RETURN button.

17

Press the STANDBY/ON button to activate the timer.
Result: Before starting recording, the DVD-VCR 

compares the timer duration with the 
remaining time on the cassette.  

Auto Tape Speed select. The DVD-VCR’s “Auto 
Tape Speed select” function compares the 
duration of the timer recording to the actual 
recording time remaining on the tape loaded. 
If there is insufficient tape to complete a timer 
recording in AUTO mode, the DVD-VCR 
automatically switches to LP mode to record the 
whole programme.

Checking a Preset Recording

ENG-22

Modifying VideoPlus Programming 

(SV-DVD540/SV-DVD545Only)

If you wish to correct the programme displayed or modify certain elements, such as the recording
speed, you can do so before you press RETURN a second time to confirm.

If you wish to...

Then...

Select an input source other 

Press the 

or 

buttons, until the PR selection mode.

than the tuner (AV1, AV2 or AUX)

Press the 

INPUT SEL.

button one or more times to change the 

input source selection.
Result:

The programme number is replaced by:

The AV1, AV2 or AUX(SV-DVD540 Only) source
using the 

INPUT SEL.

button for a satellite tuner or external video source

The input source must be selected before changing any other
value.

Record a programme every day 

Press the 

or 

buttons, until the 

DAY

selection mode.

(Monday to Sunday) at the same time

Press the 

or

buttons, until the 

DLY

(Daily) value is 

displayed.

Record a programme every week 

Press the 

or 

buttons, until the 

DAY

selection mode.

on the same day and at the same time

Press the 

or

buttons, until the 

W-

(Week) value is 

displayed, followed by the required day.

Example: 

W-SA

(Weekly Saturday)

Extend the recording time

Press the 

or 

buttons, until the 

STOP

selection mode.

Press the 

or

buttons to increase or decrease the stop

time.

Select the recording speed

Press the 

or 

buttons, until the recording speed selection

mode.

Press the 

or

buttons until the correct indication is 

displayed:

AUTO

(Auto Tape Speed Select)

SP

(Standard Play)

LP

(Long Play)

Select the PDC recording

Press the 

or 

buttons, until the PDC off mode.

Press the 

or

buttons until the “On” indication is displayed.

Do not select PDC unless you are sure the programme you 
wish to record is broadcast with PDC. If you do set PDC On 
(by selecting “On” in the right - hand column on the screen), 
then you must set up the start-time EXACTLY according to 
the published TV schedule. Otherwise the timer recording 
won’t take place.

(SV-DVD540/SV-DVD545)

00374C SV-DVD440/XEU  1/30/04 5:07 PM  Page 22

Summary of Contents for SV-DVD440

Page 1: ......

Page 2: ...Chapter Time Selection 37 Angle View 38 Subtitle 38 A to B Repeat 39 Repeat Chapter Title 39 Audio 39 Marks 40 MP3 WMA Play 40 Program Play Random Play 42 Picture CD Playback 42 Technical Specificati...

Page 3: ...audio quality less distortion and less deterioration of audio quality over time DO NOT play CD ROM CD I and DVD ROM in this player CDGs play audio only not graphics It may not be to play CD R CD RW an...

Page 4: ...R OUT SOCKETS DVD ONLY 5 VIDEO OUT SOCKET 6 OUT TO TV CONNECTOR 7 AV1 EURO AV IN OUT SCART EURO 21 SOCKET 8 DIGITAL AUDIO OUT SOCKET COAXIAL 9 DIGITAL AUDIO OUT SOCKET OPTICAL 10 S VIDEO OUT JACK AUDI...

Page 5: ...RF Coaxial Cable After making this connection you must preset the station received through the satellite tuner RF output channel of the satellite receiver should be adjusted away from channel 60 which...

Page 6: ...channels it may be necessary to change the setting of the DVD VCR output channel see Setting the DVD VCR Output Channel on page 16 and Problems and Solutions on page 45 8 When the picture and sound a...

Page 7: ...manually see page 12 Once the auto scanning procedure has finished some stations may have been stored more than once select the stations with the best reception and delete the ones no longer required...

Page 8: ...splayed 6 Press the corresponding buttons until the required preset TV programme is selected Result The selected station is displayed at the same time on the television screen 7 To change the programm...

Page 9: ...ent Picture Control Colour System Auto NICAM On IPC On VideoPlus Extend Off User Set On Off Colour System Auto NICAM On IPC On User Set On Off may need to be m interference or if VCR output channel to...

Page 10: ...repeat play Off is displayed The Auto Power Off feature automatically turns off your DVD VCR if no signal is received and you do not press any button for the selected time 1 After pressing the MENU pr...

Page 11: ...R stops recording automatically and power off 8 If you wish to cancel the recording before the end press STANDBY ON If the end of the tape is reached while recording The recording stops and power off...

Page 12: ...de marked Off 16 When you have finished press the RETURN button 17 Press the STANDBY ON button to activate the timer Result Before starting recording the DVD VCR compares the timer duration with the r...

Page 13: ...by frame interference may be seen on the screen Press the TRK buttons to minimize this effect REVERSE REVERSE REVERSE SLOW SLOW PLAY PLAY PLAY PLAY PLAY PLAY STILL MOTION MOTION PLAY X3 X5 X9 X9 X5 X...

Page 14: ...2 simply by pressing the SEARCH button 1 After pressing the SEARCH press the corresponding buttons until the Intro Scan option is selected 2 Press the OK or 3 Press the or buttons twice more This will...

Page 15: ...th the remote control If several codes are indicated for your television brand try each one in turn until you find one that works When you change the batteries in the remote control you must reprogram...

Page 16: ...using buttons then press the OK or button 5 Press the buttons to select English Select Original if you want the default soundtrack language to be the original language the disc is recorded in Select O...

Page 17: ...With the unit in Stop mode press the MENU button 2 Select DVD using buttons then OK or button 3 Select Display Setup using buttons then press the OK or button 4 Use the buttons to select the desired...

Page 18: ...l the disc will start over from the beginning Special Playback Features ENG 34 A V Receiver Connections To take full advantage of the movie theater experience that DVD offers you may want to connect y...

Page 19: ...For 16 9 aspect ratio discs 4 3 Letter Box Displays the content of the DVD title in 16 9 aspect ratio The black bars will appear at the top and bottom of the screen 4 3 Pan Scan The left and right of...

Page 20: ...se the buttons to select Chapter When you select Chapter Repeat Chapter will be highlighted 3 Repeat Chapter Press the OK button to repeat the current chapter or track 4 Select Title Use the buttons t...

Page 21: ...sc Program Random playback CD R MP3 WMA discs 1 Press the MODE button in STOP mode to switch between the RANDOM and PROGRAM modes Press the REPEAT button in PLAY mode to hear only music continuously a...

Page 22: ...ote control to display the menu again CD R JPEG Discs Random Play ect PROGRAM ons to select the first lection numbers appear ogrammed order M GRAM 01 order CLEAR WMA WMA ect RANDOM ndom order Program...

Page 23: ...e DVD VCR 1 Remove the aerial input plug from the socket marked aerial TV does not find the Screen symbol on the rear of the DVD VCR or the pattern when found suffers 2 Carry out the instructions Tuni...

Page 24: ...per ventilation or any other cause beyond the control of Samsung 6 This warranty is valid for any person who legally acquired possession of the product during the warranty period 7 The consumers statu...

Page 25: ......

Reviews: