SHR-4081N/P USER’S MANUAL
4-3
Definition of Live Screen Mode
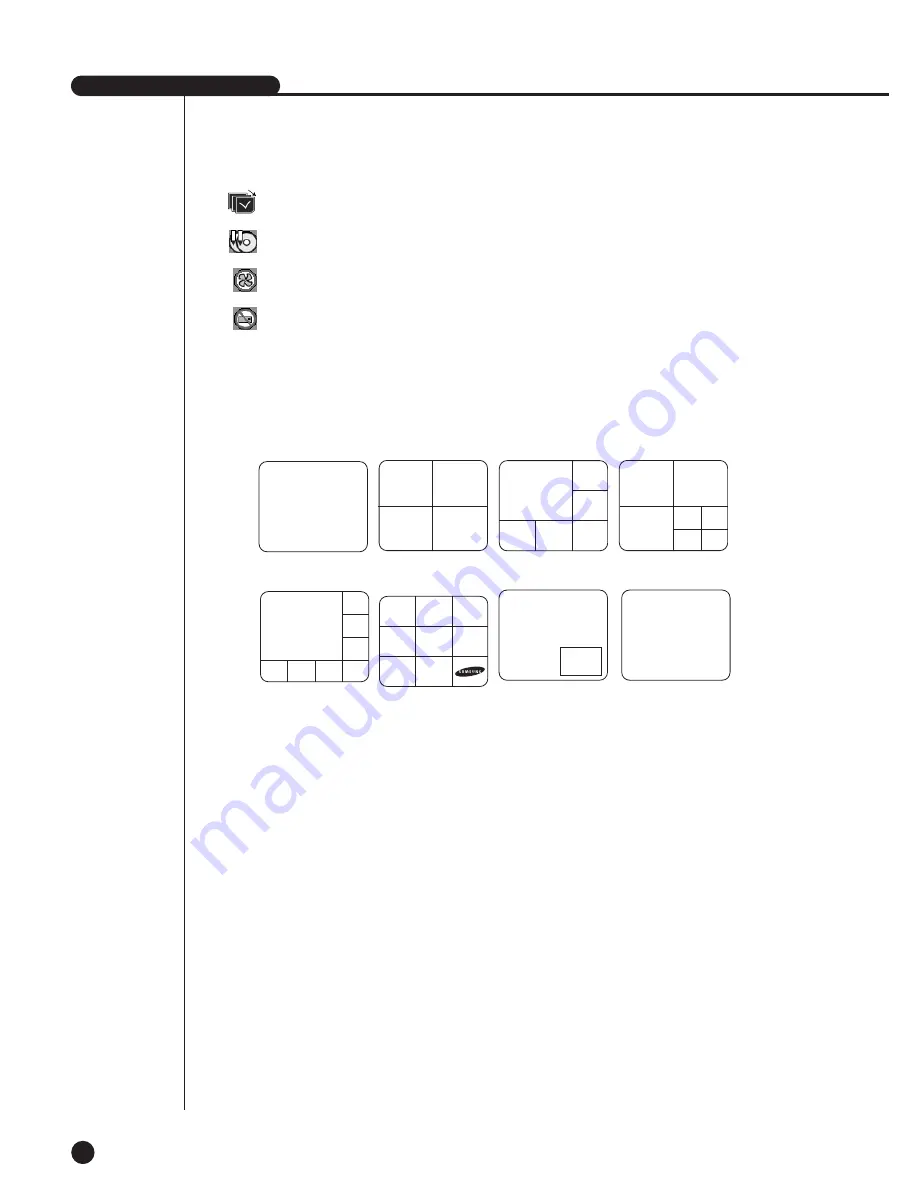
SHR-4081N/P receives 8 live images and displays them in the following 8 modes.
●
Full Screen(Single) Mode:
Displays the selected channel in a full screen. Then, the channel LED concerned
will be turned on.
●
4,6,7,8 Split Mode:
Displays 4, 6, 7, 8, and image channels in the respective split screen and the CH
LED lights on to indicate the channel no. You may match channel numbers with
split screens on your own.
The 4CH Split mode has the function of screen change. Refer to (4-4) Live Screen
Mode Setup. Press the [Direction Control] button in the 8CH Split mode and the
main screen(CAM_01 in the figure) will move.
●
PIP(Picture in picture) Mode:
Displays a one-ninth sized screen in the full screen and the channel LED
concerned is turned on. You are able to choose a channel as you want to, which is
displayed in the full screen or reduced screen area. You may move the PIP screen
at 5 stages in the Full screen with the
or
❷
key.
●
Screen change Mode:
Displays the time when FULL SCREEN has been set to each channel in sequence
and the channel LED concerned is turned on.
CAM_01
CAM_02
CAM_01
CAM_05
CAM_01
CAM_06 CAM_07 CAM_08
CAM_04
CAM_03
CAM_02
9 Split Mode
6 Split Mode
8 Split Mode
PIP Mode
Screen change Mode
7 Split Mode
CAM_03
CAM_04
CAM_01
CAM_02
CAM_03
CAM_06
CAM_04
CAM_01
CAM_02
CAM_07
CAM_05
4 Split Mode
: Screen change Icon
This icon appears in the Screen change mode.
: Backup playback icon
It is displayed when the backup data plays.
: Fan fail Icon
It is displayed when the fan stops.
: It is displayed when there is no HDD.
V.Loss / V.Off : Video Input Status
If there is no more video data input with Video On, [V.Loss] appears in the channel.
If you set Video On/Off to Off, [V.Off] will appear.
CAM_01
CAM_02
CAM_03
CAM_06
CAM_05
CAM_08
CAM_04
CAM_07
CAM_02
CAM_03
CAM_06
CAM_05
CAM_01
CAM_04
CAM_01
Single Mode
Summary of Contents for SHR-4081N/P
Page 1: ...8 Channel DVR SHR 4081N P User s Manual ...
Page 7: ......
Page 8: ...Chapter 1 Overview 1 ...
Page 14: ......
Page 15: ...Chapter 2 Installation 2 ...
Page 25: ...2 10 Fixing the fan to the left ...
Page 26: ...Chapter 3 Connecting with Other Equipment 3 ...
Page 27: ...1Connecting Video Audio Monitor 3 1 SHR 4081N P USER S MANUAL ...
Page 30: ...3 4 Note Note Refer to Appendix 2 to see which HDD specifications are supplied ...
Page 33: ...SHR 4081N P USER S MANUAL 3 7 ALARM IN OUT Connection ...
Page 35: ...Chapter 4 Live 4 ...
Page 44: ...Chapter 5 Menu Setup 5 ...
Page 77: ...Chapter 6 PTZ device Control 6 ...
Page 86: ...Chapter 7 Recording 7 ...
Page 91: ...Chapter 8 Search Play 8 ...
Page 101: ...Chapter 9 Backup and Backup Search 9 ...
Page 107: ...Chapter 10 Smart Viewer 10 ...
Page 166: ...Chapter 11 Backup Viewer 11 ...
Page 182: ......
Page 183: ...Appendix 12 ...
Page 188: ...SHR 4081N P USER S MANUAL 3Outline Drawing 12 5 ...


