background image

Confidential


Preface 

5G Indoor CPE Installation Manual 


ix 

Copyright © 2018, All Rights Reserved. 

Fire 

The product is powered from an AC supply. To protect against fire, the equipment 
is fused.  

Environment 

The product must be operated in an environment with the specified relative 
humidity and ambient temperature ranges.  

Keep all liquids away from the equipment as accidental spillage can cause severe 
damage. 

Anti-Static Precautions 

The circuit boards and other modules in the product are sensitive to and easily 
damaged by static electricity. If any card or sub-assembly is removed from the 
unit, the following anti-static precautions must be observed at all times: 


Service personnel must wear anti-static wrist straps. 


Circuit boards and sub-assemblies must be placed on ground conductive mats 
or in conductive bags. 


All tools must be discharged to ground before use. 


The anti-static wrist strap and cord must be checked at regular intervals for 
their suitability for use. 

Equipment Markings 


Correct disposal of batteries in this product 
(Applicable in countries with separate collection systems.)  


The marking on the battery, manual or packaging indicates that the battery in 
this product should not be disposed of with other household waste. Where 
marked, the chemical symbols Hg, Cd or Pb indicate that the battery contains 
mercury, cadmium or lead above the reference levels in EC Directive 
2006/66.  
The battery incorporated in this product is not user replaceable. For 
information on its replacement, please contact your service provider. Do not 
attempt to remove the battery or dispose it in a fire. Do not disassemble, 
crush, or puncture the battery. If you intend to discard the product, the waste 
collection site will take the appropriate measures for the recycling and 
treatment of the product, including the battery. 

Summary of Contents for SFG-D0100

Page 1: ...Radio Access Network 310 5G Indoor CPE Installation Manual Describes the product installation and requirement procedure Document Version 1 0 April 2018 Document Number N A ...

Page 2: ... by reason of negligence will be accepted by SAMSUNG Electronics Co Ltd its subsidiaries or employees for any direct or indirect loss or damage caused by omissions from or inaccuracies in this document SAMSUNG Electronics Co Ltd reserves the right to change details in this publication without notice This manual should be read and used as a guideline for properly installing and or operating the pro...

Page 3: ... Specifications 4 Cautions for Installation 5 Before Installing 5 While Installing 5 After Installing 5 Installation Tools 6 Chapter 2 Installing System 7 Installation Procedure 7 Transporting and Unpacking 8 Bringing in Items 8 Unpacking Items 8 In the Box 8 Indoor CPE Installation 9 Fixing CPE on Window Sill 9 Chapter 3 Inspect the Installation 15 Inspection Plan 15 On site Inspection and Inspec...

Page 4: ...ndoor CPE Window Sill Installation Step 1 10 Figure 6 Indoor CPE Window Sill Installation Step 2 10 Figure 7 Indoor CPE Window Sill Installation Step 3 11 Figure 8 Indoor CPE Window Sill Installation Step 4 11 Figure 9 Indoor CPE Window Sill Installation step 5 12 Figure 10 Indoor CPE Window Sill Installation step 6 12 Figure 11 Indoor CPE Interface Overview 13 Figure 12 LED Information 14 Figure ...

Page 5: ...hts Reserved List of Tables Table 1 5G Indoor CPE Power Cord and Power Supply Specifications 3 Table 2 5G Indoor CPE Key Specifications 4 Table 3 Basic Installation Tools 6 Table 4 Requirement to Fix Indoor CPE on Window Sill 12 Table 5 Construction Situation Checklist 16 ...

Page 6: ...damage to equipment Provides information or instructions that you should follow to avoid personal injury or fatality Provides antistatic precautions that you should observe Menu Commands menu command This indicates that you must select a command on a menu where menu is the name of the menu and command is the name of the command on that menu File Names and Paths These are indicated by a bold typefa...

Page 7: ...1 Before Installation This chapter introduces Indoor 5G CPE description that items should be understood before installation Chapter 2 Connecting Cables This chapter describes the procedures to connect the cables to the Indoor 5G CPE Chapter 3 Installing System This chapter describes the procedures to install the Indoor CPE Chapter 4 Inspect the Installation This chapter describes the procedures of...

Page 8: ...ge to the equipment could result from mistakes Maintenance should only be carried out by trained and competent engineers who are familiar with the relevant procedures and instructions Manual Handling Care should be taken when handling equipment Give due consideration to the weight of the equipment the physical capability of the individual s handling the equipment and movements such as twisting ben...

Page 9: ...tive bags All tools must be discharged to ground before use The anti static wrist strap and cord must be checked at regular intervals for their suitability for use Equipment Markings Correct disposal of batteries in this product Applicable in countries with separate collection systems The marking on the battery manual or packaging indicates that the battery in this product should not be disposed o...

Page 10: ...5G Indoor CPE Installation Manual 1 Copyright 2018 All Rights Reserved Chapter 1 Before Installation System View and Interface Indoor CPE View The view of the Indoor CPE is as follows ...

Page 11: ...nal interface structure of the Indoor CPE is as follows Figure 1 CPE DU External Interface Factory Reset nSIM USB POWER LAN LED Power LED Signal LED Connection LED Alarm Indoor CPE Power Cord and Power Supply The following figure shows the connectivity of the power cord and power supply Figure 2 Power Cord and Power Supply ...

Page 12: ... Rights Reserved Table 1 5G Indoor CPE Power Cord and Power Supply Specifications Item Specification Power Cord Length 1 8 meters Color Black Power Supply Input Voltage AC100 240 VAC 50 60 Hz Output Voltage 12 VDC 5 Operating Temperature 0 50 C Operating Humidity 5 90 ...

Page 13: ...Bm Path EIRP Antenna Gain 19dBi Ethernet Indoor RJ45 1 Port 100Base TX or 1000Base T USB USB 2 0 1 Port USIM Nano SIM 1 Port Replaceable regular SIM LED Total 4EA Power Green LED Signal 3 Color Green Yellow Red Connection 3 Color Green Yellow Red Alarm 3 Color Green Yellow Red Factory Reset 1EA Push Button Switch Operational Temperature 5 45 Humidity 5 90 non condensing not to exceed 30g m 3 absol...

Page 14: ...um performance While Installing The system power must be cut off before installing Be careful not to damage or scratch on the system and the cables among the boards when the system is transported or installed Make sure the power switch of power supply is off when installing the system Installing the system with the power switch on may cause system damage or fatal human injury when cables are not c...

Page 15: ...ation Tools The basic tools for installation are listed in the table below The additional tools required for each site need to be identified and prepared during a site survey before starting installation Table 3 Basic Installation Tools No Name Specification Remarks 1 Basic tool 3M Dual lock ...

Page 16: ...chapter describes the procedures to install the system Installation Procedure The procedure to install the RFA is as follows Figure 3 Procedure to Install the Indoor CPE Fixing Window Sill Power Up the indoor CPE Plug in the Power to CPE Ethernet cable into LAN port of CPE Fixing indoor CPE on window sill ...

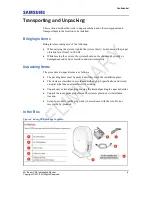
Page 17: ...d not be shocked physically or damaged caused by dust moisture and static electricity Unpacking Items The procedure to unpack items is as follows The packing items must be packed until they reach the installation place The items are classified in accordance with each job specification and stored on a place that does not interfere with working Unpack only external packing leaving the internal packi...

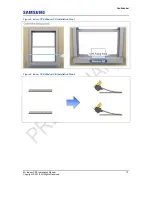
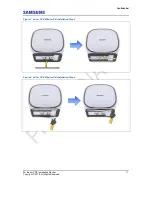
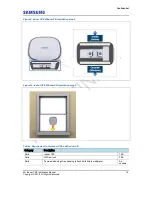
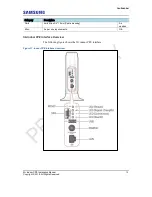
Page 18: ...ng guidelines Fixing CPE on Window Sill For the installation directions and fixing method see the following images The indoor CPE installation on a window sill is a convenient and quick method to install the CPE with good RSRP measurement conducted as a pre qualification with Spectrum analyzer To install the CPE on a window sill 1 Locate the CPE fixing point on the window sill and make sure the su...

Page 19: ...Confidential 5G Indoor CPE Installation Manual 10 Copyright 2018 All Rights Reserved Figure 5 Indoor CPE Window Sill Installation Step 1 Figure 6 Indoor CPE Window Sill Installation Step 2 ...

Page 20: ...Confidential 5G Indoor CPE Installation Manual 11 Copyright 2018 All Rights Reserved Figure 7 Indoor CPE Window Sill Installation Step 3 Figure 8 Indoor CPE Window Sill Installation Step 4 ...

Page 21: ... 9 Indoor CPE Window Sill Installation step 5 Figure 10 Indoor CPE Window Sill Installation step 6 Table 4 Requirement to Fix Indoor CPE on Window Sill Category Description Parts Indoor CPE 1 EA Parts 3M Dual lock 2 EA Parts Command damage free hanging attach Kwik Klip to wall glass As needed ...

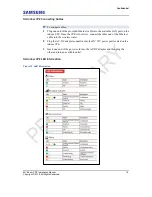
Page 22: ...t 2018 All Rights Reserved Category Description Parts Kwik Klips 3 4 19mm Cable dressing As needed Misc As per site requirements N A 5G Indoor CPE Interface Overview The following figure shows the 5G indoor CPE interface Figure 11 Indoor CPE Interface Overview ...

Page 23: ...e available LAN port on the indoor CPE Once the CPE is in service connect the other end of the Ethernet cable into the wireless router 2 Plug the AC DC adapter connector into the DC 12V power port located on the indoor CPE 3 Insert one end of the power cord into the AC DC adapter and then plug the other end into an available outlet 5G Indoor CPE LED Information Figure 12 LED Information ...

Page 24: ...on Procedure Inspection Plan Create an inspection sheet per system and select an inspector to set an inspection schedule per site NO YES Sharing Inspection Results Taking Corrective Actions On site Inspection Inspection Checklist Inspection Checklist Corrective Actions Sharing the Results of Corrective Actions and Preparing Preventive Plan Inspection Plan Checking the Results of Corrective Actions...

Page 25: ... the inspector must ask the installation operator to take the corrective actions again Sharing the Results of Corrective Actions and Preparing Preventive Plan After the corrective actions are all completed the inspector must share the results with the installation operator and relevant departments and prepare a preventive plan to prevent the same or similar problems from re occurring Construction ...

Page 26: ...essure terminal and connector Tightening condition of a pressure terminal and connector Checking compliance with tightening torque value Installation status of cable tag Position Marking content Checking tag installation method Other data cables Cable specification Checking the specification Cabling Cable damage Proper installation route Compliance with the radius of curvature Cable binding status...

Page 27: ...e inlet status Connection of equipment I O port Checking tightening status Conduit Cable Gland Cable tray and duct Checking installation status Status of inside outside of the equipment and system surrounding area Checking the stocking condition waste parts waste materials packing materials others Opinion Figure 14 Troubleshooting Steps ...

Page 28: ...opyright 2018 All Rights Reserved Appendix A Acronyms AC Admission Control AP Access Point CPE Customer Premises Equipment DC Direct Current DU Digital Unit LTE Long Term Evolution MIMO Multiple Input Multiple Output Wi Fi Wireless Fidelity ...

Page 29: ...310 5G Indoor CPE Installation Manual Document Version 1 0 2018 Samsung Electronics Co Ltd All rights reserved ...

Reviews: