background image

C

ARE  AND  

M

AINTENANCE

8

.4

C

HAPTER   

E

IGHT  :   

C

ARE   AND   

M

AINTENANCE

8

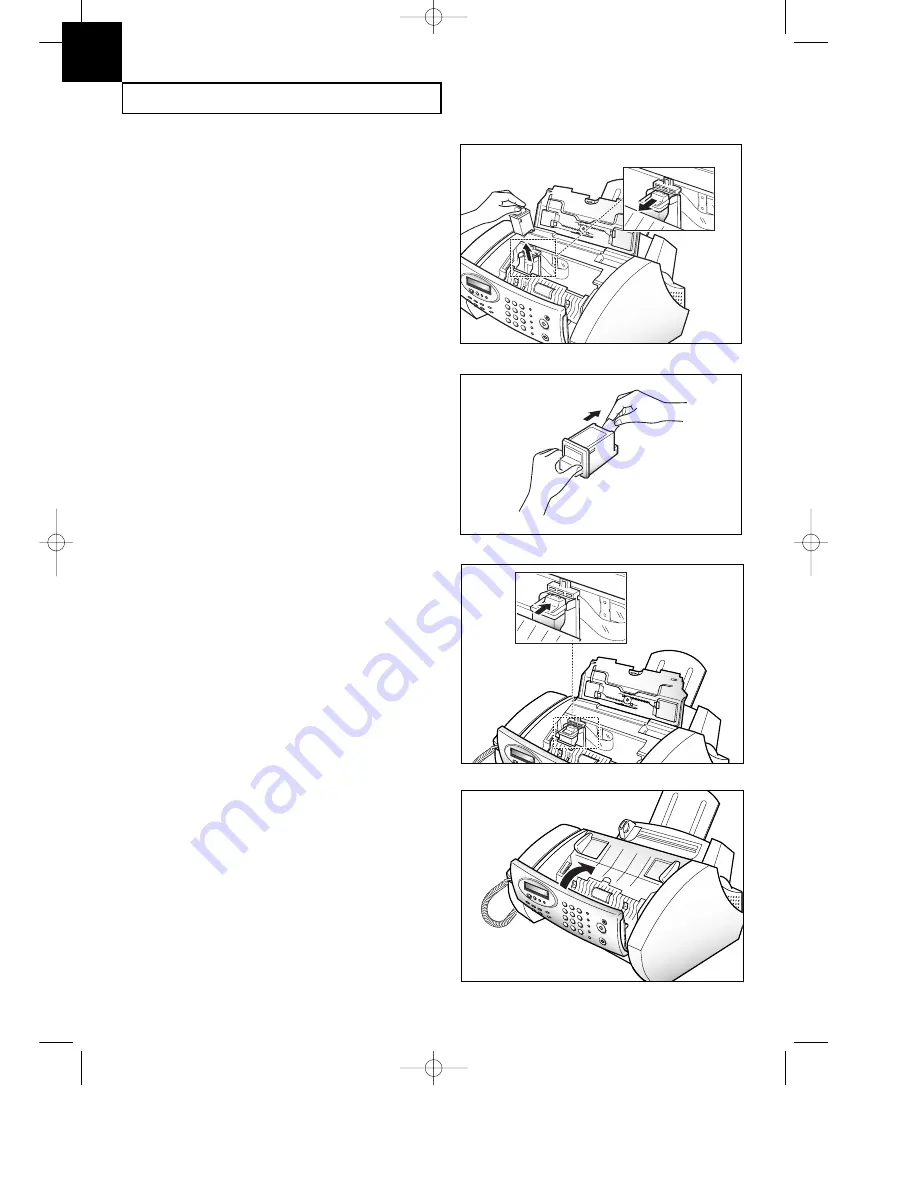
4. While holding the Cartridge holder, pull

the Cartridge handle toward you.
Remove the Print Cartridge.

5. Remove a new Print Cartridge from its

packaging and carefully remove the tape
covering the print head. 

Hold the Cartridge by the colored
top or black areas only. 

Do not touch the copper area. 

6. Insert the print cartridge in the

cartridge holder, then push firmly until
it clicks into place. 

If the Print Cartridge moves
loosely in the carrier, it has not
clicked into place. Repeat this step. 

7. Replace the Cover and Control Panel.

0-Chapter 8(GODREJ)  9/20/98 5:16 PM  Page 5

Summary of Contents for SF-3000I

Page 1: ...P N JB68 60999A Rev 2 0 ELECTRONICS 0 cove GODREJ 9 20 98 5 23 PM Page 1 ...

Page 2: ...Please read this guide before you use this equipment Operator s Guide Samsung Facsimile SF3000 SF3000T 0 cove GODREJ 9 20 98 5 23 PM Page 2 ...

Page 3: ...n the risk of fire or electric shock 10 Do not allow pets to chew on the AC power telephone 11 Never push objects of any kind into the fax machine through case or cabinet openings They may touch dangerous voltage points creating a risk fire or shock Never spill liquid of any kind onto or into the fax machine 12 To reduce the risk of electric shock do not disassemble the fax machine Take it to a qu...

Page 4: ...m the equipment experiencing interference Increase the distance between the FAX machine and the equipment experiencing interference Cable TV amplifiers and splitters are extremely prone to interference Be certain that they are as far as possible from the FAX machine and its AC power and telephone cords Replace Òtwin leadÓ antenna wire with shielded coaxial cable and use proper connectors and adapt...

Page 5: ... line Installing several types of equipment on the same telephone line may result in problems making and receiving telephone calls especially ringing when your line is called The sum of all Ringer Equivalence Numbers of the equipment on your telephone line should be less than five in order to assure proper service from the telephone company In some cases a sum of five may not be usable on your lin...

Page 6: ...cidence of lightning or power surges we recommend that you install surge protectors for both the power and the telephone lines Surge protectors can be purchased from your dealer or telephone and electronic specialty stores When programming emergency numbers and or making test calls to emergency numbers use a non emergency number to advise the emergency service dispatcher of your intentions The dis...

Page 7: ... Touch Dialing 3 1 Storing a Number for One Touch Dialing 3 1 Dialing a One Touch Number 3 2 Speed Dialing 3 3 Storing a Number for Speed Dialing 3 3 Dialing a Speed Number 3 5 Group Dialing for Multi Address Transmission 3 6 Storing Speed Dial Numbers for Group Dialing 3 6 Using Group Dialing Multi Address Transmission 3 8 Chapter 4 The Fax Machine Sending a Fax 4 1 Acceptable Documents 4 1 Setti...

Page 8: ... 7 4 To Print a List 7 5 User Options 7 6 Setting an Option 7 6 FAX Options 7 7 TAD Options SF3000T only 7 10 Clearing Memory 7 11 Chapter 6 Advanced Operations Delayed Transmission 6 1 To Cancel the Delayed Transmission You have Set 6 4 Memory Transmission Broadcasting 6 5 Polling 6 8 Being Polled By a Remote Machine 6 8 Polling a Remote Machine 6 9 Chapter 5 The Answering Machine Checking Your T...

Page 9: ...C h a p t e r O n e YOUR NEW MACHINE 0 Chapter 1 GLOBAL 9 20 98 4 42 PM Page 1 ...

Page 10: ...me multiple destinations Choice of tone or pulse dialing Choice of four reception modes Transmission confirmation report print Memory transmission to send the same document to multiple destinations Delayed transmission to send the document at a later time Transmit Polling Receive Polling Voice request to signal a request to speak with the remote machineÕs operator during a transmit or receive oper...

Page 11: ...iece is missing or broken call your dealer Common Parts Machine Handset Document Tray Document Exit Tray Coiled Handset Cord Print Cartridge Part No INK M10 Substitute INK M20 AC Power Cord Telephone Line Cord Battery for SF3000T only The shape of power and telephone line cord plugs may differ depending on your country 0 Chapter 1 GLOBAL 9 20 98 4 42 PM Page 3 ...

Page 12: ...e pictures on the next few pages Document Tray Document Guide Handset Cradle Handset Extend Tray Control Panel Document Exit Tray Front View 0 0 0 0 0 0 0 0 0 0 0 0 0 0 0 0 0 0 0 0 0 0 0 0 0 0 0 0 0 0 0 0 0 0 0 0 0 0 0 0 0 0 0 0 0 0 0 0 0 0 0 Rear View Inside AC Power Socket EXT LINE Jack SF3000 only TEL LINE Jack Print Cartridge 0 Chapter 1 GLOBAL 9 20 98 4 42 PM Page 4 ...

Page 13: ...tion such as Call Waiting Redial Pause Use to redial the last number called You can also use it to add a pause when storing a number in memory and Volume Scroll Use to display the next or last menu item to adjust volume or move the cursor to the digit you want to edit Microphone SF3000T only Answer SF3000T only Turns on the answering mode Lights up when in TAD Telephone Answering Device mode and b...

Page 14: ...l V Req Dial numbers and speak to someone without picking up the handset Also used to signal a voice request after sending or receiving documents Number Keypad Dial numbers manually or enter letters I 1 SF3000T only Use to skip back to the previous message I 3 SF3000T only Use to skip forward to the next message Help Prints out the Help list The Help list shows the machineÕs basic functions and co...

Page 15: ...axing makes use of processes very much like an office copier When you send a fax document to someone the machine makes an internal copy of it a facsimile hence the term ÒfaxÓ and converts that copy to electronic signals which we call ÒdataÓ The data is then sent out over the telephone line as a series of audible tones When you receive a fax from someone else the copy process simply converts these ...

Page 16: ...be better After a few seconds exchanging pleasantries handshaking the machines decide to get down to the business of the call sending and receiving a fax document A fax document is one or more sheets of paper which have been placed in the transmitting sending or TX machine As soon as the machines have finished with their ÒintroductionsÓ the document begins to move through the transmitting machine ...

Page 17: ...C h a p t e r T w o INSTALLATION AND SETUP 0 Chapter 2 GODREJ 9 20 98 5 06 PM Page 1 ...

Page 18: ...humidity It is not too close to heating or air conditioning vents Its ventilation openings arenÕt blocked It is at least 4 inches away from other objects Its cords wonÕt get in the way It canÕt be easily knocked off a table or dropped It is neither dusty nor dirty Connections Connection Diagram CHAPTER TWO INSTALLATION AND SETUP 2 1 0 0 0 0 0 0 0 0 0 0 0 0 0 0 0 0 0 0 0 0 0 0 0 0 0 0 0 0 0 0 0 0 0...

Page 19: ... jack on the handset Then plug the other end into the modular jack on the left side of the machine Handset 1 Insert the two tabs on the document tray into the slot on the top of your machine 2 Fold out the extender on the document tray if necessary Document Tray Extender 0 Chapter 2 GODREJ 9 20 98 5 06 PM Page 3 ...

Page 20: ...t tray into the slots on the front of your machine 2 Fold out the extender if necessary Document Exit Tray Document exit tray Extender Plug one end of the telephone line cord into the TEL LINE jack and the other end into a standard phone wall jack Telephone Line 0 Chapter 2 GODREJ 9 20 98 5 06 PM Page 4 ...

Page 21: ...Plug one end of the cord into the back of the machine and the other end into a standard grounded AC socket The machine turns on and the LCD displays ÔSYSTEM INITIALÕ If there is no cartridge installed or no paper the display shows ÔNO CARTRIDGEÕ or ÔPAPER EMPTYÕ To turn the machine off unplug the power cord Note If documents are deleted from memory due to a power failure the machine automatically ...

Page 22: ...lasts longer than a conventional battery The battery can maintain the internal memory for about 20 hours If the backup battery is weak or missing the LCD displays a warning message 1 Lift the control panel and open the cartridge compartment cover 2 Remove the old battery if necessary Connect the new battery to the clips 3 Insert the battery into the battery slot 4 Close the cartridge compartment c...

Page 23: ... sheets of paper 2 Fan the paper and insert with the print side facing you 3 Squeeze the left paper guide and move it to the right to match the width of the paper See Page 2 20 to set paper type and size Note The machine is preset to load A4 size paper To load letter or legal size paper you have to set ÔPAPER SIZEÕ option to the desired size See page 7 7 Paper support Paper Guide 0 Chapter 2 GODRE...

Page 24: ...d open the Cartridge Compartment cover 1 Press Menu 2 Press 1 or or until Ô1 CHANGE CART Õ is displayed then press Start Copy When the machine is powered up without the print cartridge installed the LCD displays ÔNO CARTRIDGE Õ 4 Remove the new print cartridge from its packaging Hold the print cartridge by the black areas or colored top only Do not touch the copper area Cartridge Compartment cover...

Page 25: ...carrier 7 Push the cartridge firmly in the direction of the arrow until it clicks into place 8 After installing the print cartridge close the cover and replace the control panel 5 Carefully remove the tape covering the printhead Be sure to remove all the tape 0 Chapter 2 GODREJ 9 20 98 5 06 PM Page 9 ...

Page 26: ...e A broken line shows any clogged nozzles Run the Nozzle Test See page 8 7 If the diagonal lines are not broken and the black bars are clear the printer is working properly See the sample pattern below Sample of test pattern Note When you put in a new cartridge you must choose ÔNEWÕ When you put in a used cartridge choose ÔUSEDÕ which helps you check the amount of ink you have left If you mix up s...

Page 27: ...Adjust the document guide to match the width of the document à If you do not select contrast within 2 seconds ÔAUTOÕ is selected and the display returns to the date and time screen 3 Feed the document into the machine The automatic document feeder pulls in the page The display asks you to choose the proper contrast if you need to LIGHT AUTO DARK 4 If needed press or to choose the desired contrast ...

Page 28: ... you to enter the number of copies 01 to 50 Copying begins The display shows the page number that is being printed 7 If you need two or more copies enter the desired number using the dial keypad ABC DEF 1 2 3 4 5 JKL GHI MNO TUV PQRS WXYZ 1 2 3 4 5 6 7 8 9 0 8 Press Start Copy when the number in the display is correct 2 3 4 Stop Start Copy PAGE 01 50 01 COPY FINE P 1 5 If needed press Resolution t...

Page 29: ... 4 Start Copy Z The display asks you to enter the telephone number TEL _ 2 SET ID DATE System ID Your Number and Name à You can select it by pressing or followed by Start Copy 1 Press Menu Menu Speed Resolution Flash 2 Press 2 on the number keypad ABC DEF JKL GHI MNO 1 2 3 4 5 6 The display asks you to choose ÔIDÕ or ÔDATE TIMEÕ ID DATE TIME 3 Press Start Copy 2 3 4 Start Copy à The blinking means...

Page 30: ...the number To enter a space press Redial Pause To enter a hyphen press To enter plus symbol press If you enter a wrong number use or to move the blinking cursor under the number then enter the correct number 5 Enter the telephone number to which your machine is connected ABC DEF 1 2 3 4 5 JKL GHI MNO TUV PQRS WXYZ 1 2 3 4 5 6 7 8 9 0 Using the Keypad to Enter Letters These instructions assume that...

Page 31: ...Assigned numbers letters or characters 2 When the letter you want appears in the display press another number key labeled with the next letter you want ABC DEF 1 2 3 4 5 JKL GHI MNO TUV PQRS WXYZ 1 2 3 4 5 6 7 8 9 0 Ã If the next letter is printed on the number button you are currently using move the cursor by pressing then press the next button The blinking cursor moves right and the next letter ...

Page 32: ...ETUP 2 15 Ã You can select it by pressing or followed by Start Copy Date and Time 4 Press to choose ÔDATE TIME Rcv Mode Redial Pause Volume Scroll 1 Press Menu Menu Speed Resolution Flash 5 Press Start Copy 2 3 4 Start Copy 2 Press 2 on the number keypad ...

Page 33: ...C h a p t e r T h r e e AUTOMATIC DIALING 0 Chapter 3 GODREJ 9 20 98 4 44 PM Page 1 ...

Page 34: ... insert a pause between numbers press Redial Pause a Ô Õ appears in the display If you make a mistake while entering a number use or to move the cursor under the digit then enter the correct digit 4 When the number appears correctly in the display press Start Copy 2 3 4 Start Copy 2 3 4 Start Copy The display asks you to enter a number T01 _ The display asks if you want to register one touch or gr...

Page 35: ...opy WXYZ 2 3 5 6 8 9 0 2 If you are making a phone call pick up the handset when the other person answers à If there is no number stored ÔNO NOT ASSIGNEDÕ appears To stop One Touch dialing press Stop à If a document is loaded in the document tray the document will be scanned into memory automatically and begins to transmit when the remote fax machine answers the phone If no answer the display will...

Page 36: ...ign the telephone or fax number ABC DEF 1 2 3 4 5 JKL GHI MNO TUV PQRS WXYZ 1 2 3 4 5 6 7 8 9 0 The display asks you to enter the location you wish to assign The display shows the selected location number Speed Dialing You can store up to 50 telephone or fax numbers in 2 digit Speed Dial locations Storing a Number for Speed Dialing LOC 01 50 S01 _ Ã To insert a pause between numbers press Redial P...

Page 37: ...L GHI MNO TUV PQRS WXYZ 1 2 3 4 5 6 7 8 9 0 Ã For more information on how to enter letters using the number keypad see page 2 13 The display asks you to enter a name up to 20 characters 7 Press Start Copy 2 3 4 Start Copy 5 When the number appears correctly in the display press Start Copy 2 3 4 Start Copy NAME _ 0 Chapter 3 GODREJ 9 20 98 4 44 PM Page 5 ...

Page 38: ...ocation number The display shows the name then the number stored in the selected location The number will be automatically dialed You hear the dialing process through the speaker Dialing a Speed Number à If there is no number stored ÔNO NOT ASSIGNEDÕ appears To stop the dialing press Stop à If a document is loaded in the document tray the document begins to transmit when the remote fax machine ans...

Page 39: ...e Touch button you want to use for Group Dial for 2 seconds ABC DEF 1 2 3 4 5 JKL GHI MNO TUV PQRS Help OHD V Req Stop Start Copy WXYZ 1 2 3 4 5 6 7 8 9 0 2 Press or to select GROUPÕ Rcv Mode Redial Pause Volume Scroll 3 Press Start Copy 2 3 4 Start Copy The display asks if you want to register a One Touch or Group Dial number ONE T GROUP Ã Where xxÕ is the selected one touch button number i e 3 0...

Page 40: ...ows any number stored in the selected 2 digit Speed Dial location The display asks you to enter a Speed Dial number to include in the Group ENTER SPEED 2 3 4 Start Copy 6 Press Start Copy 7 Repeat steps 5 and 6 to enter more destination numbers into the selected Group 8 When you have entered all the desired destinations press Stop Stop The display asks you to enter a name up to 20 characters NAME ...

Page 41: ... use Group Dialing for Memory and Delayed Transmissions Follow the procedure for the desired operation Memory Transmission p 6 5 Delayed Transmission p 6 1 When you come to a step in which the LCD requests the remote fax number press the One Touch button under which you stored the Group number You can use only one Group number per operation Then continue the procedure to complete the desired opera...

Page 42: ...AUTOMATIC DIALING CHAPTER THREE AUTOMATIC DIALING 3 9 MEMO 0 Chapter 3 1 GODREJ 9 20 98 4 43 PM Page 4 ...

Page 43: ...C h a p t e r F o u r THE FAX MACHINE 0 Chapter 4 GODREJ 9 20 98 5 14 PM Page 1 ...

Page 44: ...0 15 mm thick chemically processed pressure sensitive paper carbon coated paper etc coated glossy etc too small or short such as a label voucher etc made of cloth or metal To send these documents use an office copier to make a photocopy first and then send the copy CHAPTER FOUR THE FAX MACHINE 4 1 Single Sheet 8 26 in 210 mm Effective Scanning Width Uncoated on both sides Paper Quality Document Si...

Page 45: ...AUTO or DARK LIGHT works with very dark print AUTO works well for normal handwritten typed or printed documents DARK works with light print or faint pencil markings After the document has been loaded press Resolution to increase the sharpness and clarity By pressing Resolution repeatedly you can choose STANDARD FINE SUPER FINE or PHOTO mode STANDARD works well for printed or typewritten originals ...

Page 46: ... time If the document doesnÕt feed correctly open the control panel remove the document and try loading it again à Each time you press Resolution FINE SUPER FINE PHOTO or STANDARD are displayed in sequence à The selected mode flashes The contrast is preset to AUTO For a normal document it is not necessary to change the contrast Skip over this step 4 If needed choose the proper contrast for the doc...

Page 47: ...have dialed is busy or there is no answer the machine will automatically redial the number every three minutes up to two times Before redialing the machine asks ÔBUSY RETRY Õ If you want to redial the number immediately press Start Copy To stop redialing press Stop à You can store One Touch or Speed Dial numbers so that you can dial your most frequently used numbers with one touch of a button or a...

Page 48: ...l while sending a fax For more information about the Voice Request feature see page 4 13 à You can store One Touch or Speed Dial numbers so that you can dial your most frequently used numbers with a touch of a button or 2 digit Speed Dial number For more information see page 3 1 3 Press Start Copy when you hear the fax tone 2 3 4 Start Copy à If a person answers the telephone ask him or her to pre...

Page 49: ...fax signal it will give another ringing tone to tell you it is a phone call You should lift the handset to answer the call If you do not pick up the handset on your fax machine it will switch to automatic reception mode 4 In TAD mode on SF3000T the machine operates as in AUTO mode except that the caller can leave an incoming message on your machine as well as a fax To use TAD mode on SF3000 you ha...

Page 50: ...L MODEÕ is displayed Resolution Flash Rcv Mode Redial Pause Volume Scroll 2 When the telephone rings pick up the handset and answer it 3 If you hear a fax tone or if the person on the other end asks you to receive a document press Start Copy and hang up the handset 2 3 4 Start Copy Receiving Manually in TEL Mode In Standby Mode FAX appears in the right hand corner of the display 20 JUN 10 30 FAX I...

Page 51: ...wer the call or it will switch to automatic reception mode 2 When a call comes in the machine answers it If a fax is being sent the machine goes into receive mode If the machine does not detect a fax signal it will continue ringing to tell you it is a phone call 1 Press Rcv Mode repeatedly until ÔAUTO MODEÕ is displayed Resolution Flash Rcv Mode Redial Pause Volume Scroll Receiving in AUTO Mode SF...

Page 52: ... OGM for AUTO mode press Start Copy Any greeting message previously recorded is automatically played back so that you can check it Stop When a call comes in the machine answers it If a fax is being sent the machine goes into receive mode If the machine does not detect a fax signal it will continue ringing to tell you it is a phone call à You should pick up the handset to answer the call or it will...

Page 53: ...le ring counterÕ set the machine to answer an incoming call within 4 rings or less If the sound level of the call is too low because of a poor phone connection the fax machine or answering machine may not work properly When you are using manual reception mode on your machine and you have an answering machine you must make sure you switch off the answering machine or the outgoing message will inter...

Page 54: ... the memory becomes full when a caller leaves a message your machine sounds warning beeps and disconnects the line If the Call Transfer feature is on and a new message is recorded the machine will dial the specified phone number to alert you that there is a message recorded in memory For more information on the Call Transfer feature see page 5 4 Ã To turn off TAD mode press Answer The backlight of...

Page 55: ...n telephone 1 When you receive a call on the extension phone and hear fax tones press the buttons Ô 9 Õ on the extension telephone The machine receives the document Ã Ô 9 Ô is the remote receive start code preset at the factory The first and the last asterisks are fixed but you can change the middle digit to whatever you choose For more information see page 7 9 1 Press Stop to cancel reception at ...

Page 56: ...e end Sending a Voice Request 1 Press OHD V Req while a document is being sent or received OHD V Req à You canÕt talk with the other person and send a fax at the exact same time If the other person does not answer your request your fax machine automatically hangs up and returns to Standby Mode 2 When the phone rings pick up the handset and answer it à You can cancel a Voice Request by pressing OHD...

Page 57: ...C h a p t e r F i v e THE ANSWERING MACHINE This chapter is for SF3000T 0 Chapter 5 GODREJ 9 20 98 5 11 PM Page 1 ...

Page 58: ...UTO OGM ICM is about 12 minutes Checking Your TAD Greeting Message For information about how to record your first TAD greeting message see page 2 19 Monitoring an Incoming Call 1 Press OGM Play Erase OGM Ã If you have not yet recorded a TAD greeting message an error appears in the display You must record a TAD greeting message before you can set the machine to TAD mode To change a previously recor...

Page 59: ... message plays back The machine briefly displays the date and time when the message was recorded then starts to play the message TIME 09 10 12 45 This procedure is repeated for all messages ICM 20s 01 03 1 Press and hold Play until you hear a beep Play Answer Erase OGM Playing Back All Messages à To stop listening before you reach the end of the messages press Stop or Play à For more information s...

Page 60: ... more and more messages are recorded on your machine the memory fills up To make sure thereÕs room for new messages erase the messages youÕve already listened to as soon as you know youÕll no longer need them If the memory has no room before the caller finishes talking the machine automatically returns to Standy Mode after some beeps This is why you have to erase old messages 1 Press and hold Eras...

Page 61: ...ect password is entered while your machine sends out beeps the machine plays the newly recorded message When the playback is complete you hear a short beep You can then enter another remote command to perform another operation if you choose See ÔUsing remote commandsÕ on page 5 7 If there is no key input or the wrong password is entered while the machine sends out beeps the machine releases the li...

Page 62: ...d press Stop 2 3 4 Start Copy The display asks you to enter the number of the remote fax machine TEL _ 5 Press Start Copy 2 3 4 Start Copy The display asks you to choose ÔONÕ or ÔOFFÕ ON OFF Ã Your machine will dial this number each time a new message is recorded in TAD mode If you have already entered a phone number the number appears in the display If you want to change the number just enter a n...

Page 63: ... remote codes 3 Enter the remote command that corresponds to the operation you want to perform When the specified operation is complete you hear a short beep 1 2 3 4 5 6 7 8 9 0 Ã After you hear the confirmation tone you have 10 seconds to enter a command For more information about remote commands see page 5 7 2 When the machine answers with the greeting enter the remote password When the correct ...

Page 64: ...xits from remote control mode 1 Changes the greeting message After entering the command speak into the handset When you finish press 1 again If you run out of recording time the machine stops and plays back the message 2 Plays back all messages The machine beeps and plays all messages If there are no messages the machine beeps four times and waits for another command to be entered 3 Reserved 4 Ski...

Page 65: ...u can not turn on this feature from a remote phone 2 Changes Call Transfer destination number and turns on the feature Press 2 When you hear the confirm tone 2 short double beeps enter the new destination number You cannot include as a dial number Use to insert a PAUSE between numbers When you finish entering number press 3 Turns off Call Transfer feature Exits the fax machine from answering mode ...

Page 66: ...THE ANSWERING MACHINE CHAPTER FIVE THE ANSWERING MACHINE 5 9 MEMO 0 Chapter 5 GODREJ 9 20 98 5 11 PM Page 10 ...

Page 67: ...C h a p t e r S i x ADVANCED OPERATIONS 0 Chapter 6 GODREJ 9 20 98 5 09 PM Page 1 ...

Page 68: ...ending the same documents to many different locations Note You can store only one delayed transmissing job in memory Delayed Transmission You can set your machine to send a fax at a later time when you will not be present 1 Turn the document face down and feed the page into the machine à If needed choose the desired contrast for the document by using or If needed choose the desired resolution for ...

Page 69: ... to enter another fax number à The machine shows the ÔANOTHER Õ message up to 10 times each time you enter another fax number The display asks you to enter a name 5 Enter the number of the remote machine ABC DEF 1 2 3 4 5 JKL GHI MNO TUV PQRS WXYZ 1 2 3 4 5 6 7 8 9 0 à You can press a One Touch or Group Dial button Otherwise press Speed and enter a 2 digit Speed Dial number ANOTHER Y N NAME _ à Fo...

Page 70: ...set a time earlier than the current time the document will be sent at that time on the following day à The display shows the remaining memory If you have entered several fax numbers in step 6 the message shown at left does not appear and the documents will be stored in memory automatically 9 Press Start Copy 2 3 4 Start Copy START 10 20 TO MEMORY Y N 12 To store the document in memory press Start ...

Page 71: ...r keypad JKL GHI MNO TUV PQRS WXYZ 4 5 6 7 8 9 4 To cancel the delayed transmission press Start Copy 2 3 4 Start Copy à The reserved transmission is now canceled To stop press Stop The display asks if you want to cancel CANCEL JOB Y N à You can select it by pressing or followed by Start Copy 3 Press Start Copy 2 3 4 Start Copy 0 Chapter 6 GODREJ 9 20 98 5 10 PM Page 5 ...

Page 72: ... the number of the remote machine TEL _ 2 Press Menu 3 Press 8 on the number keypad Menu Speed Resolution Flash TUV PQRS WXYZ 7 8 9 0 1 Turn the document face down and feed the page into the machine à If needed choose the desired contrast for the document by using or Choose the desired resolution for the document by pressing Resolution For details on setting contrast and resolution see page 4 2 8 ...

Page 73: ...e location press or to choose YÕ Yes press Start Copy and repeat steps 4 6 or To send to one location or when you complete the last fax number setting press Start Copy after choosing NÕ No when the display reads ÔANOTHER Õ The display asks you to enter a name NAME _ Ã For details on how to enter letters using the number keypad see page 2 13 8 If you want to assign a name to the transmission enter ...

Page 74: ...YÕ and then if you press Start Copy the memory will be erased You should then divide your pages into two separate transmissions or send them from the feeder If you press Stop the pages which were stored will be sent You should send the remaining pages later when memory is available The display shows the number being dialed then the machine begins sending the document TO MEM P 1 99 DIALING 5551212 ...

Page 75: ...the previous one is completed à The machine automatically switches to Fax mode automatic transmitting when set to be polled To cancel the polling transmission remove the document being loaded POLL TX 2 Press Menu 3 Press 6 on the number keypad Menu Speed Resolution Flash JKL GHI MNO TUV PQRS WXYZ 4 5 6 7 8 9 The machine returns to Standby Mode and the display shows a reminder that a Polling Transm...

Page 76: ...3 Press Start Copy 2 3 4 Start Copy Z Your machine starts to receive the document from the remote machine RX POLL RX The display asks if you want to poll another machine à You cannot receive a document if the machine you are polling uses a Poll Code Note Not all fax machines have polling capability and polling incompatibility sometimes occurs between fax machines from different manufacturers There...

Page 77: ...C h a p t e r S e v e n SPECIAL FEATURES 0 Chapter 7 GODREJ 9 20 98 5 21 PM Page 1 ...

Page 78: ...begins to send à If this is a phone call pick up the handset when the other person answers DIALING 5551212 TX à When you dial a number the dialing process pauses for about 3 seconds at the point where you pressed Redial Pause If you require a longer pause time press Redial Pause twice To Insert a Pause With some private telephone systems you must dial an access code 9 for example and listen for a ...

Page 79: ...ing numbers required by the service ABC DEF 1 2 3 4 5 JKL GHI MNO TUV PQRS WXYZ 1 2 3 4 5 6 7 8 9 0 0 Ã The machine returns to pulse dial mode after you finish the call Using Flash When a call comes in and you want to connect the caller to another person you can transfer the call by pressing Flash and dialing the number of that other person You may not be able to use it with some phone systems Con...

Page 80: ...mple in one memory location and the rest of the information such as your card number in another memory location Dial the phone number of the special service first Then when the computer answers dial the rest of the information such as a long distance number We call this procedure Chain Dialing 3 When the computer answers dial the next information by pressing a One Touch button ABC DEF 1 2 3 4 5 JK...

Page 81: ...stored for delayed transmission The list shows the operation number starting time type of operation etc Message Confirmation Report This report shows the fax number the number of pages elapsed time of the operation the communication mode and the communication results Set up your machine to print the Message Confirmation Report see page 7 9 as you prefer Automatically after each transmission ON Aut...

Page 82: ...to print by using or Rcv Mode Redial Pause Volume Scroll 5 Press Start Copy when the desired list is displayed 2 3 4 Start Copy 1 Press Menu Menu Speed Resolution Flash The selected list will print PRINTING 4 LIST PRINT Ã You can select it by pressing or followed by Start Copy 3 Press Start Copy 2 3 4 Start Copy 0 Chapter 7 GODREJ 9 20 98 5 21 PM Page 6 ...

Page 83: ... Speed Resolution Flash 2 Press 3 on the number keypad ABC DEF 1 2 JKL MNO 2 3 5 6 3a For SF3000T users the display asks you to choose FAX or TAD option FAX TAD 3b For SF3000 users the display shows the first option menu Go to step 5 1 DIAL TYPE 4 SF3000T users should select ÔFAXÕ or ÔTADÕ by using Then press Start Copy Rcv Mode Redial Pause Volume Scroll à You can select it by pressing or followe...

Page 84: ...X OptionsÕ below and ÔTAD OptionsÕ on page 7 10 5 Scroll through the options you want to set by pressing or repeatedly Rcv Mode Redial Pause Volume Scroll FAX Options These instructions assume youÕve followed the steps above under ÔSetting an OptionÕ and the machine is prompting you to change one of the options listed here DIAL TYPE_Select the type of dial system your fax machine is connected to C...

Page 85: ...y select Vertical Reduction YES or NO When you select vertical Reduction to be YES the machine will reduce an incoming page containing overflow data only in vertical as shown below If you want to reduce both in vertical and horizontal at the same rate in order to maintain height to width relationships turn the Vertical Reduction feature NO If you turn off this feature the machine reduces the data ...

Page 86: ...up the extension phone and hear fax tones enter the remote receive code and the fax will start receiving The password is preset to 9 at the factory Enter the desired code 0 to 9 on the number keypad ERROR CORRECTION MODE_This mode compensates for poor line quality and ensures accurate error free transmission with any other ECM equipped facsimile machine If the line quality is poor transmission tim...

Page 87: ... The machine doesnÕt accept double continuous character codes 11 22 etc as passwords because line conditions can occasionally make the machine fail to recognize a double digit code Enter the characters you want to use then press Start Copy BATTERY ALARM You can turn on the Battery Alarm feature With this feature on the machine displays a low or no battery message in the LCD and sounds beeps to ale...

Page 88: ...the machineÕs memory SYSTEM DATA restores user selectable options to their default value DIAL SCHEDULE clears the One Touch Speed Dial or Group Dial numbers stored in memory In addition all the Scheduled Job time operations you have reserved are also canceled TX RX JOURNAL clears all records of transmissions receptions SYSTEM ID 6 Press Start Copy when you find the memory you want to erase 2 3 4 S...

Page 89: ...C h a p t e r E i g h t CARE AND MAINTENANCE 0 Chapter 8 GODREJ 9 20 98 5 16 PM Page 1 ...

Page 90: ... fax machine wonÕt be clear Note If you turn the power off to clean the scanner documents stored in memory will be lost 1 Open the control panel 2 Disassemble the white roller as follows Both ends of the white roller have bushings that are secured with small white tabs as shown Push each tab slightly inward then rotate towards you Then pull the roller upward 3 Wipe the roller surface with a soft c...

Page 91: ...e control panel firmly until it clicks into place 4 Clean the ADF rubber piece also 5 Carefully wipe the scanning glass with a soft dry cloth If the glass is very dirty first wipe it with a slightly dampened cloth then with a dry one Be careful not to scratch the glass surface 0 Chapter 8 GODREJ 9 20 98 5 16 PM Page 3 ...

Page 92: ...e unit store it in an airtight plastic bag Do not leave it exposed for an extended period Replacing the Print Cartridge The print cartridge includes the ink supply and the printhead Each time you replace the print cartridge you are replacing the printhead as well When you notice that the print becomes light or ÔINK LOWÕ appears in the display replace your cartridge 1 Press Menu then 1 or or until ...

Page 93: ...nd carefully remove the tape covering the print head Hold the Cartridge by the colored top or black areas only Do not touch the copper area 6 Insert the print cartridge in the cartridge holder then push firmly until it clicks into place If the Print Cartridge moves loosely in the carrier it has not clicked into place Repeat this step 7 Replace the Cover and Control Panel 0 Chapter 8 GODREJ 9 20 98...

Page 94: ...t pattern Examine the test pattern and look for a break in the diagonal line For a sample pattern see page 2 9 A broken line shows any clogged nozzles Run the nozzle test See page 8 7 Note When you put in a new cartridge you must choose ÔNEWÕ When you put in a used cartridge choose ÔUSEDÕ this helps you check the amount of ink you have left If you mix up several used cartridges it will be difficul...

Page 95: ...nter is functioning properly 1 Press Menu Menu Speed Resolution Flash 2 Press 0 on the number keypad Help 0 3 Press Start Copy 2 3 4 Start Copy 4 Press Start Copy 2 3 4 Start Copy The display asks if you want to run self test SELF TEST Ã You can select it by pressing or followed by Start Copy 0 Chapter 8 GODREJ 9 20 98 5 17 PM Page 7 ...

Page 96: ...rove remove and reinstall the print cartridge See ÔReplacing the Print CartridgeÕ on page 8 3 for complete instructions on removing and reinstalling a print cartridge Repeat the nozzle test If the line is still broken wipe the nozzles and contacts For help see ÔWiping the Print Nozzles and ContactsÕ on page 8 9 1 Press Menu Menu Speed Resolution Flash 2 Press 0 on the number keypad 4 Press or repe...

Page 97: ...ress Menu Menu Speed Resolution Flash 4 Press or repeatedly until ÔINK LEVEL VIEW Õ is displayed 5 Press Start Copy 2 3 4 Start Copy INK LEVEL VIEW Rcv Mode Redial Pause Volume Scroll 2 Press 0 on the number keypad Help 0 3 Press Start Copy 2 3 4 Start Copy The display shows a number of blocks indicating the ink level 8 8 à Press Stop to return to Standby Mode à You can select it by pressing or fo...

Page 98: ...and deflector 1 Remove the Print Cartridge See ÔReplacing the Print CartridgeÕ on page 8 3 2 Use a clean cloth dampened with water only to gently clean the entire copper colored area including the nozzles and contacts To dissolve any dried ink hold the damp cloth against the nozzles for about three seconds Gently blot and wipe dry nozzles contact area 3 Reinstall the Print Cartridge If the line is...

Page 99: ...he Print CartridgeÕ on page 8 3 3 Use a CLEAN DRY CLOTH to clean the Print Cartridge Carrier contacts inside the printer cartridge carrier 4 Clean the Carrier Deflector inside the printer 5 Plug in the power cord and install the Print Cartridge See page 2 7 Note You must choose ÔUsedÕ when the display reads Ô NEW USEDÕ after you install the cartridge if using the same cartridge carrier deflector 0...

Page 100: ...able or split the new document into smaller parts MONO INSTALLED The Print Cartridge installed in your machine is a mono black cartridge NO ANSWER The other machine has not answered after all your attempts to redial Or the other operator does not press START LOW BATTERY SF3000T Only The backup battery is weak Replace the battery See page 2 5 NO BATTERY SF3000T Only The backup battery is not instal...

Page 101: ...Place the handset in its cradle POLLING ERROR TOO MUCH PAGES RECEIVE ERROR SEND ERROR The machine you want to poll is not ready to answer your poll The person you are polling should have loaded their fax machine with a document This message also appears when you poll another fax machine with an incorrect Poll Code You have tried to store more than 99 pages One memory job can store up to 99 pages A...

Page 102: ... document does not feed into the machine Be sure the document is not wrinkled and you are putting it in correctly Check that the document is the right size not too thick or thin The machine will not send anything Check that the document is loaded face down ÔTXÕ should show up in the display You may have hung up the handset before you pressed Start Copy Check if the machine to which you are sending...

Page 103: ... with a remote fax machine The remote fax machine may be turned off out of recording paper or unable to answer incoming calls Speak with the remote operator and ask for the problem to be rectified You cannot store a document in memory There may not be enough available memory to hold the document you want to store If the display shows a ÔMEMORY FULLÕ or ÔMEMORY LOWÕ message delete any documents you...

Page 104: ...rs Make sure the paper is straight and unwrinkled Let ink dry before handling the paper Clean the Print Cartridge See ÔRun Nozzle TestÕ on page 8 7 Characters with white lines If ÔINK LOWÕ is displayed install a new print cartridge See ÔReplacing the Print CartridgeÕ on page 8 3 Remove and reinstall the Print Cartridge Clean the Print Cartridge See ÔRun Nozzle TestÕ on page 8 7 Solution Improperly...

Page 105: ... feed Remove any obstructions inside the printer Solution Paper skews or buckles in the automatic sheet feed Make sure there is not too much paper in the bin The paper bin can hold up to 100 sheets Make sure the paper guides do not cause the paper to bow in the bin When loading paper do not force it down into the printer Make sure the envelope guide is not in the envelope position Multiple sheets ...

Page 106: ...f a document jams during transmission ÔDOCUMENT JAMÕ appears in the LCD DO NOT pull the document out of the slot Doing so could harm your machine 2 Carefully remove the jammed document 1 Open the control panel 3 Close the control panel firmly until it clicks into place 0 Chapter 8 GODREJ 9 20 98 5 17 PM Page 18 ...

Page 107: ...paper is jammed in the Received Paper Output Area If the paper is jammed in the Paper Feed Area Remove the jammed paper as shown in the figure After removing the jammed paper load new paper with the print side facing you Remove the jammed paper by hand as shown 8 18 CHAPTER EIGHT CARE AND MAINTENANCE 8 CARE AND MAINTENANCE 0 Chapter 8 GODREJ 9 20 98 5 17 PM Page 19 ...

Page 108: ...CHAPTER EIGHT CARE AND MAINTENANCE 8 19 CARE AND MAINTENANCE MEMO 0 Chapter 8 GODREJ 9 20 98 5 17 PM Page 20 ...

Page 109: ...A p p e n d i x 0 Chapter 9 GODREJ 9 20 98 5 24 PM Page 1 ...

Page 110: ...width 8 inches 203 millimeters Power consumption Stand by 13 Watts Maximum In use 26 Watts Temperature range 50 F to 95 F 10 C to 35 C Humidity range 20 to 80 RH non condensing Dimension WxDxH 384 x 330 x 183 mm Weight 4 5 kg Power source See power label attached near the power outlet Scan resolution 200 dpi ADF 15 sheets 0 075 0 12 mm thick ECM mode YES Sending resolution Standard 3 85 lines mm F...

Reviews: