background image

0_

 setup

setup

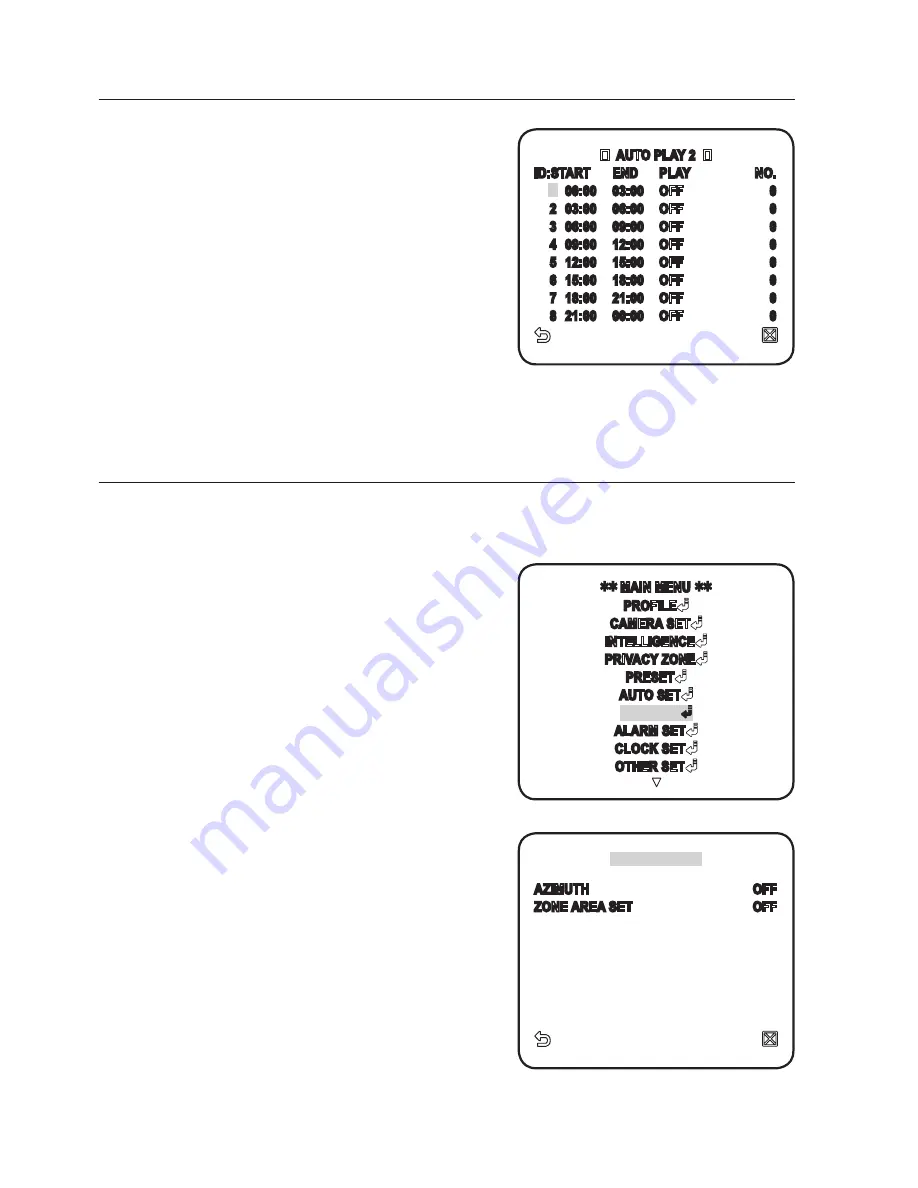
AUTO PLAY2 : Select the auto play 
action and set its starting / ending time. 
When the time hits the defined starting 
time, configured auto play will begin. 
You can set between 1 ~ 4 for SCAN or 
AUTO PAN, 1 ~ 3 for PATTERN, and  
0 ~ 511 for PRESET.

ZONE SET

You can set the north direction and the zone coverage.

For selecting and saving each menu item, refer to “

How to use the keyboard controller

”. (page 20)

Select <

mAIN mENU

>-<

ZONE SET

>.

Set <

AZImUTH

> to <

ON

>.

Set the north direction using the joystick 

and press [

ENTER

].

SET NORTH : In SET NORTH, press 

[

ENTER

] to set the north direction 

which will be the reference for all other 

directions.

Set <

ZONE AREA SET

> to <

ON

>.

1.

2.
3.

4.

  ZONE SET  

AZIMUTH 

OFF 

ZONE AREA SET 

OFF 



 MAIN MENU 



PROFILE

CAMERA SET

INTELLIGENCE

PRIVACY ZONE

PRESET

AUTO SET

ZONE SET

ALARM SET

CLOCK SET

OTHER SET

  AUTO PLAY 2  

ID: START  END  PLAY 

NO.


1

   00:00  03:00  OFF 

0

  2   03:00  06:00  OFF 

0

  3   06:00  09:00  OFF 

0

  4   09:00  12:00  OFF 

0

  5   12:00  15:00  OFF 

0

  6   15:00  18:00  OFF 

0

  7   18:00  21:00  OFF 

0

  8   21:00  00:00  OFF 

0

Summary of Contents for SCP-2430H

Page 1: ...Smart Dome Camera User Manual SCP 2430H ...

Page 2: ...RNING Be sure to use only the standard adapter that is specified in the specification sheet Using any other adapter could cause fire electrical shock or damage to the product Incorrectly connecting the power supply or replacing battery may cause explosion fire electric shock or damage to the product Do not connect multiple cameras to a single adapter Exceeding the capacity may cause abnormal heat ...

Page 3: ...ce between internal and external temperature CAUTION Do not drop objects on the product or apply strong blows to it Keep away from a location subject to excessive vibration or magnetic interference Do not install in a location subject to high temperature over 50 C low temperature below 50 C or high humidity Doing so may cause fire or electric shock If you want to relocate the already installed pro...

Page 4: ...tect the power cord from being walked on or pinched particularly at plugs convenience receptacles and the point where they exit from the apparatus Only use attachments accessories specified by the manufacturer Use only with the cart stand tripod bracket or table specified by the manufacturer or sold with the apparatus When a cart is used use caution when moving the cart apparatus combination to av...

Page 5: ... 10 Precautions 10 Preparation 11 Installation 14 Initial Setup 17 Connecting With Other Device setup 20 20 How to use the Keyboard Controller 21 Main Menu 22 Profile 24 Camera Set 33 Intelligent Video 34 Privacy Zone 35 Preset 37 Auto Set 40 Zone Set 41 Alarm Set 43 Clock Set 43 Other Set 45 Communication 45 System Info appendix 46 46 Shortcut Keys 47 Specifications 49 Product Appearance ...

Page 6: ...onversion into the black and white mode at night or in the environment with low illumination White Balance to control the brightness to the illumination Backlight Compensation under spotlight or utmost bright illumination Auto Focus to automatically adjust the focus to the subject movement Privacy zone to hide a specific area for personal privacy PAN TILT for precise control at high speed What s I...

Page 7: ...lish _ English At a Glance CAMERA FRAME SET Wipe out a dirty surface of the lens softly with a lens tissue or cloth to which you have applied ethanol M LENS HOOK HOOK ALARM IN ALARM OUT RS 485 POWER INPUT ...

Page 8: ...T ADAPTOR SCX 300WM This is a wall mount adaptor used for wall mounted installation of SMART DOME CAMEA units CEILING MOUNT ADAPTOR SCX 300CM This is a ceiling mount adaptor used for installation of SMART DOME CAMEA units on a concrete ceiling POLE MOUNT ADAPTOR SCX 300PM This is an adaptor for WALL MOUNT ADAPTOR SCX 300WM installation on a pole whose diameter is bigger than 80mm 1 2 3 ...

Page 9: ...NT ADAPTOR SCX 300KM This is an adaptor for WALL MOUNT ADAPTOR SCX 300WM installation on the corner of wall joint PARAPET LONG MOUNT SCX 300LM This is a mounting kit used for installation of SMART DOME CAMEA units on a parapet 4 5 ...

Page 10: ...t weight When installing prevent peoples approaching to avoid personal injury Move valuables to a safer place before installing Preparation Run all the external cables through the bracket adaptor s PIPE or MOUNT hole Wrap around the HOUSING s screw hole with the Teflon Tape 1 2 PIPE OR MOUNT 1 5 PT EXTERNAL CABLE 1 5 PT TEFLON TAPE HOUSING ...

Page 11: ...d connect the CONNECTOR to the ADAPTOR Insert the cable into the FRAME SET and close the ADAPTOR Then wrap the BNC JACK with the INSULATION TUBE and use an insulation tape to seal up the end of the INSULATION TUBE so that the BNC JACK does not protrude outside of the INSULATION TUBE coating For more information about cable connection refer to Connecting the adaptor cable page 19 1 2 M PIPE OR MOUN...

Page 12: ...se of proper dose on the BUSHING before assembling and run cables through each hole of the bushings Use PINS to stop up empty holes having no cable running Assemble the BUSHING to the top side of HOUSING s inside as shown in the diagram below At the moment apply pressure evenly on the BUSHING to secure it tightly to the HOUSING as shown in the diagram BUSH BUSH ETC CABLE POWER 24V CABLE BNC CABLE ...

Page 13: ...from the lens Align each of the 3 SCREWS of COVER DOME and 3 SCREW HOLEs of the HOUSING respectively and assemble the COVER DOME and HOUSING During the assembling note on the followings Insert and arrange SAFETY WIRE into the HOUSING while not disturbing the camera operation Ensure that the GASKET DOME component does not separate from the COVER DOME If the GASKET DOME is not properly assembled it ...

Page 14: ...w Communication Protocol Setup Use pins 1 4 of SW603 to specify the communication protocol PIN Comp PIN1 PIN2 PIN3 PIN4 PIN7 A OFF OFF OFF OFF OFF B ON OFF OFF OFF OFF C OFF ON OFF OFF OFF D ON ON OFF OFF OFF E OFF OFF ON OFF OFF ON OFF ON OFF OFF OFF ON ON OFF OFF H ON ON ON OFF OFF I OFF OFF OFF ON OFF J ON OFF OFF ON OFF OFF ON OFF ON OFF ON ON OFF ON OFF OFF OFF ON ON OFF N ON OFF ON ON OFF O ...

Page 15: ...en Controller and RS 422A RS 485 is connected it should be terminated according to the Cable feature of impedance on the each end of the transmitting line to transfer the signals in long distance by controlling the reflection of the signals to the lowest Termination Using numbers 1 and 2 PIN turn to ON and it will be terminated Controller Termination n 32 Termination SW1 ON CAM n CAM n 1 CAM 2 CAM...

Page 16: ...nnection A communication error may occur if you connect multiple cameras that are assigned the same address in the network M Controller Termination n 32 Termination SW1 ON SW2 ON CAM n CAM n 1 CAM 2 CAM 1 RS 422A RS 485 Full Duplex Organization ...

Page 17: ...onnect one end of the BNC video cable connector to the Video Output Terminal VIDEO OUT Connect the other end of the connector to the Video Input Terminal of the monitor 1 2 Video terminal on the rear of monitor BNC Cable MONITOR ALARM IN POWER SOURCE ALARM OUT CONTROLLER DVR ...

Page 18: ... line to a corresponding ALARM OUT port of the monitor Connect the other end of the signal line to the common COM port To connect the controller Connect an external controller or DVR to the camera with which you can adjust the camera Connect the Rx pin of the camera to the Tx pin of the controller Connect the Rx pin of the camera to the Tx pin of the controller Connect the Tx pin of the camera to ...

Page 19: ...aptor cable Power Supply Connect the cables as necessary and turn on the camera to check if it works properly Connect the adaptor to the power terminal of the camera Plug the power cord of the adaptor into the wall outlet 1 2 Adaptor Board ...

Page 20: ...ves your settings and returns to the previous screen HOME Returns to the main menu SAVE Use this icon if you want to save your settings after you specified the mask area and privacy area etc Once you saved your settings the changes remain intact even if you select QUIT on exit DEL Use this icon if you want to delete a mask or privacy area etc Once you deleted your settings the deletions remain val...

Page 21: ...u can set the PRESET POSITION and DURATION AUTO SET Contains sub menu items of AUTO PAN PATTERN and SCAN ZONE SET You can set the standard azimuth and zone area for the camera ALARM SET You can set the alarm priority and I O sequence CLOCK SET You can set the display time and format OTHER SET You can set preferred language reset the system and select an OSD color to your preference COMMUNICATION C...

Page 22: ...bject even in a severe backlight scene DAY NIGHT Automatically optimizes the camera settings to the day and night scene GAMING This automatically configures the settings so that you can work in a stable illumina tion condition as indoors CUSTOM Your change to any of the PROFILE settings will switch the display to CUSTOM CAMERA SETUP MENU STANDARD ITS BACKLIGHT DAY NIGHT GAMING Parent Menu Sub menu...

Page 23: ...ST OFF ON OFF OFF OFF EXT BURST OFF ON OFF OFF OFF WHITE BAL DAY DAY NIGHT DAY DAY NIGHT DAY DAY MODE ATW2 ATW1 ATW1 ATW1 ATW1 RED 0 0 0 0 0 BLUE 0 0 0 0 0 NIGHT BRIGHTNESS Custom Setting MEDIUM Custom Setting MEDIUM Custom Setting MODE OFF ATW2 OFF ATW2 OFF RED Custom Setting 0 Custom Setting 0 Custom Setting BLUE Custom Setting 0 Custom Setting 0 Custom Setting DETAIL 2 2 2 2 2 ...

Page 24: ...fer to How to use the keyboard controller page 20 Select CAMERA SET CAMERA ID Use the joystick to select a desired character then press ENTER In the lower input box of the screen the selected character will be entered You can enter up to 54 characters including alphabets numbers and special characters LOCATION Specify the display position of the camera ID When done press ENTER The camera ID will b...

Page 25: ... the signal strength falls below the standard level AGC will amplify the video signal to automatically improve the sensitivity If SENS UP is set to OFF or FIX mode the MOTION menu will switch to AGC With the USER submenu selected press ENTER to display the corresponding screen In this mode you can select from VERY LOW to VERY HIGH in 16 levels enabling deeper wider choices to your convenience With...

Page 26: ...is the greater the effect is Set it to USER to specify the level SHUTTER You can select a fixed fast electronic shutter speed in 7 options ranging from 1 120 PAL or 1 100 NTSC to 1 10k which is mostly used to take a picture of a fast moving object As long as SENSE UP is set to AUTO FIXED FLICKERLESS to ON the SHUTTER menu is not available SENS UP Automatically senses the darkness level at night or...

Page 27: ... set options as appropriate DAY Fixed to DAY mode regardless of the scene NIGHT Fixed to NIGHT mode regardless of the scene If BURST is set to ON the burst signal will be output along with the black and white composite video signal AUTO According to the luminance this will switch DAY to NIGHT mode or vice versa BURST If set to OFF the burst signal will not be output in NIGHT mode DAY NIGHT BRIGHTN...

Page 28: ...MASK 1 and 2 simultaneously If BACKLIGHT is set to BLC the MASK AREA function is not available EXT The interface to an external alarm enables an automatic switch between DAY and NIGHT mode If you set DAY NIGHT to EXT and alarm 1 to NO NC in ALARM SET ALARM IN SET the alarm can be used for an input signal in EXT mode of DAY NIGHT If an alarm signal occurs the mode will switch to NIGHT If DAY NIGHT ...

Page 29: ...nge of the color temperature to correct the WHITE BAL as needed The following color temperature ranges are assured in individual modes ATW1 2500K 9300K 1 ATW2 2000K 10000K suitable to sodium light source 2 1 With ATW1 mode active in a color temperature environment ranging beyond between 2500K and 9300K a proper white balance value may not be produced if this is the case you are recommended to use ...

Page 30: ...ording to your settings According to the specified recording mode select a WHITE BAL mode with necessary options ATW1 2 The camera can automatically adjust the color temperature in real time according to the ambient conditions Color temperature range 1 2500K 9300K 2 2000K 10000K AWC Pressing ENTER on a desired item will perform ATW once You can set the R GAIN B GAIN value 3200K Set the color tempe...

Page 31: ...nless the operation of pan tile zoom is executed MF You can adjust the focus manually While you are working on the following objects AF may not work properly If this is the case use MF instead Very bright object or dominant object in a dark scene Object against the rear side of a moist or dirty glass A scene where nearby and distant objects co exist White wall or single colored object Venetian bli...

Page 32: ...ncy for synchronization The LL PHASE can be adjusted as appropriate AGC COLOR SUP You can adjust the color reproduction range according to AGC REVERSE You can reverse the video signal from left to right upside down or vice versa to your convenience POSI NEGA You can set the video brightness signal to normal or reverse PIP You can view a main image with a sub image on the same screen If more than o...

Page 33: ...ropriately MOTION You can enable the motion detection and tracking functions If you set it to DETECTION the FIXED MOVED option of ADVANCED menu will not be available In following situations motion detection and tracking function may not work properly When there is sudden changes of brightness When the device moves When a certain object s movement fills most of the framing area When there is diffic...

Page 34: ...tion setting the smaller the object that can be detected ALARM OUT When selected ON it outputs alarm signal when the motion is detected and on a detection of configured advanced function PRIVACY ZONE You can set up to 12 privacy zones that will be hided for privacy of the subject when recording Zone Setup For selecting and saving each menu item refer to How to use the keyboard controller page 20 S...

Page 35: ...ious screen and select the STYLE Select the COLOR and pick a desired color Setting one or more privacy zone and enabling privacy function will disable the PIP function For better privacy protection make your privacy zone bigger than the required bigger by about 30 Video portion of mosaic pattern or colored by the privacy zone setup is not recoverable PRESET This function provides preset camera set...

Page 36: ... to CAMERA SET pages 24 32 The preset position can be specified for a tilt range of between 0 and 90 Those presets that are out of a tilt of 90 can not be specified If you try to specify a preset position for a range exceeding a tilt of 90 using a controller SSC 1000 2000 or 5000 you will see a message of SET AGAIN on the screen If this is the case try again for a range below a tilt of 90 If you u...

Page 37: ...r page 20 Select MAIN MENU AUTO SET Select the number of AUTO PAN AUTO PAN setup screen appears Select each item and set appropriately POSITION Set the starting and ending positions for the AUTO PAN Move to the setting screen and adjust pan tilt to the desired starting position and then press ENTER Again adjust pan tilt to the desired ending position and press ENTER to finish AUTO PAN setup M 1 2 ...

Page 38: ...t zoom movements to a monitoring pattern for up to 2 minutes For selecting and saving each menu item refer to How to use the keyboard controller page 20 Select MAIN MENU AUTO SET Select the pattern number PATTERN setup screen appears Select the POSITION and set the pattern s starting position and press ENTER Select the START and move the camera using pan tilt zoom Your manual camera actions will b...

Page 39: ...figured AUTO PAN PATTERN and SCAN functions automatically For selecting and saving each menu item refer to How to use the keyboard controller page 20 Select MAIN MENU AUTO SET Select the AUTO PLAY and select a number AUTO PLAY setup screen appears AUTO PLAY1 Sets overall function properties of the AUTO PLAY AUTO RETURN Sets the interval between auto plays AUTO PLAY Sets the auto play action at eve...

Page 40: ...ge 20 Select MAIN MENU ZONE SET Set AZIMUTH to ON Set the north direction using the joystick and press ENTER SET NORTH In SET NORTH press ENTER to set the north direction which will be the reference for all other directions Set ZONE AREA SET to ON 1 2 3 4 ZONE SET AZIMUTH OFF ZONE AREA SET OFF MAIN MENU PROFILE CAMERA SET INTELLIGENCE PRIVACY ZONE PRESET AUTO SET ZONE SET ALARM SET CLOCK SET OTHER...

Page 41: ...ng with configured presets patterns and scan functions and produces alarm outputs Alarm s dwell time is defined by the corresponding preset s DWELL TIME and its alarm action For selecting and saving each menu item refer to How to use the keyboard controller page 20 Select MAIN MENU ALARM SET Select each item and set appropriately 5 6 1 2 ZONE AREA MAP 1 2 3 4 5 6 7 8 ALARM SET ALARM PRIORITY SET A...

Page 42: ...nd remains in the corresponding preset position for the defined DWELL TIME and performs pattern or scan action defined by the AUTO SET Setting to OFF will discard with the pattern or scan action after moving to the preset position PATTERN 1 3 Defined pattern action HALF1 Patterns 1 and 2 in serial action HALF2 Patterns 2 and 3 in serial action WHOLE Patterns 1 2 and 3 in serial action SCAN 1 4 Pre...

Page 43: ...or zoom turbo pan tilt etc For selecting and saving each menu item refer to How to use the keyboard controller page 20 Select MAIN MENU OTHER SET Select each item and set appropriately Language Select LANGUAGE and use the left right button to select a preferred display language 1 2 3 4 1 2 OTHER SET LANGUAGE ENGLISH FACTORY DEFAULTS OSD COLOR BW PROPORTIONAL P T ON P T SPEED 2 AUTO CAL OFF D FLIP ...

Page 44: ...lly to the zoom ratio P T SPEED When selected ON manual pan tilt movement speed will be doubled AUTO CAL AUTO CALIBRATION To enhance the lens and pan tilt motor s accuracy the automatic compensation function is provided It automatically resets the lens and pan tilt when there is no user operation for a specified time period D FLIP DIGITAL FLIP When selected ON the displayed screen will be flipped ...

Page 45: ...ngs of the adaptor switch PROTOCOL BAUD RATE ADDRESS When selected SW you can manually set the protocol baud rate and address SYSTEM INFO You can check the system information For selecting and saving each menu item refer to How to use the keyboard controller page 20 Select MAIN MENU SYSTEM INFO The current system information is displayed 1 2 1 2 COMMUNICATION RS485 PRIORITY HW PROTOCOL SAMSUNG E H...

Page 46: ...ET 5 2 3 ENTER AUX OUT CONTROL OUT1 OFF PRESET 5 2 4 ENTER AUX OUT CONTROL OUT2 ON PRESET 5 2 5 ENTER AUX OUT CONTROL OUT2 OFF PRESET 5 2 6 ENTER AUX OUT CONTROL OUT3 ON PRESET 5 2 7 ENTER AUX OUT CONTROL OUT3 OFF PRESET 5 2 8 ENTER OTHER SET PROPORTIONAL P T ON PRESET 5 2 9 ENTER PROPORTIONAL P T OFF PRESET 5 3 0 ENTER P T SPEED 9 PRESET 5 3 1 ENTER P T SPEED 5 PRESET 5 3 2 ENTER D FLIP ON PRESET...

Page 47: ...ical 50 Hz INT 50 Hz L L NTSC Horizontal 15 734 Hz INT 15 750 Hz L L Vertical 59 94 Hz INT 60 Hz L L Synchronization INT LINE LOCK Resolution Horizontal 600 TV LINES Vertical 350 TV LINES S N Ratio Approximately 52 dB Minimum subject illumination SENS UP Illumination Color B W Off 50IRE 0 2 0 02 Off 30IRE 0 12 0 012 Off 15IRE 0 06 0 006 x512 50IRE 0 00039 0 00004 x512 30IRE 0 00023 0 00002 x512 15...

Page 48: ...186 Preset Tilt Speed 600 sec maximum Manual Tilt Speed 0 01 180 sec Remote Control RS485 Half Full Duplex RS422 Data on Coaxial Cable Alarm Alarm Inputs 8 IN Alarm Outputs 3 OUT 2 Open collector 1 relay Operation Temperature 50 C absolute minimum 50 C Operation Humidity 90 Dimensions Ø x H 228 Ø x 256 H mm Weight 5 52 Kg Product Color Light Gray ...

Page 49: ...English _49 English Product Appearance 256mm 240mm Ø216mm Housing Body Ø228mm Shield Sun ...

Page 50: ... SAMSUNG TECHWIN AMERICA Inc 1480 Charles Willard St Carson CA 90746 UNITED STATES Tol Free 1 877 213 1222 FAX 1 310 632 2195 www samsungcctvusa com SAMSUNG TECHWIN EUROPE LTD Samsung House 1000 Hillswood Drive Hillswood Business Park Chertsey Surrey UNITED KINGDOM KT16 OPS TEL 44 1932 45 5300 FAX 44 1932 45 5325 www samsungtechwin com www samsungsecurity com Z6806138901A ...

Reviews: