background image

English - 4

− 

Software Upgrade (Option)

To keep your product up-to-date with new digital television 

features then software upgrades are periodically broadcast 

as part of the normal television signal. It will automatically 

detect these signals and display the software upgrade 

banner. You are given the option to install the upgrade.

 

Software Inforamtion 

Press the 

ENTER

 button, then the current software 

version is shown. To display the software version 

information, press the 

ENTER

 button again.

 

Manual Upgrade 

Press the 

ENTER

 button to search for new software from the currently broadcasting channels.

 

Standby Mode upgrade 

:

 On / Off 

Press the 

ENTER

 button. To continue software upgrade with master power on, Select 

On

 by 

pressing the ▲ or ▼ button. 


45 minutes after entering standby mode, a manual upgrade is automatically conducted. Since 

the power of the unit is turned on internally, the screen may be on slightly for the PDP product. 

This phenomenon may continue for more than 1 hour until the software upgrade is completed.

− 

Reset

You can reset the values stored to the factory default values.

  The Reset operation deletes all channel information 

and user preferences returning all values to their default 

factory state.

 

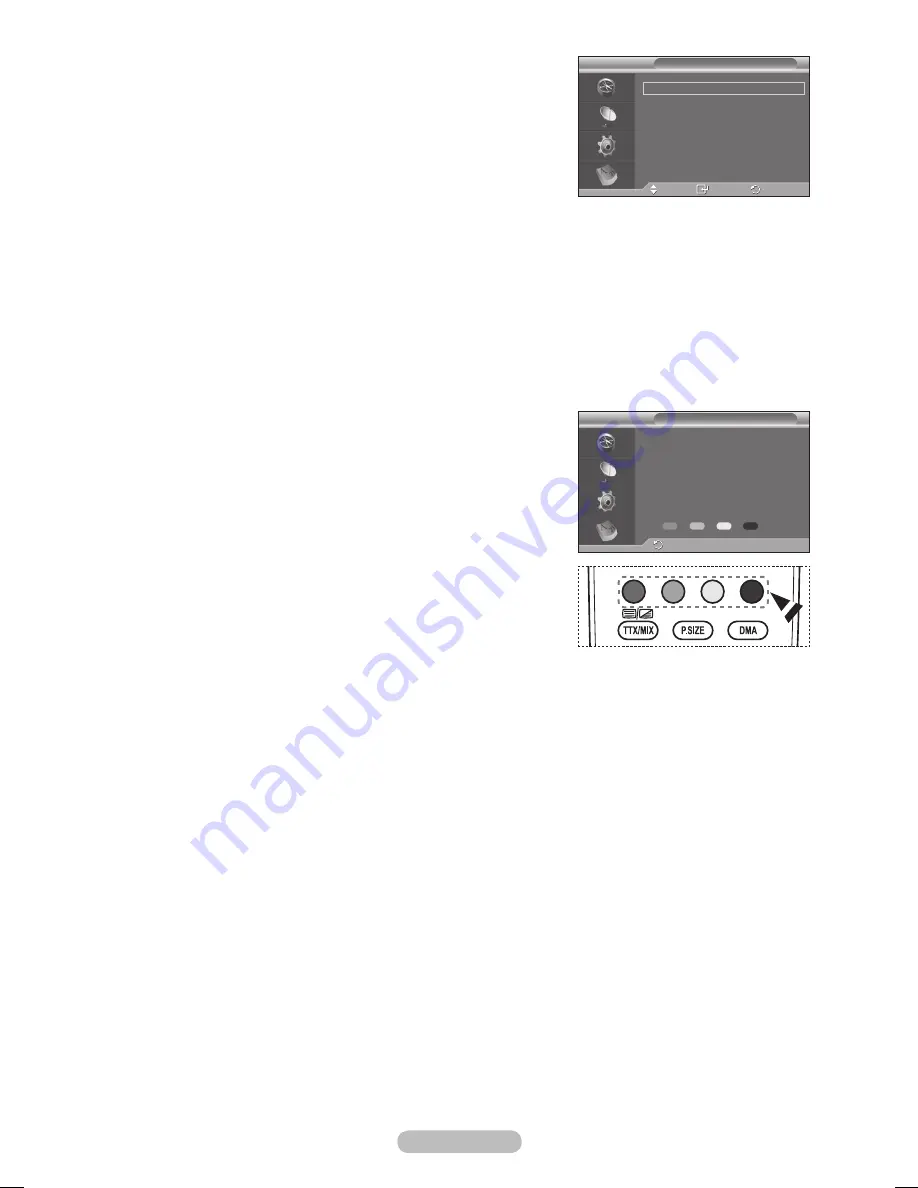
Press the 

ENTER

 button with 

Reset

 selected.  

The 

Enter PIN

 is displayed.

 

Enter your current 4-digit PIN code by using the 

numeric buttons (0~9). The warning message is 

displayed. All values will be reset by pressing the 

coloured buttons (red, green, yellow, and blue) in turn.

  The default PIN of a new TV set is “0-0-0-0”.

  When PIN is changed in Child Lock, the PIN for 

resetting automatically changes.

 

When reset is complete, it operates DTV Plug & Play 

(DTV Auto Store, Time Zone-depending on the country, 

Time Setting) and exits from the digital TV mode without changing to the analog TV mode. 

(Refer to page 10)

WARNING: All channel settings and user preferences will be 

lost and returned to the factory defaults. It is recommended 

that a reset is performed only when serious problems are 

experienced.

Reset


 Return

DTV

Software Information 

Manual Upgrade     

Standby Mode upgrade : On 

Software Upgrade


Move 

 Enter 

 Return

DTV

BN68-01422D-Eng.indb   43

2008-04-18   오후 1:27:37

Summary of Contents for PS50A476

Page 1: ...s please contact the SAMSUNG customer care centre Thank you for purchasing this Samsung product To receive more complete service please register your product at www samsung com global register Model Serial No Country Customer Care Centre Web Site EIRE 0818 717 100 www samsung com ie U K 0845 SAMSUNG 7267864 www samsung com BN68 01422D Eng indb 1 2008 04 18 오후 1 26 4 ...

Page 2: ...ratures below 5 C 41 F A still image displayed too long may cause permanent damage to the PDP Panel Watching the PDP TV in 4 3 format for a long period of time may leave traces of borders displayed on the left right and centre of the screen caused by the difference of light emission on the screen Playing a DVD or a game console may cause similar effect to the screen Damages caused by the above eff...

Page 3: ... 22 Resetting the Picture Settings to the Factory Defaults 24 Sound Control Sound Features 25 Selecting the Sound Mode depending on the model 26 Connecting Headphones Sold separately 26 Function Description Time Features 27 Language Melody Light Effect Entertainment Energy Saving 28 PC Display Setting up Your PC Software Based on Windows XP 29 Input Mode PC 30 Setting the PC 31 Using the DTV Featu...

Page 4: ...art Cable PC Audio Cable HDMI Cable HDMI DVI Cable Ferrite Core Power Cord S Video The ferrite cores are used to shield the cables from interference When connecting a cable open the ferrite core and clip it around the cable near the plug Using the Stand Base Two or more people should carry the PDP Never lay the PDP on the floor because of possible damage to the screen Always keep the PDP upright T...

Page 5: ... the volume In the on screen menu use the buttons as you would use the and buttons on the remote control 4 C P Press to change channels In the on screen menu use the C P buttons as you would use the and buttons on the remote control 5 Power Indicator Blinks and turns off when the power is on and lights up in stand by mode 6 POWER Press to turn the TV on and off 7 Remote Control Sensor Aim the remo...

Page 6: ...ideo disc players Input Output Specification Connector Input Output Video Audio L R RGB Video Audio L R EXT 1 Only TV or DTV output is available EXT 2 Output you can choose 5 DIGITAL AUDIO OUT OPTICAL Connect to a Digital Audio Component 6 Connecting external Audio Devices Connect RCA audio signals from the TV to an external source such as Audio equipment 7 3D SYNC OUT Connect to 3D IR Emitter 8 S...

Page 7: ...nent O O O O O O The product colour and shape may vary depending on the model Side Panel 1 COMMON INTERFACE Slot Insert CI Common Interface card into the slot refer to page 42 When not inserting CI CARD in some channels Scramble Signal is displayed on the screen The pairing information containing a telephone number CI CARD ID Host ID and other information will be displayed in about 2 3 minutes If ...

Page 8: ...in on screen menu Channel control button Refer to page 15 Returns to the previous menu a Exit the on screen menu b Picture size selection c Use this when connecting a SAMSUNG DMA Digital Media Adapter device through an HDMI interface and switching to DMA mode The DMA button is optional For more information on the operating procedures refer to the user manual of the DMA This button is available whe...

Page 9: ...OWER button on the remote control to switch the television on The programme that you were watching last is re selected automatically If you have not yet stored any channels no clear picture appears Refer to Storing Channels Automatically on page 13 or Storing Channels Manually on page 14 If the television is initially powered on several basic customer settings proceed automatically Refer to Plug P...

Page 10: ... home environment Store Demo mode is only intended for use in retail environments If the unit is accidentally set to Store Demo mode and you want to return to Home Use Standard Press the Volume button When the volume OSD is displayed press and hold the MENU button for 5 seconds 5 Make sure that the antenna is connected to the TV Press the ENTER button The Country menu is displayed 6 Select your co...

Page 11: ...ng on the country To stop the search before it has finished press the ENTER button with Stop selected If the DTV channel is updated the Source in the source list of the Input menu is automatically changed to DTV For detailed descriptions about DTV channel update refer to page 34 of this manual 14 Press the or button to select required time zone then press the ENTER button The screen for setting th...

Page 12: ...umber required Using the TOOLS Button You can use the TOOLS button to select your frequently used functions quickly and easily The Tools menu changes depending on which external input mode you are viewing 1 Press the TOOLS button The Tools menu will appear 2 Press the or button to select a menu then press the ENTER button 3 Press the ENTER buttons to display change or use the selected items For a ...

Page 13: ...tton to select Channel then press the ENTER button 3 Press the ENTER button again The available countries are listed 4 Select your country by pressing the or button then press the ENTER button Even though you have changed the country setting in this menu the country setting for DTV is not changed Use the Plug Play function to change the country setting for DTV Refer to pages 10 to 11 5 Press the o...

Page 14: ...el to be stored Press the or button to select C Air channel or S Cable channel Press the button then press the or button to select the required number You can also select the channel number directly by pressing the numeric buttons 0 9 If there is abnormal sound or no sound re select the sound standard required Search When you do not know the channel numbers Press the or button to start the search ...

Page 15: ...ing unsuitable programmes by muting out video and audio 6 Press the or button to select Child Lock then press the ENTER button 7 Select On by pressing the or button then press the ENTER button 8 Press the or button to select Channel List then press the ENTER button 9 Move to the field by pressing the buttons select a channel to be locked and press the ENTER button If you press the ENTER button aga...

Page 16: ...ssigned automatically when channel information is broadcast These names can be changed allowing you to assign new names 1 Press the MENU button to display the menu 2 Press the or button to select Channel then press the ENTER button 3 Press the or button to select Name then press the ENTER button 4 Press the or button to select the channel to be assigned to a new name then press the ENTER button 5 ...

Page 17: ... select Reset by pressing the or button Press the ENTER button 5 Press the EXIT button to exit LNA Low Noise Amplifier This function is very useful in the situation that the TV is used in weak signal LNA amplifies the TV signal in the weak signal area a low noise preamplifier boosts the incoming signal 1 Press the MENU button to display the menu 2 Press the or button to select Channel then press t...

Page 18: ...re 3 Press the ENTER button again to select Mode 4 Select the required mode by pressing the or button then press the ENTER button Available modes Dynamic Standard Movie The settings values may vary depending on the input source 5 Press the EXIT button to exit Choose Dynamic for viewing the TV during the day or when there is bright light in the room Choose Standard for general TV watching mode Choo...

Page 19: ...ur preference see Customizing the Colour Space Customizing the Colour Space Colour Red Green Blue Yellow Cyan Magenta Adjusts the Colour range to suit your preference Colour is available when Colour Space is set to Custom Press the or button to select Red Green Blue Yellow Cyan or Magenta Press the ENTER button Red Green Blue In Colour you can adjust the RGB values for the selected colour Press th...

Page 20: ...t and right Reset Press the or button to select Reset then press the ENTER button You can initialize the setting With the HDMI Just Scan picture size depending on the AV devices the screen may be cut off or a specific colour appears on the screen For an HDMI 1080p connection of 24 25 30 50 and 60 Hz and for a Component 1080p connection of 50 and 60Hz only the input source is supported You can chan...

Page 21: ... available in Dynamic mode HDMI Black Level Normal Low Using this function you can adjust the image quality when the screen burn appearance of black level low contrast low color etc is encountered by the HDMI input for RGB limited range 16 to 235 This function is active only when the externel input connects to HDMI RGB signals Blue Only Mode Off On This function is for AV device measurement expert...

Page 22: ...h extreme left and right sides Dark When you set the screen ratio to 4 3 it darkens the left and right sides Light When you set the screen ratio to 4 3 it brightens the left and right sides To remove after images on the screen use either White or Scrolling function Although both of the two functions remove after images on the screen Scrolling is more effective The after image removal function has ...

Page 23: ...ng may not be supported If you find the screen flickering while the 3D function is used change the environmental lighting darker or turn off the fluorescent lamp to watch the screen for its best condition Changing the Mode Changing the Mode will exchange the pictures for each eye by exchanging the left and right output signals 1 Connect the TV PC and 3D IR Emitter as shown in the figure 2 Press th...

Page 24: ... 3D software is Checkerboard select this input format Horizontal If the output format of your graphic card or 3D software is Horizontal interleaved select this input format Vertical If the output format of your graphic card or 3D software is Vertical interleaved select this input format You can press the 3D button on the remote control repeatedly to change the 3D mode Easy Setting 1 Press the TOOL...

Page 25: ...s fully compatible with all multichannel formats Easy Setting 1 Press the TOOLS button on the remote control 2 Press the or button to select SRS TS XT 3 Press the or button to select Off or On Auto Volume Off On Each broadcasting station has its own signal conditions and so it is not easy to adjust the volume every time the channel is changed This feature lets you automatically adjust the volume o...

Page 26: ...gual or DUAL I II Dual I Dual II Stereo Stereo Mono Forced mono If the receiving conditions deteriorate listening will be easier if the mode is set to Mono If the stereo signal is weak and automatic switching occurs switch to Mono This function is only available in Analog TV mode Connecting Headphones Sold separately You can connect a set of headphones to your set if you wish to watch a TV program...

Page 27: ...ton to select Sleep Timer 3 Press the or button to select the minute then press the ENTER button Timer 1 Timer 2 Timer 3 You can set the On Off timers so that the television will switch on or off automatically at the time you select You must set the clock first Press the or button to select the required item below Press the or button to adjust to the setting satisfied On Time Select hour minute an...

Page 28: ...The blue LED always lights Set the Light Effect to Off to reduce the power consumption Melody Off Low Medium High The TV power on off melody sound can be adjusted Entertainment Off Sports Cinema Game Entertainment mode enables you to select the optimal display and sound for sports cinema and games Off Switches the Entertainment function off Sports Provides the optimal picture and sound quality for...

Page 29: ...rate with reference to the Display Modes Table Set the Vertical Frequency and Horizontal Frequency individually if you can do so instead of setting the Screen refresh rate 5 Click on OK to close the window then Click on OK button to the Display Properties window Automatic re booting may commence at this moment Energy Saving Off Low Medium High This feature adjusts the screen brightness depending o...

Page 30: ... 476 60 023 47 712 59 940 72 809 75 000 60 317 72 188 75 000 60 004 70 069 75 029 60 015 25 175 31 500 31 500 40 000 50 000 49 500 65 000 75 000 78 750 85 500 HDMI DVI Input Mode Resolution Horizontal Frequency kHz Vertical Frequency Hz Pixel Clock Frequency MHz Sync Polarity H V PS50A476 VESA 640 x 480 800 x 600 1024 x 768 1360 x 768 31 469 37 879 48 363 47 712 59 940 60 317 60 004 60 015 25 175 ...

Page 31: ...t the frequency as best as possible coarse and Fine tune again After the noise has been reduced re adjust the picture so that it is aligned on the center of screen 1 Press the or button to select Coarse or Fine then press the ENTER button 2 Press the or button to adjust the screen quality vertical stripes may appear or the picture may be blurry Press the ENTER button Position Adjust the PC s scree...

Page 32: ... select Digital Menu then press the ENTER button Guide Now Next Guide Full Guide Scheduled List Default Guide Now Next Full Guide Digital Channel Country Auto Store Manual Store Edit Favourite Channels Channel List All Favourites Default All Favourites Setup Menu Transparency High Medium Low Opaque Change PIN Parental Lock Parental Rating Subtitle Off On Subtitle Mode Normal Hard of hearing Audio ...

Page 33: ...ional information about the current programme may be displayed While viewing a programme press the INFO button The programme information is displayed The information is displayed Parental Rating Video Type SD HD Radio Audio Type Mono Stereo Dual Dolby Digital Existence of Teletext or DVB Subtitle Audio Language To exit from banner information press the INFO button Exit 1 AFDO 16 9 AFDO 16 9 No Blo...

Page 34: ...has finished the number of scanned services will be displayed The existing favourite channel list will not be deleted when the channel list is updated To stop the scan before it has finished press the ENTER button with Stop selected If the signal status is poor No service found Check the aerial connection message is displayed 1 3 Manual Store You can specify the channel for a fast channel search C...

Page 35: ...H LIST button to display the favourite channel list Renumber depending on the Country In the Edit Favourite Channels menu press the or button to select the required channel Press the green button The space for entering the number is a blank Enter the new channel number Press ENTER button to store or RETURN button to cancel Press the button to delete an entered digit If you enter a number already a...

Page 36: ...ilable Now Next Guide For the six channels indicated in the left hand column displays the Current programme and the Next programme information Full Guide Displays the programme information as time ordered 1 hour segments 2 hours of programme information is displayed which may be scrolled forwards or backwards in time Press the or button to select Now Next Guide or Full Guide Press the ENTER button...

Page 37: ...ramme select a programme by pressing the or button then press the green button If necessary select the programme to be deleted by pressing the or button then press the blue button When watching analog TV the reserved DTV channel cannot be changed The channel is only changed automatically to the reserved channel when you are watching DTV Scheduling programme only functions with the television alrea...

Page 38: ...a message will be displayed and you will not be able to change the channel even if you press the ENTER button When the No Data message appears and you cannot change the channel press the channel number directly using the numeric buttons 3 Language This menu consists of 4 sub menus Audio Language Subtitle Language Teletext Language and Preference 3 1 Audio Language Subtitle Language Teletext Langua...

Page 39: ...uage setting the Audio Language Subtitle Language and the Teletext Language of the Language menu refer to page 38 are automatically changed to the selected language The Audio Language Subtitle Language and the Teletext Language of the Language menu show a list of languages supported by the current channel and the selection is highlighted If you change this language setting the new selection is onl...

Page 40: ... try again message is displayed Press the ENTER button Press the or button to select the age rating you want to lock out then press the ENTER button If you want to change the PIN code press the or button to select Change PIN then press the ENTER button Enter your new PIN code by using the numeric buttons 0 9 The Confirm New PIN is displayed Re enter your new PIN code to confirm by using the numeri...

Page 41: ...Audio Description This is an auxiliary audio function that provides an additional audio track for visually challenged persons This function handles the Audio Stream for the AD Audio Description when it is sent along with the Main audio from the broadcaster Users can turn the Audio Description On or Off and control the volume Digital Text Enable Disable UK only If the programme is broadcast with di...

Page 42: ... on the PC Card menu 4 6 System This menu consists of 5 sub menus Product Information Signal Information Software Upgrade and Reset Product Information You can view your product information For service or repair please contact a Samsung approved dealer Press the ENTER button with Product Information selected The product information menu is displayed Software Version Firmware Version Signal Informa...

Page 43: ...for more than 1 hour until the software upgrade is completed Reset You can reset the values stored to the factory default values The Reset operation deletes all channel information and user preferences returning all values to their default factory state Press the ENTER button with Reset selected The Enter PIN is displayed Enter your current 4 digit PIN code by using the numeric buttons 0 9 The war...

Page 44: ... cable between Digital Audio Out Optical on your TV and Digital Audio Input on the receiver Connect only one receiver You can listen to 5 1 channel sound through the home theatre s speakers Otherwise you can only listen to 2 channel stereo sound in other cases Make sure to connect the Digital Audio IN Optical of the home theatre and the TV correctly to listen to TV sound through the home theatre H...

Page 45: ... ENTER button 3 Press the or button to select Select Device then press the ENTER button 4 Press the or button to select to a particular device and press the ENTER button It is switched to the selected device 5 If you cannot find a device you want press the or button to select Searching Connections then press the ENTER button The meassage Configuring Anynet connection is displayed When searching de...

Page 46: ...ay Pause Device with built in Tuner After switching to the device when you are watching a TV programme P button Audio Device When a Receiver is activated W LINK W LINK button MUTE button The Anynet function only works when the remote control is set to TV The REC button works only while in the recordable state You cannot control Anynet devices using the buttons on the side of the TV You can control...

Page 47: ...ake sure to search devices again or restart your TV Check if the Anynet Function of Anynet device is set on I want to start Anynet Check if the Anynet device is properly connected to the TV and check if the Anynet HDMI CEC is set to On in the Anynet Setup menu Press the TV button on the TV remote control to switch to TV Then press the TOOLS button to show the Anynet menu and select a menu you want...

Page 48: ...oded and can be selected by pressing the coloured buttons Press one of them corresponding to the required The page is displayed with other coloured information that can be selected in the same way To display the previous or next page press the corresponding coloured button 6 teletext on mix Press to activate teletext mode after selecting the channel providing the teletext service Press it twice to...

Page 49: ...nt page number or search indications Date and time Text Status information FASTEXT information Teletext information is often divided between several pages displayed in sequence which can be accessed by Entering the page number Selecting a title in a list Selecting a coloured heading FASTEXT system Press the TV DTV button to exit from the teletext display ...

Page 50: ...han the standard dimension as they may cause damage to the inside of the TV set For wall mounts that do not comply with the VESA standard screw specifications the length of the screws may differ depending on their specifications Do not use screws that do not comply with the VESA standard screw specifications Do not use fasten the screws too strongly this may damage the product or cause the product...

Page 51: ...efault setting 3 Press the blue button Press the and buttons to select a save mode from either Position1 Position2 or Position3 in order to save the current position To not save the current position press the RETURN button When selecting a save mode you cannot use the Color buttons 4 Press the ENTER button to save When Position1 is selected the message Current position saved as Position1 is displa...

Page 52: ...g a Color Red Green Yellow button moves the auto wall mount to the saved position You can move the wall mount to one of the 3 pre set positions by pressing the Red Position 1 Green Position 2 or Yellow Position 3 buttons If you adjust the positon after moving to a pre set position the position display will disappear For installation refer to the Installation Manual provided with the wall mount For...

Page 53: ...tring are not supplied please purchase these additionally 2 Remove the screws from the center back of the TV put the screws into the clamps and then fasten the screws onto the TV again Screws may not be supplied with the product In this case please purchase the screws of the following specifications 3 Connect the clamps fixed onto the TV and the clamps fixed onto the wall with a strong string and ...

Page 54: ...et Blurred or snowy picture distorted sound Check the direction location and connections of your aerial This interference often occurs due to the use of an indoor aerial Remote control malfunctions Replace the remote control batteries Clean the upper edge of the remote control transmission window Check that the and ends of the batteries are inserted correctly Check that the batteries are drained S...

Page 55: ... With stand 1290 x 740 x 95 mm 1290 x 804 x 319 mm Weight Body With stand 39 Kg 41 Kg Environmental Considerations Operating Temperature Operating Humidity Storage Temperature Storage Humidity 10 C to 40 C 50 F to 104 F 10 to 80 non condensing 20 C to 45 C 4 F to 113 F 5 to 95 non condensing This device is a Class B digital apparatus Design and specifications are subject to change without prior no...

Page 56: ...k To avoid electric shock never touch the inside of this apparatus Only a qualified technician should open this apparatus Make sure to plug the power cord in until it is firmly inserted When removing the power cord make sure to hold the power plug when pulling the plug from the outlet Do not touch the power cord with wet hands If this apparatus does not operate normally in particular if there are ...

Page 57: ... UK Only United Kingdom This Samsung product is warranted for a period of twelve 12 months from the original date of purchase against defective materials and workmanship In the event that warranty service is required you should return the product to the retailer from whom it was purchased However Samsung Authorised Dealers and Authorised Service Centres in other EC Countries will comply with the w...

Page 58: ...This page is intentionally left blank ...

Page 59: ...or human health from uncontrolled waste disposal please separate this from other types of wastes and recycle it responsibly to promote the sustainable reuse of material resources Household users should contact either the retailer where they purchased this product or their local government office for details of where and how they can take this item for environmentally safe recycling Business users ...

Reviews: