background image

ENGLISH-

29

Using Select & Go

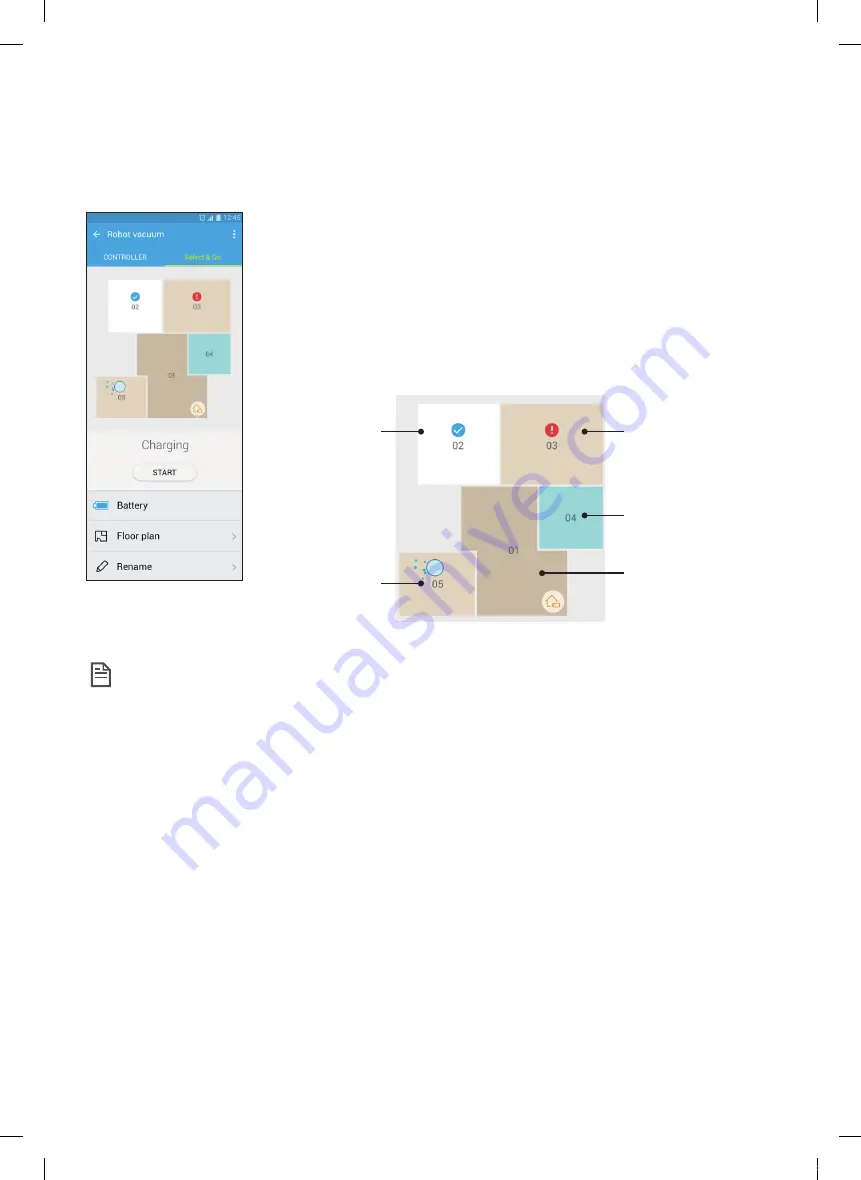
A feature that allows the user to select and clean specific areas using the Samsung Smart Home app.

1. Cleaning Map and Cleaning Floorplan


f

Cleaning Map represents the areas the POWERbot moved while cleaning.
 

f

Cleaning Floorplan is an artificially delineated representation of Cleaning 
Map.

2. Area Cleaning


f

Includes configurable labels for each of the areas.
 

f

Select areas to clean and tap Start to clean.
 

f

Each area’s status is indicated on the map.

Completed

Progressing

Canceled, Error occurred

Selected

Not selected

Note


f

Precautions for Setting Cleaning Floorplan


Place the charging station flush to a wall in an open area.


Remove obstacles from the floor (rugs, towels, chairs, mats, toys, etc.).


Remove obstacles along the paths to the areas to be included in the floorplan.


If possible, close all doors with high sills (veranda, balcony, etc.).


Ensure the areas to be included in the floorplan are well illuminated.


f

Cautions for Using Area Cleaning


Area Cleaning can commence only when Powerbot is being charged.


Area Cleaning will not function properly if the actual station’s location and orientation do not match the 
location and orientation in the floorplan selected.


Area Cleaning feature may not function properly depending on the state of the floor and/or placement or 
obstacles in the concerned area.


Areas on a floorplan are areas artificially delineated by Powerbot and may not include all the rooms.


Map generation and Select & Go may not be available on areas covered in some carpets.


There may be the difference between floorplans according to status of Powerbot even the environment is 
same.


The user can select and use the desired floorplan by Floor plan menu.

SR9300K_EN_DJ68-00743E-00_EU.indd   29

2016-02-03   오후 8:24:07

Summary of Contents for POWERbot SR20K9350W Series

Page 1: ...POWERbot User manual SR20K9350W Series Before operating this unit please read the instructions carefully For indoor use only SR9300K_EN_DJ68 00743E 00_EU indd 1 2016 02 03 8 23 52...

Page 2: ...ning 18 Name of each part Top Bottom Display panel 19 Setting time schedule Setting the time Setting the schedule 20 Cleaning and maintaining Cleaning the dustbin Cleaning the sensors and the camera C...

Page 3: ...escribed in this manual CAUTION WARNING SYMBOLS USED WARNING Indicates that a danger of death or serious injury exists caution Indicates that a risk of personal injury or material damage exists OTHER...

Page 4: ...appliance in a safe way and understand the hazards involved Children shall not play with the appliance Cleaning and user maintenance shall not be made by children without supervision BATTERY Charger...

Page 5: ...ble or combustible liquids such as gasoline nor use on areas where they may be present Locations with candles or desk lamps on the floor Locations with unattended fires fire or embers Locations with d...

Page 6: ...ll the Virtual guard in front of dangerous areas such as stairs or railings to prevent damaging the product or getting injured For your safety always keep the cliff sensor clean f f Be sure POWERbot d...

Page 7: ...that may disturb POWERbot s movement such as children s indoor swing or slides before cleaning CAUTION In use f f Using POWERbot on thick carpet may damage both POWERbot and the carpet The POWERbot ca...

Page 8: ...nect the power plug to the outlet Power lamp Red will turn on Installation Power of the docking station must be on at all times DC IN DC IN Power lamp Red About 1 m About 0 5 m About 0 5 m Install it...

Page 9: ...itch is off POWERbot will not charge even if it is docked on the docking station f f Always turn on the power of the docking station If power is not supplied to the docking station POWERbot cannot fin...

Page 10: ...witch on the bottom You must turn on the emergency switch to turn on POWERbot 2 Manually charge POWERbot by placing it on the docking station Make sure charge pins of POWERbot and the docking station...

Page 11: ...g station is located in a place where POWERbot cannot easily access f fdistance of the docking station and POWERbot is over 5 m apart It may take a long time for POWERbot to return to the docking stat...

Page 12: ...nstall the Virtual guard where you want to restrict POWERbot s entrance Make sure that distance sensor is facing at the desired direction you want to create a invisible barrier which will restrict POW...

Page 13: ...Batteries for Virtual guard must be purchased separately 1 Open the battery cover of the Virtual guard by pressing the locking tab and lift it up 2 Insert the alkaline batteries D type as shown in the...

Page 14: ...n to charge itself automatically Location recognizing function f fIf turning off the POWERbot and turning it back on the POWERbot will search the location that it stopped previously and then clean the...

Page 15: ...r If the POWERbot fails to return to the docking station it will be turned into the energy saving mode Then the display panel of the main body will be turned off Press Start Stop or Power button to ca...

Page 16: ...l function Sound Each time you press this button Sound Effects Mute is selected in this sequence Smart control Select to turn on or off the smart control Press Sound button for 3 seconds Wi Fi connect...

Page 17: ...d spot The POWERbot will follow the light while cleaning 1 m Operating distance of the remote control Height of the remote control Operating distance Height of the remote control 1 m 1 5 m Operating d...

Page 18: ...oller 6 Battery cover 7 Pet brush cover button 8 Driving wheel 9 Emergency switch 13 14 9 12 11 10 6 16 17 3 4 5 8 1 7 2 15 Display panel 1 Mute 2 Information Indicator 3 Filter inspection 4 Smart Con...

Page 19: ...OWERbot is docked on the docking station Start setting Select One time or Daily schedule Select Hour Select Minute Select AM PM Setting complete Skip to previous next setting Cancelling during setup f...

Page 20: ...e dustbin cover 3 Remove dust in the dustbin and cyclone unit Click 4 Detach the cyclone unit from the dustbin cover then wash the dustbin and the filter 5 Reassemble the dustbin 6 Reinsert the dustbi...

Page 21: ...the Pet brush ON OF F ON OFF 4 Reassemble the Pet brush 5 Reassemble the Pet brush cover Cleaning the Driving wheel 1 Put a soft cloth on the floor and place POWERbot upside down 2 Use a blunt rod or...

Page 22: ...after trying the procedure informed by your Internet service provider please ask an agency or service center of Samsung Electronics Note f f Please refer to the user manual of the pertinent wireless r...

Page 23: ...are compatible with selected Samsung Galaxy S and Samsung Note series devices support Android 2 4 0 since Galaxy S2 or higher and iOS7 or higher Application must be downloaded Internet connection requ...

Page 24: ...n 3 Enter the information of the wireless router to be connected 4 Set the POWERbot according to the guidance on the screen To turn on the AP mode immediately press Clock button for more than 5 second...

Page 25: ...t 3 Enter the samsung account and then press Sign in button For iPhone your ID and password is not saved so that you need to sign in everytime you use Samsung Smart Home app 4 Select Robot vacuum icon...

Page 26: ...one and the robot vacuum is in progress 9 Run the Settings app of your iPhone and then connect to the wireless router which will be connected on the Wi Fi list 10 The connection between the wireless r...

Page 27: ...rt home appliances made by Samsung Electronics with Chat control and Master key functions Chat control f fYou can control the smart home appliances or check about the status of them conveniently Maste...

Page 28: ...5 Current status indicator 6 Battery status 7 Suction power 8 Schedule You can set the desired time for each date The POWERbot operates by synchronizing the set time in the network 9 Cleaning history...

Page 29: ...be included in the floorplan If possible close all doors with high sills veranda balcony etc Ensure the areas to be included in the floorplan are well illuminated f f Cautions for Using Area Cleaning...

Page 30: ...eas it cannot enter such as corners between the wall and sofa etc Please use another cleaning tool to clean them regularly f f The POWERbot cannot vacuum clumps of dirt so some may remain on the floor...

Page 31: ...battery warranty period is 6 months from the date of purchase About the IrDA sensor Caution f f The infrared signal transmission may not be smooth in locations exposed to halogen lamps or in outdoor l...

Page 32: ...gency switch and remove the foreign matter from the Driving wheel Foreign matter caught in the right Driving wheel f fTurn off the emergency switch and remove the foreign matter from the Driving wheel...

Page 33: ...tbin The POWERbot cannot find the docking station f fCheck if there s power failure or whether the power plug is unplugged f fRemove any obstacles around the docking station that may disturb POWERbot...

Page 34: ...password on the screen of the Samsung account There appears a message saying there is a failure during Easy Setup f fYou may have failed temporarily due to the distance from the wireless router or oth...

Page 35: ...3 Remove the battery from the slot and disconnect the connector Correct disposal of batteries in this product Applicable in countries with separate battery return systems The marking on the battery ma...

Page 36: ...samsung com It is also possible to obtain the complete corresponding source code in a physical medium such as a CD ROM a minimal charge will be required The following URL http opensource samsung com...

Page 37: ...ging time Approximately 240 minutes Cleaning time On the basis of hard floor Max mode Approximately 30 minutes Normal mode Approximately 60 minutes Quiet mode Approximately 90 minutes For product impr...

Page 38: ...ENGLISH 38 Memo SR9300K_EN_DJ68 00743E 00_EU indd 38 2016 02 03 8 24 08...

Page 39: ...ENGLISH 39 Memo SR9300K_EN_DJ68 00743E 00_EU indd 39 2016 02 03 8 24 08...

Page 40: ...DJ68 00743E 00 SR9300K_EN_DJ68 00743E 00_EU indd 40 2016 02 03 8 24 08...

Reviews: