background image

English - 116

Setting Up 

The following settings help set the  functions.

Continued...

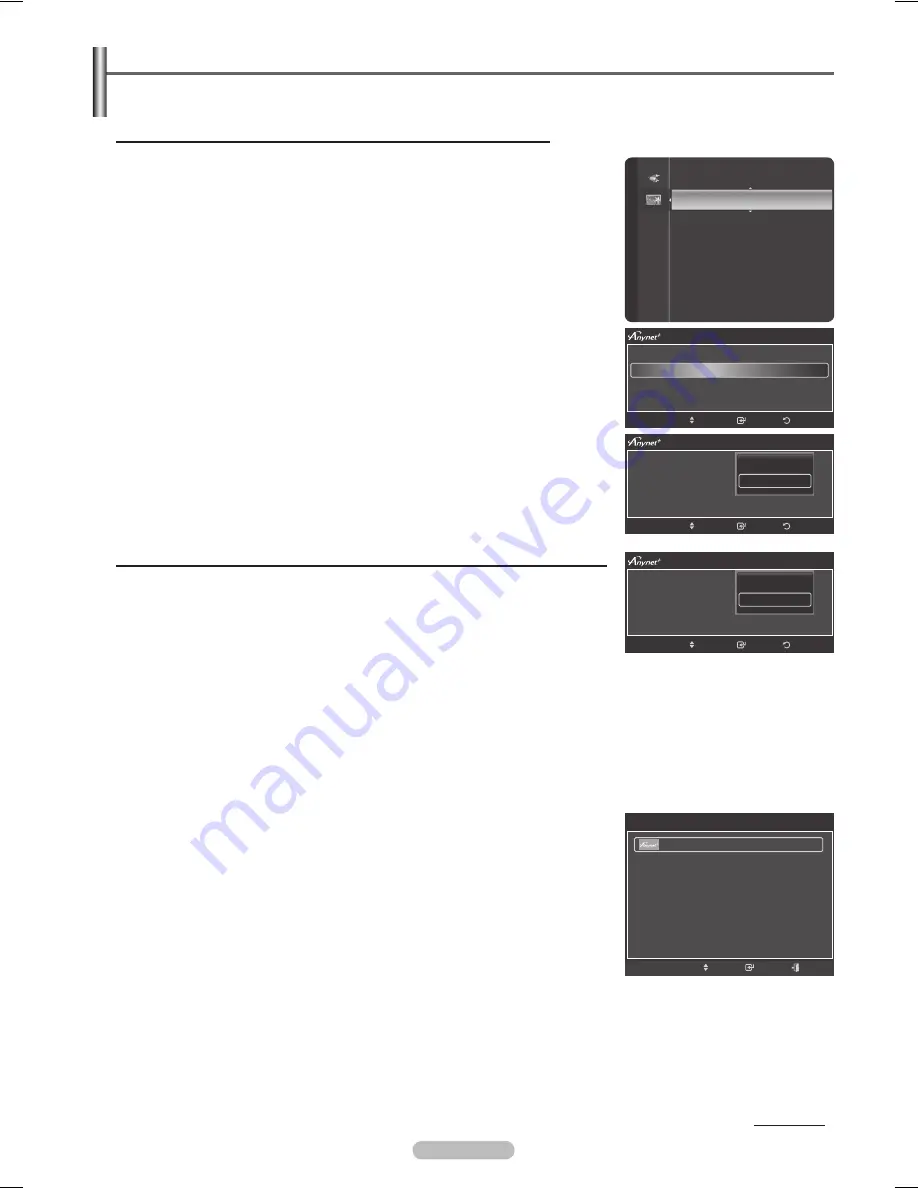
To use the  Function,  (HDMI-CEC) must be set to On

Press the 

MENU

 button. Press the ▲ or ▼ button to select 

Application

, then 

press the 

ENTER

 button.

Press the ▲ or ▼ button to select 

(HDMI-CEC)

, then press the 

ENTER

 button.


Press the ▲ or ▼ button to select 

Setup

, then press the 

ENTER

 button.

Press the ▲ or ▼ button to select 

(HDMI-CEC)

, then press the 

ENTER

 button.

Press the ▲ or ▼ button to select 

On

, then press the 

ENTER

 button.

  The 

(HDMI-CEC)

 function is enabled.

  If you select 

Off

(HDMI-CEC)

 is disabled.

  When the 

(HDMI-CEC)

 function is disabled, all the  related 

operations are deactivated. 

Setting an  Device to turn Off Automatically when the TV is Turned Off

Press the ▲ or ▼ button to select 

Auto Turn Off

, then press the 

ENTER

 button.

Press the ▲ or ▼ button to select 

Yes

, then press the 

ENTER

 button.

  The 

Auto Turn Off

 function is enabled.

  If you select 

No

, the 

Auto Turn Off

 function is canceled.

  Press the 

EXIT

 button to exit.

  The active source on the TV remote must be set to TV to use the  

function.

  If you set 

Auto 

Turn Off to Yes, connected external devices are also turned 

off when the TV is turned off. If an external device is still recording, it may or 

may not turn off.

Easy Setting

Press the 

TOOLS

 button on the remote control.

Press the ENTER button to select 

(HDMI-CEC)

.

  The  (HDMI-CEC) menus appear on the screen.

   (HDMI-CEC)

Multi-Track Sound  : 

 Stereo

Picture Size 

16:9

Picture Mode 

Standard 

Sound Mode 

 Custom

Sleep Timer 

     Off

Add to Favorite
Switch to Cable

Tools

 Move 

 Enter 

 Exit

WISELINK Pro

 (HDMI-CEC)


Content Library
Product Guide

Application

Setup

 (HDMI-CEC)  :

Auto Turn Off 

Return

Enter

Move

Off

On

Setup

 (HDMI-CEC)  :

Auto Turn Off 

Return

Enter

Move

No

Yes

Return

Enter

Move

Device List
Setup 

BN68-01731A-Eng.indb   116

2008-08-29   오전 9:44:32

Summary of Contents for PL63A750T1F

Page 1: ...ww samsung com cl COLOMBIA 01 8000112112 www samsung com co COSTA RICA 0 800 507 7267 www samsung com latin ECUADOR 1 800 10 7267 www samsung com latin EL SALVADOR 800 6225 www samsung com latin GUATEMALA 1 800 299 0013 www samsung com latin HONDURAS 800 7919267 www samsung com latin JAMAICA 1 800 234 7267 www samsung com latin MEXICO 01 800 SAMSUNG 726 7864 www samsung com mx NICARAGUA 00 1800 50...

Page 2: ...y images and text such as stock market reports video game displays station logos web sites or computer graphics and patterns should be limited as described above for all televisions Displaying stationary images that exceed the above guidelines can cause uneven aging of PDP Displays that leave subtle but permanent burned in ghost images in the PDP picture To avoid this vary the programming and imag...

Page 3: ...s temperature or humidity This is normal and not a defect of the unit Cell Defects The PDP uses a panel consisting of 1 230 000 SD level to 3 150 000 HD level pixels which require sophisticated technology to produce However there may be a few bright or dark pixels on the screen These pixels will have no impact on the performance of the product Avoid operating the TV at temperatures below 5 C 41 F ...

Page 4: ...s to the Factory Defaults 40 Connecting Headphones Sold separately 40 Channel Control Managing Channels 41 Clearing Scrambled Channels Digital 47 Fine Tuning Analog Channels 47 Checking the Digital Signal Strength 48 PC Display Using Your TV as a Computer PC Display 49 Display Modes 49 Setting up the TV with your PC 50 Time Setting Setting the Time 52 Function Description Selecting a Menu Language...

Page 5: ...following items are included with your TV If any items are missing contact your dealer Remote Control 2 AAA Batteries Not available in all locations Power Cord Owner s Instructions Warranty Card Safety Guide Manual Not available in all locations Cloth Clean Ferrite Core 3ea Program CD Holder Ring 4ea Refer to page 122 The following parts are sold separately and are available at most electronics st...

Page 6: ... to see an on screen menu of your TV s features 3 VOL Press to increase or decrease the volume In the on screen menu use the VOL buttons as you would use the and buttons on the remote control 4 CH Press to change channels In the on screen menu use the CH buttons as you would use the and buttons on the remote control 5 POWER INDICATOR Blinks and turns off when the power is on and lights up in stand...

Page 7: ...t and right audio from your DVI device 7 ANT IN Connects to an antenna or cable TV system 8 LAN Connect a LAN cable to this port to connect to the Network See page 95 9 COMPONENT IN 1 2 AV IN 1 Connects Component video audio The COMPONENT IN 1 jack is also used as the AV IN 1 jack Connect the video cable to the COMPONENT IN 1 Y VIDEO jack and the audio cable to the COMPONENT IN 1 R AUDIO L jacks 0...

Page 8: ...ress to display information on the TV screen COLOR BUTTONS Use these buttons in the Channel list and WISELINK etc CC Controls the caption decoder E MODE Press to select the preset display and sound modes for sports cinema and games Use these buttons in the DMA WISELINK and Anynet modes RETURN TOOLS INFO W LINK CH LIST EXIT This remote can be used to control recording on Samsung recorders with the ...

Page 9: ...is procedure requires an optional combiner adaptor available at most electronics shops 1 Connect both antenna leads to the combiner 2 Plug the combiner into the ANT IN terminal on the bottom of the back panel Installing Batteries in the Remote Control 1 Lift the cover at the back of the remote control upward as shown in the figure 2 Install two AAA size batteries Make sure to match the and ends of...

Page 10: ...T IN terminal on your cable box This terminal might be labeled ANT IN VHF IN or simply IN 2 Connect this cable to a two way splitter 3 Connect an Antenna cable between an OUTPUT terminal on the splitter and the IN terminal on the cable box 4 Connect an Antenna cable between the ANT OUT terminal on the cable box and the B IN terminal on the RF A B switch 5 Connect another cable between the other OU...

Page 11: ...Satellite receiver Set Top Box What is HDMI HDMI or high definition multimedia interface is an interface that enables the transmission of digital audio and video signals using a single cable The difference between HDMI and DVI is that the HDMI device is smaller in size and has the HDCP High Bandwidth Digital Copy Protection coding feature installed DVI also requires a separate audio connection see...

Page 12: ...ite receiver Set Top Box to your TV 1 Connect a Component Cable between the COMPONENT IN 1 or 2 Y PB PR jacks on the TV and the COMPONENT Y PB PR jacks on the DVD Blu Ray Player or Cable Box Satellite receiver Set Top Box 2 Connect Audio Cables between the COMPONENT IN 1 or 2 R AUDIO L jacks on the TV and the AUDIO OUT jacks on the DVD Blu Ray Player or Cable Box Satellite receiver Set Top Box Com...

Page 13: ... as compared to a standard VCR 1 To begin follow steps 1 3 in the previous section to connect the antenna or cable to your VCR and your TV 2 Connect an S Video Cable between the S VIDEO OUT jack on the VCR and the AV IN 2 S VIDEO jack on the TV Connect Audio Cables between the AUDIO OUT jacks on the VCR and the AV IN 2 R AUDIO L jacks on the TV An S Video cable may be included with your VCR If not...

Page 14: ...onnected to the DIGITAL AUDIO OUT OPTICAL jack Decrease the volume of the TV and adjust the volume level with the system s volume control What is OPTICAL An optical cable converts an electric signal into an optical light signal and transmits it through glass fibers S PDIF is a transmission system of digital audio in the form of a light wave that uses a glass conductor 5 1CH audio is possible when ...

Page 15: ...2 Connect a 3 5 mm Stereo plug to 2RCA cable between the DVI IN HDMI2 R AUDIO L jack on the TV and the Audio Out jack of the sound card on your computer Each PC has a different back panel configuration When connecting a PC match the color of the connection terminal to the cable When using an HDMI DVI cable connection you must use the HDMI IN 2 terminal Connecting a PC PC TV Rear Panel PC Audio Cab...

Page 16: ... then press the ENTER button We recommend setting the TV to Home Use mode for the best picture in your home environment Store Demo mode is only intended for use in retail environments If the unit is accidentally set to Store Demo mode and you want to return to Home Use mode Press the Volume button on the TV When the volume OSD is displayed press and hold the MENU button on the TV for 5 seconds 4 P...

Page 17: ...button Press the or button to select Off On or Auto then the ENTER button The message Select the time zone in which you live is displayed 10 Press the or button to highlight the time zone for your local area and to move the highlight to the appropriate time zone on the map of the United States Press the ENTER button If clock is not automatically set see page 52 to set the clock 11 The message Enjo...

Page 18: ...to select channel 27 press 2 then 7 The TV will change channels when you press the second number For quick channel change press the number buttons then press the ENTER button You can press number buttons on Remote control for direct channel access press the same Number button again to switch between digital and analog TV channels broadcast by the same station Using the Button The RETURN TOOLS INFO...

Page 19: ...icture Sound Channel Setup Input Application 2 Press the or button to select one of the icons Then press the ENTER button to access the icon s sub menu To move to a lower menu turn the wheel clockwise when the menu Display is on the screen To move to a higher menu turn the wheel counterclockwise 3 Press the EXIT button to exit It takes about one minute until the on screen menu disappears Mode Stan...

Page 20: ...rned on for a moment Pressing a remote control button when the remote control is on turns the button backlight on for a moment If you touch or move the remote control and the motion is detected by the sensor of the remote control the button backlight will be turned on for a moment The button backlight will not be turned on when the remote control is turned off Using the TOOLS Button You can use th...

Page 21: ...ed the TV starts to remove scrambled channels see page 47 The Auto program menu then reappears If you want to stop Auto Programming press the ENTER button The Stop Auto Program message will be displayed Select Yes by pressing the or button then press the ENTER button Press the EXIT button to exit Easy Setting 1 Press the TOOLS button on the remote control 2 Press the or button to select Switch to ...

Page 22: ...n name the device connected to the input jacks to make your input source selection easier 1 Press the MENU button to display the menu Press the or button to select Input then press the ENTER button Press the or button to select Edit Name then press the ENTER button 2 Press the or button to select AV1 AV2 S Video Component1 Component2 PC HDMI1 HDMI2 DVI HDMI or HDMI4 input jack then press the ENTER...

Page 23: ...f a particular item Press the ENTER button Press the EXIT button to exit When you make changes to Cell Light Contrast Brightness Sharpness Color or Tint G R the OSD will be adjusted accordingly When in PC mode Tint G R Sharpness and Color are not available Each adjusted setting will be stored separately according to its input mode This TV includes the Cell Light function to adjust the panel bright...

Page 24: ...ow Sets the black color depth to low Medium Sets the black color depth to medium High Sets the black color depth to high Activating Dynamic Contrast You can adjust the screen contrast so that the optimal contrast is provided 6 Press the or button to select Dynamic Contrast then press the ENTER button 7 Press the or button to select Off Low Medium or High Press the ENTER button Off Turns off the dy...

Page 25: ...he value of a particular item Press the ENTER button In Color you can adjust the RGB values for the selected color To reset the adjusted RGB value select Reset Red Adjusts the red saturation level of the selected color Green Adjusts the green saturation level of the selected color Blue Adjusts the blue saturation level of the selected color Reset Resets the color space to the default values Changi...

Page 26: ...ENTER button R Offset Adjusts the red color darkness G Offset Adjusts the green color darkness B Offset Adjusts the blue color darkness R Gain Adjusts the red color brightness G Gain Adjusts the green color brightness B Gain Adjusts the blue color brightness Reset The previously adjusted white balance will be reset to the factory defaults Changing the adjustment value will refresh the adjusted scr...

Page 27: ...ER button In PC mode you can only make changes to the Color Tone Size and Screen Burn Protection from among the items in Picture Options Adjusting the Color Tone 1 Follow the Activating Picture Options instructions numbers 1 and 2 2 Press the or button to select Color Tone then press the ENTER button 3 Press the or button to select Cool2 Cool1 Normal Warm1 or Warm2 Press the ENTER button Warm1 or ...

Page 28: ...n to move the picture up and down Reset Press the or button to select Reset then press the ENTER button You can initialize the setting Easy Setting 1 Press the TOOLS button on the remote control 2 Press the or button to select Picture Size 3 Press the or button to select the required option 4 Press the EXIT or TOOLS button to exit Continued After selecting Just Scan in HDMI 1080i 1080p or Componen...

Page 29: ... 1 Follow the Activating Picture Options instructions numbers 1 and 2 Refer to page 27 2 Press the or button to select Digital NR then press the ENTER button 3 Press the or button to select Off Low Medium High or Auto Press the ENTER button Off Turns the screen noise reduction function off Low Reduces screen noise at a low level Medium Reduces screen noise at a medium level High Reduces screen noi...

Page 30: ...efer to page 27 2 Press the or button to select HDMI Black Level then press the ENTER button 3 Press the or button to select Normal or Low then press the ENTER button Normal The screen gets brighter Low The screen gets darker This function is active only when an external device is connected to the TV via HDMI RGB signals HDMI Black Level function may not be compatible with all external devices Pre...

Page 31: ...or and Tint to preferred values appropri ate to the signal level of each video device using the Red Green Blue Cyan Ma genta Yellow Color Bar Patterns without using an additional Blue DLNA Filter 1 Follow the Activating Picture Options instructions numbers 1 and 2 Refer to page 27 2 Press the or button to select Blue Only Mode then press the ENTER button 3 Press the or button to select Off or On t...

Page 32: ...Side Gray When you watch TV with the screen ratio of 4 3 the screen is prevented from any damage by adjusting the white balance on both extreme left and right sides To prevent the screen burn from happening select Dark or Light Dark When you set the screen ratio to 4 3 it darkens the left and right sides Light When you set the screen ratio to 4 3 it brightens the left and right sides To remove aft...

Page 33: ...he PDP in the horizontal or vertical direction to prevent after images on the screen 4 Press the or button to select the item you wish to change then press the ENTER button Press the or button to change the value of the item then press the ENTER button Optimum condition for pixel shift PC TV AV1 AV2 S Video Component HDMI Horizontal Dot 2 2 Vertical Line 4 4 Time min 2 min 2 min This function is n...

Page 34: ...tory Defaults 1 To select the desired picture mode follow the Changing the Picture Standard instructions numbers 1 and 2 see page 23 2 Press the or button to select Picture Reset then press the ENTER button Press the or button to select Reset Picture Mode or Cancel then press the ENTER button Press the EXIT button to exit Each mode can be reset Changing the Size of the PIP Window 3 Press the or bu...

Page 35: ... select a particular item 4 Press the or button to select the required option 5 Press the EXIT or TOOLS button to exit Changing the Position of the PIP Window 4 Press the or button to select Position then press the ENTER button Press the or button to select the desired PIP window position then press the ENTER button In Double Window and Double Wide modes Position cannot be selected Return Enter PI...

Page 36: ... Press the MENU button Press the or button to select Sound then press the ENTER button 2 Press the or button to select Equalizer then press the ENTER button 3 Press the ENTER button to select Mode Press the or button to select a particular item Standard Music Movie Speech Custom then press the ENTER button Continued Mode Custom Equalizer SRS TruSurround XT Off Preferred Language English Multi Trac...

Page 37: ...rnal television speakers It is fully compatible with all multi channel formats 1 Press the MENU button to display the menu Press the or button to select Sound then press the ENTER button 2 Press the or button to select SRS TruSurround XT then press the ENTER button 3 Press the or button to select Off or On then press the ENTER button Press the EXIT button to exit TruSurround XT SRS and Symbol are ...

Page 38: ...ary Audio Program which is usually a foreign language translation Multi Track Sound is available only in Analog TV mode Depending on the particular program being broadcast you can listen to Mono Stereo or SAP Easy Setting 1 Press the TOOLS button on the remote control 2 Press the or button to select Multi Track Sound 3 Press the or button to select the required option 4 Press the EXIT or TOOLS but...

Page 39: ... CH LIST EXIT VOL RETURN TOOLS INFO W LINK CH LIST EXIT and MUTE buttons do not operate when the Select Speaker is set to External Speaker Setting the Speaker You can set to have sound output from the TV s internal speakers or from external speakers connected to your sound system TV s Internal Speakers Audio Out Optical L R Out to Sound System TV AV S Video Component PC HDMI TV AV S Video Componen...

Page 40: ...Resetting the Sound Settings to the Factory Defaults You can restore the Sound settings to the factory defaults Connecting Headphones Sold separately You can connect a set of headphones to your set if you wish to watch a TV program without disturbing other people in the room When you insert the headphone s plug into the headphone jack you can operate only Preferred Language in digital TV mode Mult...

Page 41: ... lists Using the Color buttons on the Remote with the Channel List Red Antenna Switches to DTV air or DTV cable Green Zoom Enlarges or shrinks a channel number Yellow Select Selects multiple channel lists TOOLS Option Displays the Add or Delete Add to Favorite or Delete from Favorite Timer Viewing Channel Name Edit Select All and Auto Program menus A gray colored channel indicates the channel has ...

Page 42: ...r A channel must be deleted before it can be added back to the Added Channels list To Add Restore a channel back to the Added Channel List follow steps 1 3 above press the or button to select a channel to add the press the TOOLS button Press the ENTER button to select Add Press the CH LIST button on the remote control to bring up the channel lists Continued Channel Auto Program Clear Scrambled Cha...

Page 43: ... button The channel is deleted from Favorites and the mark disappears Press the EXIT button to exit You can also Add or Delete a channel from Favorites in the Added Channels menu in the same manner All favorite channels will be shown on Favorite menu Press the CH LIST button on the remote control to bring up the channel lists To select the favorite channels you have set up press the FAV CH button ...

Page 44: ...to page 45 Only memorized channels can be reserved channels You can set the channel month day year hour and minute directly by pressing the number buttons on the remote control Press the CH LIST button on the remote control to bring up the channel lists Digital Program Guide and Viewing Reservation When a digital channel is selected and you press the button the Program Guide for the channel appear...

Page 45: ... Press the or button to select OK then press the ENTER button The viewing reservation has been canceled Press the EXIT button to exit Programmed Menu Change Info Select to change a viewing reservation Cancel Schedules Select to cancel a viewing reservation Information Select to view a viewing reservation Select All Deselect All You can select or Deselect all channels in the channel list Continued ...

Page 46: ...oring Channels in Memory Auto Program Channels can labeled so that their call letters appear whenever the channel is selected 1 Press the MENU button Press the or button to select Channel then press the ENTER button Press the or button to select Channel List then press the ENTER button 2 Press the or button to select the channel to be assigned a new name then press the TOOLS button 3 Press the or ...

Page 47: ... button to display the menu Press the or button to select Channel then press the ENTER button 2 Press the or button to select Fine Tune then press the ENTER button 3 Press the or button to adjust the fine tuning To store the fine tuning setting in the TV s memory press the ENTER button If you do not store the fine tuned channel in memory adjustments are not saved 4 To reset the fine tuning setting...

Page 48: ...tion of available digital channels 1 Press the MENU button to display the menu Press the or button to select Channel then press the ENTER button 2 Press the or button to select Signal Strength then press the ENTER button If the signal strength meter indicates that the signal is weak physically adjust your antenna to increase the signal strength Continue to adjust the antenna until you find the bes...

Page 49: ...system equals the standard signal mode the screen is adjusted automatically If the signal from the system doesn t equal the standard signal mode adjust the mode by referring to your videocard user guide otherwise there may be no video For the display modes listed below the screen image has been optimized during manufacturing D Sub Input Mode Resolution Horizontal Frequency kHz Vertical Frequency H...

Page 50: ...n make the vertical frequency adjustments and fine tune again After the noise has been reduced re adjust the picture so that it is aligned in the center of the screen Preset Press the SOURCE button to select PC mode 1 Press the MENU button to display the menu Press the or button to select Picture then press the ENTER button Press the or button to select Screen then press the ENTER button 2 Press t...

Page 51: ...izing the Screen Position You can replace all image settings with the factory default values Preset Press the SOURCE button to select PC mode 1 Press the MENU button to display the menu Press the or button to select Picture then press the ENTER button Press the or button to select Screen then press the ENTER button 2 Press the or button to select Image Reset then press the ENTER button The message...

Page 52: ...he or button to move to Month Day Year Hour Minute or am pm Set the date and time you want by pressing the or button then press the ENTER button Press the EXIT button to exit The current time will appear every time you press the INFO button You can set the Month Day Year Hour and Minute directly by pressing the number buttons on the remote control Continued Setup Plug Play Language English Time Ca...

Page 53: ...ss the ENTER button Press the or button to select On Off or Auto then press the ENTER button Press the EXIT button to exit Depending on the broadcast station and signal the auto time may not be set correctly If this occurs set the time manually Antenna or Cable must be connected in order to set the time automatically Continued Setup Plug Play Language English Time Cable Network Setup V Chip Captio...

Page 54: ...elect TV or USB Make sure that an USB device is connected to your TV Antenna Select Air or Cable Channel Select the desired channel Music Select the folder containing MP3 files on the USB device Photo Select the folder containing JPEG files on the USB device Repeat Select Once Everyday Mon Fri Mon Sat Sat Sun or Manual When Manual is selected press the button to select the desired day of the week ...

Page 55: ...mer Press the or button to select Off then press the ENTER button Press the EXIT button to exit Easy Setting 1 Press the TOOLS button on the remote control 2 Press the or button to select Sleep Timer 3 Press the or button to select the minute then press the ENTER button Tools Anynet HDMI CEC Multi Track Sound Stereo Picture Size 16 9 Picture Mode Standard Sound Mode Custom Sleep Timer Off Add to F...

Page 56: ...button 2 Press the or button to select the appropriate language English Español or Français then press the ENTER button Press the EXIT button to exit Plug Play Language English Time Cable Network Setup V Chip Caption External Settings Entertainment Off Energy Saving Off Setup Plug Play Language English Time Cable Network Setup V Chip Caption External Settings Entertainment Off Energy Saving Off Se...

Page 57: ...IN will appear Enter your 4 digit PIN number The default PIN number of a new TV set is 0 0 0 0 3 The V Chip screen will appear Press the or button to select Change PIN then press the ENTER button The Change PIN screen will appear Choose any 4 digits for your PIN and enter them Re enter the same 4 digits When the message PIN is changed successfully is displayed your PIN has been memorized Press the...

Page 58: ...ther of two methods The TV guidelines or the MPAA rating 1 Press the MENU button to display the menu Press the or button to select Setup then press the ENTER button 2 Press the or button to select V Chip then press the ENTER button The message Enter PIN will appear Enter your 4 digit PIN number 3 The V Chip screen will appear Press the or button to select TV Parental Guidelines then press the ENTE...

Page 59: ...Press to lock all TV ratings The TV Y TV Y7 TV G TV PG TV 14 and TV MA have additional options See the next step to change any of the following sub ratings ALL Lock all TV ratings L Adult language FV Fantasy violence S Sexual situation D Sexually suggestive dialog V Violence The V Chip will automatically block certain categories that are more restrictive For example if you block TV Y category then...

Page 60: ...utton to block or unblock the category Press the EXIT button to exit G General audience no restriction PG Parental guidance suggested PG 13 Parents strongly cautioned R Restricted Children under 17 should be accompanied by an adult NC 17 No children under age 17 X Adults only NR Not rated Allow All Press to unlock all TV ratings Block All Press to lock all TV ratings The V Chip will automatically ...

Page 61: ... Programming intended for children under age 8 C8 Programming generally considered acceptable for children 8 years and over to watch on their own G General programming suitable for all audiences PG Parental guidance 14 Programming contains themes or content which may not be suitable for viewers under the age of 14 18 Adult programming The V Chip will automatically block any category that is more r...

Page 62: ...ings Block All Press to lock all TV ratings G General 8 ans Not recommended for young children 13 ans Programming may not be suitable for children under the age of 13 16 ans Programming is not suitable for children under the age of 16 18 ans Programming restricted to adults The V Chip will automatically block any category that is more restrictive For example if you block 8 ans category then 13 ans...

Page 63: ...e ENTER button to activate the restriction selected The symbol is indicated Press the EXIT button to exit Allow All Press to unlock all TV ratings Block All Press to lock all TV ratings Parental restriction levels differ depending on the broadcasting station The default menu name and downloadable US rating changes depending on the downloaded information Even if you set the on screen display to you...

Page 64: ... or CH button Under certain conditions depending on the rating of the local TV programs the V Chip might lock out all the channels In this case use the V Chip function for an emergency escape If you forget the PIN press the remote control buttons in the following sequence which resets the pin to 0 0 0 0 Power Off MUTE 8 2 4 Power On Received Rating MPAAX MPAAPG Max8char Use the NUMBER buttons to e...

Page 65: ... Size This option consists of Default Small Standard and Large The default is Default Font Style This option consists of Default Style0 Style7 You can change the font you want The default is Default Foreground Color This option consists of Default White Black Red Green Blue Yellow Magenta and Cyan You can change the color of the letter The default is Default Background Color This option consists o...

Page 66: ...C2 The Special Non Synchronous Use Captions This channel carries data that is intended to augment information carried in the program CC3 Secondary Synchronous Caption Service Alternate program related caption data typically second language captions CC4 Special Non Synchronous Use Captions Similar to CC2 Text1 First Text Service This may be various non program related data Text2 Second Text Service...

Page 67: ...ton When the TV is turned off by Sleep Timer function Setting the Light Effect You can turn the red LED on the front of TV on off 1 Press the MENU button to display the menu Press the or button to select Setup then press the ENTER button Press the or button to select External Settings then press the ENTER button 2 Press the or button to select Light Effect then press the ENTER button Press the or ...

Page 68: ...rovides the optimal picture and sound quality for sports Cinema Provides the optimal picture and sound quality for movie watching You can experience a richer picture and enhanced sound Game Provides the optimal picture and sound quality for games This mode accelerates the playing speed when using an external game console connected to the TV Press the EXIT button to exit If you set any of the three...

Page 69: ...30 seconds is displayed 5 If the firmware on the USB is properly recognized the message Upgrade version xxxx to version xxxx The system would be reset after upgrade is displayed Press the or button to select OK then press the ENTER button The upgrade starts Please be careful not to disconnect the power or remove the USB drive while upgrades are being applied The TV will shut off and turn on automa...

Page 70: ... and JPEG files while a PTP device supports JPEG files only The sequential jpeg format is supported Photo and audio files must be named in English French or Spanish If not the files can not be played Change the file names to English French or Spanish if necessary The higher the resolution of the image the longer it takes to display on the screen The maximum supported JPEG resolution is 15360x8640 ...

Page 71: ...mes Not support game program Using the Photo List This menu shows Photo files saved on an USB memory device Photo List 1 Press the W LINK button on the remote control to display the WISELINK Pro menu 2 Press the or button to select Photo then press the ENTER button Photo files are displayed This menu only shows files whose file extension is jpg Files of other formats such as bmp or tiff will not b...

Page 72: ...s the number of photos that are selected by pressing the Yellow button 6 Help Items Red Device button Selects a connected device Green Favorites Setting button Changes the favorites setting for the selected photo Press this button repeatedly until the desired value appears Refer to page 75 Yellow Select button Selects photos from the photo list Selected photos are marked with a symbol on the left ...

Page 73: ...he or button to select from the sublist of files grouped by Month To move to the previous next group press the RETURN TOOLS INFO W LINK CH LIST EXIT REW or RETURN TOOLS INFO W LINK CH LIST EXIT FF button 3 Press the TOOLS button Press the or button to select Play Current Group 4 Press ENTER to play the selected group of photo files from the sublist Timeline Sorts photos by time It sorts and shows ...

Page 74: ...select from the sublist of photos grouped by compositon To move to the previous next composition group press the RETURN TOOLS INFO W LINK CH LIST EXIT REW or RETURN TOOLS INFO W LINK CH LIST EXIT FF button 3 Press the TOOLS button Press the or button to select Play Current Group 4 Press ENTER to play the selected group of photo files from the sublist Changing the composition information of a selec...

Page 75: ...ss the Green button repeatedly until the desired setting appears Favorites settings change completed Favorite options Users can select the number of stars up to 3 according to their preference The stars are for grouping purposes only For example the 3 star setting has no priority over the one star setting Rotating the Photo file 1 Press the or button to select a sorting standard Monthly Timeline C...

Page 76: ...eting the Photo files 1 Press the or button to select the desired photo in the Photo list 2 Press the TOOLS button 3 Press the or button to select Delete then press the ENTER button The Delete this file message appear 4 Press the or button to select OK then press the ENTER button The photo is deleted When a read only file is deleted the Read only file s Delete the file s message appear If you sele...

Page 77: ...n the remote control to start the Slide Show Slide show function information icon Displayed at the top left of the screen Icon Current OSD Function Photo Slide Show Photo Slide Show is in progress Photo Pause You can pause a Slide Show and Music by pressing the RETURN TOOLS INFO W LINK CH LIST EXIT pause ENTER button on the remote control during a Slide Show To resume the Slide Show press the RETU...

Page 78: ...e is not saved The Rotating function information icon is displayed at the top right of the screen Icon Current OSD Function Rotating 0 This rotates a photo to its original position Rotating 90 This rotates a photo by 90 degrees Rotating 180 This rotates a photo by 180 degrees Rotating 270 This rotates a photo by 270 degrees Continued 0 90 180 270 Viewing a photo 1 Press the W LINK button on the re...

Page 79: ... to select Slide Show Speed Press the or button to select the desired option Normal Fast Slow You can select the Slide Show speed only during a slide show You can also change the speed of the Slide Show by pressing the RETURN TOOLS INFO W LINK CH LIST EXIT REW or RETURN TOOLS INFO W LINK CH LIST EXIT FF key during the Slide Show Background Music If you set Background Music On the background music ...

Page 80: ...ood the music files on the USB device and groups them accordingly Picture Setting Change the screen settings Refer to page 23 Sound Setting Change the audio settings Refer to page 36 Information The photo file information including the order of the file in the current directory the name the size the resolution the date modified and the path is displayed Refer to page 76 Safe Remove You can remove ...

Page 81: ...standard for sorting music files Title Artist Mood Genre Folder Preference 3 View Groups Shows the sorting groups The sorting group including the currently selected music file is highlighted 4 Current Device Shows the currently selected device name Press the Red button to select a device Music SUM Device Favorites Setting Select Jump Option Preference Title Artist Energetic Jee Album 1 2005 Blues ...

Page 82: ...an change the Favorite information Music files for which information cannot be displayed are set to Unclassified If there is no title information for a music file the filename is displayed If no information is available for the Genre Artist Album or Year the corresponding item is displayed as blank Title Sorts music files by the title It sorts and displays the Music titles in alphabetical order 1 ...

Page 83: ...press the or button to select a music file 2 Press the TOOLS button 3 Press the or button to select Change Group Info Press the ENTER button The mark appears on the top of the left of the selected music file WISELINK Pro identifies the mood of the music files and groups them accordingly by analyzing the music files on the USB device Mood information extracted from a music file may not always match...

Page 84: ...NK CH LIST EXIT REW or RETURN TOOLS INFO W LINK CH LIST EXIT FF button 3 Press the TOOLS button 4 Press the or button to select Play Current Group 5 Press ENTER to play the selected group of music files from the sublist Changing the Favorites setting 1 Press the or button to select the desired music in the music list 2 Press the Green button repeatedly until the desired setting appears Favorites s...

Page 85: ...cannot restore the deleted music files Viewing the Information The music file information including the order of the file in the current directory the name the size the date modified and the path is displayed 1 Press the or button to select the desired music in the music list 2 Press the TOOLS button 3 Press the or button to select Information then press the ENTER button The information on the sel...

Page 86: ...of a music file may be displayed as 00 00 00 if its playing time information is not found at the start of the file 4 To exit WISELINK Pro mode press the W LINK button on the remote control Playing the music group 1 Press the W LINK button on the remote control to display the WISELINK Pro menu 2 Press the or button to select Music then press the ENTER button To move to the previous next group press...

Page 87: ...ce When all music files in the folder or the selected file are played once Repeat Mode is Off RETURN TOOLS INFO W LINK CH LIST EXIT RETURN TOOLS INFO W LINK CH LIST EXIT Music Play Pause When pressing the RETURN TOOLS INFO W LINK CH LIST EXIT Play RETURN TOOLS INFO W LINK CH LIST EXIT Pause ENTER button on the remote control while music is playing Repeating Music Play 1 While a Music file is playi...

Page 88: ...lution Audio codec avi Xvid 800X600 PCM ADPCM H 264 MP 1920X1080 AC3 MPEG4 SP 800X600 PCM ADPCM MPEG4 ASP 800X600 ADPCM MJPEG 800X600 PCM mp4 H 264 BP 1920X1080 AAC H 264 MP 1920X1080 PCM AAC mpg MPEG2 1920X1080 AC3 vro vob MPEG2 1920X1080 AC3 Screen Display 1 Currently selected movie Shows the currently selected movie 2 Current Sort Standard Press the or button to change the standard for sorting ...

Page 89: ...INK Pro menu 2 Press the or button to select Movie then press the ENTER button Movie files are displayed 3 Press the or button to select a sorting standard Title Timeline Folder Preference The movies are sorted according to the newly selected sorting standard Movie information is automatically set You can change the Favorite Title Sorts movie files by the title It sorts and displays the Movie titl...

Page 90: ...e selected group of movie files from the sublist Preference Sorts movies by preference Favorite You can change the movie preferences 1 Select Preference as the sorting standard in the Movie List 2 Press the or button to select from the sublist of files grouped by preference To move to the previous next group press the RETURN TOOLS INFO W LINK CH LIST EXIT REW or RETURN TOOLS INFO W LINK CH LIST EX...

Page 91: ... deleted If you select Cancel the deletion is cancelled 5 To exit WISELINK Pro mode press the W LINK button on the remote control You cannot remove read only files You cannot restore the deleted Movie files Viewing the Movie Information The movie file information including the order of the file in the current directory the name the size the date modified and the path is displayed 1 Press the or bu...

Page 92: ...the file Press the button while playing a video file to rewind by 20 seconds Press the button to fast forward by 20 seconds 4 To exit WISELINK Pro mode press the W LINK button on the remote control Playing the movie group 1 Press the W LINK button on the remote control to display the WISELINK Pro menu 2 Press the or button to select Movie then press the ENTER button Press the or button to select t...

Page 93: ...n on the remote control Movie function information icon Displayed at the top left of the screen Icon Current OSD Function Movie Repeat When all movie files in the folder or the selected file are repeated Repeat Mode is On Movie Once When all movie files in the folder or the selected file are played once Repeat Mode is Off RETURN TOOLS INFO W LINK CH LIST EXIT RETURN TOOLS INFO W LINK CH LIST EXIT ...

Page 94: ...the screen saver appears Press the or button to select Screen Saver Run Time Press the or button to select 1 min 3 min or 5 min Information Select to viewing the information of the connected device Press the or button to select Information then press the ENTER button Safe Remove You can remove the device safely from the TV Refer to page 80 Setup SUM Device Move Adjust Return Slide Show Speed Norma...

Page 95: ...LAN Cable 1 PC LAN Cable 2 1 Connect the LAN port on the rear panel of the TV to the external modem with a LAN Cable 2 Connect the PC to which the DLNA PC Share Manager program will be installed and the external modem using a LAN cable 3 Connect the LAN port on the wall and the external modem with a Modem Cable Connecting to the Network 1 When connecting to the network is complete set up the netwo...

Page 96: ...aring the hard disk drive space used for the thumbnail information is also freed Supported Formats 1 Image JPEG jpg jpeg 2 Audio MP3 mp3 3 Video MPEG1 mpg mpeg MPEG2 PS TS mpg mpeg trp ts tp divx mpg mpeg avi MPEG4 H 264 mpg mpeg Install the application 1 Run the Setup exe file on the Program CD supplied with the product Alternatively you can download the file from www samsung com 2 Install the SA...

Page 97: ...k to share the selected PC server folder see page 99 3 Click to cancel sharing see page 99 4 Click to refresh the PC folder and files 5 Click to synchronize the share status see page 100 6 The folders and files of the PC to be shared are listed 7 Folders shared by the user are listed 8 PC server name shown on the device list of the Wiselink Click to change the name ...

Page 98: ...ethod 2 Select a file or folder right click over the selected file or folder and then select Property from the pop up menu Exit Exits the DLNA application If you select Exit without applying the changes after changing the shared status a message will appear asking if you want to apply the changed settings to the PC Select Yes to apply the changes and exit the application ...

Page 99: ...and drag drop the folder into the Shared Folders pane If a message appears asking you to confirm the shared folder select Yes Cancelling a Shared Folder You can cancel a shared folder on your PC Select a folder from the Shared Folder pane and select Unshare Folder Method 1 Select a folder from the Shared Folder pane select the Share menu and then select Unshare Folder Method 2 Select a folder from...

Page 100: ...der is not applied to the server Changes to the shared folders are not applied to your PC until you select the Set Changed State menu Method 1 Select the Share menu and select the Refresh DB sub menu Method 2 Click the Set Changed State icon Setting the Access Permission To enable the TV to find your PC the TV must be set to Set Device Policy in the Access Permission Settings window In addition th...

Page 101: ...u can determine whether to start the PC server automatically when Windows starts Change server name You can rename the PC server Enter a new name and click OK The new name will appear at the top right of the window and will appear on the TV Help Version The program version information message box appears ...

Page 102: ...DLNA mode press the W LINK button on the remote control Photo Photo List Sorting Photo List Refer to page 73 Viewing the Information Refer to page 76 Rotating the Photo file Refer to page 75 Viewing a Slide Show Refer to page 77 During a Slide Show Play Pause Refer to page 77 Slide Show Speed Refer to page 79 Zoom Refer to page 79 Rotate Refer to page 78 Music Music List Sorting Music List Refer t...

Page 103: ...sic and Background Music Setting functions Sorting files by preference in the Photo Music and Movie folders The Change Group Info function The Delete function The Safe Remove function The REW FF key functions while a movie is playing The Skip keys or Pause function may not work while a movie is playing for the DLNA of other manufacturers depending on the corresponding content information The playi...

Page 104: ...play the Content Library menu 3 Press the or button to select an icon Gallery Cooking Children Fitness then press the ENTER button To return to TV mode press the CH button on the remote control If you press the Volume or MUTE button no OSD is displayed but the function operates accordingly The Screen Saver is activated if there is no remote control key input for longer than 10 minutes Screen Saver...

Page 105: ...the CH button on the remote control Art You can view masterpieces of the impressionists including Van Gogh Monet Degas Cezanne and so on Relaxation You can view beautiful and serene images of nature Party You can view images that can produce a cheerful and exciting atmosphere The copyrights of the Gallery contents and all issues related to them are reserved by Gallery Player Inc For additional Gal...

Page 106: ...ed in the Cooking contents on the Samsung TV are based on recipes published by Anness Publishing The copyrights of the Cooking contents and all issues related to them are reserved by Practical Pictures 3 Press the or button to select a particular item Press the ENTER button 4 Press the or button to select a recipe you want to use Then press the ENTER button 5 Press the or button to use a recipe To...

Page 107: ... Boowa and Kwala characters Play You can enjoy exciting and fun interactive games using the remote control The copyrights of the Children contents and issues related to them are reserved by UpToTen 3 Press the or button to select an item to play Press the ENTER button The selected content is played To return to Content Library main menu press the EXIT button To exit Content Library mode press the ...

Page 108: ...ed by the DK Publishing Company The copyrights to the Massage content are reserved by Practical Pictures All issues related to copyrights are reserved by the corresponding company 3 Press the or button to select an item to view Press the ENTER button The Basic Stretches contents are automatically played so that you can easily follow the movements on the screen To move to the previous or next opera...

Page 109: ... only supports USB Mass Storage Class devices MSC MSC is a Mass Storage Class Bulk Only Transport device Examples of MSC are Thumb drives and Flash Card Readers Both USB HDD and HUB are not supported 5 Go to Content Library main menu by pressing Contents button or choosing Content Library Menu Application Content Library 6 Plug the USB memory into USB port on the side of the TV Finding a product n...

Page 110: ... TV IP Sharer LAN Cable Modem Cable TV Rear Panel LAN Cable You can connect the LAN port and the TV directly depending on your network status The LAN Port on the Wall You can connect the LAN via a Sharer Router LAN Cable The terminals the position of the port and the type of the external device may differ depending on the manufacturer If the IP address allocation by the DHCP server has failed turn...

Page 111: ...als the position of the port and the type of the external device may differ depending on the manufacturer If you are using a static IP address your ISP will inform you of the IP address subnet mask gateway and DNS You must enter these values to complete the network settings If you do not know the values ask your network administrator For the information on how to configure and connect a Sharer Rou...

Page 112: ... then press the ENTER button 3 Press the ENTER button to select Internet Protocol Setup 4 Press the or button to select Manual Setup then press the ENTER button 5 Press the or button to move to an item and press the numeric button to configure the selected item Press the ENTER button Select Network Test to check the network connectivity Refer to page 113 Press the EXIT button to exit Setup Languag...

Page 113: ...to connect devices other than your PC such as your TV to the Internet 2 If your Internet service provider requires an ID or password to connect to the Internet network your TV may not be able to connect to the Internet In this case you have to enter your ID or password when connecting to the Internet using an Internet Sharer Router 3 The internet connection may fail due to a firewall problem In th...

Page 114: ...oLink Not available for all locations Content Library Entertainment Mode Connectivity WISELINK Pro DLNA 4HDMI Anynet 5 Press the EXIT button to exit Using the Remote Control Button in Product Guide Menu Button Operations Yellow Button Shows the contents of the Product Guide sequentially AutoPlay Wheel Move the cursor and select an item Enter Select the currently selected item Return to the previou...

Page 115: ... jack only outputs 2 channel audio You will only hear sound from the Home Theater s Front Left and Right speakers and the subwoofer If you want to hear 5 1 channel audio connect the DIGITAL AUDIO OUT OPTICAL jack on the DVD player or Cable Satellite Box ie Anynet Device 1 or 2 directly to the Amplifier or Home Theater not the TV Please see the home theater s user manual for more information Some H...

Page 116: ...n Off then press the ENTER button 2 Press the or button to select Yes then press the ENTER button The Auto Turn Off function is enabled If you select No the Auto Turn Off function is canceled Press the EXIT button to exit The active source on the TV remote must be set to TV to use the Anynet function If you set Auto Turn Off to Yes connected external devices are also turned off when the TV is turn...

Page 117: ...evices may take up to 2 minutes You cannot cancel the operation during the switching operation The time required to scan for devices is determined by the number of connected devices When the device scan is complete the number of devices found are not displayed Although the TV automatically scans devices when it is turned on using the POWER button devices connected when the TV is already on are not...

Page 118: ...ter switching to the device when you are watching a TV program CH CH button Audio Device When a Receiver is activated VOL VOL MUTE button The Anynet function only works when the active source on the TV remote control is set to TV The RETURN TOOLS INFO W LINK CH LIST EXIT button works only while in the recordable state You cannot control Anynet devices using the buttons on the TV You can control An...

Page 119: ...is in TV mode Check whether it is Anynet exclusive remote control Anynet doesn t work in certain situations Searching channels Operating WISELINK When connecting or removing the HDMI 1 3 cable please make sure to search devices again or your TV off and on again Check if the Anynet Function of Anynet device is set on I want to start Anynet Check if the Anynet device is properly connected to the TV ...

Page 120: ... production method is digital High visual quality If the original production method is analog The digital program displayed on the screen is originally an analog program which has been converted to digital The visual quality is of an SD Standard Definition grade Screen is black and power indicator light blinks steadily On your computer check the Power and Signal Cable The TV is using its power man...

Page 121: ...he standard dimension as they may cause damage to the inside of the TV set For wall mounts that do not comply with the VESA standard screw specifications the length of the screws may differ depending on their specifications Do not use screws that do not comply with the VESA standard screw specifications Do not use fasten the screws too strongly this may damage the product or cause the product to f...

Page 122: ...curing the stand base and the monitor firmly attach the monitor to the stand base The exterior of the set may be different from the picture Preparing before installing Wall Mount on the wall 1 Install Wall Mount with the torque range of 15kgf cm or less Make sure that parts can be damaged if the torque is out of the specified range 2 Accessory Kit contains Holder Ring for installing other company ...

Page 123: ...7 9 lbs 58 0 kg 185 2 lbs 84 0 kg Environmental Considerations Operating Temperature Operating Humidity Storage Temperature Storage Humidity 50 F to 104 F 10 C to 40 C 10 to 80 non condensing 4 F to 113 F 20 C to 45 C 5 to 95 non condensing This device is a Class B digital apparatus Design and specifications are subject to change without prior notice For the power supply and Power Consumption refe...

Page 124: ...This page is intentionally left blank ...

Page 125: ...This page is intentionally left blank ...

Reviews: