background image

Wireless network setup

_ 31

several minutes to receive the IP address.

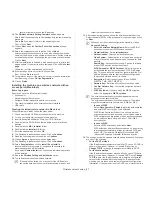
10.

The 

Wireless Network Setting Complete

 window appears.

Select 

Yes

 if you accept the current settings and continue the setup 

procedure.
Select 

No

 if you want to return to the beginning screen. 

Then, click on 

Next

.

11.

Click on 

Next

 when the 

Confirm Printer Connection

 window 

appears.

12.

Select the components to be installed. Click on 

Next

.

After selecting the components, you can also change the machine 

name, set the machine to be shared on the network, set the machine 

as the default machine, and change the port name of each machine. 

Click on 

Next

.

13.

After the installation is finished, a window asking you to print a test 

page appears. If you want to print a test page, click on 

Print a test 

page

.

Otherwise, just click on 

Next

 and go to step 15.

14.

If the test page prints out correctly, click on 

Yes

.

If not, click on 

No

 to reprint it.

15.

To register as a user of the machine in order to receive information 

from Samsung, click on 

On-line Registration

.

16.

Click on 

Finish

.

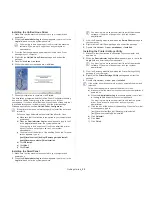
Installing the machine on a wireless network with an 

access point (Macintosh)

Items to prepare

Ensure you have the following items ready:

Access point

Network-connected computer

Software CD that was provided with your machine

The machine installed with a wireless network interface

USB cable

Creating the infrastructure network in Macintosh

When the items are ready, follow the steps below:

1.

Check whether the USB cable is connected to the machine.

2.

Turn on your computer, access point, and machine.

3.

Insert the supplied software CD into your CD-ROM drive.

4.

Double-click the CD-ROM icon that appears on your Macintosh 

desktop.

5.

Double-click the 

MAC_Installer

 folder.

6.

Double-click the 

Installer OS X

 icon.

7.

Enter the password and click on 

OK

.

8.

The Samsung Installer window opens. Click on 

Continue

.

9.

Read the license agreement and click on 

Continue

.

10.

Click on 

Agree

 to agree to the license agreement.

11.

The Samsung Installer window opens. Click on 

Continue

.

12.

Select 

Easy Install

 and click on 

Install

Easy Install

 is 

recommended for most users. All compoenets necessary for 

machine operations will be installed.
If you select 

Custom Install

, you can choose individual operations 

will be installed.

13.

Select the 

Wireless Setting and Installation

 option.

14.

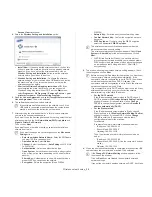
The software searches the wireless network.


If the search has failed, you may check if the USB cable is 

connected between the computer and machine properly, and 

follow the instructions in the window.

15.

After searching, the window shows the wireless network devices. 

Select the name (SSID) of the access point you are using and click 

on 

Next

.


When you set the wireless configuration manually, click on 

Advanced Setting

.

Enter the wireless Network Name: 

Enter the SSID of 

access point you want (SSID is case-sensitive).

Operation Mode: 

Select 

Infrastructure

.

Authentication: 

Select an authentication type.

Open System: 

Authentication is not used, and encryption 

may or may not be used, depending on the need for data 

security.

Shared Key: 

Authentication is used. A device that has a 

proper WEP key can access the network.

WPA Personal or WPA2 Personal: 

Select this option to 

authenticate the print server based on WPA Pre-Shared 

Key. This uses a shared secret key (generally called Pre- 

Shared Key pass phrase) that is manually configured on 

the access point and each of its clients.

Encryption: 

Select the encryption. (None, WEP64, 

WEP128, TKIP, AES, TKIP AES)

Network Key: 

Enter the encryption network key value.

Confirm Network Key: 

Confirm the encryption network 

key value.

WEP Key Index: 

If you are using the WEP Encryption, 

select the appropriate 

WEP Key Index

.


The wireless network security window appears when the 

access point has security setting.
The wireless network security window appears. The window 

may differ according to its security mode: WEP or WPA.

In case of WEP

Select 

Open System

 or 

Shared Key

 for the authentication 

and enter WEP security key. Click on 

Next

.

WEP (Wired Equivalent Privacy) is a security protocol 

preventing unauthorized access to your wireless network. 

WEP encrypts the data portion of each packet exchanged 

on a wireless network using a 64-bit or 128-bit WEP 

encryption key.

In case of WPA

Enter the WPA shared key and click on 

Next

.

WPA authorizes and identifies users based on a secret key 

that changes automatically at regular intervals. WPA also 

uses TKIP (Temporal Key Integrity Protocol) and AES 

(Advanced Encryption Standard) for data encryption.

16.

The window shows the wireless network setting and check if settings 

are right. Click on 

Next

.

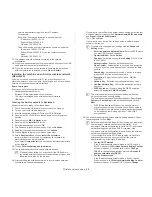
For the DHCP method

If the IP address assignment method is DHCP, check if DHCP is 

shown in the window. However, if it shows Static, click on 

Change TCP/IP

 to change the assignment method to DHCP.

For the Static method

If the IP address assignment method is Static, check if Static is 

shown in the window. However, if it shows DHCP, click 

Change 

TCP/IP

 to enter the IP address and other network configuration 

values for the machine. Before entering the IP address for the 

machine, you must know the computer’s network configuration 

information. If the computer is set to DHCP, you must contact the 

Summary of Contents for ML-1865W

Page 1: ...ML 186xW Series Mono Laser Printer User s Guide imagine the possibilities Thank you for purchasing a Samsung product...

Page 2: ...f Samsung Electronics Co Ltd PCL and PCL 6 are trademarks of Hewlett Packard Company Microsoft Internet Explore Windows Windows Vista Windows 7 and Windows 2008 Server R2 either registered trademarks...

Page 3: ...e practices that may result in severe personal injury or death Caution Hazards or unsafe practices that may result in minor personal injury or property damage Do not attempt Do not disassemble Do not...

Page 4: ...rface connections and request assistance from qualified service personnel Otherwise this could result in electric shock or fire If the machine exhibits a sudden and distinct change in performance unpl...

Page 5: ...l which is specified on the label If you are unsure and want to check the power level you are using contact the electrical utility company Do not overload wall outlets and extension cords This can dim...
Page 6: ...s Fuser units should only be repaired by a certified service technician Repair by non certified technicians could result in fire or electric shock The machine should only be repaired by a Samsung serv...

Page 7: ...otective cover removed from Laser Scanner assembly The reflected beam although invisible can damage your eyes When using this product these basic safety precautions should always be followed to reduce...

Page 8: ...arest recycling location go to our website www samsung com recyclingdirect Or call 877 278 0799 Radio Frequency Emissions FCC Information to the User This device complies with Part 15 of the FCC Rules...

Page 9: ...ct e par l Industrie et Sciences Canada Russia only Turkey only Germany only Replacing the Fitted Plug for UK Only Important The mains lead for this machine is fitted with a standard BS 1363 13 amp pl...

Page 10: ...ertification to 1999 5 EC Radio Equipment Telecommunications Terminal Equipment Directive FAX This Samsung product has been self certified by Samsung for pan European single terminal connection to the...

Page 11: ...e on and transmitting This transmitter must not be collocated or operation in conjunction with any other antenna or transmitter Some circumstances require restrictions on wireless devices Examples of...

Page 12: ...Regulatory information_ 12 China only...

Page 13: ...y based on Windows XP Use Index to find information Convention Some terms in this guide are used interchangeably as below Document is synonymous with original Paper is synonymous with media or print m...

Page 14: ...ntaining your machine troubleshooting and replacing supplies Machine Driver Help This help provides you with information about the printer driver and instructions for setting up the options for printi...

Page 15: ...marks on page 44 Print Posters The text and pictures of each page of your document are magnified and printed across the sheet of paper and can then be taped together to form a poster See Printing post...

Page 16: ...r your business Features by model include FEATURES ML 186xW Series High Speed USB 2 0 Duplex 2 sided printing Manual Network Interface 802 11 b g n wireless LANa a Depending on your country wireless L...

Page 17: ...anel overview Understanding the status LED Introducing the useful buttons Turning on the machine Machine overview Front view This illustration may differ from your machine depending on its model 1 Con...

Page 18: ...Introduction_ 18 Rear view This illustration may differ from your machine depending on its model 1 USB port 2 Power cord receptacle...

Page 19: ...status LED on page 20 2 Wireless Shows the status of wireless network When the LED on the machine is ready See Wireless LED on page 20 3 WPS If your wireless access point supports WPS Wi Fi Protected...

Page 20: ...g in manual feed mode or in manual duplex mode A job is being canceled Orange On A paper jam has occurred See Clearing paper jams on page 55 Blinking Upgrading Firmware Please wait Samsung does not re...

Page 21: ...achine and the computer and then the machine returns to the ready mode This may take some time depending on the size of the print job If you press this button for more than 3 seconds the power goes of...

Page 22: ...ter you have set up your machine and connected it to your computer you must install the printer software If you are a Windows or Macintosh OS user install the software from the supplied CD and if you...

Page 23: ...11 12 32 64bit SuSE Linux 10 0 10 1 32bit OpenSuSE 10 2 10 3 11 0 11 1 11 2 32 64bit Mandriva 2005 2006 2007 2008 2009 2009 1 32 64bit Ubuntu 5 04 5 10 6 06 6 10 7 04 7 10 8 04 8 10 9 04 9 10 32 64bit...

Page 24: ...ense agreement and click Continue 9 Click Agree to agree to the license agreement 10 Select Easy Install and click Install Easy Install is recommended for most users All components necessary for machi...

Page 25: ...sh d Click Uninstall e Click Next f Click Finish Installing the SmartPanel 1 Make sure that the machine is connected to your computer and powered on 2 When the Administrator Login window appears type...

Page 26: ...rams below set the IP address first SyncThru Web Service Web server embedded on your network machine which allows you to Configure the network parameters necessary for the machine to connect to variou...

Page 27: ...have the following items ready to use Check if the access point or wireless router supports Wi Fi Protected Setup WPS Check if your machine supports Wi Fi Protected Setup WPS Networked computer PIN mo...

Page 28: ...wireless network interface USB cable Creating the infrastructure network in Windows When the items are ready follow the steps below 1 Check whether the USB cable is connected to the machine 2 Turn on...

Page 29: ...on is as shown below IP address 169 254 133 42 Subnet Mask 255 255 0 0 Gateway 169 254 133 0 Then the machine s network information should be as below IP address 169 254 133 43 Subnet Mask 255 255 0 0...

Page 30: ...ork key value Confirm Network Key Confirm the encryption network key value WEP Key Index If you are using the WEP Encryption select the appropriate WEP Key Index The wireless network security window a...

Page 31: ...nstructions in the window 15 After searching the window shows the wireless network devices Select the name SSID of the access point you are using and click on Next When you set the wireless configurat...

Page 32: ...If you want to use the Samsung default ad hoc setting select the last wireless network on the list which Network Name SSID is portthru and Signal is Printer Self Network Then click on Next If you want...

Page 33: ...blems that might occur during setting up the wireless setting and installing the machine driver Printers Not Found Your machine may not be turned on Turn on your computer and the machine USB cable is...

Page 34: ...time or if the access point has been reset Check the wireless environment You might not be able to connect to the network in the infrastructure environment where you need to type in a user s informati...

Page 35: ...e they want to print using other settings 1 Open a Macintosh application and select the file you want to print 2 Open the File menu and click Print 3 Go to Paper Feed pane 4 Set appropriate tray from...

Page 36: ...print media may meet all of the guidelines in this section and still not produce satisfactory results This may be the result of the sheets characteristics improper handling unacceptable temperature a...

Page 37: ...edia size you are loading See Changing the tray size on page 36 2 Flex or fan the edge of the paper stack to separate the pages before loading papers 3 Place the paper with the side you want to print...

Page 38: ...pecial media we recommend you feed one paper at a time Check the maximum input number of media for tray See Print media specifications on page 67 Types tray Manual feeding in traya Plain Thick Thin Co...

Page 39: ...quality position margins no closer than 15 mm 0 59 inch from the edges of the envelope Avoid printing over the area where the envelope s seams meet Transparencies To avoid damaging the machine use onl...

Page 40: ...ded Face up Face down Letterhead Preprinted paper must be printed with heat resistant ink that will not melt vaporize or release hazardous emissions when subjected to the machine s fusing temperature...

Page 41: ...operating system s that are compatible with your machine Refer to the OS compatibility section of Printer Specifications See System requirements on page 22 When you select an option in Printing Prefer...

Page 42: ...for future use To save a Presets item 1 Change the settings as needed on each tab 2 Enter a name for the item in the Presets input box 3 Click Add When you save Presets all current driver settings are...

Page 43: ...u exit the Print window 7 You can complete the poster by pasting the sheets together Printing booklets Manual This feature prints your document on both sides of a paper and arranges the pages so that...

Page 44: ...ed watermark in the preview image 3 Click OK or Print until you exit the print window Creating a watermark 1 To change the print settings from your software application access Printing Preferences See...

Page 45: ...ument 7 Click OK or Print until you exit the Print window The selected overlay prints over your document The resolution of the overlay document must match the resolution of the original print job Dele...

Page 46: ...box at the Print window 2 Click Print 3 Type in the destination path and the file name and then click OK For example c Temp file name If you type in only the file name the file is automatically saved...

Page 47: ...If you load a different type of print material select the corresponding paper type Printer Settings Toner Save Mode Selecting this option extends the life of your toner cartridge and reduces your cos...

Page 48: ...window appears When you type only lpr and press Enter the Select file s to print window appears first Just select any files you want to print and click Open 2 From the LPR GUI window select your mach...

Page 49: ...heck the supplied software CD Understanding Smart Panel If an error occurs while printing you can check the error from the Smart Panel You can also launch Smart Panel manually Double click the Smart P...

Page 50: ...ttings you want from the Options window Using the Unified Linux Driver Configurator The Unified Driver Configurator is a tool primarily intended for configuring machine devices You need to install Uni...

Page 51: ...the port and status Refresh Renews the available ports list Release port Releases the selected port Using SyncThru Web Service Internet Explorer 6 0 or higher is the minimum requirement for SyncThru...

Page 52: ...set things such as TCP IP network protocols and so on SNMP You can exchange of management information between network devices using SNMP Security tab This tab allows you to set system and network secu...

Page 53: ...might be harmful if inhaled Cleaning the outside Clean the machine cabinet with a soft lint free cloth Dampen the cloth slightly with water but be careful not to let any water drip onto or into the ma...

Page 54: ...e less than 20 and not greater than 80 An environment with extreme changes in humidity or temperature Direct sunlight or room light Dusty places A car for a long period of time An environment where co...

Page 55: ...artridge into the opening in the machine The tabs on the sides of the cartridge and corresponding grooves within the machine will guide the cartridge into the correct position until it locks into plac...

Page 56: ...e on page 56 Inside the machine Click this link to open an animation about clearing a jam The fuser area is hot Be careful when removing paper from this area to prevent getting your fingers burnt 1 If...

Page 57: ...her problems include See Power problems on page 57 See Paper feeding problems on page 58 See Printing problems on page 58 See Printing quality problems on page 60 See Common Windows problems on page 6...

Page 58: ...that the paper guides are against both sides of the envelopes Printing problems Condition Possible cause Suggested solutions The machine does not print The machine is not receiving power Check the pow...

Page 59: ...that you know works and try a print job Finally try a new machine cable The wrong printer driver was selected Check the application s printer selection menu to ensure that your machine is selected The...

Page 60: ...Opening printing preferences on page 42 If these steps do not correct the problem contact a service representative White Spots If white spots appear on the page The paper is too rough and a lot of dir...

Page 61: ...Print media specifications on page 67 Ensure that the guides are not too tight or too loose against the paper stack Condition Suggested Solutions Curl or wave Ensure that the paper is loaded properly...

Page 62: ...ier of Ghostscript 64 bit Linux OS and has been reported to bugs ghostscript com as Ghostscript Bug 688252 The problem is solved in AFPL Ghostscript v 8 52 or above Download the latest version of AFPL...

Page 63: ...not disappeared from the spooler in Mac OS X 10 3 2 Update your Mac OS to Mac OS X 10 3 3 or higher Some letters are not displayed normally during the Cover page printing Mac OS cannot create the font...

Page 64: ...e Otherwise supplies will be incompatible with your machine since the system configuration of these vary from country to country Samsung does not recommend using non genuine Samsung toner cartridge su...

Page 65: ...a dry cloth and wash clothing in cold water Hot water sets toner into fabric Do not touch the drum located in the toner cartridge or imaging unit Use the handle on the cartridge to avoid touching this...

Page 66: ...ssure Level ISO 7779 Configuration tested machine basic installation A4 paper simplex printing Ready mode 26 dB A Printing mode 50 dB A Temperature Operation 10 to 32 C 50 to 90 F Storage unpacked 0 t...

Page 67: ...the Plain paper section Refer to the Plain paper section 90 g m2 24 lbs bond 140 sheets 90 to 163 g m2 24 to 43 lbs bond 1 sheet for manual feeding in the tray Thin paper Refer to the Plain paper sec...

Page 68: ...001 33 11 www samsung com CANADA 1 800 SAMSUNG 726 7864 www samsung com CHILE 800 SAMSUNG 726 7864 www samsung com CHINA 400 810 5858 www samsung com COLOMBIA 01 8000112112 www samsung com COSTA RICA...

Page 69: ...RDAN 800 22273 www samsung com KAZAKHSTAN 8 10 800 500 55 500 GSM 7799 www samsung com KOSOVO 381 0113216899 KUWAIT 183 2255 www samsung com KYRGYZSTAN 00 800 500 55 500 www samsung com LATVIA 8000 72...

Page 70: ...AMSUNG 726 7864 www samsung com SOUTH AFRICA 0860 SAMSUNG 726 7864 www samsung com SPAIN 902 1 SAMSUNG 902 172 678 www samsung com SWEDEN 0771 726 7864 SAMSUNG www samsung com SWITZERLAND 0848 SAMSUNG...

Page 71: ...ress automatically This is usually done in the bootstrap process of computers or operating systems running on them The BOOTP servers assign the IP address from a pool of addresses to each client BOOTP...

Page 72: ...s an abstract model of the system being simulated often considering its internal state Ethernet Ethernet is a frame based computer networking technology for local area networks LANs It defines wiring...

Page 73: ...shed to standardize and regulate international radio and telecommunications Its main tasks include standardization allocation of the radio spectrum and organizing interconnection arrangements between...

Page 74: ...d by Adobe Systems for representing two dimensional documents in a device independent and resolution independent format PostScript PostScript PS is a page description language and programming language...

Page 75: ...documents and resources on the Internet The first part of the address indicates what protocol to use the second part specifies the IP address or the domain name where the resource is located USB Unive...

Reviews: