background image

8

ENGLISH

INSTALLING YOUR MICROWAVE OVEN

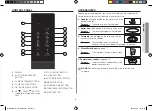
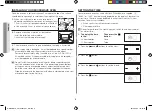
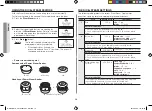
Place the oven on a flat level surface 85 cm above the floor. The surface 

should be strong enough to safely bear the weight of the oven.

1. 

When you install your oven, make sure there is 

adequate ventilation for your oven by leaving at least 

10 cm (4 inches) of space behind and, on the sides 

of the oven and 20 cm (8 inches) of space above.

2. 

Remove all packing materials inside the oven.

Install the roller ring and turntable. 

Check that the turntable rotates freely.

3. 

This microwave oven has to be positioned so that plug is accessible.

If the supply cord is damaged, it must be replaced by a special cord or 

assembly available from the manufacturer or its service agent.  

For your personal safety, plug the cable into a 3-pin, 220 Volt, 50Hz, 

AC earthed socket. If the power cable of this appliance is damaged, it 

must be replaced by a special cable.

Do not install the microwave oven in hot or damp surroundings like 

next to a traditional oven or radiator. The power supply specifications 

of the oven must be respected and any extension cable used must 

be of the same standard as the power cable supplied with the oven. 

Wipe the interior and the door seal with a damp cloth before using your 

microwave oven for the first time.

SETTING THE TIME

Your microwave oven has an inbuilt clock. When power is supplied, “:0”, 

“88:88” or “12:00” is automatically displayed on the display. Please set the 

current time. The time can be displayed in either the 24-hour or 12-hour 

notation. You must set the clock:

•  When you first install your microwave oven
•  After a power failure

Do not forget to reset the clock when you switch to and from summer 

or winter time.

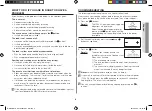
1.  To display the time 

in the...

Then press the ( ) 

button...

24-hour notation

12-hour notation

Once

Twice

2. 

Press the ( ) and ( ) buttons to set the hour.

3. 

Press the ( ) button.

4. 

Press the ( ) and ( ) buttons to set the minute.

5. 

Press the ( ) button.

10 cm 

behind

20 cm 

above

10 cm on 

the side

85 cm of 

the floor

ME109MSTD_XST-04001A-01_EN.indd   8

2012-03-23   �� 2:55:05

Summary of Contents for ME109MSTD

Page 1: ...imagine the possibilities Samsung www samsung com register ME109MSTD 100 ME109MSTD XST_04001A 01_TH indd 1 3 5 2012 6 32 07 PM...

Page 2: ...3 4 5 6 7 8 9 10 11 2 3 3 4 4 4 4 4 4 5 8 8 9 9 9 10 10 10 1 10 11 11 12 12 13 13 14 14 1 16 1 16 17 17 7 17 8 18 1 19 19 2 20 8 9 10 11 7 1 2 3 4 5 6 ME109MSTD XST_04001A 01_TH indd 2 3 5 2012 6 32...

Page 3: ...3 1 2 3 4 5 6 7 8 9 10 11 12 13 30 1 2 3 4 17 5 12 12 13 1 2 3 4 5 8 10 9 11 6 7 ME109MSTD XST_04001A 01_TH indd 3 3 5 2012 6 32 09 PM...

Page 4: ...4 SAMSUNG www samsung com a b c 1 2 3 ME109MSTD XST_04001A 01_TH indd 4 3 5 2012 6 32 10 PM...

Page 5: ...5 d Group 2 Class B ISM 2 ISM EDM Class B ME109MSTD XST_04001A 01_TH indd 5 3 5 2012 6 32 18 PM...

Page 6: ...6 8 8 20 10 10 ME109MSTD XST_04001A 01_TH indd 6 3 5 2012 6 32 23 PM...

Page 7: ...7 20 30 ME109MSTD XST_04001A 01_TH indd 7 3 5 2012 6 32 28 PM...

Page 8: ...8 85 1 10 4 20 8 2 3 220 50 0 88 88 12 00 24 12 1 24 12 2 3 4 5 10 20 10 85 ME109MSTD XST_04001A 01_TH indd 8 3 5 2012 6 32 29 PM...

Page 9: ...9 SAMSUNG 1 1000 W 2 3 1 2 3 1000W 30 30 ME109MSTD XST_04001A 01_TH indd 9 3 5 2012 6 32 30 PM...

Page 10: ...10 1000 850 W 600 W 450 W 300 W 180 W 100 W 1 2 30 30 30 30 5 30 30 15 ME109MSTD XST_04001A 01_TH indd 10 3 5 2012 6 32 31 PM...

Page 11: ...11 1 2 3 0 1 670 100 1 2 100 1 1 2 192 16 192 1 3 180 30 180 1 4 250 250 1 2 3 4 5 350 350 1 2 3 ME109MSTD XST_04001A 01_TH indd 11 3 5 2012 6 32 31 PM...

Page 12: ...12 Rice Steam 1 2 3 0 1 320 1 1 1 2 15 20 2 350 1 2 1 2 10 3 350 400 1 1 2 15 20 4 400 450 2 2 1 4 1 2 ME109MSTD XST_04001A 01_TH indd 12 3 5 2012 6 32 33 PM...

Page 13: ...5 400 400 45 1 2 3 45 3 400 450 4 6 400 400 45 1 2 3 45 3 400 450 4 1 2 3 0 1 850 100 500 1 1 2 1 1 1 5 2 3 2 920 150 4 2 500 1 4 1 3 3 10 1 2 2 3 ME109MSTD XST_04001A 01_TH indd 13 3 5 2012 6 32 33...

Page 14: ...600 750 1 500 1 1 1 1 2 3 3 800 150 50 250 6 2 3 3 1 3 2 3 3 250 1 2 4 900 1000 200 2 2 1 1 1 1 5 600 700 500 1 1 2 100 50 1 2 6 500 600 100 150 3 1 240 1 2 ME109MSTD XST_04001A 01_TH indd 14 3 5 201...

Page 15: ...2 1 1 1 1 2 4 450 500 80 2 3 1 100 2 1 2 5 500 550 80 200 3 2 1 1 2 3 6 550 500 2 2 3 1 1 2 1 2 3 4 7 800 1200 250 5 500 1 1 1 1 1 2 3 1 10 2 3 450 30 8 130 3 1 2 3 1 1 2 ME109MSTD XST_04001A 01_TH in...

Page 16: ...16 1 2 2000 1000 3 180 9 1 200 2000 20 60 2 200 2000 20 60 3 200 2000 20 50 4 125 1000 5 30 ME109MSTD XST_04001A 01_TH indd 16 3 5 2012 6 32 34 PM...

Page 17: ...17 1 2 50 50 50 3 4 5 6 7 1 2 1 L 2 ME109MSTD XST_04001A 01_TH indd 17 3 5 2012 6 32 37 PM...

Page 18: ...18 ME109MSTD XST_04001A 01_TH indd 18 3 5 2012 6 32 37 PM...

Page 19: ...19 1 2 3 4 ME109MSTD XST_04001A 01_TH indd 19 3 5 2012 6 32 37 PM...

Page 20: ...20 SAMSUNG ME109MSTD 220 V 50 Hz 1500 W 100 W 1000 W IEC 705 2450 MHz OM75P 31 x x 517 x 297 x 411 336 x 241 x 349 28 15 DE68 04001A 01 ME109MSTD XST_04001A 01_TH indd 20 3 5 2012 6 32 38 PM...

Page 21: ...for purchasing this Samsung product Please register your product at www samsung com register Microwave oven Owner s instructions ME109MSTD This manual is made with 100 recycled paper ME109MSTD_XST 040...

Page 22: ...Cooking Reheating 9 Power levels 10 Stopping the cooking 10 Adjusting the cooking time 10 Using the Deodorization Feature 10 Using the quick meal feature 11 Quick meal settings 11 Using the Rice Stea...

Page 23: ...over the motor shaft in the base of the oven Purpose The coupler rotates the turntable 2 Roller ring to be placed in the centre of the oven Purpose The roller ring supports the turntable 3 Turntable t...

Page 24: ...l injury or property damage Warning Fire hazard Warning Hot surface Warning Electricity Warning Explosive material Do NOT attempt Follow directions explicitly Do NOT disassemble Unplug the power plug...

Page 25: ...er alcohol steam cleaner or high pressure cleaner to clean the appliance Ensure that the power voltage frequency and current are the same as those of the product specifications Plug the power plug int...

Page 26: ...not apply any creams oils or lotions During use the appliance becomes hot Care should be taken to avoid touching heating elements inside the oven WARNING The contents of feeding bottles and baby food...

Page 27: ...Do not cover the ventilation slots with cloth or paper They may catch fire as hot air escapes from the oven The oven may also overheat and switch itself off automatically and will remain off until it...

Page 28: ...microwave oven in hot or damp surroundings like next to a traditional oven or radiator The power supply specifications of the oven must be respected and any extension cable used must be of the same st...

Page 29: ...s microprocessor the display may be reset To solve this problem disconnect the power plug and reconnect it Reset the time If the above guidelines do not enable you to solve the problem contact your l...

Page 30: ...to cancel the cooking setting press the Stop button again You can cancel any setting before you start cooking by simply pressing Stop ADJUSTING THE COOKING TIME You can increase the cooking time by p...

Page 31: ...odle 670 g minced pork 100 g egg 1 boiled water 2 cups any vegetables 100 g instant noodle 1 bag Recommendations 1 Put instant noodle minced pork vegetable and egg together and cook 2 Frozen Shrimp Du...

Page 32: ...and appropriate recommendations Code Food Serving size Ingredients 1 Rice 320 g rice 1 cup water 1 1 4 cup Recommendations 1 Put rice water in a bowl and cover with the lid 2 Cook and keep the lid cl...

Page 33: ...elected When cooking has finished the oven will beep and flash 0 four times The oven will then beep one time per minute THE SOUP SETTINGS The following table presents the various Soup Programmes quant...

Page 34: ...g size Ingredients 3 Tom kha soup with chicken 800 g chicken 150 g mushroom 50 g coconut milk 250 ml sliced galangal 6 pieces sliced lemongrass 2 kaffir leave 3 charlotte 3 coriander 1 fried chili 3 p...

Page 35: ...n water 3 Cook and serve with cooked spaghetti Code Food Serving size Ingredients 6 Steamed Sea bass with spicy lemon sauce 550 g sea bass 500 g salt ts choped garlic 2 tbs chilli 2 tbs lime juice 3 t...

Page 36: ...ackage material before defrosting Place meat poultry and fish on a flat ceramic plate Code Food Serving size g Standing time min Recommendations 1 Meat 200 2000 20 60 Shield the edges with aluminium f...

Page 37: ...itchen paper Water Bowl only can be use during Steam Clean mode When cooking non liquid items remove water bowl because It will damage and cause fire to the microwave oven SWITCHING THE BEEPER OFF You...

Page 38: ...od Overheating may cause the polystyrene to melt Paper bags or newspaper May catch fire Recycled paper or metal trims May cause arcing Glassware Oven to table ware Can be used unless decorated with a...

Page 39: ...the dishwasher safe plate whenever necessary Do not spill water in the vents Never use any abrasive products or chemical solvents Take particular care when cleaning the door seals to ensure that no p...

Page 40: ...QUESTIONS OR COMMENTS COUNTRY CALL OR VISIT US ONLINE AT AUSTRALIA NEW ZEALAND CHINA HONG KONG INDIA INDONESIA JAPAN MALAYSIA PHILIPPINES SINGAPORE THAILAND TAIWAN VIETNAM 1300 362 603 0800 SAMSUNG 0...

Reviews: