background image

English-13

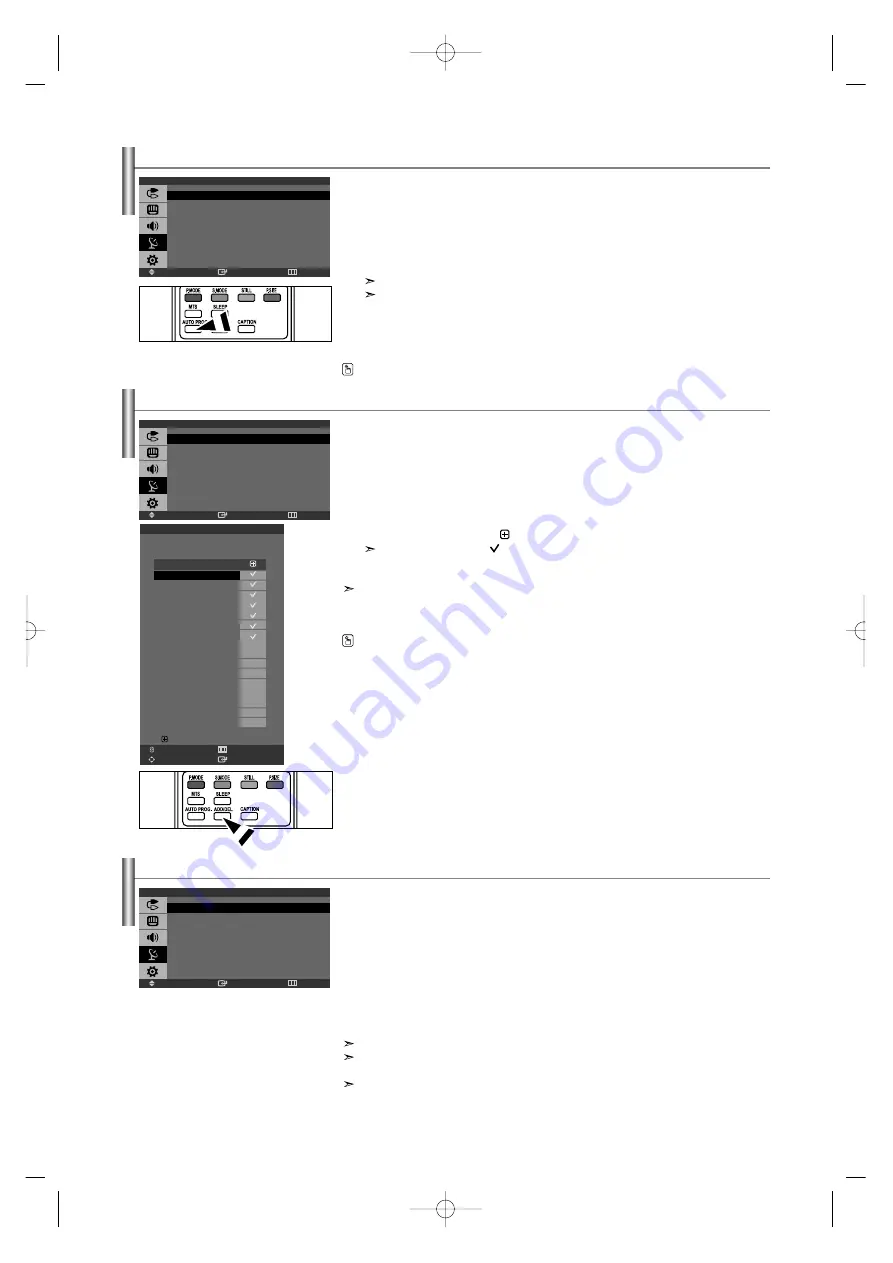
Storing Channels Manually

Set the channels according to your preference. You can easily delete or add the channels you want. 

1.

Use the number buttons to directly select the channel that will be added or deleted.

2.

Press the 

MENU 

button to display the menu.

Press the 

or 

button to select “Channel”, then press the

ENTER

button.

3.

Press the 

or 

button to select “Add/Delete”, then press the

ENTER

button.

4.

Press the 

or 

button to select the channels to be deleted or added. 

5.

Press the 


button to select “

” column, then press the

ENTER

button.

The channels marked with “

” will be added. 

6.

Press the 

EXIT 

button to exit.  

You can directly select any channel (including an erased channel) by using the number buttons on the

remote control.

Use the number buttons to directly select the channel that will be added or erased. 
Press the 

ADD/DEL

button on the remote control.

Storing Channels Automatically

The TV automatically cycles through all of the available channels and stores them in memory. 
This takes about one to two minutes. 

1.

To select the signal source, follow the “Selecting the Video Signal-source” instructions 
numbers 1 to 3 on page 12. 

2.

Press the 

or 

button to select “Auto Program”, then press the 

ENTER

button. 

3.

Press the 

ENTER

button to select “Start”.

The channel search will start and end automatically.

Press the 

ENTER

button at any time to interrupt the memorization process and return to

the “Channel” menu.

4.

After all the available channels are stored, the “Channel” menu reappears. 

5.

Press the 

EXIT 

button to exit.

Press the 

AUTO PROG.

button on the remote control.

Enter

Move

Return

Channel

Air/Cable

: Air

Auto Program

Add/Delete

Fine Tune

Enter

Move

Return

Channel

Air/Cable

: Air

Auto Program

Add/Delete

Fine Tune

Add/Delete

Air

8

1/5

Ch.

Air

8

Air

9

Air

10

Air

11

Air

12

Air

13

Air

14

Air

15

Air

16

Air

17

Air

18

Air

19

Air

20

Air

21

Air

22

Add

Fine Tuning Channels

Use fine tuning to manually adjust a particular channel for optimal reception.

1.

Use the number buttons to directly select the channel that you want to fine tune.

2.

Press the 

MENU 

button to display the menu. 

Press the 

or 

button to select “Channel”, then press the

ENTER

button.

3.

Press the 

or 

button to select “Fine Tune”, then press the

ENTER

button.

4.

Press the 

or 

button to adjust the fine tuning.

5.

To store the fine tuning setting in the TV’s memory, press the

ENTER

button.

6.

Press the

EXIT 

button to exit.

If you do not store the fine-tuned channel in memory, adjustments are not saved.

Fine tuned channels that have been saved are marked with an asterisk “ * ” on the right-hand side of the 

channel number in the channel banner.

To reset the fine-tuning, select “Reset” by pressing the 

or 

button and then press the 

ENTER

button.

Enter

Move

Return

Channel

Air/Cable

: Air

Auto Program

Add/Delete

Fine Tune

Return

Page

Enter

Move

Add/Delete

BN68-001074L-00Eng.qxd  1/15/04 2:41  Page 13

Summary of Contents for LN19R71B

Page 1: ...800 726 7864 SAMSUNG 01 8000 112 112 0 800 507 7267 1 800 10 7267 800 6225 1 800 299 0013 1 800 234 7267 01 800 SAMSUNG 7267864 800 7267 1 800 682 3180 1 800 751 2676 1 800 7267 864 1 800 100 5303 We...

Page 2: ...La imagen fija puede causar da os permanentes en la pantalla del televisor No deje una imagen fija en la pantalla LCD durante m s de dos horas ya que se podr a producir una retenci n de la imagen en l...

Page 3: ...e Settings 14 Customizing the Picture 14 Adjusting the Color Tone 14 Changing the Picture Size 15 Adjusting the Color Control 15 Freezing the Picture 15 SOUND CONTROL Using Automatic Sound Settings 15...

Page 4: ...e possible A built in multi channel sound decoder for stereo and bilingual listening Built in dual channel speakers Headphone jack for private listening Please make sure the following items are includ...

Page 5: ...nnels In the on screen menu use the buttons as you would use the and buttons on the remote control SPEAKERS POWER Press to turn the TV on and off POWER INDICATOR Blinks and turns off when the power is...

Page 6: ...n S Video signal from a camcorder or VCR COMPONENT IN Connect Component video audio KENSINGTON LOCK The Kensington lock optional is a device used to physically fix the system when used in a public pla...

Page 7: ...en SOURCE Press to display all of the available video sources PRE CH Tunes to the previous channel CH CH Press to change channels EXIT Press to exit the menu STILL Press to stop the action during a pa...

Page 8: ...ighten the screws 2 Plug the adaptor into the ANT IN terminal on the back of the TV Connecting VHF and UHF Antennas If your antenna has a set of leads that look like this see Antennas with 300 Flat Tw...

Page 9: ...le Box Incoming cable Connecting to a Cable Box that Descrambles Some Channels If your cable box descrambles only some channels such as premium channels follow the instructions below You will need a t...

Page 10: ...ach VCR has a different back panel configuration When connecting a VCR match the color of the connection terminal to the cable VCR Rear Panel TV Rear Panel Antenna Cable Not supplied Video Cable Not s...

Page 11: ...e rear panel jacks on your TV make it easy to connect a DVD player to your TV 1 Connect a Component Cable between the COMPONENT IN Y PB PR jacks on the TV and the COMPONENT OUT Y PB PR jacks on the DV...

Page 12: ...IN AUDIO jack on the TV and the Audio Out jack of the sound card on your computer PC TV Rear Panel D Sub Cable Not supplied PC Audio Cable Not supplied Each PC has a different back panel configuratio...

Page 13: ...NTER button at any time to interrupt the memorization process 6 Press the ENTER button Press the or button to move to the Hour Minute or am pm Set the Hour Minute or am pm by pressing the or button 7...

Page 14: ...l source then press the ENTER button 4 Press the EXIT button to exit STD HRC and IRC identify various types of cable TV systems Contact your local cable company to identify the type of cable system th...

Page 15: ...button at any time to interrupt the memorization process and return to the Channel menu 4 After all the available channels are stored the Channel menu reappears 5 Press the EXIT button to exit Press t...

Page 16: ...C mode only Contrast and Brightness can be adjusted Tint doesn t operate in Component or DVI mode In the PC mode Cool Normal Warm Custom appears Dynamic Selects the picture for high definition in a br...

Page 17: ...NTER button to select Mode 3 Press the or button to select the desired sound effect Press the ENTER button 4 Press the EXIT button to exit You can also press the S MODE button on the remote control to...

Page 18: ...he MENU button to display the menu Press the or button to select Sound then press the ENTER button 2 Press the or button to select Auto Volume then press the ENTER button 3 Press the or button to sele...

Page 19: ...the remote control to set the sleep time You can set the On Off timers so that the set will Switch on automatically and tune to the channel of your choice at the time you select Switch off automatical...

Page 20: ...the ENTER button 3 The Enter PIN screen will appear Enter your 4 digit PIN 4 Press the or button to select TV Parental Guidelines then press the ENTER button 5 The TV Parental Guidelines screen will a...

Page 21: ...The V Chip will automatically block any category that is more restrictive For example if you block the PG 13 category then R NC 17 and X will automatically be blocked also How to Reset the TV after th...

Page 22: ...changes to Channel and Field 6 Press the EXIT button to exit Caption Off On Mode Caption Text Channel 1 2 Field 1 2 The Caption feature does not work with Component PC and DVI mode Different channels...

Page 23: ...menu Press the ENTER button to select Input 2 Press the ENTER button to select the Source List 3 Press the or button to select the Input source then press ENTER button You can only select a source if...

Page 24: ...xists on your display settings dialog box the correct value is 60 or 60 Hz Otherwise just click OK and exit the dialog box Display Modes Both screen position and size will vary depending on the type o...

Page 25: ...he or button to adjust the H Position Horizontal Position Press the ENTER button 6 Press the EXIT button to exit Image Reset You can replace all image settings with the factory default values 1 Press...

Page 26: ...he back of the stand How to Adjust the Angle of the TV Wall mount items sold separately allow you to mount the TV on the wall For the detailed information on installing the Wall Mount see the instruct...

Page 27: ...r on the image Possible Solution Try another channel Adjust the antenna Check all wire connections Try another channel Adjust the antenna Try another channel Press the SOURCE button Make sure the TV i...

Page 28: ...del fondo 14 Cambio del tama o de la imagen 15 Ajuste del control del color 15 Congelaci n de la imagen 15 CONTROL DE SONIDO Uso de los par metros de sonido autom ticos 15 Personalizaci n del sonido...

Page 29: ...n decodificador de sonido de varios canales incorporado para audici n est reo y biling e Altavoces incorporados de canal dual Toma de auricular para audici n privada Compruebe que las opciones siguien...

Page 30: ...a pantalla utilice estos botones del mismo modo que los botones y del mando a distancia ALTAVOCES ENCENDIDO Pulse para encender o apagar el TV INDICADOR DE ALIMENTACI N Parpadea y se apaga cuando se e...

Page 31: ...O Permite conectar la se al de video desde una c mara o de un video COMPONENT IN Conecte el componente de v deo audio KENSINGTON LOCK El bloqueo Kensington opcional es un dispositivo que se utiliza pa...

Page 32: ...para ver todas las fuentes de v deo disponibles PRE CH Sintoniza el canal anterior CH CH Permiten cambiar de canal EXIT Se pulsa para salir del men STILL Pulse para detener la acci n durante una dete...

Page 33: ...necte el adaptador en el terminal ANT IN en la parte posterior del televisor Conexi n de antenas de VHF y UHF Si su antena tiene un conjunto de cables con este aspecto consulte Antenas de par de cable...

Page 34: ...ficador que decodifica algunos canales Si su decodificador s lo decodifica algunos canales como los canales de pago siga las instrucciones siguientes Necesitar un divisor de dos v as un conmutador de...

Page 35: ...l posterior Cuando conecte un aparato de v deo debe hacer coincidir los colores del terminal de conexi n y del cable Panel posterior del VCR Panel posterior del TV Cable RF No incluido Cable de v deo...

Page 36: ...n reproductor de DVD Los conectores del panel posterior del TV facilitan la conexi n de un reproductor de DVD al TV 1 Conecte un cable de componente entre las tomas COMPONENT IN Y PB PR del televisor...

Page 37: ...udio de la tarjeta de sonido del ordenador PC Panel posterior del TV Cable de D Sub No incluido Cable de Audio de PC No incluido Cada dispositivo de fuente de entrada externa requiere una configuraci...

Page 38: ...en cualquier momento para interrumpir el proceso de memorizaci n 6 Pulse el bot n ENTER Pulse el bot n o para desplazarse a la Hora Minuto o am pm Defina el valor de Hora Minuto o am pm pulsando el bo...

Page 39: ...spu s pulse el bot n ENTER 4 Pulse el bot n EXIT para salir STD HRC e IRC identifican los distintos tipos de sistemas de TV por cable P ngase en contacto con su proveedor de cable para averiguar el ti...

Page 40: ...o si desea interrumpir el proceso de memorizaci n y volver al men Canal 4 Una vez memorizados todos los canales disponibles el men Canal volver a aparecer 5 Pulse el bot n EXIT para salir Pulse el bot...

Page 41: ...e y Brillo se pueden ajustar Tinte no funciona en los modos Componente ni DVI En el modo PC aparecen Fr o Normal Tibio Favorito Din mico Selecciona la alta definici n en la imagen en una habitaci n lu...

Page 42: ...l bot n ENTER para seleccionar Modo 3 Pulse los botones o para seleccionar el efecto de sonido deseado Pulse el bot n ENTER 4 Pulse el bot n EXIT para salir Tambi n puede pulsar el bot n S MODE del ma...

Page 43: ...el bot n o para seleccionar Sonido y despu s pulse el bot n ENTER 2 Pulse el bot n o para seleccionar Vol Auto y despu s pulse el bot n ENTER 3 Pulse el bot n o para seleccionar Enc o Apag Pulse el bo...

Page 44: ...ot n SLEEP del mando a distancia para ajustar el temporizador Puede establecer los temporizadores Encendido Apagado para que el equipo Se encienda de forma autom tica y sintonice el canal que desee a...

Page 45: ...cionar V Chip y despu s pulse el bot n ENTER 3 Aparecer la pantalla Ingresar C digo Escriba un n mero PIN de cuatro d gitos 4 Pulse el bot n o para seleccionar Gu as pater TV y despu s pulse el bot n...

Page 46: ...uprimir las pantallas La opci n V chip bloquear autom ticamente cualquier categor a que sea m s restrictiva Por ejemplo si bloquea la categor a PG 13 tambi n se bloquear n autom ticamente R NC 17 y X...

Page 47: ...figuraci n de Canal y Campo 6 Pulse el bot n EXIT para salir Subt tulo Enc Apag Modo Subt tulo Texto Canal 1 2 Campo 1 2 La funci n Subtitulo no funciona en los modos Componente PC ni DVI Canales y ca...

Page 48: ...el bot n ENTER para seleccionar Entrada 2 Pulse el bot n ENTER para seleccionar Lista de Origen 3 Pulse el bot n o para seleccionar origen entrada en seguida y despu s ENTER S lo puede seleccionar una...

Page 49: ...x 900 60Hz Si existe una opci n de frecuencia vertical en el cuadro de di logo de configuraci n de la pantalla el valor correcto es 60 o 60 Hz Si no haga clic en OK Aceptar y salga del cuadro de di lo...

Page 50: ...a ajustar la posici n H Pulse el bot n ENTER 6 Pulse el bot n EXIT para salir Reiniciar imagen Puede recuperar todos los ajustes de imagen predeterminados de f brica 1 Ajustes predefinidos Pulse el bo...

Page 51: ...r el soporte C mo ajustar el ngulo del televisor Los elementos del montaje en la pared se venden por separado permiten instalar el televisor en una pared Si desea m s informaci n sobre la instalaci n...

Page 52: ...n Intente sintonizar otro canal Ajuste la antena Compruebe las conexiones de todos los cables Intente sintonizar otro canal Ajuste la antena Intente sintonizar otro canal Pulse el bot n SOURCE Comprue...

Reviews: