background image

Compatible Devices

1.   USB devices that support USB Mass Storage v1.0. (USB devices that operate as a removable disc in 

Windows (2000 or later) without additional driver installation.)

2.   MP3 Player : HDD and 

fl

 ash type MP3 players.

3.    Digital camera : Cameras that support USB Mass Storage v1.0.

Cameras that operate as a removable disc in Windows (2000 or later) without additional driver installation.

4.   USB HDD and USB Flash Drive: Devices that support USB2.0 or USB1.1.

You may experience a difference in playback quality when you connect a USB1.1 device.
For a USB HDD, make sure to connect an auxiliary power cord to the USB HDD for proper operation.

5.    USB card Reader : One slot USB card reader and Multi slot USB card reader.

Depending on the manufacturer. the USB card reader may not be supported.
 If you install multiple memory devices into a multi card reader, you may experience problems.

6.   If you use a USB extension cable, the USB device might not be recognized.

Supported Formats

File name

File extension

Bit rate

Version

Pixel

Sampling Frequency

Still Picture

JPG

JPG  .JPEG

640X480

Music

MP3

.MP3

80~384kbps

44.1kHz

WMA

.WMA

56~128kbps

V8

44.1kHz

Movie

VCD

MPG.MPEG 

.DAT

1.5Mbps

VCD1.1,VCD2.0

320X480

44.1kHz

WMV

.WMV

4Mbps

V1,V2,V3,V7

720X480

44.1KHz~48KHz

DivX

.AVI,.ASF

4Mbps

DivX3.11~DivX5.1,XviD

720x480

44.1KHz~48KHz

CBI (Control/Bulk/Interrupt) is not supported.
  Digital Cameras that use PTP protocol or require additional program installation when connected to a PC are not 
supported.
  A device using NTFS 

fi

 le system is not supported. 

(Only FAT 16/32 (File Allocation Table 16/32) 

fi

 le system is supported.)

 Some MP3 players, when connected to this product,may not operate depending on the sector size of their 

fi

 le system.

 The USB HOST function is not supported if a product that transfers media 

fi

 les by its manufacturer-speci

fi

 c program is 

connected. 
  Does not operate with Janus enabled MTP (Media Transfer Protocol) devices.

  The USB host function of this product does not support all USB devices. For information on the supported 
devices, see page 65.


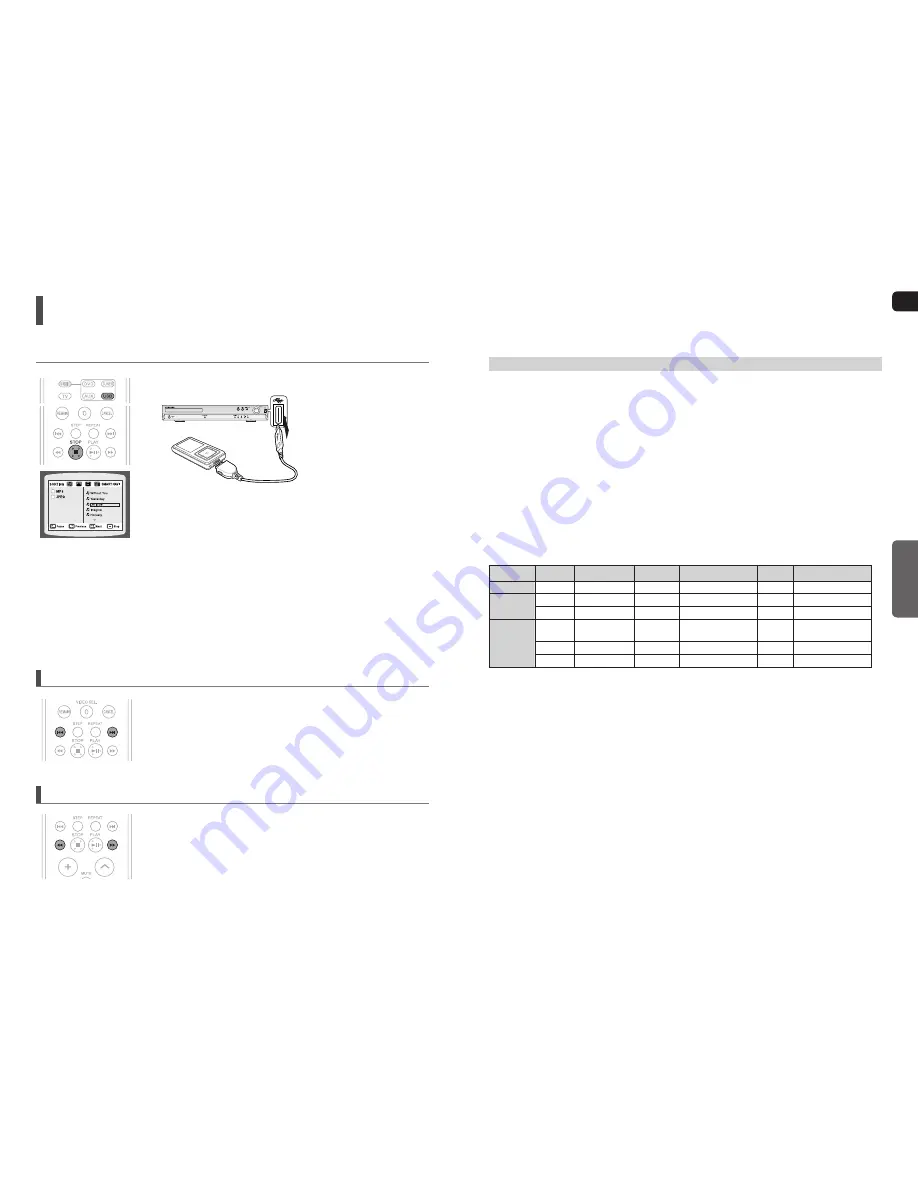
Playing Media Files using the USB Host Feature    

You can enjoy media 

fi

 les such as pictures, movies and music saved in an MP3 player, USB memory or digital camera in high 

quality video with 5.1 channel home theater sound by connecting the storage device to the USB port of the home theater.

1


Connect the USB device to the USB port on the front of the unit.


2


Press the 

FUNCTION

 button on the main unit or the 

USB

 button on the 

remote control to select the USB mode.

The <USB> appears on the display screen and then disappears.

 USB MENU screen appears on the TV screen and the saved 

fi

 le is played.

3


To stop playback, press the 

STOP

 (

) button.


Safe 

USB

 Removal

To prevent damage to the memory stored in the USB device, 
perform safe removal before disconnecting the USB cable.

Press the 

STOP (

)

 button twice in a row.  

The display will show 

REMOVE


USB

.

Remove the USB cable.

Skip Forward/Back 

During playback, press the 

# $ 

button.

When there is more than one 

fi

 le and you press the 

$

 button, the next 

fi

 le is 

selected.
When there is more than one 

fi

 le and you press the 

#

 button, the previous 

fi

 le is selected.

Fast Playback 

To play back the disc at a faster speed, press the 

 

 button during 

playback.


Each time you press either button, the playback speed will change as follows: 
2x 

 4x 

 8x 

 32x 

 Normal.


1)

2)

40

41

GB

OPERATION

40

41

Summary of Contents for HT-TX22

Page 1: ...AH68 01660E REV 01 THIS APPLIANCE IS MANUFACTURED BY DIGITAL HOME CINEMA SYSTEM HT X20 HT TX22 HT TX25 GB Instruction Manual COMPACT DIGITAL VIDEO AH68 01964P ...

Page 2: ...ing and maintenance instructions accompanying the unit CLASS 1 LASER PRODUCT This Compact Disc player is classified as a CLASS 1 LASER product Use of controls adjustments or performance of procedures other than those specified herein may result in hazardous radiation exposure CAUTION INVISIBLE LASER RADIATION WHEN OPEN AND INTERLOCKS DEFEATED AVOID EXPOSURETO BEAM WARNING To reduce the risk of fir...

Page 3: ...Wireless Receiving Amplifier 16 Connecting the Video Out to your TV 19 P SCAN Progressive Scan Function 20 Connecting Audio from External Components 21 Connecting the FM Antenna 22 Connecting Microphone 22 OPERATION Before Reading the User s Manual 23 Before Using Your Home Theater 24 Disc Playback 25 MP3 WMA CD Playback 26 JPEG File Playback 27 DivX Playback 28 Using the Playback Function 30 Disp...

Page 4: ...ince this product only provides encoding formats authorized by DivX Networks Inc a DivX file created by the user might not play Software updates for incompatible formats are not supported Example QPEL GMC resolution higher than 720x480 pixels etc Sections with a high frame rate might not be played while playing a DivX file For more information about the formats authorized by DivX Networks Inc plea...

Page 5: ...R indicator 12 STEREO indicator 13 RTA indicator 14 RDS indicator 15 PRO LOGIC indicator 16 MPEG indicator 17 DSP indicator 18 System Status Display 19 RADIO FREQUENCY indicator 20 SPEAKER indicator 8 9 11 12 1 6 7 3 4 2 5 18 19 20 15 16 17 13 14 10 Rear Panel 1 Video Output Connector Connect the TV s video input jacks VIDEO IN to the VIDEO OUT connector 2 Component Video Output Connectors Connect...

Page 6: ...rol sensor Description Con t Remote Control 1 DVD RECEIVER button 2 TV button 3 POWER button 4 Number 0 9 buttons 5 REMAIN button 6 STEP button 7 Tuning Preset CD Skip buttons 8 VOLUME button 9 MENU button 10 INFO button 11 PL II EFFECT button 12 PL II MODE button 13 TUNER MEMORY P SCAN button 14 ZOOM button 15 SLEEP button 16 SLOW MO ST button 17 DIMMER button 18 DVD button TUNER button AUX butto...

Page 7: ...our ear facing slightly downward Unlike the front and center speakers the rear speakers are used to handle mainly sound effects and sound will not come from them all the time Subwoofer g The position of the subwoofer is not so critical Place it anywhere you like Front Speaker R Rear Speaker R Subwoofer Center Speaker Front Speaker L Rear Speaker L Connecting the Speakers 1 Press down the terminal ...

Page 8: ...driver as shown in the illustration 3 Insert a screw B into the hole on the rear of the Speaker STAND 4 Connect the assembled stand to the SPEAKER 5 Insert another screw B into the hole on the rear of the speaker using a screwdriver as shown in the illustration 6 This is the SPEAKER successfully assembled with the Stand Make sure that the speaker is installed on a flat and stable area Otherwise it...

Page 9: ...n unit Hold the TX card so that the slanted side faces downward and insert the card into the port The TX card enables communication between the main unit and the wireless receiver 3 Connect the left and right rear speakers to the wireless receiving module 4 Plug the power cord of the wireless receiving module in the wall out let and switch the power switch ON Do not insert a card other than the TX...

Page 10: ... main unit and the wireless receiver module SWA 3000 are in Power Standby mode 1 With the main unit turned off press and hold the remote control s REMAIN button for 5 seconds The STANDBY LED on the front panel of the wireless receivermodule blinks 2 With the wireless receiver module turned on use a ball point pen or a pair of toothpick to press the RESET button on the back of the unit The STANDBY ...

Page 11: ...essive scanning method scans one full frame of video consecutively down the screen line by line An entire image is drawn at one time as opposed to the interlaced scanning process by which a video image is drawn in a series of passes The progressive scanning method is desirable for dealing with moving objects Progressive Scan FULL FRAME This function works only on TVs equipped with component video ...

Page 12: ...t have been recorded in Video Mode and then finalized Where a particular DVD type is mentioned it is indicated separately If a DVD R RW discs has not been recorded properly in DVD Video format it will not be playable Connecting the FM Antenna FM Antenna supplied 1 Connect the FM antenna supplied to the FM 75Ω COAXIAL Jack 2 Slowly move the antenna wire around until you find a location where recept...

Page 13: ...our Samsung TV and the Home Theater with the HT X20 HT TX22 HT TX25 s Remote Control The DVD Home Theater s remote can be used to control Samsung TVs 1 Plug the main unit s power cord into the AC power supply Before plugging your system into a main socket you must checkthe voltage setting OPTIONAL If the voltage of the socket doesnot correspond to the setting on the rear of the unit you mayserious...

Page 14: ...wise button Rotate 90 Clockwise Original Image The maximum resolutions supported by this product are 5120 x 3480 or 19 0 MPixel for standard JPEG files and 2048 x 1536 or 3 0 MPixel for progressive image files MP3 WMA CD Playback MP3 Data CDs CD R CD RW encoded in MP3 WMA format can be played 1 Place the MP3 WMA disc on the disc tray The MP3 WMA menu screen will appear and playback will start The ...

Page 15: ...resolutions higher than 800 will not be supported When you play a disc whose sampling frequency is higher than 48khz or 320kbps you may experience shaking on the screen during playback 2 Caption Function You must have some experience with video extraction and editing in order to use this feature properly To use the caption function save the caption file smi in the same file name as that of the Div...

Page 16: ... PLAY No sound is heard during slow playback Reverse slow playback does not work with VCD and DivX Using the Playback Function Displaying Disc Information DVD VCD MP3 JPEG DivX CD You can view disc playback information on the TV screen Press the INFO button Each time the button is pressed the display changes as follows The information Display disappears from the screen The information Display disa...

Page 17: ... played may be played again TRACK Repeatedly plays the selected track DIR Repeatedly plays all tracks in the selected folder DISC Repeatedly plays the entire disc OFF Cancels Repeat Playback Repeat playback operation is not possible with version 2 0 VCD discs if PBC is turned on To use Repeat Playback on a VCD with PBC you should set the MENU to OFF in the disc menu See page 39 Using the Playback ...

Page 18: ...ion of a DVD 1 Press the INFO button twice For a VCD press the INFO button once 2 Press the Cursor button to move to REPEAT PLAYBACK display 3 Press the Cursor button to select A and then press ENTER button at the beginning of the desired segment When the ENTER button is pressed the selected position will be stored in memory 4 Press the ENTER button at the end of the desired segment The specified ...

Page 19: ...e and Audio Language functions may not be available Using the Playback Function Con t Angle Function DVD This function allows you to view the same scene in different angles 1 Press the INFO button 2 Press the Cursor button to move to ANGLE display 3 Press the Cursor button or numeric buttons to select the desired angle Each time the button is pressed the angle changes as follows The Angle function...

Page 20: ...titles you can view the title of each movie Depending on the disc the availability of this feature may vary 1 In Stop mode press the MENU button 2 Press the Cursor button to move to Title Menu 3 Press the ENTER button The title menu appears d Press the MENU button to exit the setup screen The Title menu display may be different depending on the disc Using the Playback Function Con t Moving Directl...

Page 21: ...on Table 16 32 file system is supported Some MP3 players when connected to this product may not operate depending on the sector size of their file system The USB HOST function is not supported if a product that transfers media files by its manufacturer specific program is connected Does not operate with Janus enabled MTP Media Transfer Protocol devices The USB host function of this product does no...

Page 22: ...l appear at the top and bottom of the screen WIDE HDTV Select this to view a 16 9 picture in the full screen mode on your widescreen TV You can enjoy the widescreen aspect If a DVD is in the 4 3 ratio you cannot view it in widescreen Since DVD discs are recorded in various image formats they will look different depending on the software the type of TV and the TV aspect ratio setting Settings Setti...

Page 23: ...TER button 3 Press the Cursor button to move to PARENTAL and then press the ENTER button 4 Press the Cursor button to select the desired rating level and then press the ENTER button If you have selected Level 6 you cannot view DVDs with Level 7 or higher The higher the level the closer the content is to violent or adult material 5 Enter the password and then press the ENTER button The password is ...

Page 24: ...of Ds in the figure set the mode as 0ms Otherwise change the setting according to the table Distance between Df and Dc 0 00 m 1 02 m 2 04 m 3 06 m 4 08 m 5 10 m Delay Time 0 ms 3 ms 6 ms 9 ms 12 ms 15 ms With Dolby Pro Logic II the delay time may be different for each mode With AC 3 and DTS the delay time can be set between 00 and 15mSEC The Center channel is only adjustable on 5 1 channel discs I...

Page 25: ...nd gets louder as you move closer to 6dB and quieter as you get closer to 6dB Settings Con t Setting the Test Tone Use the Test Tone feature to check the speaker connections 1 In Stop mode press the MENU button 2 Press the Cursor button to move to Audio and then press the ENTER button 3 Press the Cursor button to move to TEST TONE and then press the ENTER button The test tone will be sent to L C R...

Page 26: ...Time and then press the ENTER button You can set the audio delay time between 0 ms and 300 ms Set it to the optimal status d Press the RETURN button to return to the previous level d Press the MENU button to exit the setup screen Sound Field DSP EQ Function DSP Digital Signal Processor DSP modes have been designed to simulate different acoustic environments EQ You can select ROCK POP or CLASSIC to...

Page 27: ...urround sound Dolby Pro Logic II Effect This function works only in Dolby Pro Logic MUSIC mode 1 Press the PL II MODE button to select MUSIC mode 2 Press the PL II EFFECT button to select PANORAMA then press the Cursor button to select the desired effect setting You can select either 0 or 1 This mode extends the front stereo image to include the surround speakers for an exciting wraparound effect ...

Page 28: ...n to select MANUAL and then briefly press the button to tune in to a lower or higher frequency d Press the MO ST button to listen in Mono Stereo This applies only when listening to an FM station Each time the button is pressed the sound switches between STEREO and MONO In a poor reception area select MONO for a clear interference free broad cast Presetting Stations Example Presetting FM 89 10 in t...

Page 29: ... not appear on the display PTY Program Type indication and PTY SEARCH function One of the advantages of the RDS service is that you can locate a particular kind of program from the preset channels by specifying the PTY codes To search for a program using the PTY codes Before you start remember The PTY Search is only applicable to preset stations To stop searching any time during the process press ...

Page 30: ... Function This is useful when answering a doorbell or telephone call Press the MUTE button MUTE appears in the display To restore the sound press the MUTE button again Operating a TV with the Remote Control When operating a TV with the remote control 1 Press the TV button to set the remote to TV mode 2 Press the POWER button to turn on the TV 3 While holding down the POWER button enter the code co...

Page 31: ... Zonda 01 42 MGA 18 40 86 Dongyang 03 54 43 Mitsubishi MGA 18 40 59 60 75 Troubleshooting Refer to the chart below when this unit does not function properly If the problem you are experiencing is not listed below or if the instruction below does not help turn off the unit disconnect the power cord and contact the nearest authorized dealer or Samsung Electronics Service Center Symptom Check Remedy ...

Page 32: ...n for longer than 5 seconds INITIAL appears on the display and all settings will return to the default values Press the POWER button Using the RESET function will erase all stored settings Do not use this unless necessary Can t receive radio broadcast Is the antenna connected properly If the antenna s input signal is weak install an external FM antenna in an area with good reception Cautions on Ha...

Page 33: ...x f450 Fuji Digital Camera Finepix S7000 Fuji Digital Camera Finepix A310 Fuji Digital Camera KD 310Z Konica Digital Camera Finecam SL300R Kyocera Digital Camera Finecam SL400R Kyocera Digital Camera Finecam S5R Kyocera Digital Camera Finecam Xt Kyocera Digital Camera Dimage Z1 Minolta Digital Camera Dimage Z1 Minolta Digital Camera Dimage X21 Minolta Digital Camera Coolpix4200 Nikon Digital Camer...

Page 34: ...pressure level 86dB W M 86dB W M Rated input 100W 100W Maximum input 200W 200W Dimensions W x H x D Front Rear 90 x 168 x 95 mm 180 x 320 x 390 mm Center 250 x 90 x 95 mm Weights Front Rear 0 6 kg 0 5 kg 4 6 kg Center 0 7 kg HT TX22 SPEAKER Speaker system 5 1ch speaker system Front Center Rear speaker Subwoofer speaker Impedance 3Ω x 5 3Ω Frequency range 140Hz 20 kHz 35Hz 155 Hz Output sound press...

Page 35: ...Contact SAMSUNG WORLD WIDE If you have any questions or comments relating to Samsung products please contact the SAMSUNG customer care centre Region Country Customer Care Center Web Site ...

Reviews: