background image

23 

EN

Cooking Guide (continued)

DEFROSTING

Microwaves are an excellent way of defrosting frozen food. Microwaves gently 
defrost frozen food in a short period of time. This can be of great advantage, if 
unexpected guests suddenly show up.

Frozen poultry must be thoroughly thawed before cooking. Remove any metal 
ties and take it out of any wrapping to allow thawed liquid to drain away.

Put the frozen food on a dish without cover. Turn over half way, drain off any 
liquid and remove any giblets as soon as possible.
Check the food occasionally to make sure that it does not feel warm.
If smaller and thinner parts of the frozen food start to warm up, they can be shield 
by wrapping very small strips of aluminium foil around them during defrosting.

Should poultry start to warm  up on the outer surface, stop thawing and allow it to 
stand for 20 minutes before continuing.
Leave the fish, meat and poultry to stand in order to complete defrosting. The 
standing time for complete defrosting will vary depending on the quantity 
defrosted. Please refer to the table below.

Hint: 

Flat food defrosts better than thick and smaller quantities need less 
time than bigger ones. Remember this hint while freezing and 
defrosting food.

For defrosting of frozen food with a temperature of about -18 to - 20 °C, use the 
following table as a guide.

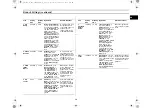
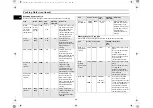
All frozen food should be defrosted using defrosting power level (180 W).

Food

Portion

Time 
(min.)

Standing 
Time 
(min.)

Instructions

Meat

Minced 

Pork 
steaks 

500g

250g

10-12

7-8

5-20

Place the meat on a flat ceramic 
plate. Shield thinner edges with 
aluminium foil.
Turn over after half of defrosting 
time!

Poultry

Chicken 
pieces 

Whole 
chicken 

500g

(2 pcs)

1000g

12-14

25-28

15-40

First, put chicken pieces first 
skin-side down, whole chicken 
first breast-side-down on a flat 
ceramic plate. Shield the thinner 
parts like wings and ends with 
aluminium foil. Turn over after 
half of defrosting time! 

Fish

Fish fillets

250g

(2 pcs)

400g

(4 pcs)

6-7

11-13

5-20

Put frozen fish in the middle of a 
flat ceramic plate.
Arrange the thinner parts under 
the thicker parts.
Shield narrow ends with 
aluminium foil. Turn over after 
half of defrosting time! 

Fruits

Berries 

250g

6-7

5 - 10

Distribute fruits on a flat, round 
glass dish (with a large 
diameter).

Bread

Bread rolls 
(each ca. 
50 g) 
Toast/
Sandwich
German 
bread 
(wheat+
rye flour)

2 pcs
4 pcs

250g

500g

1½-2

3-4

4-5

8-10

5 - 10

Arrange rolls in a circle or bread 
horizontally on kitchen paper in 
the middle of turntable.
Turn over after half of defrosting 
time!

n~^ZjkTi†{sTWZ][`i†luU”GGwˆŽŒGYZGG{œŒš‹ˆ SGzŒ—›Œ”‰Œ™GX\SGYWW`GGYaW\Gwt

Summary of Contents for GW73CD

Page 1: ...Cooking 9 Adjusting the Cooking Time 9 Using the Indian s Best Feature 9 Indian s Best Settings 9 Using the Cafeteria Feature 11 Cafeteria Settings 11 Using the Brunch Feature 12 Brunch Settings 12 Using the Auto Rapid Defrost Feature 14 Auto Rapid Defrost Settings 14 Choosing the Accessories 15 Grilling 15 Combining Microwaves and the Grill 15 Multistage Cooking 16 Switching the Beeper Off 17 Saf...

Page 2: ...ce the frozen food in the oven Press the Rapid button once or more times according to the type of food to be defrosted 2 Select the weight by pressing the kg and g buttons as required 3 Press the Start button Leave the food in the oven Press 30 sonce or more times for each extra 30 seconds that you wish to add 1 Preheat the grill to the required temperature by pressing the Grill time settng 10 min...

Page 3: ... to the coupler Purpose The turntable serves as the main cooking surface it can be easily removed for cleaning 4 Metal rack to be placed on the turntable Purpose The metal rack can be used in grill and combination cooking VENTILATION HOLES DOOR LATCHES DOOR TURNTABLE COUPLER ROLLER RING SAFETY INTERLOCK HOLES LIGHT DISPLAY CONTROL PANEL GRILL DOOR HANDLE 1 DISPLAY 2 AUTO RAPID DEFROST FEATURE SELE...

Page 4: ...stic bags Reason Electric arcing or sparking may occur and may damage the oven When heating food in plastic or paper containers keep an eye on the oven due to the possibility of ignition Do not use your microwave oven to dry papers or clothes Small amounts of food require shorter cooking or heating time If normal times are allowed they may overheat and burn If smoke is observed switch off or unplu...

Page 5: ... for anyone other than a comperent person to carry out any service or repair operation which involves the removal of a cover which gives protection against exposure to microwave energy WARNING Liquids and other foods must not be heated in sealed containers since they are liable to explode WARNING Only allow children to use the oven without supervision when adequate instructions have been given so ...

Page 6: ...klet must therefore be respected to ensure Even cooking of the food right to the centre The same temperature throughout the food 1 To display the time Then press the in the Clock button 24 hour notation Once 12 hour notation Twice 2 Set the hour with the h button and the minutes with the min button 3 When the right time is displayed press the Clock button again to start the clock Result The time i...

Page 7: ...the electric circuit and caused a fuse to blow or a breaker to be triggered The food is either overcooked or undercooked Was the appropriate cooking length set for the type of food Was an appropriate power level chosen Sparking and cracking occur inside the oven arcing Have you used a dish with metal trimmings Have you left a fork or other metal utensil inside the oven Is aluminium foil too close ...

Page 8: ...sed 1 Press the Power Level button Result The 750W maximum cooking power indications are displayed Select the appropriate power level by pressing the Power Level button again until the corresponding wattage is displayed Refer to the power level table on the next page 2 Set the cooking time by pressing the 10 min 1 min and 10 s button 3 Press the Start button Result The oven light comes on and the ...

Page 9: ...or and press Start again 2 To stop Completely Press the Stop button Result The cooking stops If you wish to cancel the cooking settings press the Stop button again Press the 30 s button once for each 30 seconds to be added 1 Select the type of food that you are cooking by pressing the Indian s Best button once or more times 2 Press the Start button Result Cooking starts When it has finished 1 The ...

Page 10: ...ase the steam and cook for 10 minutes on microwave mode and serve hot Food Serving Size Standing Time Ingredients Recommendations 6 Banarasi Kheer 200 g 1hr Milk 200 g Boiled rice 1 3 cup crushed Condensed Milk 4 tbsp Cardamom Powder 1 4 tsp Kewra Essence 2 drops Badam paste 1 tbsp Cottage Cheese cup grated Saffron 4 strings Pista to garnish In a microwave safe glass bowl mix all the ingredients a...

Page 11: ...iner and place the idli stands Serve hot with coconut chutni Food Serving Size Standing Time Ingredients Recommendations 3 Sweet andSour Stuffed Baskets 300 350 g Bread Slices 6 Olive Oil 3 tsp Chili Flakes 1 4 tsp Oregano 1 4 tsp Black Pepper powder 1 4 tsp Chaat masala 1 4 tsp Blanched Sprouts 1 4 cup Pomegranate 1 4 cup Onion 1 4 cup Fine chopped Cucumber 1 4 cup Fine chopped Tamarind Sauce 2 t...

Page 12: ...or 1 min Add milk and essence Add Maida Beat well for 3 4 minutes till the mixture is smooth and light Add walnuts mix well transfer to big greased deep dish of 9 inch diameter Let it cool till it leaves the sides of container And serve 8 Almond drop Chocolates 100 g 7 8 min Dark Chocolate 50 g Milk Compound 50 g Almonds whole Gurbandi Amonds comparatively small almond In a glass bowl put both the...

Page 13: ...ce Regular flour tbsp add cup Milk add salt add pepper In a microwave safe glass dish add boiled past and all the ingredients mix well and grate cheese above it 6 Dry Lentils 200 g 1 2 min Urad Dhuli 1 4 cup Water 3 4 cup 150 ml Ginger Paste tsp Oil tbsp Salt to taste Turmeric 1 4 tsp Red Chili Powder 1 4 tsp Dry Mango Powder 1 4 tsp Coriander powder 1 4 tsp Green Chili 1 slit Fresh coriander to g...

Page 14: ...of food that you are cooking by pressing the Rapid Defrost button one or more times Refer to the table on the opposite page for further details 2 Select the food weight by pressing the kg and g button It is possible to set up to a maximum of 2000g 3 Press the Start button Result Defrosting begins The oven beeps halfway through defrosting to remind you to turn the food over Press Start button again...

Page 15: ...e grill to the required temperature by pressing the Grill time settng 10min 1min and 10s and Start button 2 Open the door and place the food on the rack 3 Place the food on the rack in the oven Press the Grill button Select the cooking time by pressing the 10min 1min and 10s buttons The maximun grilling time is 60 minute 4 Press the Start button Result The oven light comes on and the turntable sta...

Page 16: ...t the power level by pressing the Power Level button again one or more times 600W in the example 4 Set the cooking time by pressing the 10min 1min and 10s buttons the appropiate number of times 4 minutes in the example 5 Press the Grill button The grill mode II 6 Set the cooking time by pressing the 10min 1min and 10s buttons the appropiate number of times 5 minutes in the example The maximun gril...

Page 17: ... time 1 Press the Stop and Start buttons at the same time Result The oven will not beep each time you press a button 2 To switch the beeper back on press the Stop and Start buttons again at the same time Result The oven operates with the beeper on again 1 Press the Stop and Clock buttons at the same time Result The oven is locked no functions can be selected 2 To unlock the oven press the Stop and...

Page 18: ...rene cups containers Paper bags or newspaper Recycled paper or metal trims Glassware Can be used to warm food Overheating may cause the polystyrene to melt May catch fire May cause arcing Glassware Oven to table ware Fine glassware Glass jars Can be used unless decorated with a metal trim Can be used to warm foods or liquids Delicate glass may break or crack if heated suddenly Must remove the lid ...

Page 19: ...e for example see the chapter with tips techniques and hints Covering during cooking To cover the food during cooking is very important as the evaporated water rises as steam and contributes to cooking process Food can be covered in different ways e g with a ceramic plate plastic cover or microwave suitable cling film Standing times After cooking is over food the standing time is important to allo...

Page 20: ...5 Add 500 ml cold water Brown Rice parboiled 250g 750W 22 23 5 Add 500 ml cold water Mixed Rice rice wild rice 250g 750W 18 19 5 Add 500 ml cold water Mixed Corn rice grain 250g 750W 19 20 5 Add 400 ml cold water Pasta 250g 750W 11 12 5 Add 1000 ml hot water Food Portion Time min Standing Time min Instructions Broccoli 250g 500g 5 5 8 9 3 Prepare even sized florets Arrange the stems to the centre ...

Page 21: ...imes When reheating food for the first time it is helpful to make a note of the time taken for future reference Always make sure that the reheated food is piping hot throughout Allow food to stand for a short time after reheating to let the temperature even out The recommended standing time after reheating is 2 4 minutes unless another time is recommended in the chart Take particular care when hea...

Page 22: ... a deep ceramic plate Cover with plastic lid Stir occasionally during reheating and again before standing and serving Plated Meal chilled 300g 400g 600W 5 6 6 7 3 Plate a meal of 2 3 chilled components on a ceramic dish Cover with microwave cling film Frozen Ready Meal 300g 400g 600W 11 12 13 14 4 Put microwave proof dish with frozen ready meal 18 C on the turntable Pierce film or cover with micro...

Page 23: ...is hint while freezing and defrosting food For defrosting of frozen food with a temperature of about 18 to 20 C use the following table as a guide All frozen food should be defrosted using defrosting power level 180 W Food Portion Time min Standing Time min Instructions Meat Minced Pork steaks 500g 250g 10 12 7 8 5 20 Place the meat on a flat ceramic plate Shield thinner edges with aluminium foil ...

Page 24: ...ooking time to brown the top of the food Also this mode can be used for thick food portions that benefit from a browned and crispy top e g chicken pieces turning them over half way through cooking Please refer to the grill table for further details IMPORTANT REMARK Whenever the combination mode microwave grill is used make sure that the grill heating element is under the ceiling in the horizontal ...

Page 25: ...h twist off lids Stand on lid for 5 minutes COOKING PUDDING Mix pudding powder with sugar and milk 500 ml by following the manufacturers instructions and stir well Use a suitable sized glass pyrex bowl with lid Cook covered for 6 to 7 minutes using 750 W Stir several times well during cooking BROWNING ALMOND SLICES Spread 30 g sliced almonds evenly on a medium sized ceramic plate Stir several time...

Page 26: ...use any abrasive products or chemical solvents Take particular care when cleaning the door seals to ensure that no particles Accumulate Prevent the door from closing correctly Clean the microwave oven cavity right ofter each use with a mild detergent solution but let the microwave oven cool down before cleaning in order to avoid injury Storing and Repairing Your Microwave Oven A few simple precaut...

Page 27: ...Model GW73CD Power source 230V 50 Hz Power consumption Microwave Grill Combined mode 1100 W 950 W 2050 W Output power 100 W 750 W IEC 705 Operating frequency 2450 MHz Magnetron OM75S 31 Cooling method Cooling fan motor Dimensions W x H x D Outside Oven cavity 489 x 275 x 379 mm 330 x 187 x 320 mm Volume 20 liter Weight Net 13 5 kg approx n ZjkTi sTWZ i luU GGw GY GG SGz GX SGYWW GGYaW Gwt ...

Page 28: ...n ZjkTi sTWZ i luU GGw GY_GG SGz GX SGYWW GGYaW Gwt ...

Reviews: